Blower Door Test: The Only Way to Prove Your Home Doesn't Leak

You've replaced your windows, added external wall insulation, waterproofed the roof. Your energy engineer tells you that you now lose 70% less heat. But how do you actually know? How do you prove the contractor installed the windows correctly?

The answer is one thing: the Blower Door Test. It's the only objective method that measures the overall airtightness of the entire building - not just windows, but also joints, pipe penetrations and electrical pass-throughs. A test that costs from €300 but could save you thousands.

1. What Is a Blower Door Test?

A specialised industrial fan is mounted into the frame of an external door, sealed with a calibrated fabric panel. The fan extracts air outward, creating a negative pressure of 50 Pascal (equivalent to a light Beaufort 4 breeze). Under this "artificial" depressurisation, every gap becomes visible: outside air rushes in through every weak point. The test is completely non-destructive - it causes no damage to the home or the windows.

Blower Door Test equipment - fan mounted in a door frame

2. What It Measures: n50 and ACH

Digital Blower Door manometer displaying n50 reading

The main result is expressed as n50 - the number of air changes per hour at 50 Pa. For example, n50 = 3.0 means that in one hour the indoor air is replaced 3 times through leakage.

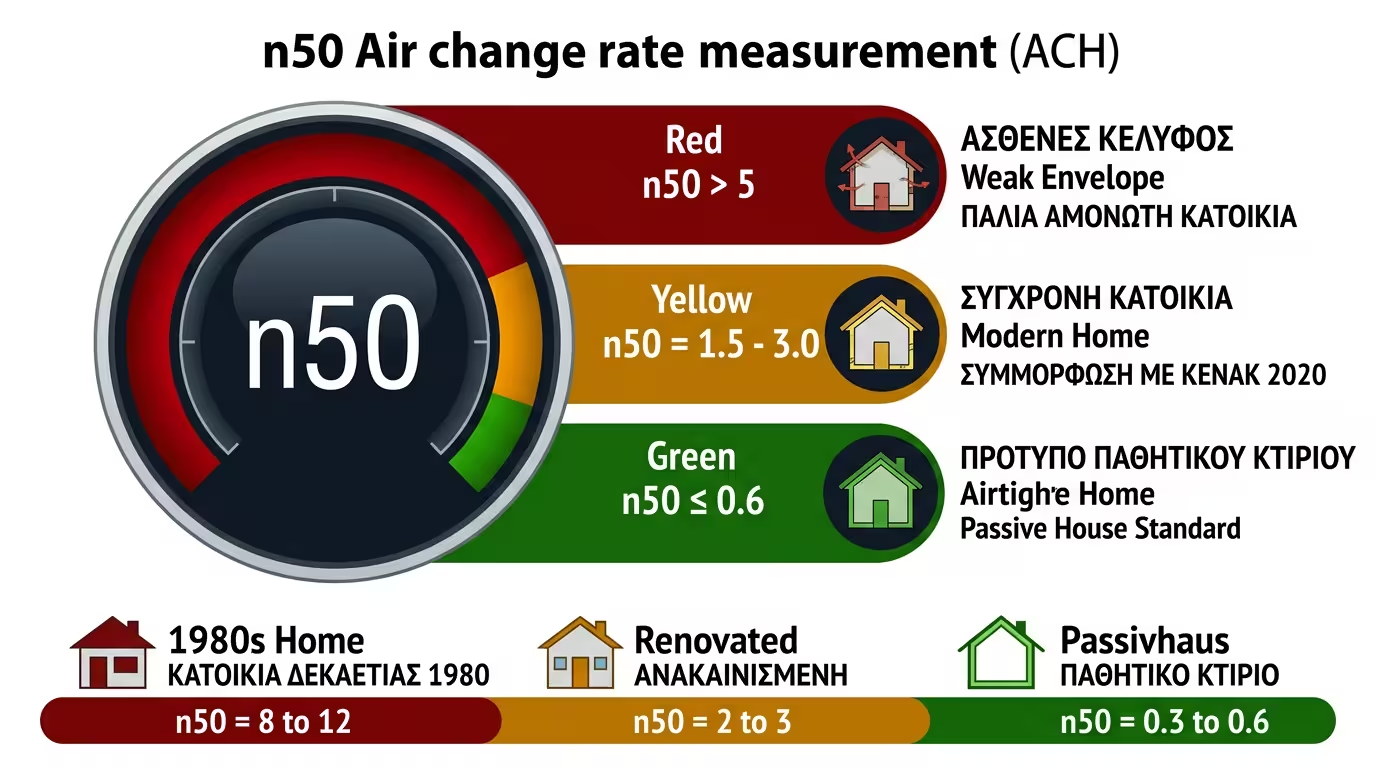
🔴 n50 > 5 - Weak Envelope

Typical values for old Greek homes without insulation. Draughts are clearly felt, energy loss is massive. Replacing windows alone can reduce n50 by 30–50%. In some measurements we've seen, 1980s Greek homes reached n50 = 8–12.

🟡 n50 = 1.5–3 - Modern Home

Decent airtightness. The building is properly insulated and windows are carefully installed. KENAK 2020 requires n50 ≤ 3.0 for new residences.

🟢 n50 ≤ 0.6 - Passive House

The Passivhaus gold standard. Virtually zero leakage. Requires impeccable installation, AIRSTOP-type sealing tapes on every joint, and exclusively Class 4 airtightness windows.

3. The Power Combo: Blower Door + Thermal Camera

When an infrared thermal camera is used alongside the test, the technician can see exactly where air enters. Cold spots appear as blue/purple on the screen.

Thermal camera detecting air leak around a window frame

🎯 Common Weak Points

Around windows: poor sealing between the frame and the wall (missing or badly applied polyurethane foam). Under roller shutters: the shutter box often needs dedicated insulation as it's frequently the biggest thermal weak spot. Electrical panels & pipes: penetrations left unsealed during construction.

💡 Money-Saving Tip

Run the Blower Door test before the interior finish (plasterboard, plaster) is completed. If a leak is found, the repair costs very little. After finishing works, the same repair can cost ten times as much. Plan Blower Door into the construction schedule from the start, not as an afterthought.

4. When Do You Need a Blower Door Test?

Not every home needs a Blower Door test. The key scenarios:

Passive house target - n50 below 0.6

🏗️ New Build or Major Renovation

If you're replacing all windows in your home, request a Blower Door test before paying the contractor. If n50 exceeds expectations, it proves the installation didn't meet spec - and you can request reinstallation or remediation.

📋 "Exoikonomo" Subsidy

In certain categories of the programme, the Blower Door Test is a prerequisite for certification. Ask your energy auditor whether it applies to your case.

💰 Cost & Duration

€300–600 for an apartment, depending on size. The procedure takes 2–3 hours. A one-off investment that proves, in black and white, whether the contractor did their job properly.

Related Articles

Preview