Wooden Shutters: How to Maintain Them Properly so They Last a Lifetime
If you are one of the lucky ones who own authentic wooden shutters -
whether part of a restored neoclassical, a stone country cottage or a
traditional house - you know their unmatched charm. Wood breathes, has
character, smells beautiful and gives a warmth no industrial material
can fully replicate.
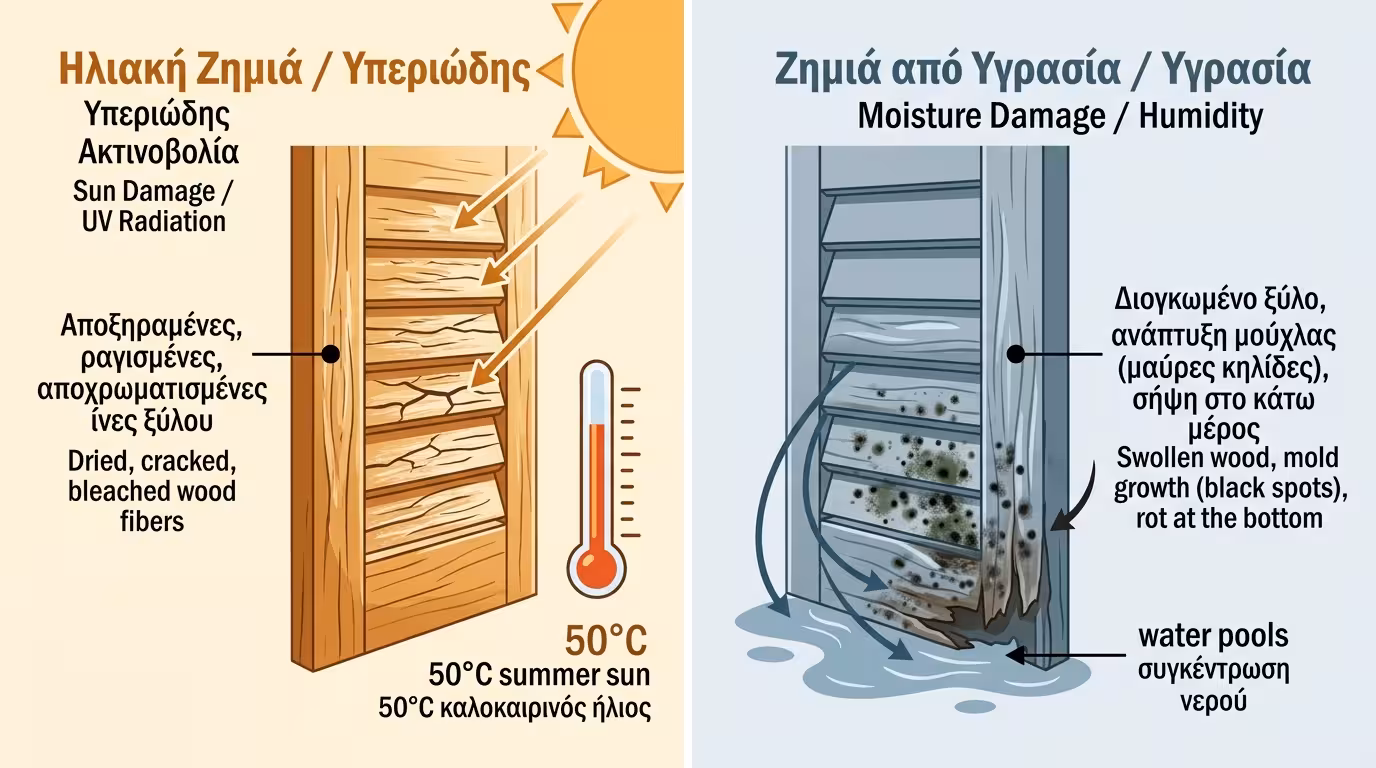
But this beauty comes at a price: relentless weather damage. The scorching Greek sun dries out the wood fibres, while winter rain
and moisture cause swelling, mould and rot.
Many homeowners spend their weekends sanding and painting, only to see
the varnish peel again the following spring. Why does this happen?
Because, more often than not, they use the wrong products. Let’s look at the correct, professional maintenance method so your
wooden shutters can last literally a lifetime.
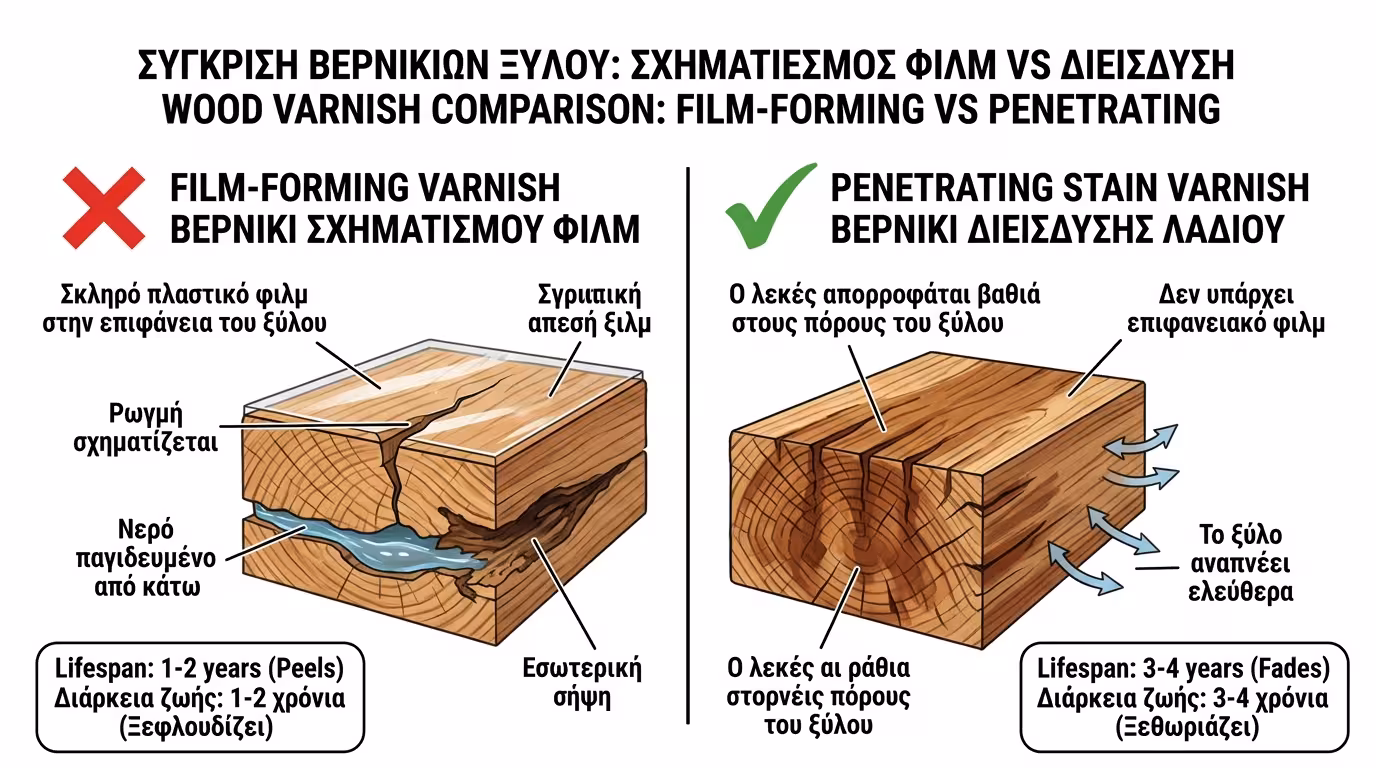
1. The Big Mistake: Film-Forming vs Stain Varnish
If your shutters are peeling, cracking and flaking, the varnish choice
is to blame.
❌ Film-Forming Varnish (The Wrong Choice)
In the past, we used to coat wood with thick, glossy film-forming
varnishes that create a plastic-like crust. The problem? Wood
expands and contracts with heat and moisture. The rigid crust cracks, water gets underneath, gets trapped and rots the wood from
within. Result: peeling every 1-2 years, requiring a full
strip-back.
✅ Stain Varnish (The Right Choice)
For exterior use, always choose penetrating stain varnish (water- or solvent-based). These do not form a “skin” on the surface.
They penetrate deep into the wood pores, nourish the
wood, protect against UV and let it “breathe”. When they wear, they simply
fade - without peeling! The new coat is applied directly
over the old one, with no stripping needed.
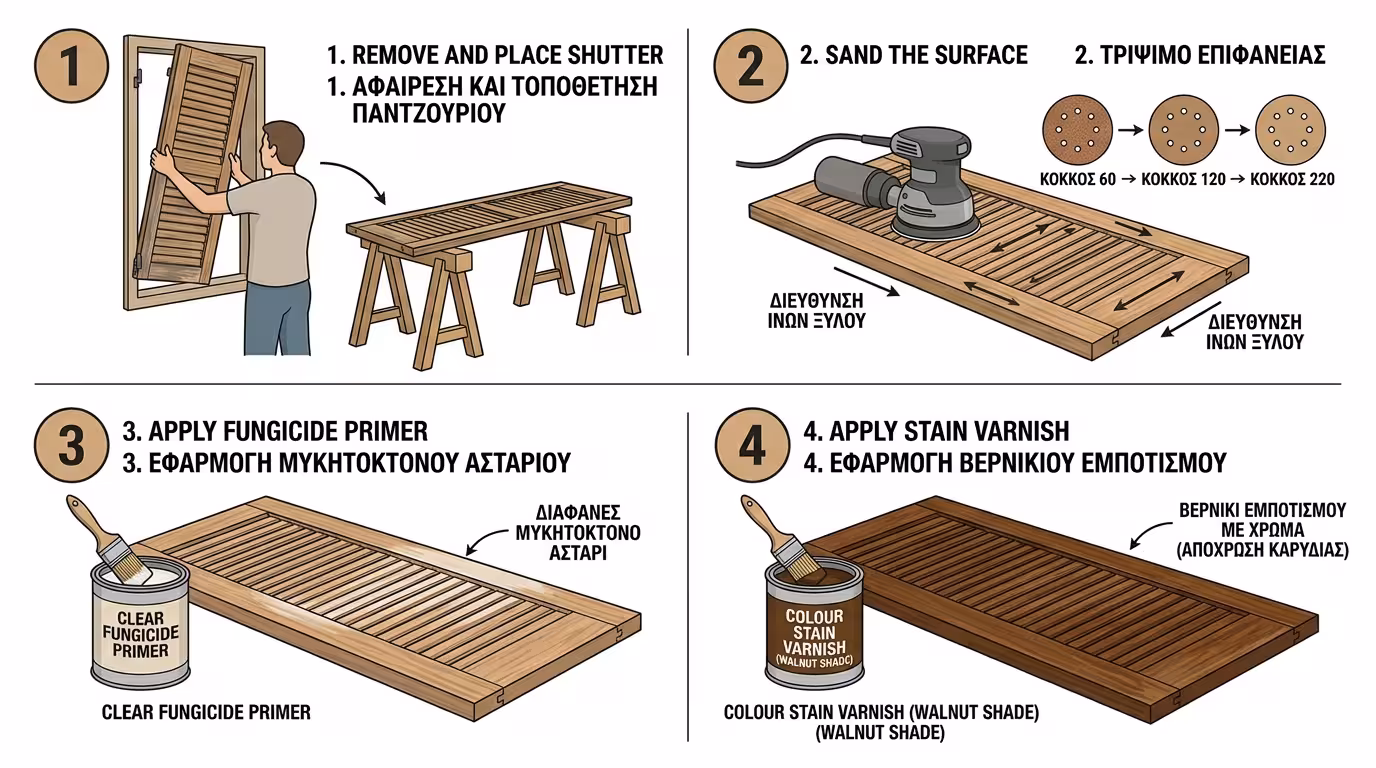
2. Step-by-Step Maintenance Guide (For DIYers)
For a job that lasts, follow these steps (ideally spring or autumn, in
the shade).
🔩 Step 1: Removal & Cleaning
Never try to paint them while hanging. Remove the shutters from
their hinges and lay them on two trestles in a shaded,
well-ventilated area. Remove metal hardware (handles, latches) or
mask it carefully with painter's tape to avoid paint drips.
🪵 Step 2: The Critical Sanding
If the old varnish is peeling, it must come off completely until the
clean, bare wood is revealed. Start with coarse sandpaper (No 60-80)
using an orbital or palm sander. Once the old paint is gone, move to
medium sandpaper (No 120) to smooth out scratches. Finish with fine
sandpaper (No 180-220) for a velvet-like surface. Always follow the grain, never sand across it. Wipe thoroughly with a slightly damp cloth
to remove all dust.
🧪 Step 3: Fungicide Protection
Most people skip this step! Before any colour, soak the bare wood
with a clear fungicide/insecticide stain primer.
This liquid penetrates deep into the fibres and kills woodworm,
fungi (black stains) and mould spores. Apply one generous coat by
brush and let it dry fully according to the manufacturer's
instructions.
🎨 Step 4: Stain Varnish Application
Now the wood is ready to “drink” the colour. Stir the stain varnish
thoroughly (in your chosen shade - walnut, oak or chestnut). Apply
the first coat with a quality brush following the grain. Let it dry,
then light-sand (No 240) to knock down raised fibres, and apply the
second coat. A third coat may be needed for maximum UV protection.
3. How Often Should I Repeat This?
If you followed the stain-varnish process correctly, future
maintenance is a breeze!
⏰ Every 2-4 Years
In 2, 3 or 4 years (depending on how much sun or north wind they
face), the shutter will simply look a little “dull”. No deep stripping required! Clean it, give it a light sand, and apply one coat of stain varnish
for a refresh. The whole job takes just a few hours per pair of shutters.
💡 The Alternative
If you want to be done once and for all with maintenance chores,
replacing with aluminium wood-effect (sublimation) shutters eliminates all future sanding and painting - forever. The sublimation
technology reproduces the exact grain and texture of real wood, so they
are visually indistinguishable. Read our related article to see why more
and more homeowners are making the switch.
💡 Summary: Wooden shutter maintenance is a "ritual" that,
when done right (with stain varnish, not film-forming varnish), gives decades
of life to your exterior joinery.