Thermal Bridges in Roller Shutter Boxes: Why Cold Gets In from Above and How to Fix It

You replaced your windows, installed energy glass with Argon gas, insulated the walls - yet one cold winter evening you still feel a draught of cold air directly above the window. You put your hand near the plastic or aluminium shutter cover and it’s genuinely freezing. How can your brand-new windows possibly be “leaking”?

The truth is your windows are doing a perfect job. The culprit is right above them: the shutter box. If not given proper attention, it becomes the biggest thermal bridge (energy hole) in the entire wall. Even worse, warm indoor air hits the freezing cover, condenses, and soon you see dark patches of mould in the corners above the window.

An expensive energy-rated window loses 30% of its value if paired with an uninsulated “cold” shutter box. Let’s see why this happens and what solutions exist for new and existing buildings.

1. Why Does the Shutter Box Let Cold In? The Anatomy of a Thermal Bridge

A classic (uninsulated) shutter box consists of a thin aluminium or galvanised steel shell just 1–2 mm thick. Aluminium is an excellent heat conductor - arguably the worst material if you want insulation. What separates the freezing outdoor air from your warm living room? Only this thin metal sheet - a fact that explains everything.

Anatomy of a shutter box thermal bridge - cold air flow through an aluminium shell

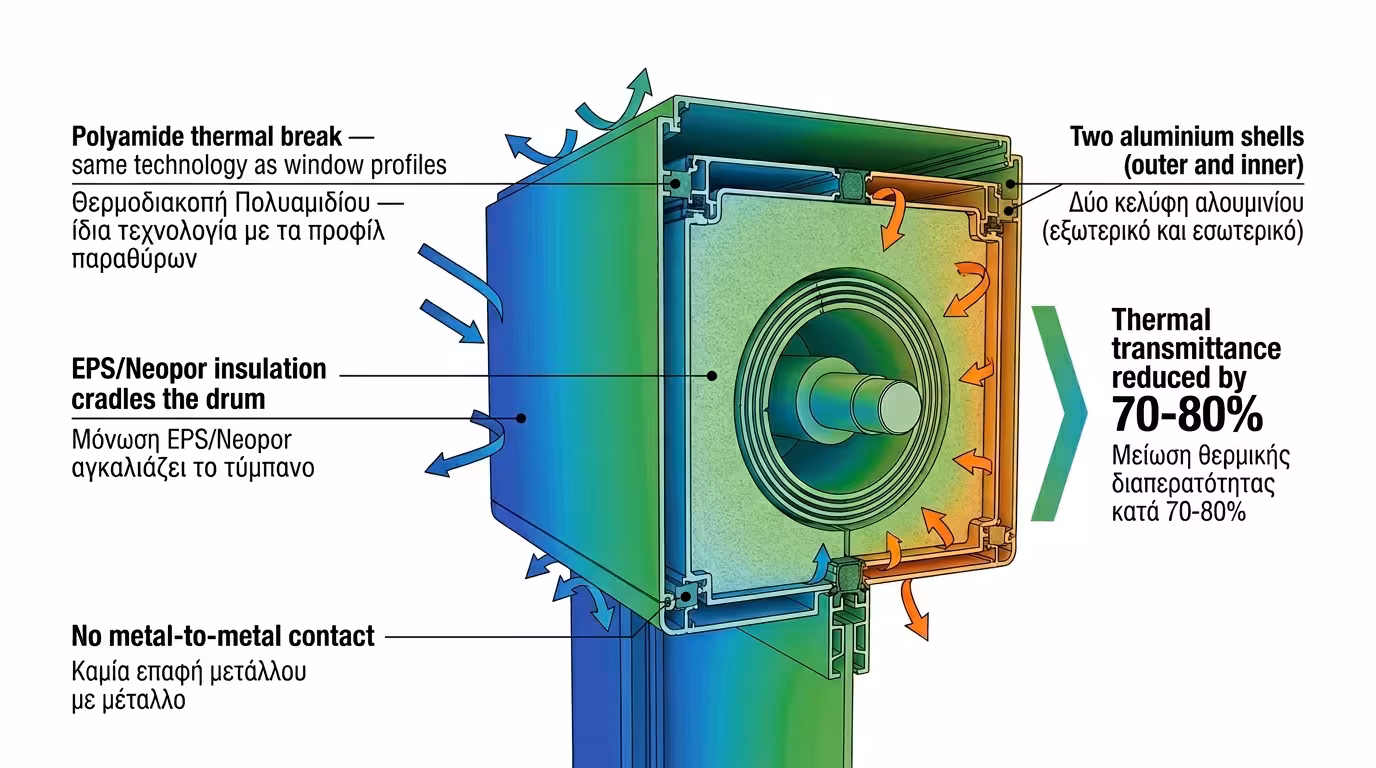
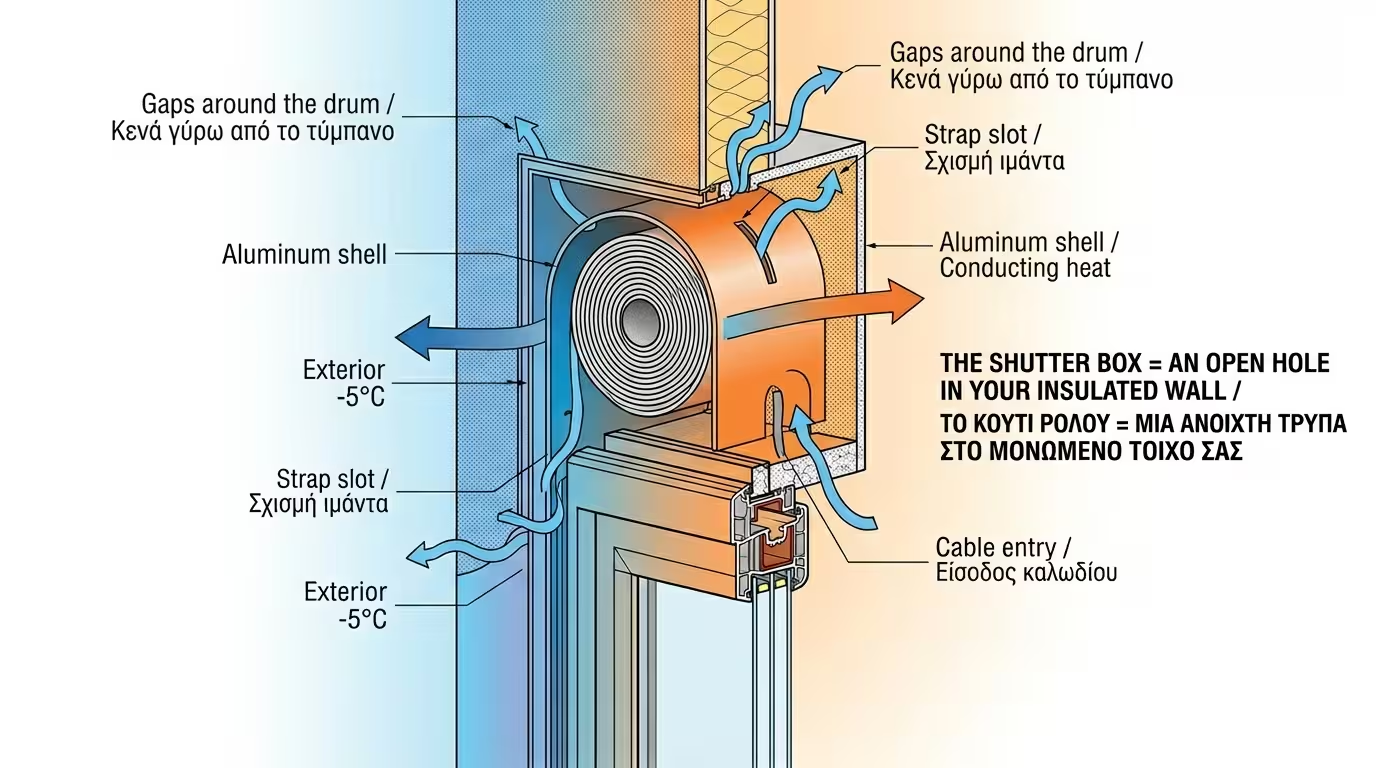
🥶 Heat Transfer via Conduction

The aluminium shell simultaneously contacts the freezing exterior air (through the slat opening) and the warm interior (through the inspection cover). Result: cold is literally conducted into the home through the metal.

💨 Air Draughts (Leaks)

Gaps around the roller drum, the strap/cord and the cable entry point (on motorised shutters) allow cold air to "stream" into the room. In strong gusts you may even hear whistling.

📸 Thermography: The Proof

A thermal camera shows the problem clearly: while the wall and glass are green (warm), the area around the shutter box appears blue or purple (freezing). That means you're losing energy right there.

2. Solutions in New Buildings: Thermally Broken Boxes

In new construction or a renovation involving shutter replacement, the ideal solution is installing a thermally broken (insulated) box. The rule is simple and non-negotiable: never accept a quote for plain, uninsulated shutter boxes. Always demand thermally broken boxes from your fabricator.

Thermally broken shutter box with internal EPS insulation

🏗️ What Is a Thermally Broken Box?

It consists of two shells (outer aluminium + inner aluminium) that DO NOT touch each other. Between them sit specialised insulating materials - polyamide strips (the same that “break” modern window profiles) combined with internally shaped EPS or graphite-enhanced Neopor blocks. These “cradle” the roller drum. This creates a complete thermal break, thermal transmittance drops dramatically, and freezing air is trapped in the outer shell without ever touching the interior cover.

🔇 Noise Elimination

Besides cold, an insulated box also blocks external noise entering through the gaps. Sound insulation improves impressively.

💰 Negligible Extra Cost

The price difference between an uninsulated and a thermally broken box is minimal relative to the total window cost. Energy savings pay for themselves within 1-2 years.

3. DIY Insulation for an Old Shutter Box (No Replacement Needed)

DIY shutter box insulation with XPS extruded polystyrene sheets

If you're not replacing your shutters but want to stop the cold, you can insulate the existing box from inside. It's a one-hour job with minimal material costs.

🔧 Step 1: Open the Cover

Remove the screws or clips holding the inspection cover (on the room side). The space around the drum and slats will be exposed.

📏 Step 2: Measure and Cut

The best option is flexible elastomeric insulation like Armaflex, 10 mm or 19 mm thick, with a self-adhesive backing. It cuts easily with a craft knife, bonds strongly to metal and moulds to the box’s shape. Alternatively, cut sheets of extruded polystyrene (XPS) 2–3 cm thick to the exact dimensions of the box’s inner walls. You can also find ready-made flexible EPS panels designed exclusively for shutter box retrofitting. In every case, make sure they don’t obstruct the drum as it turns.

🧴 Step 3: Glue and Seal

Glue the XPS sheets to the inner walls with appropriate adhesive or double-sided tape. Seal every gap and crack (around the strap, cables, pipes) with expanding polyurethane foam spray.

✅ Step 4: Insulate the Cover

Don't forget the cover itself! Glue an XPS sheet or reflective foam (self-adhesive radiant barrier) to it as well. This is often the most effective step, as the cover faces directly into the room.

⚠️ Caution: Don't reduce the space so much that the slats can't wind freely. Test repeatedly (raise and lower) after insulating before permanently closing the cover.
💡 Bonus step - Brush strips at the slot: Check the slot where the shutter exits toward the outside. Modern shutters have dense brush seals that press against the slat and block draughts. If yours have worn out or are missing, adding them will dramatically reduce air entering the box. Before screwing the cover back on, you can also apply a thin self-adhesive foam draught strip around the perimeter so it seals airtight.

Related Articles

Preview