The 5 Most Devastating Aluminium Window Installation Mistakes
You've spent weeks in showrooms. You compared thermal transmittance
values (Uw), chose the top energy-rated windows on the market and feel
confident that next winter will find you warm. But there's a hard truth: The best window in the world performs like a cheap 1990s unit if the
installation is done wrong.
Installation accounts for 50% of success.
Unfortunately, due to haste, ignorance or cost-cutting, many crews in
Greece repeat specific construction errors that void your investment. If
you're planning a renovation or new build, these are the 5 mistakes you
must absolutely forbid your installers from making!
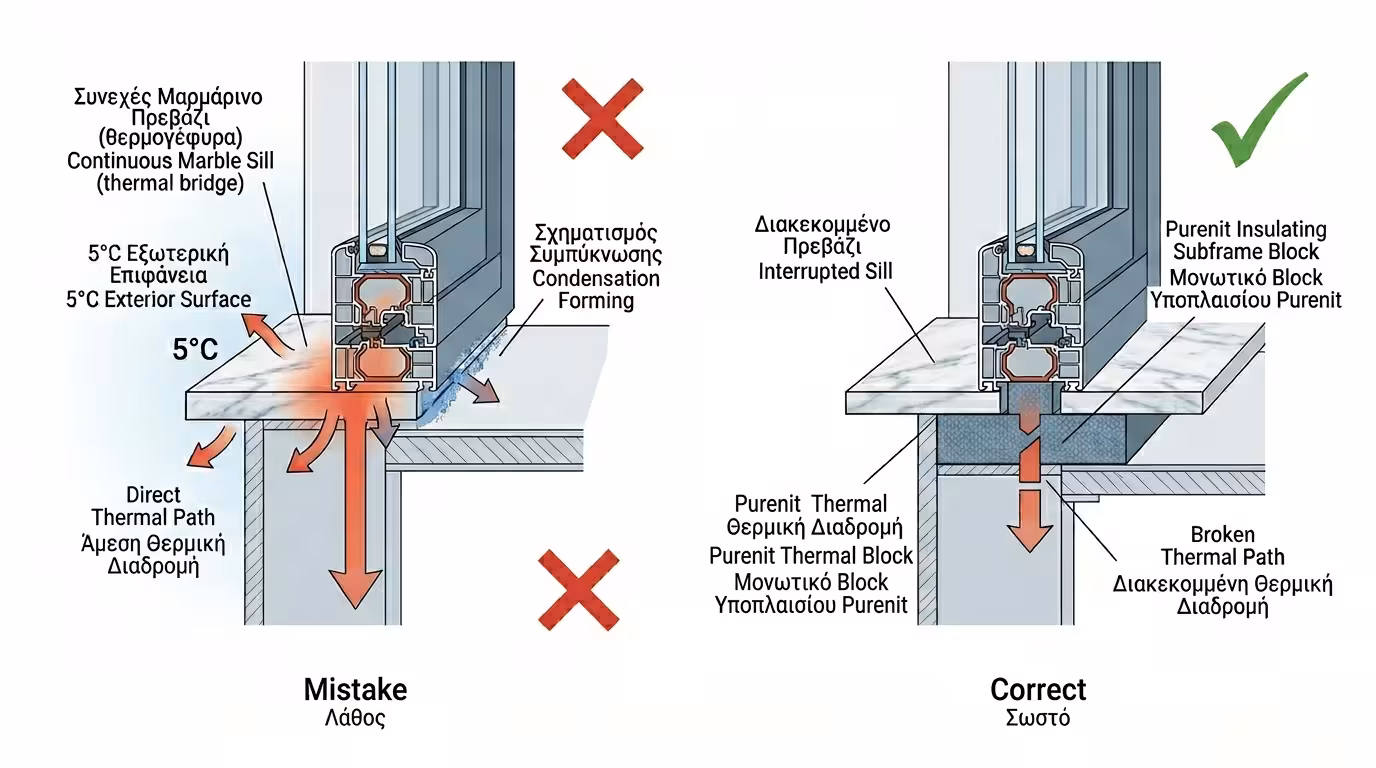
1. The Continuous Marble Sill - The "Highway" for Cold
This is perhaps the #1 construction "crime" in Greece.
The marble installer lays a single piece of marble that starts on the balcony
and continues straight into the living room. The window fitter then screws
the brand-new thermally broken window right on top of it.
💥 Why It's Devastating
Marble has a thermal conductivity of 2.5-3.5 W/(m·K) - it is an excellent heat conductor. The cold from outside travels through
the stone, passes underneath the window frame and reaches
your living room. The floor freezes, indoor humidity condenses on the
inner marble surface, and your hardwood flooring begins to rot. Even worse,
this thermal bridge completely nullifies the aluminium's thermal break
- like running an uninsulated electrical cable.
✅ The Correct Solution
The marble must be cut in the middle (under the window)
and the gap filled with insulating material - extruded polystyrene (XPS)
or Purenit - to break the thermal bridge. The indoor and outdoor marble
sections then operate independently, without "talking" to each other thermally.
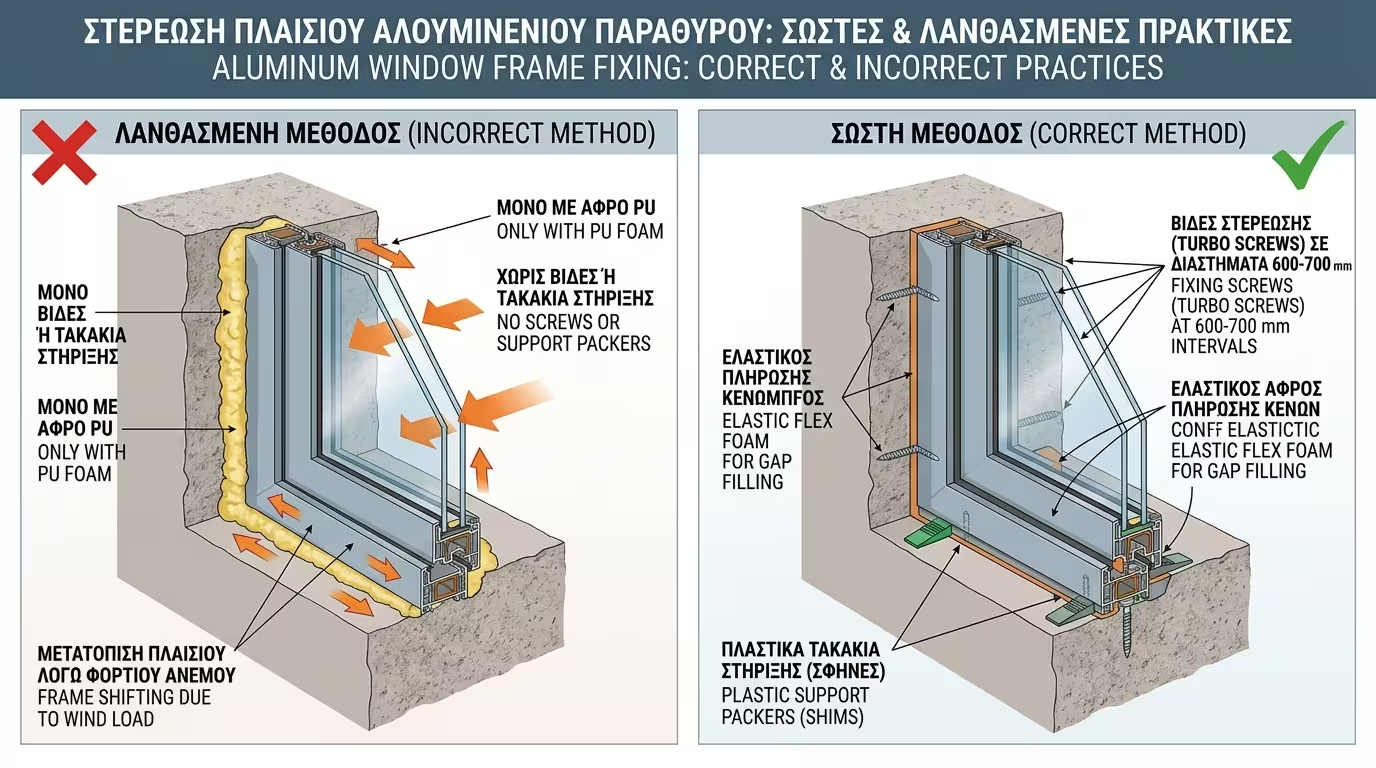
2. Supporting Windows with PU Foam Alone
You watch the installer place the window in the opening, fill the gap
all around with yellow PU foam and consider the job done,
perhaps driving just one or two screws "for good measure". This is the second
most serious mistake after the continuous marble.
💥 Why It's Devastating
Foam is an insulating material, NOT a structural support. A modern window with triple glazing weighs over 100-150 kg. Under this enormous weight (and with summer's thermal
expansion-contraction cycles), the foam gradually compresses. Within
months, the window "sags", drags on the floor and won't lock
properly - a scenario we describe in detail in our next article.
✅ The Correct Solution
The window rests on specialised, hard plastic load-bearing shims at the bottom corners, is laser-levelled in 3 axes and anchored around
the perimeter with concrete Turbo screws every 50-70 cm. Elastic closed-cell foam is applied only at the end, solely for thermal insulation of the joint - never for support.
This method ensures even a 200 kg sliding door won't shift by a
single millimetre.
3. The "Blind" Silicone Seal - Goodbye Breathability
The window is installed and the fitter grabs the silicone gun,
squeezing a thick bead inside and outside "to seal it". Many
homeowners even consider this a sign of "good work" - "Look,
he sealed everything!" Unfortunately, this is one of the worst practices.
💥 Why It's Devastating
Standard silicone traps moisture. Warm, humid
indoor air from bathrooms and kitchens finds invisible gaps, enters
the window-to-wall joint and gets trapped behind the external
silicone. Moisture condenses at the dew point (~12.6 °C), resulting
in severe black mould around the frame. Mould isn't just
cosmetic - it releases spores that cause allergies and respiratory problems.
✅ The Correct Solution (RAL)
Demand installation to the RAL standard - three separate
sealing levels. Interior: airtightness membranes (EPDM
or Fleece) that block vapour. Middle: elastic closed-cell
foam for thermal insulation. Exterior: self-expanding
Compriband tapes that keep rain out but allow the wall to "breathe" -
the exact opposite of silicone.
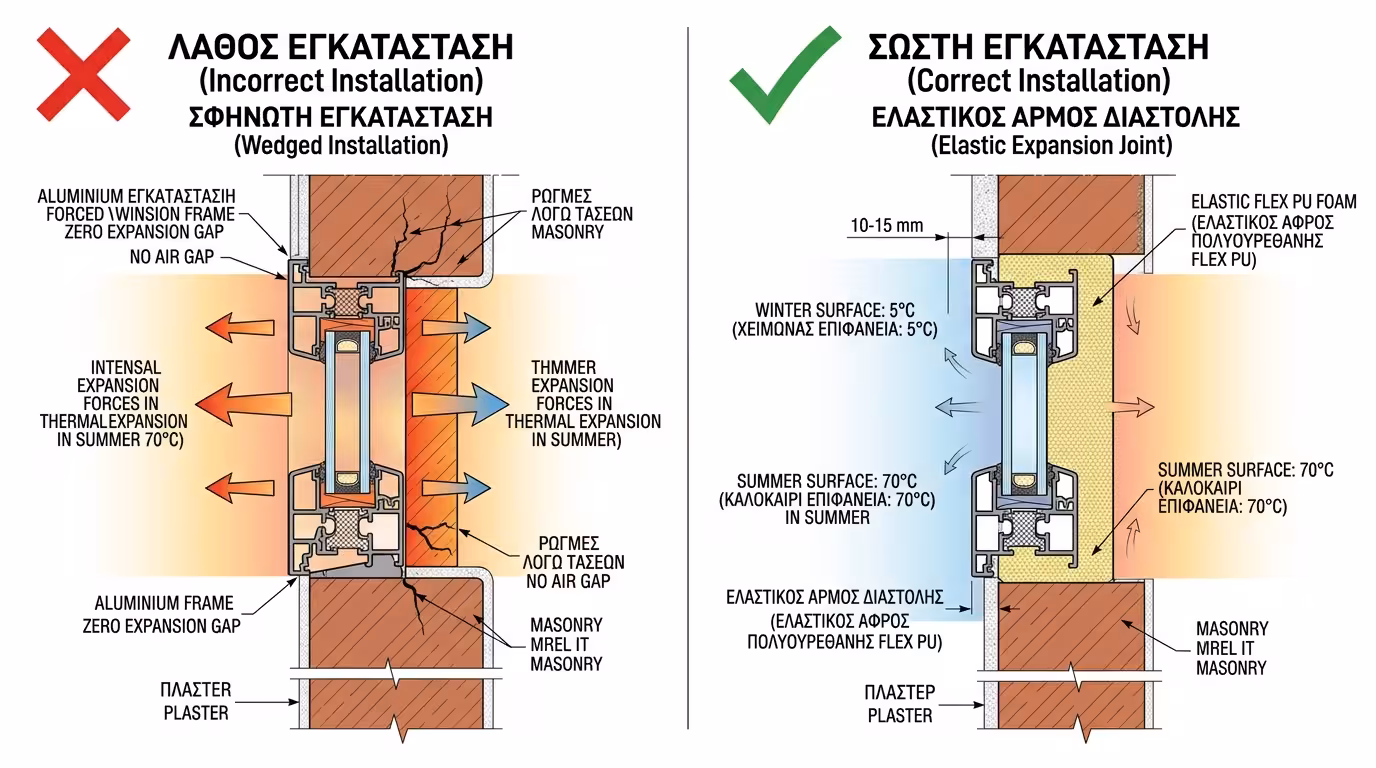
4. The "Wedge-Fit" Installation - Zero Gap Around the Window
The bricklayer, trying to avoid finishing work, leaves an opening
exactly the size of the window. The aluminium goes in "wedge-tight",
almost touching the brickwork on all sides. It looks "perfect" - but
physics disagrees.
💥 Why It's Devastating
Materials "live and breathe". In summer, especially if
dark-coloured, aluminium expands by 2-3 mm on large frames.
With no room to expand, it pushes against the wall, warps the frame, cracks the plaster and the sashes jam. At the same time, with no
gap there's no space for any insulation material - no foam, no
Compriband, no membranes. The joint is left completely open to air
and rain.
✅ The Correct Solution
A construction joint (air gap) of 10-20 mm must always
be left on every side. The exact dimension depends on the window size,
profile colour (dark = greater expansion) and the sealing method. The
gap is filled with elastic insulating materials that absorb movement without cracking or splitting - flex foam, Compriband and membranes.
5. The Galvanised Sheet-Metal Subframe - The Hidden Thermal Bridge
💥 Why It's Devastating
Before the aluminium goes in, the contractor "plants" a square steel
frame (galvanised sheet metal) in the wall to level
the plaster and screw the window onto. The problem? Sheet metal has
a thermal conductivity of 50 W/(m·K) - 1,400 times higher
than an insulating material. You are screwing a super-insulating window
onto a freezing piece of steel! The sheet metal
voids the aluminium's thermal break, transfers cold indoors and over
the years rusts, leaving brown stains on your plaster.
✅ The Correct Solution
For new builds, demand insulating subframes - made of
Purenit (recycled high-density polyurethane, λ = 0.06-0.08 W/(m·K), compressive
strength >30 N/mm²) or high-density EPS. These provide top structural
support without conducting cold. During
renovations, if the sheet metal cannot be removed, it can be
externally "wrapped" with insulation to reduce the thermal bridge.
6. Summary: How to Protect Yourself
🏠 The Golden Rule
Proper installation isn't just about "good hands" - it's about know-how and modern materials. A perfectly installed mid-range window outperforms a premium
window with shoddy installation. Next time you receive a quote,
don't just look at the brand - ask the installer exactly how they plan to fit the windows. Demand RAL-standard installation, insulating subframes,
proper levelling with Turbo screws, and elastic sealing materials.
📋 Your Checklist
Before paying the installer, check: (1) Is the marble sill cut in
two? (2) Are there load-bearing shims and Turbo screws every 50-70
cm? (3) Does the joint have three sealing levels (membrane inside,
foam middle, Compriband outside)? (4) Is there a 10-20 mm gap all
around? (5) Is the subframe insulating? A serious professional will
be happy to explain their work!