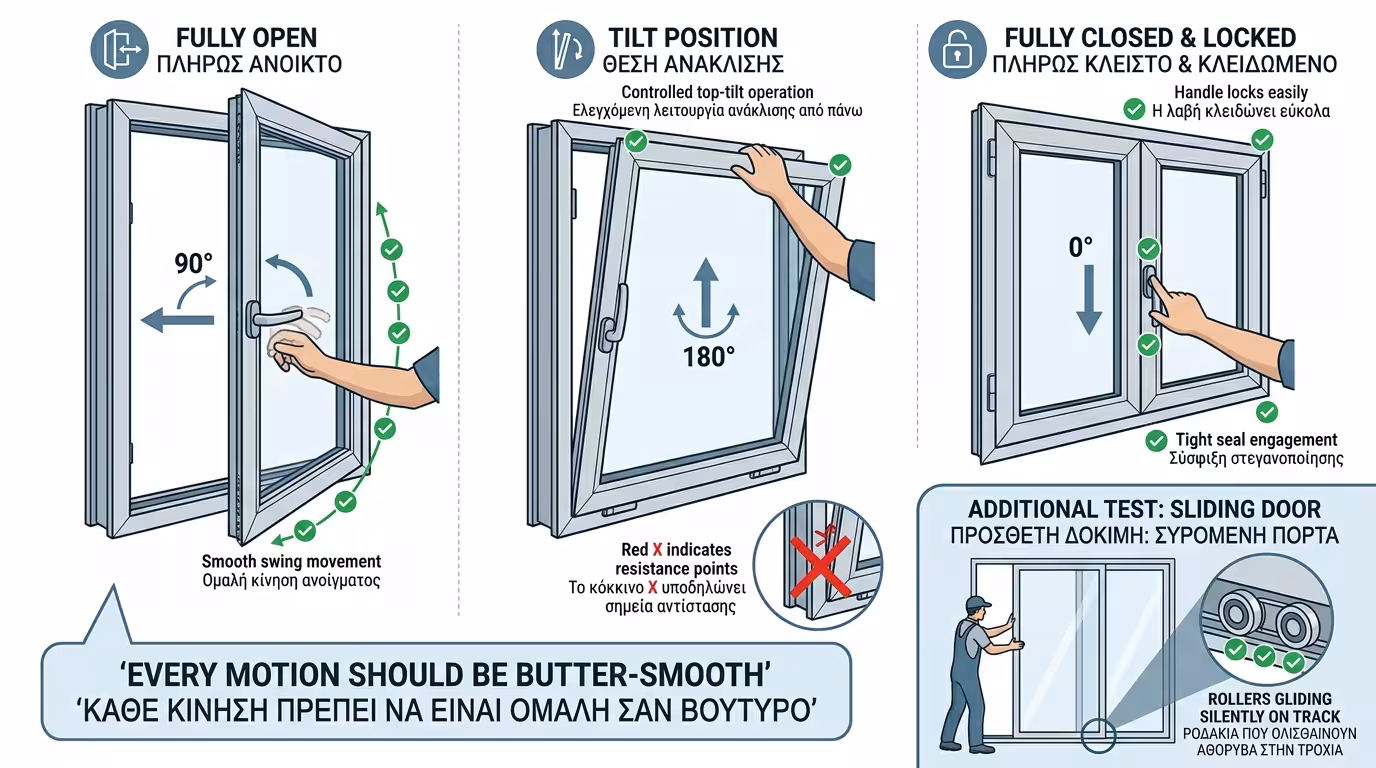
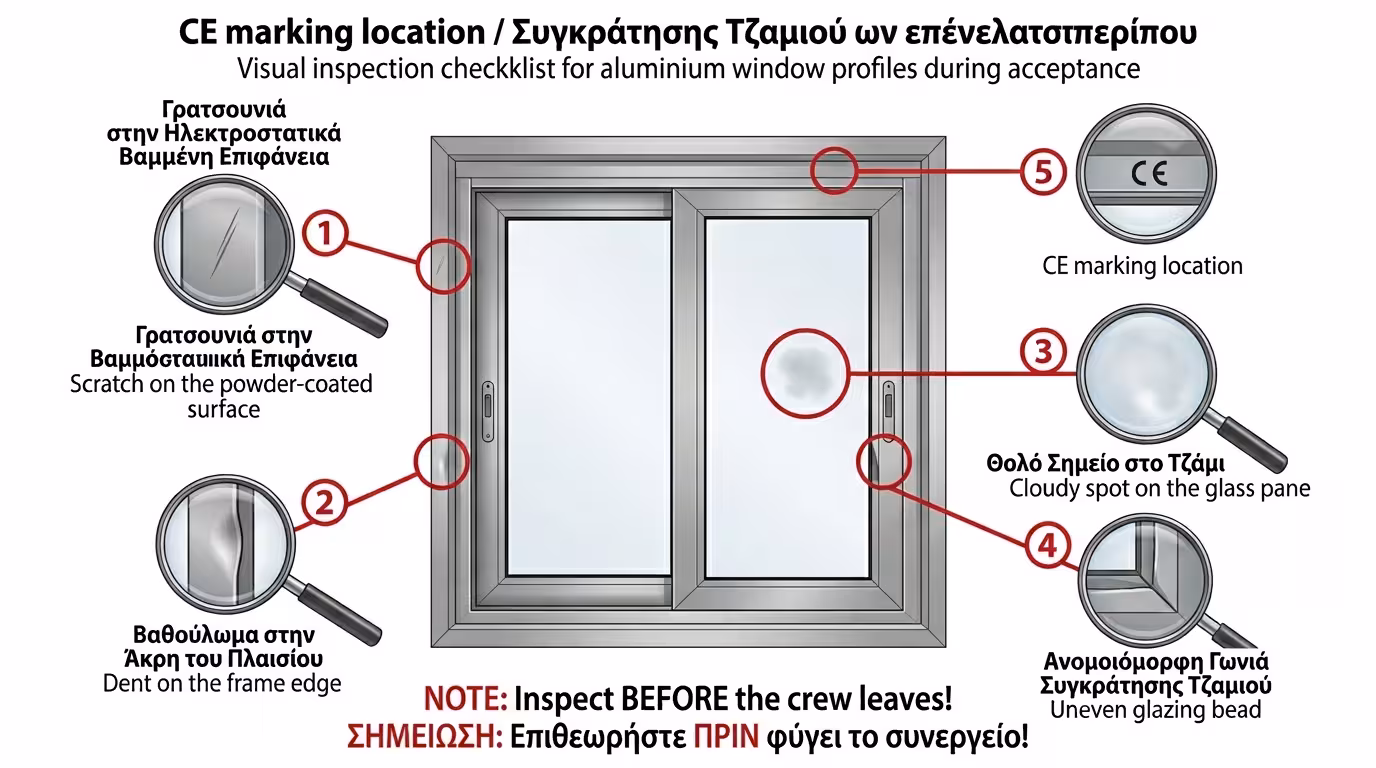
Window Acceptance Protocol: 10-Point Installation Checklist

Installation is complete. The installer asks for payment. Before you sign off, don't rush. This is the most critical day - the day you withhold the final payment until you've confirmed that every single point is perfect.

Follow this 10-point acceptance protocol to catch every issue before it becomes your problem. A serious installer will happily show you everything - a questionable one will get impatient. That alone is a quality indicator.

1. Visual Inspection of Profiles & Glass

The first check is done with your eyes. Walk slowly around each window. If there are tube lights in the room, even better - shadows reveal defects.

Visual acceptance inspection of windows - scratches, dents, defects on aluminium profiles

✅ What to Look For

Scratches or dents on the aluminium (it's electrostatically powder-coated - not easily touched up afterwards). Cracks or cloudy spots on the glass. Glazing beads that don't close evenly or appear slightly warped. CE marking embossed on the top of the frame - if absent, ask immediately.

⚠️ Caution

Perform this check before the crew leaves. If you find a scratch later, the company may claim someone else caused it. Note every observation on a checklist or photograph defects with your phone.

2. Sash Operation & Locking

Testing window sash operation - smooth opening/closing, tilt function

Open, close, tilt - every motion should be butter-smooth. If it takes effort, something is wrong.

📋 What to Check

(1) Every sash opens and closes smoothly with minimal effort. (2) The handle turns fully to all positions (closed, tilt, open) without force. (3) No sash drags on the floor or hits another sash. (4) Sliding units glide silently - if they squeak, the roller bearing adjustment screw may need loosening.

🔐 Locking

Lock every cylinder. Check that each turns easily, that the multipoint locking mechanism engages at all points (top, bottom, centre), and that you've received 3 keys per lock.

3. Sealing, Joints & Drainage

The invisible work behind the plaster. This is where long-term durability is determined - and you can't easily re-check it once the plaster goes on.

Frame-to-wall joint sealing - foam, mastics, Compriband, EPDM membrane tapes

📋 What to Check (If Not Yet Plastered)

(1) Has the frame-to-wall joint been filled with elastic foam (flex PU) through the full depth? (2) Externally, is there Compriband tape or MS polymer sealant? (3) Internally, is there an airtightness membrane (EPDM or Fleece)? (4) Are the weep holes clear? Pour a little water into the external track - it should exit immediately.

🏠 Shutters & Screens

(1) Each roller shutter goes up and down smoothly without squeaking or jamming. (2) For electric units, test remotes or buttons - if automation is fitted, verify auto-stop at full open/close. (3) Insect screens: check sliding, frame, locking - a loose screen will break within a year.

4. Glass, Documents & Warranties

The paperwork guarantees your rights - without it, any warranty claim falls flat.

CE certificates, warranties, delivery documents for windows - documentation

🔍 Glass

(1) Look through the panes at an angle (check for white haze between the layers - that means a broken seal). (2) Confirm the glass specification matches your order (e.g. triple 4-18-4-18-4) - the code is printed on the spacer bar. (3) Check for large bubbles, foreign bodies inside the glass, or scratches on the surface.

📄 Required Documents

(1) CE marking / DoP (Declaration of Performance) - for each profile system and glazing unit, proving compliance with European standards. (2) Manufacturer's warranty (written, stamped, dated). (3) Retail invoice/receipt. (4) Installation protocol (if a RAL warranty applies). File these away - you may need them in 5 or 10 years.

5. Site Cleanliness & The Golden Rule

🧹 Clean-Up

The installation crew must leave the site clean. PU foam residue should be removed, plaster dust swept, protective tapes peeled. If they leave a mess, it reflects their workmanship. Don't remove protective film yourself until the plaster/finishing work is complete - the film protects profiles during the second phase of finishing.

🏠 The Rule

Never pay in full before inspection. Always retain a holdback (typically 5-10% or the final instalment) until the full inspection is complete. Note your findings, photograph them, request a remediation date before paying. A serious professional will be happy to explain their work. A bad one will… be in a rush to leave.

Related Articles

Preview