Hinge Adjustment for a Casement / Tilt & Turn Window That "Drags":
Step-by-Step Guide
It's one of the most annoying - and most common - problems in every
home. You go to close the balcony door or window and feel that the
bottom corner "drags" (scrapes) against the frame. To lock the handle,
you're forced to lift the sash with force from the handle, which will
eventually destroy the mechanism.
Before you panic and call a technician, we have good news: Your window is probably not broken. It has simply "sagged" (lost its alignment) due to the tremendous weight
of the double glazing and gravity.
Modern Tilt & Turn systems, whether aluminium or PVC, are designed
with "smart" 3D hinges that allow micro-adjustments on three axes
(up-down, left-right, front-back). All you need is 5 minutes and a simple Allen key (usually 4 mm).
Follow the step-by-step guide below to realign your window like a
professional.
Step 1: Height Adjustment (Up – Down)
The most common problem is that the sash has "dropped" overall and
drags on the bottom of the frame. Height adjustment is handled
exclusively by the bottom hinge.
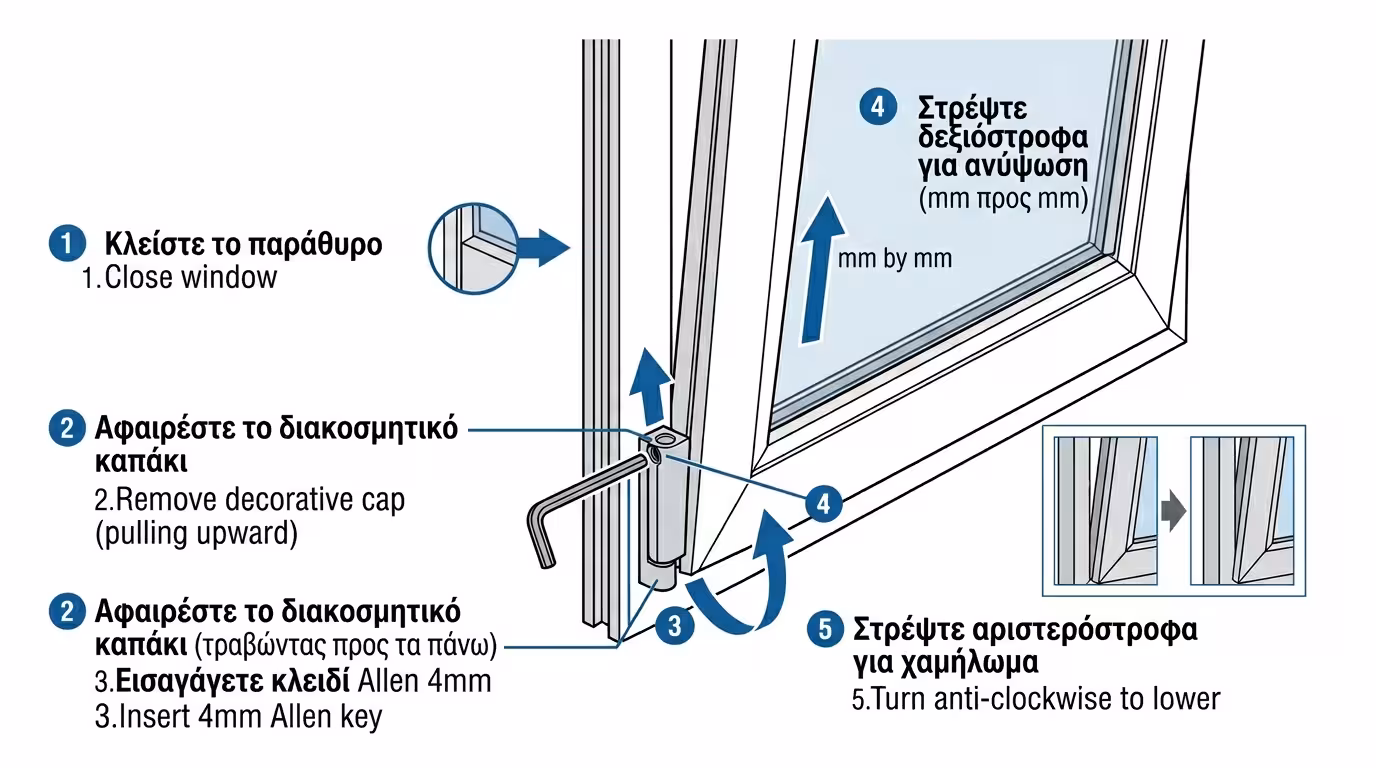
📋 Procedure
Close the window (or leave it slightly ajar).
Locate the bottom hinge and remove its plastic decorative cap (it
usually pulls off upward easily).
At the top of the exposed hinge, you'll see a hole for an Allen key. Insert the 4 mm Allen key.
Turn the Allen key clockwise to raise the sash. You'll
feel the window lifting millimetre by millimetre. (Half or one full
turn is usually enough).
Turn the Allen key anti-clockwise if you want to lower
the sash.
Try opening and closing the window. If it closes smoothly, you're
done!
Step 2: Horizontal Adjustment at the Bottom Hinge (Left – Right)
Sometimes the window doesn't drag at the bottom but hits on the side -
on the lock side or the hinge side. We need to move it horizontally.
📋 Procedure
Open the window.
Look at the base of the bottom hinge (on the side or bottom,
depending on the mechanism). You'll see a different Allen screw.
Insert the key and turn clockwise or anti-clockwise.
This movement "pushes" the bottom of the window closer to the
hinge or away from it, correcting the horizontal deviation.
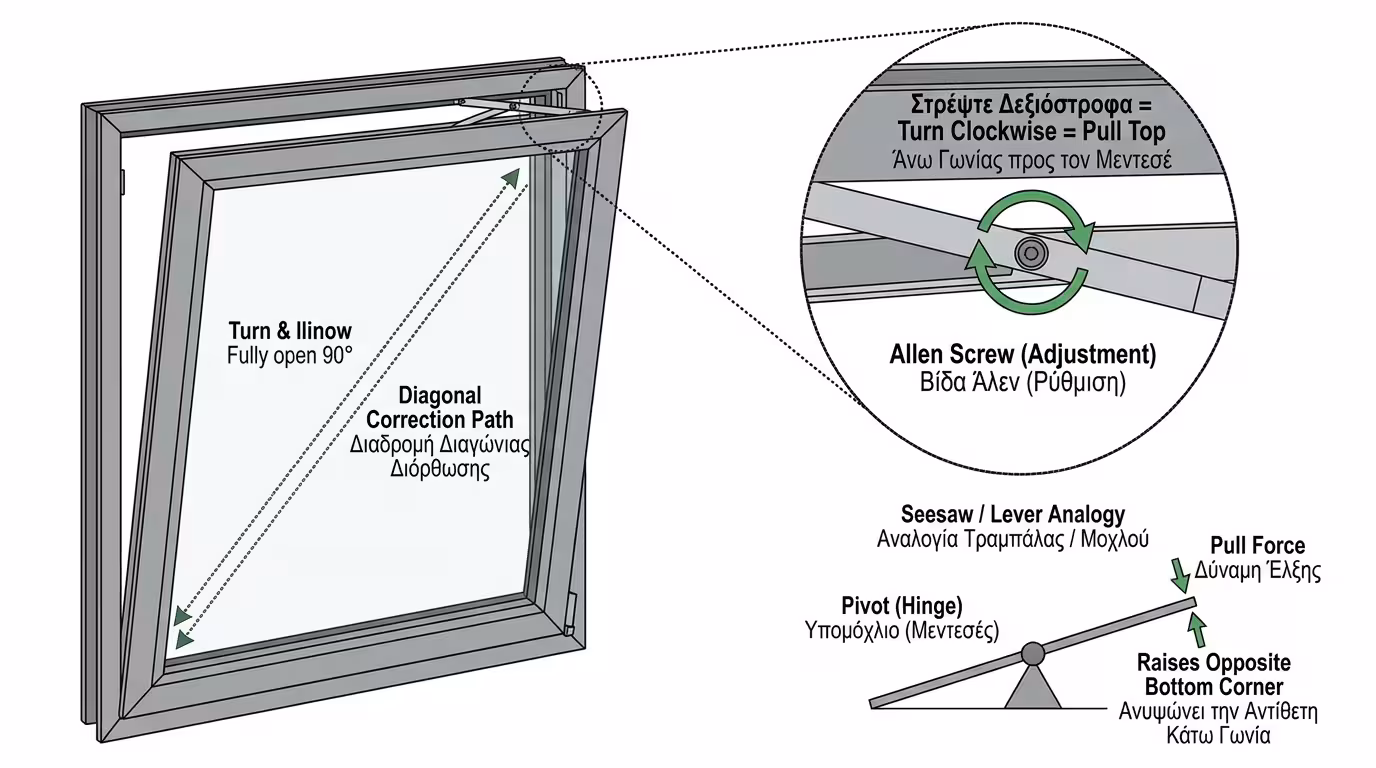
Step 3: Diagonal Adjustment at the Top Hinge (The "Scissors")
If the bottom corner of the window (the one diagonally opposite the
top hinge, i.e. below the handle) drags against the frame, the sash
has "tilted". We need to pull it diagonally upward. This is done from
the top hinge (at the scissors mechanism).
📋 Procedure
Open the window wide (at 90 degrees).
Look at the mechanism at the top of the sash (where the sash
connects to the top hinge). You'll see an Allen screw on the
horizontal metal bar.
Turn the Allen key clockwise. This will "pull"
the top corner of the window closer to the hinge, which in turn
will raise the opposite bottom corner (like a seesaw).
Test the closing. Your door should no longer "sag".
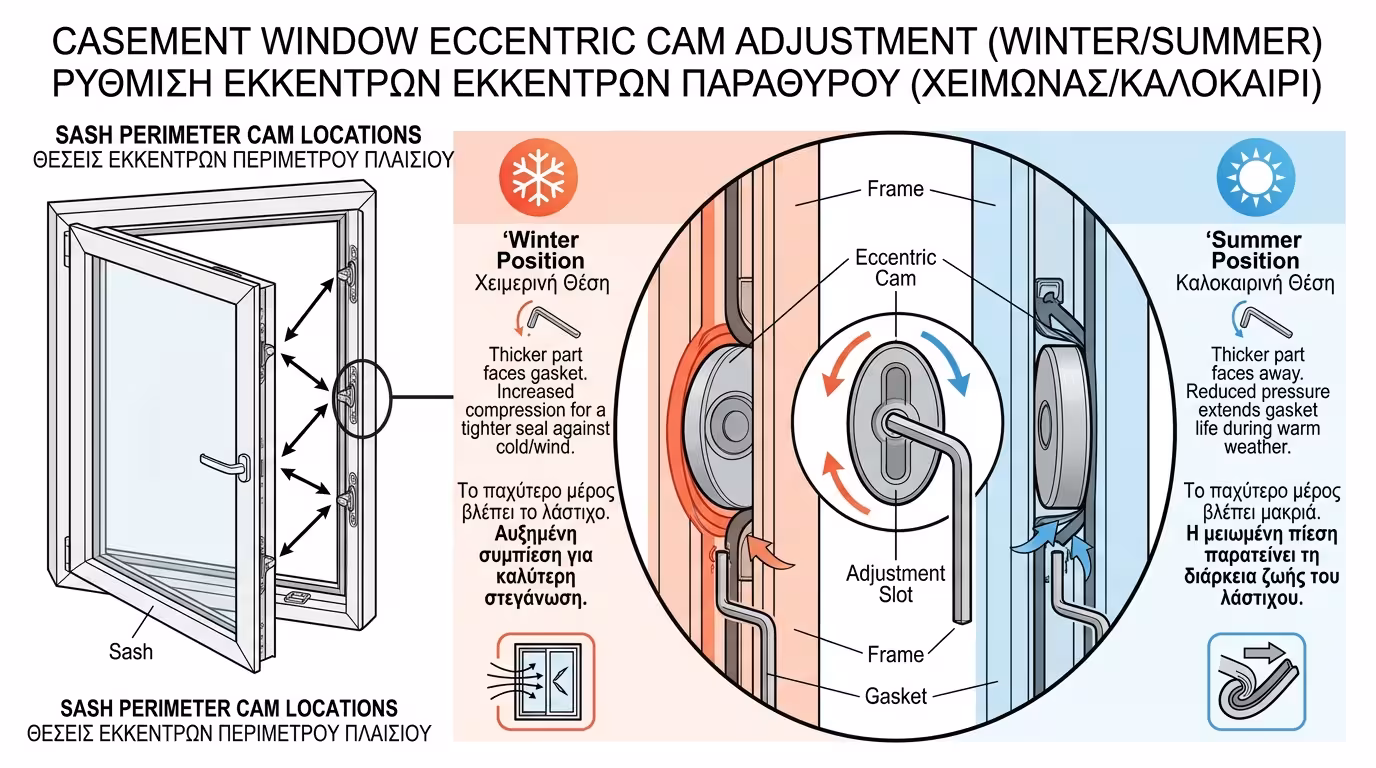
If the window doesn't drag anywhere, but you feel it lets in a little
air or you hear outside noise, the gaskets may not be compressed
enough. You can adjust the "cams" (the cylindrical fittings that lock
around the perimeter) to tighten the sash against the frame.
📋 Procedure
Open the window and locate the cylindrical cams around the sash
perimeter.
If you look closely, they are not perfectly round but eccentric (oval), with a small notch for an Allen key (or small adjustable spanner/pliers).
By rotating the cam, you increase or decrease pressure:
When the thicker part faces the gasket → Winter setting (increased pressure).
When it faces away → Summer setting (reduced pressure
to prevent unnecessary gasket wear).
When Should You Call a Professional?
The above procedure solves 90% of everyday problems.
However, never over-tighten the Allen screws if you feel strong
resistance (you risk stripping the thread).
🔧 Maxed-Out Screws
You've maxed out the adjustment screws and the window still drags.
This means the glazing inside the frame has shifted and the sash
needs "re-shimming" (replacing spacers by a technician).
⚠️ Broken Component
The mechanism makes a loud "crack" during tilting or
a metal component has broken. In this case, professional replacement is
required.