Uneven Walls & Thermal Facade: How Correct "Levelling" Works
Bonding a thermal facade onto a brand-new, perfectly built building is
easy work. The real test for a crew comes when they take on an old
house, where the wall resembles... a stormy sea.
If the insulation boards simply follow the "waves" of the old wall, the
final result will be aesthetically tragic, while the render will have
uneven thickness, with a huge risk of cracking. To achieve a perfectly
flat (level) finish, we must "correct" the wall by hiding its
imperfections behind or inside
the insulation material.
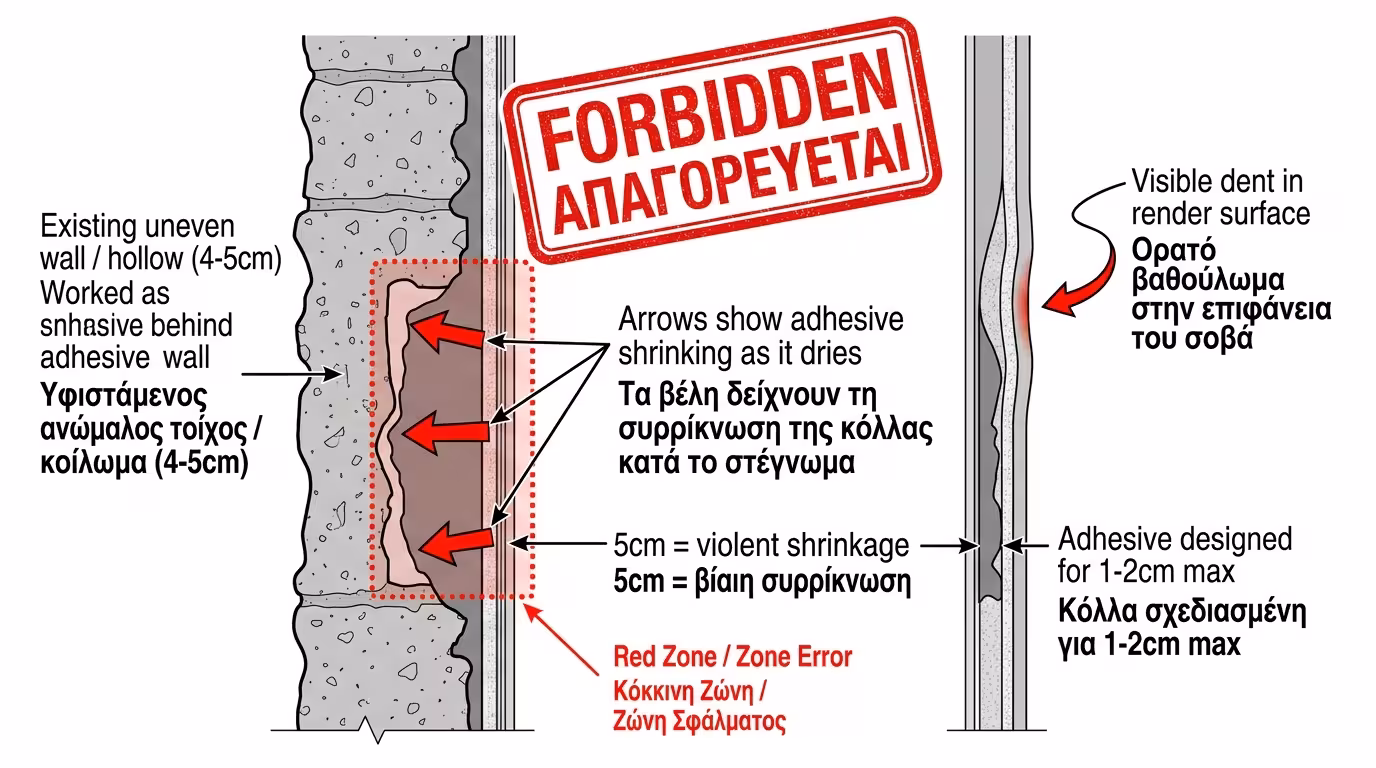
1. The Mistake: "Fill It with Adhesive, Worker!"
The most common (and dangerous) defect is filling large voids with...
tonnes of adhesive. If the wall has a deep "belly" of 4 or 5
centimetres, the bad worker packs a huge mass of mortar (adhesive)
behind the polystyrene to bring it "flush" (in line) with the
neighbours.
⚠️ Why It Is Forbidden
The thermal facade adhesive is designed to work at thicknesses
up to 1-2 centimetres maximum. If you apply 5 cm of
adhesive, when it dries it will shrink violently, pull the board
inward and create enormous mechanical stresses. The polystyrene may
detach or the render may split.
2. The Correct Approach (The Professional's 3 Tools)
So how do we "straighten" the wall safely?
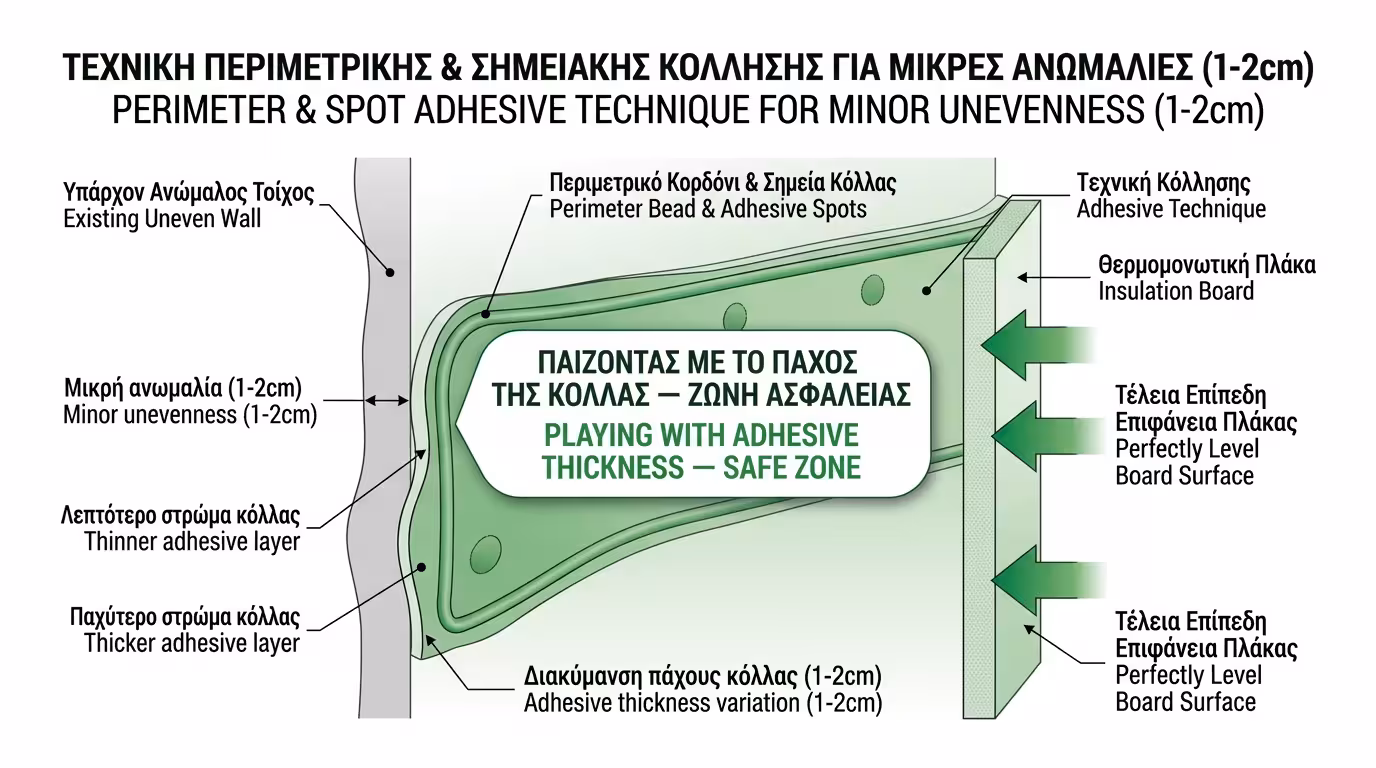
1️⃣ Minor Unevenness (up to 1-2cm): Playing with Adhesive
Here the solution is simple. Using the "Perimeter & Spot" method,
the worker adjusts the thickness of the bead and the spots. Where
the wall protrudes, he applies less adhesive. Where there is a
slight hollow, he applies a little more (always within the material's safe limits).
2️⃣ Large "Bellies" (over 2-3cm): Changing EPS Thickness
If the wall has large hollows, we do not fill them with adhesive. We fill them with insulation! The worker orders EPS boards of different thicknesses. If the base insulation
is 8cm, at the point where the wall has a 3 cm "belly", he locally installs
an 11cm board! This way, the outer surface comes level, the adhesive stays
at the correct thickness, and you gain extra insulation. In extreme cases,
traditional rendering (filling) of the wall precedes the ETICS.
3. The Final Finish: The Rasp
Even with perfect installation, between board joints there may be tiny
"teeth" (1-2mm unevenness). Before the mesh and render go on, the
worker passes the entire wall surface with a specialised rasp. EPS rasps extremely easily. The wall is completely smoothed, the
teeth vanish and the final surface becomes a perfect, smooth "level"
ready to receive render in a perfectly uniform layer.
4. The 10x10 Model Experiment
The west wall of our house was poorly built and has a deep 4 cm hollow
in the middle. We stretch the string line and see the problem.
❌ Scenario A (Filled with Adhesive)
The contractor applies 4cm-thick adhesive to bring the board level.
After a few days, the adhesive "pulls" (dries) and shrinks. The
board sinks inward. When sunlight falls at an angle, we see an enormous shadow in the middle of the house. The hollow has "transferred" to the new
render.
✅ Scenario B (Thicker EPS & Rasping)
The worker bonds 12cm boards (instead of 8cm) where the
hollow is. The outer face protrudes slightly. He then takes the rasp and
"erases" the protrusion until it comes flush with the neighbours. The
adhesive behind is at the ideal 1cm thickness. The final result? A perfect, flat wall that withstands time and weather.
The Final Conclusion: A straight wall is not just about aesthetics.
It is about mechanical durability. An uneven wall means the final render will
be 3mm thick in places and 8mm in others. These variations create stresses
and, inevitably, cracks. Rasping and "playing" with board thickness is the
secret to the perfect canvas!