Masonry Decoupling: The Art of Breaking the Mechanical Contact of Structural Materials

When we build a traditional brick wall (stretcher or header bond), the process is well known: the mason spreads mortar on the floor, lays the first course of bricks, and continues up to the ceiling, where the last bricks are wedged in place with mortar. Finally, the wall is tied to the building columns with steel rods.

For safety and structural integrity, this wall is perfect. For studio sound insulation, it is a disaster. The cement joining the wall to the floor and ceiling acts as an "umbilical cord" that carries every vibration (bass, drums) straight into the building frame (flanking transmission).

To achieve the ultimate "Room-in-Room" with heavy materials, we apply Masonry Decoupling at 3 critical points.

1. The Base: A Wall That Stands on Rubber

We never spread mortar directly on the concrete floor. Before the first brick is laid, we place a heavy-duty elastomeric strip bearing on the floor. These are certified anti-vibration materials (often high-density polyurethane, e.g. Sylomer), calculated by an engineer to support exactly the weight of the wall that will be built on top.

The wall is built on this "rubber". The enormous mass of the brickwork never touches the building slab.

Elastomeric strip bearing (Sylomer) under a brick wall - the wall never touches the concrete

2. The Bracing: Acoustic Wall Ties

A free-standing brick wall that simply sits on rubber and does not touch anything else is dangerous. In an earthquake it would collapse on us. It must be braced to the old external wall or columns.

How do we do this without creating a sound bridge? We use Acoustic Wall Ties. These are specialist metal fittings ("blades") with a powerful elastic silent block in the middle. One end is screwed into the old wall, and the other is built into the mortar of the new brick wall. They keep the wall upright in an earthquake, but their elastic centre does not let sound pass through!

Acoustic wall ties with elastic silent block in the centre

3. The Top: Elastic Ceiling Seal

When the mason reaches the ceiling, it is strictly forbidden to "wedge" the wall with cement or mortar. If they do, noise will strike the ceiling slab.

We always leave a 1 to 2 centimetre gap between the last brick and the ceiling. This gap is filled with rock wool (for sound absorption) and sealed on both sides with backer rod and a thick layer of elastic acoustic sealant. We do exactly the same at the vertical joints where the wall meets the side columns.

1-2 cm gap at the top of the wall filled with rock wool and elastic acoustic sealant

4. The Experiment in Our Model: The Studio in the 4×4

Experiment: Scenario A (traditional build, bass reaches neighbours) vs Scenario B (decoupling, silence)

We decide to build a second wall of solid bricks inside our room to create a recording Control Room.

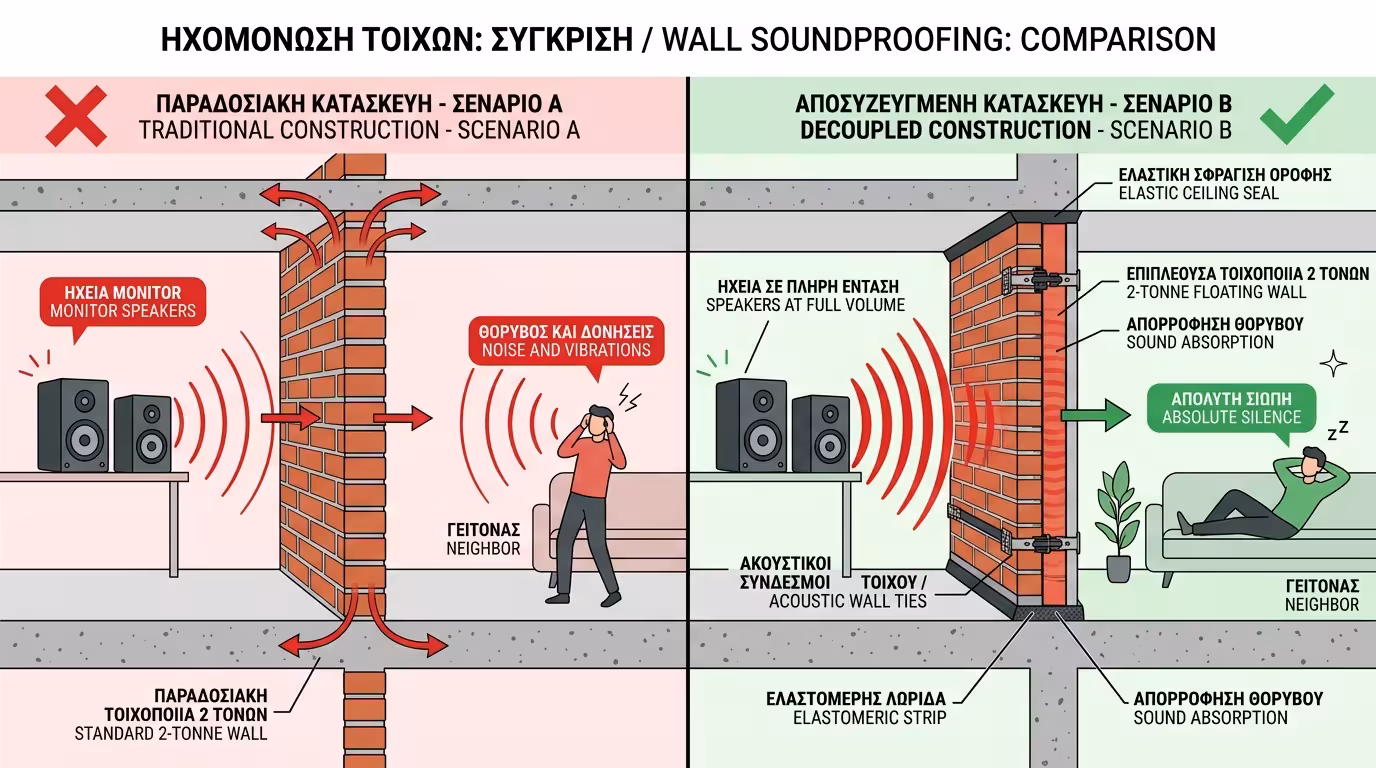
❌ Scenario A (The Traditional Build)

The mason spreads mortar, builds the wall, wedges it into the ceiling and plasters it. The wall is "rock solid". We crank the monitors to full volume. The bass moves the heavy wall slightly, but because it is "one body" with the floor and ceiling, the entire building acts as a conduit. The neighbour can hear the bass kicks of the songs.

✅ Scenario B (Surgical Decoupling)

We place an elastomeric strip on the floor. Build the wall with acoustic wall ties every 1 metre. Leave a gap at the ceiling and apply sealant. Our new 2-tonne wall "floats" in the room. The monitors blast at full volume. The wall absorbs all the energy but cannot transfer it anywhere! In the adjacent apartment there is absolute silence.

The Bottom Line: Decoupling is not just for lightweight plasterboard. When bass and volume levels are extreme, we need the mass of brick. But without the specialist elastomeric bearings and acoustic ties, a heavy wall is simply an enormous "battering ram" pounding the building's skeleton.

Related Articles

Sound Insulation: Silence and Noise Protection

Return to category.

Go to category

Preview