Expansion Joints and Parapets: The 2 Most Dangerous Points for Water
Ingress on Your Balcony
In construction, problems rarely start from flat, open surfaces.
Problems always begin where two different materials meet. On a balcony, the tile meets the wall, concrete meets the railing
steel, and large slabs meet each other.
If these junction points are sealed the wrong way (or ignored entirely),
your balcony will become a "colander" from the very first winter. Let's
look at the two biggest culprits.
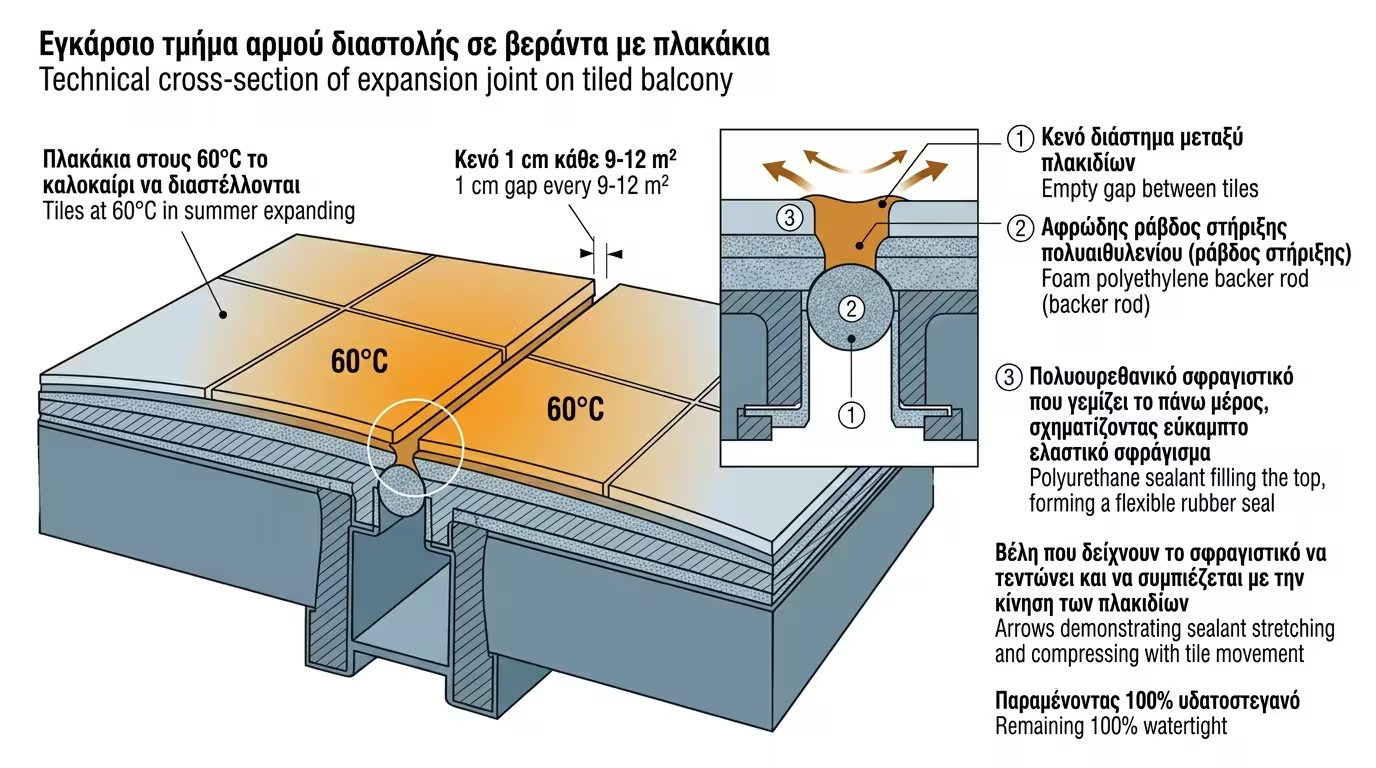
1. Expansion Joints (The Balcony That "Breathes")
Your balcony tiles bake in summer at 60°C
and freeze in winter. Heat makes them expand and cold makes them contract.
❌ The Problem
If the tiler sticks all tiles tightly together without leaving any
gaps, using rigid cementitious grout between every piece, in summer
the tiles will have absolutely no room to expand. Result? They'll pop off, burst into the air or crack the grout. Rainwater then passes through those cracks completely unhindered and
soaks into the screed layer below.
✅ The Correct Solution
Every 9 to 12 m² (and always around the perimeter where
tile meets wall), an empty joint about
1 cm wide must be left: the
Expansion Joint.
🔧 The Sealing Secret
This gap is NEVER filled with ordinary grout! A foam polyethylene
cord (backer rod) goes in the bottom and
Polyurethane Sealant fills the top. The sealant becomes
an incredibly strong rubber. When tiles move, the rubber stretches and
compresses, keeping the joint 100% watertight for decades!
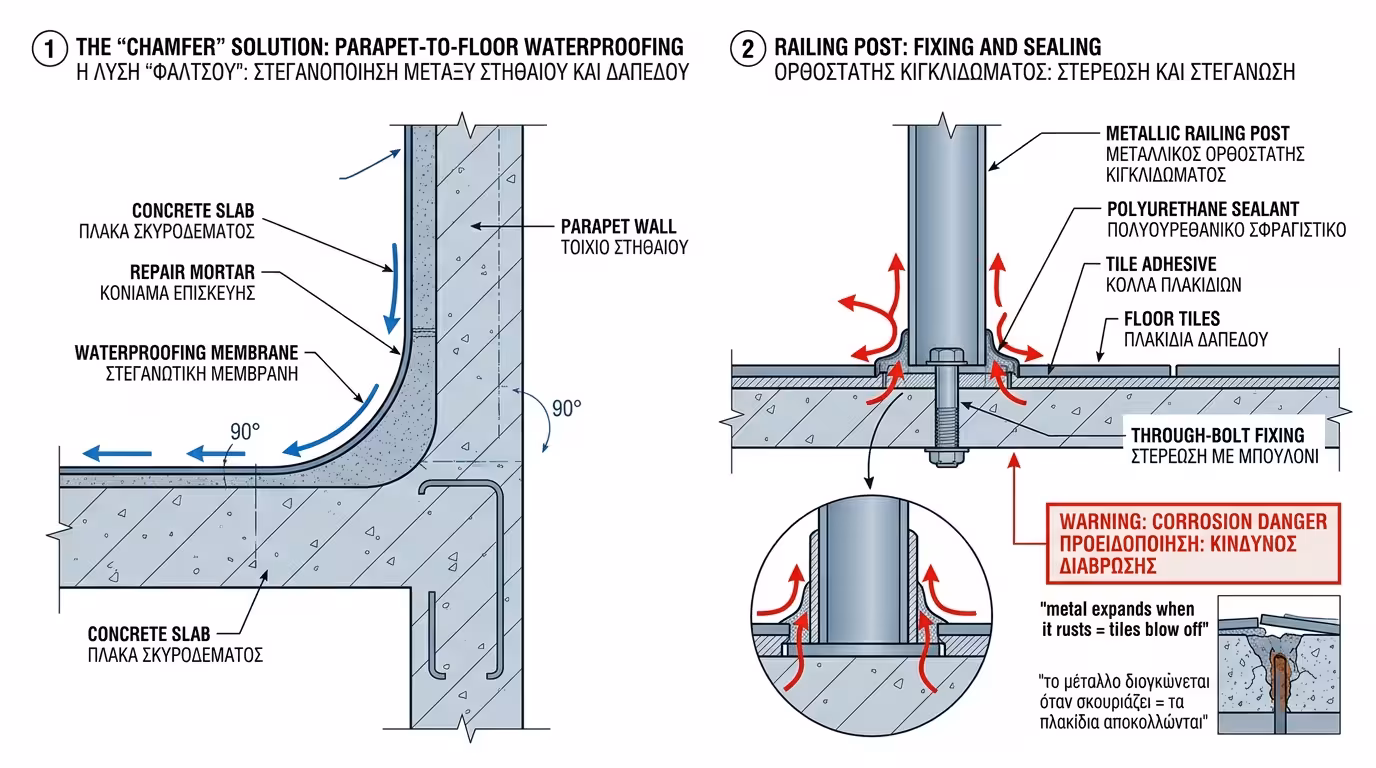
2. Parapets and Railing Bases (The "Holes" in the Slab)
Balcony water flows (thanks to the slope) toward the edge. There it
meets the "parapet" (a low wall) or metallic railing bases bolted or
embedded into the concrete.
📐 The 90° Corner Mistake
If waterproofing is applied at a sharp 90° corner (where the
horizontal floor meets the vertical parapet wall), the material
usually cracks at the slightest vibration or thermal movement. The
proven solution is a
"Chamfer". Before waterproofing, the installer uses
repair mortar to "round off" the corner, creating a smooth, curved
transition instead of a sharp angle. This stops water from pooling
in the angle and lets the waterproof sealant hug the joint smoothly
without developing stress cracks.
🔧 Rusting Steel
If railings are bolted to the floor, water will try to seep around
the bolts or posts. If it gets through, the steel will rust inside
the concrete, swell and blow off the tiles! The fix: Every point where metal "pierces" the floor must be wrapped with polyurethane
sealant before any adhesive or tile is laid.
3. The 10 × 2 m Edge Renovation Experiment
Our balcony is large (20 m²) and we've just applied the waterproofing.
The tiler is about to start.
🔴 Scenario A (Grout Disaster)
The tiler lays tiles flush against the wall and parapets, filling
every gap with rigid acrylic grout. No flexible joints at all. In
August the tiles expand. The hard grout around the parapet cracks,
opening a 2 mm fissure. Come winter, rainwater streams through that
crack under the tiles. Water freezes, and by spring we have
4 "hollow" tiles that have detached.
🟢 Scenario B (The Balcony That "Breathes")
The tiler leaves an 8 mm gap around the perimeter (between
tile and wall/parapet) and cuts the balcony in half with another joint.
After tiling, he cleans these joints perfectly, inserts backer rod and
fills the gap with polyurethane sealant colour-matched to the tile. The
tiles can now move fractions of a millimetre in summer without anything
cracking, and water is blocked
100%.
The Final Conclusion: A balcony almost never leaks through
the middle of a tile. The battle against water is won or lost exclusively
at the joints, parapets and junctions where different materials meet each
other. A single cartridge of good polyurethane sealant costs less than €10, but it saves your balcony and your roof from damage that could cost
thousands of euros to repair!