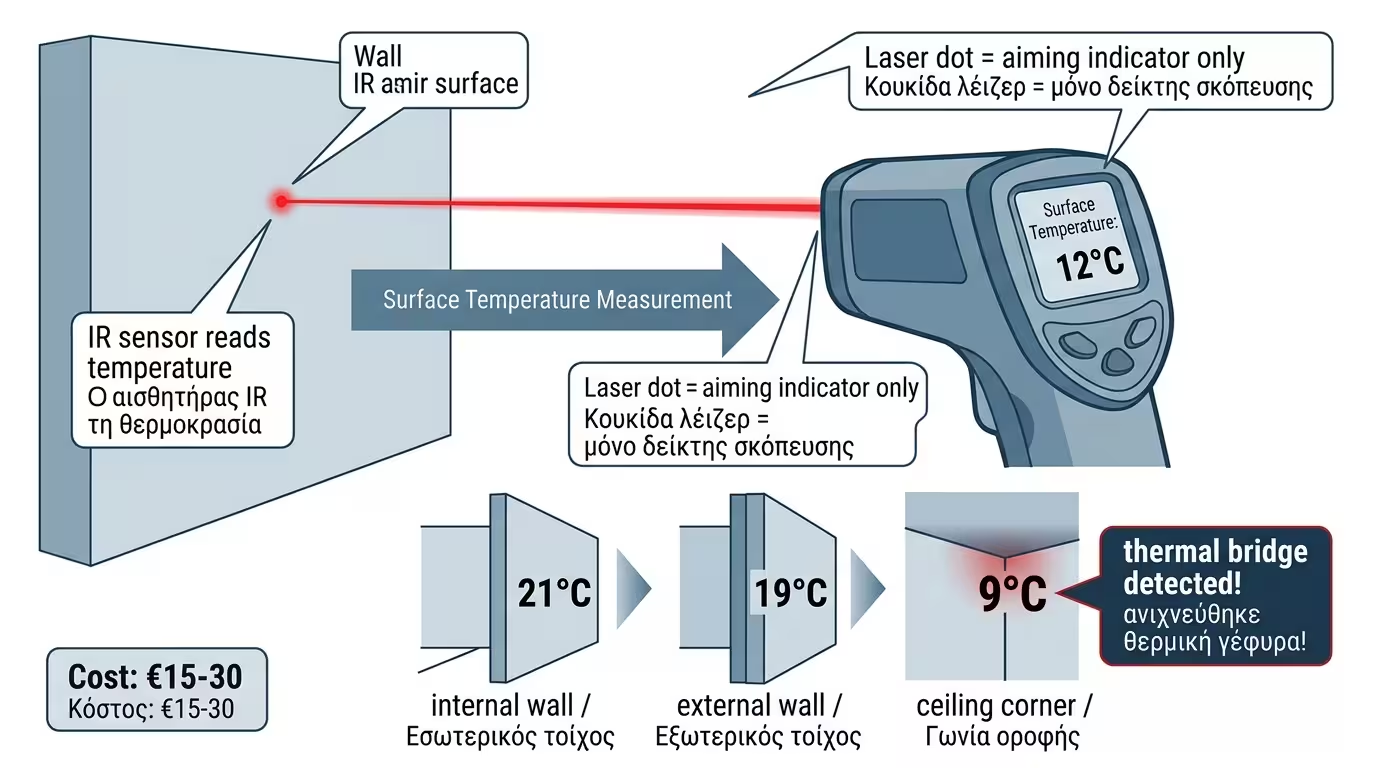
DIY Diagnostic Solutions: Laser Thermometers and Humidity Sensors

Technology has become so affordable that tools once exclusive to contractors now sit on hardware store shelves at toy-like prices. Let's look at the 3 "magic" gadgets every home should have to monitor energy and moisture.

1. The Laser Thermometer (Infrared Thermometer)

It looks like a small gun that emits a red laser dot. It costs €15 to €30. The laser measures nothing; it simply shows you where you're aiming. The sensor underneath instantly "reads" the infrared radiation of the surface and displays the temperature on screen.

Laser thermometer - red dot, screen shows surface temperature

🎯 How to Use It

On a cold winter night (with the heating on), stand in the middle of the living room. Aim at an internal wall (one shared with the next room). The screen will read e.g. 21°C . Then start scanning the external wall, the bottom of the aluminium frame, and the ceiling corners. If the screen suddenly drops to 12°C or 9°C, you've just found a huge thermal bridge or an air draught! You can literally "draw" with a pencil on the wall exactly where insulation is missing.

2. The Moisture Meter (Pin-type Hygrometer)

It is a small device the size of a mobile phone with two metallic "needles" (pins) at the top. It costs around €15 to €25. If you lightly press these pins into a material, the device measures the electrical resistance (water is a good conductor) and gives you a moisture percentage.

Pin moisture meter - two needles measure material moisture content

💧 How to Use It

You see a brown stain below the window. Is it from yesterday's rain or an old stain from last year's leak that has dried? Press the pins on the clean wall next to it: reads 0% . Press the pins on the stain: if it reads 15% or 20%, the wall is still wet internally and the problem is active!

🪵 Bonus Tip

It's the ultimate tool for checking whether the firewood delivered to you is dry or fresh and wet!

3. The Room Hygrometer

The simplest of all. A digital clock (costing €5 - €10) that measures the Relative Humidity (RH%) of the air inside the room.

Digital room hygrometer - 40%-60% comfort zone

📊 How to Use It

Place it on your bedside table. If in winter it reads below 40%, the air is too dry (your throat dries out). If it consistently reads above 60% - 65% , your home is in the "danger zone" for mould growth! That is your signal to perform the "5-Minute Cross-Ventilation" technique we learned.

4. The 10x10 Model Experiment (The Hidden Gap)

10x10 experiment - blind guesses vs €20 DIY diagnosis

We are sitting on the sofa and feel a freezing draught at our feet, but we don't know where it comes from.

❌ Scenario A (Blind Guesses)

We put our hand around the window. It feels a bit cold. We call the window fitter, pay €50 for leaf adjustment. The freezing feet remain.

✅ Scenario B (The €20 DIY Diagnosis)

We take out the laser thermometer. We aim at the window: reads 17°C (normal). We aim at the wall: 19°C. We aim at the junction of the wooden floor and skirting board, right behind the sofa: the screen "dives" to 6°C! We have just found, with millimetre accuracy, a huge air draught entering under the floor. We buy a €3 acrylic mastic, seal the joint and the problem is solved permanently.

The Final Conclusion: You don't need an engineering degree to improve your home. A laser thermometer and a simple hygrometer are your "shield" against poor workmanship and hidden problems. They make invisible energy… visible, helping you make smart, targeted and affordable renovation decisions!

Related Articles

Ventilation, Airtightness & Real Consumption: Climate Control

Return to category.

Go to category

Preview