Marble and Tiles: The Ultimate Challenge in Floor Sound Insulation During Renovation

Tiles and marble are the "noisiest" floors you can install. Extremely hard and rigid, when a chair is dragged across them, they produce a sharp impact noise that pierces through concrete like an arrow.

In a renovation where you strip the old floors to lay new tiles, the classic method says glue them directly onto the slab. This creates a rigid, stone-solid bond - a perfect noise conductor.

The Adhesive Problem

If you try to cheat physics and place a common, soft anti-vibration roll under tiles, you will regret it. Tile adhesive, once cured, becomes stone. If the underlay beneath is soft and compresses even one millimetre when you step on it, the adhesive will crack, the grout joints will break, and the tiles will detach. The damage is irreversible - you will need to strip everything out and start over.

Soft foam under tiles: adhesive cracks, grout breaks, tiles detach

The Solution: Acoustic Tile Mats

The industry created specialised direct-bond acoustic mats. These are membranes (compressed cork with recycled rubber, or polyurethane materials) 3-5mm thick.

Their secret: enormous compressive strength. They absorb the momentary vibration of impact (the sound), but do not sink under the static weight of furniture and people. They last decades without losing their properties, unlike cheap foam materials that pancake within months.

Specialist cork-rubber membrane: enormous compressive strength, 3-5mm

The "Double Sandwich" System

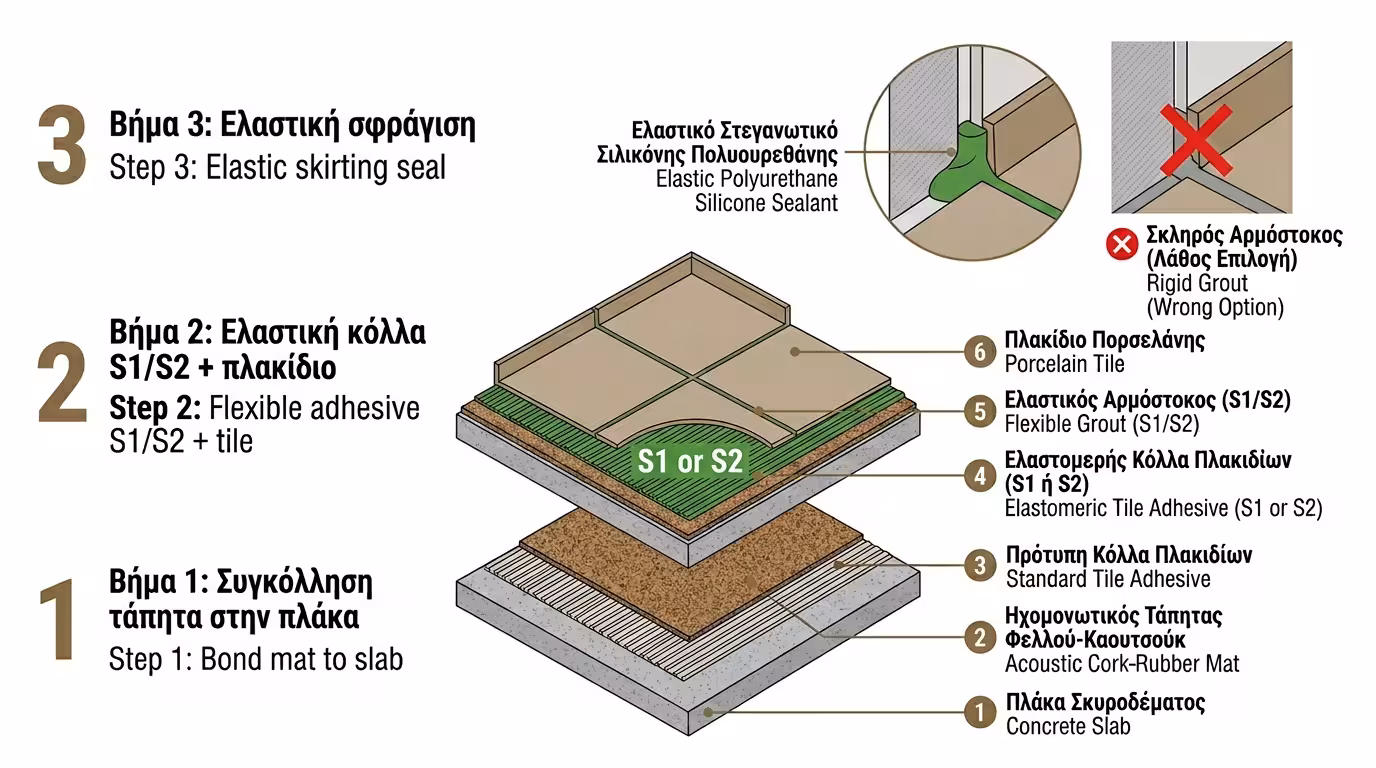
Installation requires a specialist tiler and a process called "double bonding":

  • 1. Mat Bonding: Tile adhesive on the bare, clean floor, then the acoustic mat sheets are bonded covering the entire room.
  • 2. Flexible Adhesive (S1/S2): On top of the mat, adhesive again - but strictly elastomeric tile adhesive (rated S1 or S2). Important: do not use standard adhesive. S1/S2 adhesive retains flexibility even after curing, allowing the system to absorb micro-vibrations without cracking.
  • 3. Flexible Grout: The grout must also be elastomeric.

Critical Error - The Skirting Board: Say you completed the above process perfectly. The tiler now installs the skirting. If the floor tile touches the wall skirting directly, or the joint is filled with rigid grout, the system is short-circuited! Sound from the floor will climb through the skirting into the wall and descend to the neighbour below.

The Rule: The junction between floor and wall must ALWAYS be sealed with elastic polyurethane mastic (silicone), never with rigid grout!

Three steps: mat, S1/S2 flexible adhesive, tile

The Experiment in Our Model (Replacing Tiles in the 4×4)

Experiment: Scenario A (standard adhesive, 0 dB) vs Scenario B (acoustic mat + S1, 16-18 dB)

We want modern large-format granite tiles, but the neighbour below complains easily.

❌ Scenario A (The Conventional Installation)

The tiler glues tiles directly to the concrete with standard adhesive. Fills the perimeter with rigid grout. Our floor has become a perfect percussion instrument. We drop our keys, the neighbour hears crystal-clear sound. We gained absolutely nothing in noise reduction.

✅ Scenario B (The Acoustic Installation)

We pay about €15-20/m² more and install a cork-rubber acoustic mat with S1 flexible adhesive. We seal the perimeter with silicone. Our tiles are now "disconnected" from the concrete. We gained 16-18 dB of noise reduction! Footstep noise becomes imperceptible.

The Final Conclusion: Tiles and marble are "tough" players. To make them fall silent, build an "elastic sandwich" underneath. Don't scrimp on flexible adhesive and the specialist mat - once tiles are bonded to concrete, there is no going back.

Related Articles

Sound Insulation: Silence and Noise Protection

Return to category.

Go to category

Preview