Partition Wall Soundproofing: Building a Plasterboard Stud Wall (Anatomy of the Perfect Wall)

When you call a tradesman to soundproof your wall, the most common (and catastrophic) suggestion you will hear is: "I'll glue a plasterboard with a bit of polystyrene onto the wall and you're done".

Don't do it. If you glue or screw any hard material directly onto the noisy wall, the vibration of the sound will pass straight through to the new surface. The only thing you will have achieved is making your room smaller.

To stop sound, we need to build an independent wall (stud wall) that does not touch the old one anywhere. Let us examine the 5 layers (from inside to outside) of the perfect wall.

The Anatomy of Soundproofing (The 5 Steps)

1. The Air Gap (The Safety Distance)

We start by leaving a gap of 2 to 5 centimetres from the old wall. This air is our first "shock absorber". Our new frame is strictly forbidden from touching the neighbour's wall!

2-5 cm air gap - the safety distance between old wall and new frame

2. The Frame and Anti-Vibration Tape (The Decoupling)

The plasterer will screw the metal runners to the floor, ceiling and side walls.

The absolute secret: Before screwing the metal to the floor, he must stick a special foam anti-vibration strip (decoupling tape) underneath it. If he doesn't, sound from the floor will climb into the metalwork and make the plasterboard sing!

3. The Spring (The Rock Wool)

Between the vertical metal studs we place rock wool slabs. The rock wool absorbs the sound that manages to creep into the wall cavity, preventing the air inside the stud wall from acting as a… loudspeaker (drum effect).

Metal frame with anti-vibration decoupling tape under the runners

4. The Double Mass (Specialist Acoustic Plasterboard)

Forget ordinary, cheap, white plasterboard. You will ask for Acoustic Plasterboard, which is much denser and heavier (usually coloured blue).

The second secret: We never install one layer. We install two layers. And most importantly: the plasterer must lay the boards with staggered joints. That is, the seam of the first layer must never fall over the seam of the second layer, so that sound cannot find a "gap".

5. The Airtight Seal (Acoustic Sealant)

Sound behaves like water. If it finds a tiny hole, it will all pass through it. Our plasterboard must not be wedged tight against the floor and ceiling. We must leave a joint of 3-5 millimetres around the perimeter. This gap is finally filled with a special, elastic acoustic sealant. This way, our new wall "floats" without rubbing against the other building elements.

Double acoustic plasterboard with staggered joints and acoustic sealant

The Experiment in Our Model (The 4×4 Renovation)

Stud wall experiment: Scenario A (drum effect) vs Scenario B (full decoupling)

We are ready to build the wall to escape the neighbour's TV (which is "hitting" us with 75 dB).

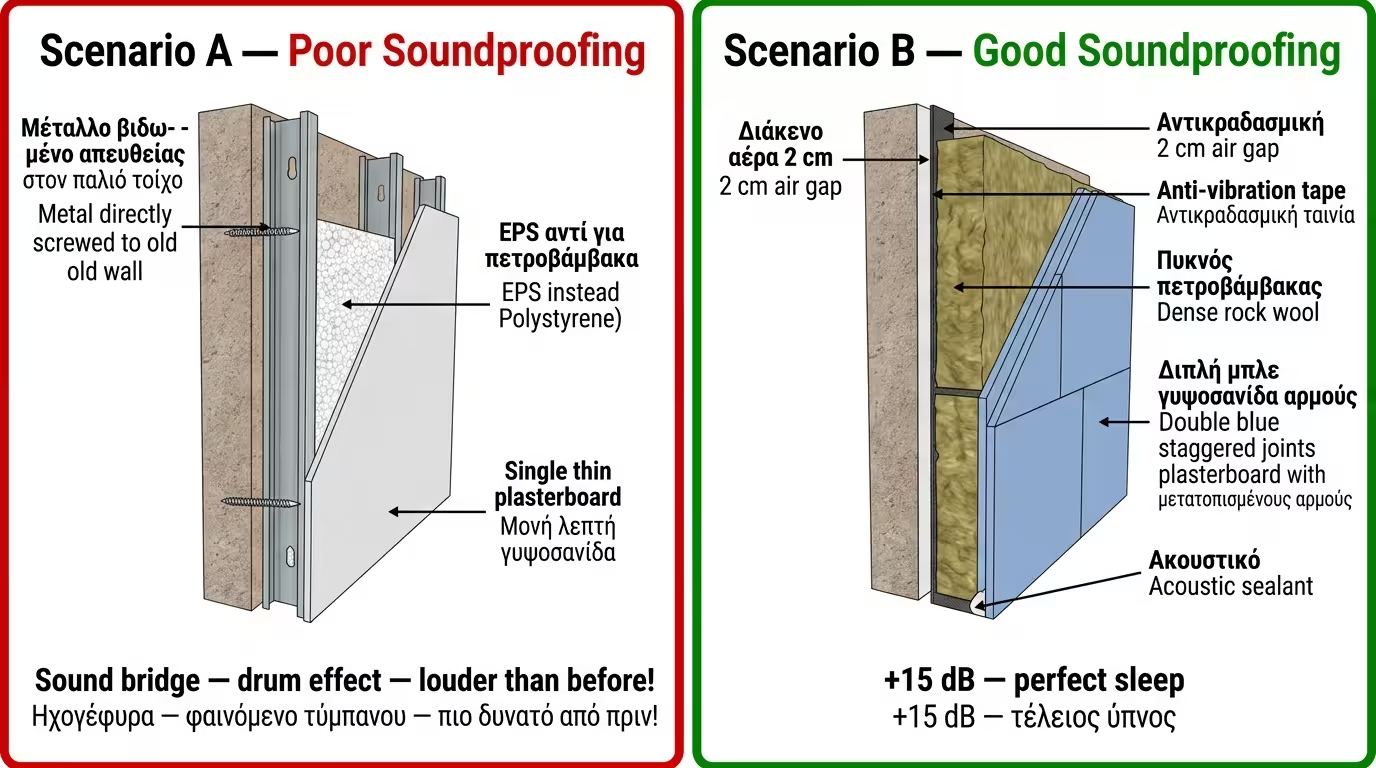
❌ Scenario A (The Slapdash Job - The "Drum")

The tradesman is in a rush. He screws the metal directly onto the neighbour's wall so it "grips" well. He stuffs in a bit of EPS (which is a thermal insulator, not a sound insulator) and screws on a single ordinary plasterboard. He fills the joints roughly. Result? The new wall literally acts as a loudspeaker (drum)! Vibration passes from the screws to the plasterboard, the cavity resonates, and we hear the TV perhaps even… louder than before!

✅ Scenario B (The Surgical Decoupling)

We leave 2 cm of air. We place anti-vibration tape under the metal. We fill with dense rock wool. We screw on double blue plasterboard with staggered joints, and seal with acoustic sealant at the corners. We have lost 8 centimetres of room in total. The neighbour's TV "hits" the old wall, very little energy passes into the air, it is absorbed by the rock wool and does not have the force to vibrate our double heavy plasterboard. We have gained the +15 dB we were looking for and we sleep perfectly!

The Final Conclusion: In soundproofing, a single wrong screw is enough to destroy a thousand-euro installation (this is called a sound bridge). Demand absolute decoupling from your tradesman (nothing rigid touching the old wall) and never skimp on the second layer of plasterboard.

Related Articles

Sound Insulation: Silence and Noise Protection

Return to category.

Go to category

Preview