Thermal Facade Bonding Methods: The "Blob" Trap

Now that we have prepared the wall, it is time to bond the insulation boards. If you watch 10 different crews in Greece applying adhesive to polystyrene, you will likely see 10 different methods. However, the international ETICS system standards recognise only two correct methods, and explicitly prohibit a third that unfortunately "lives and reigns" on our building sites.

Let us see how the adhesive must be applied for perfect insulation and absolute safety.

1. The Forbidden Method: "Blobs" (Spot Bonding Only)

This is the most classic defect. The worker, to finish quickly (or to save on material), throws 4-5 "blobs" of adhesive in the centre and at the edges of the board, and slaps it onto the wall.

Spot bonding blobs on polystyrene

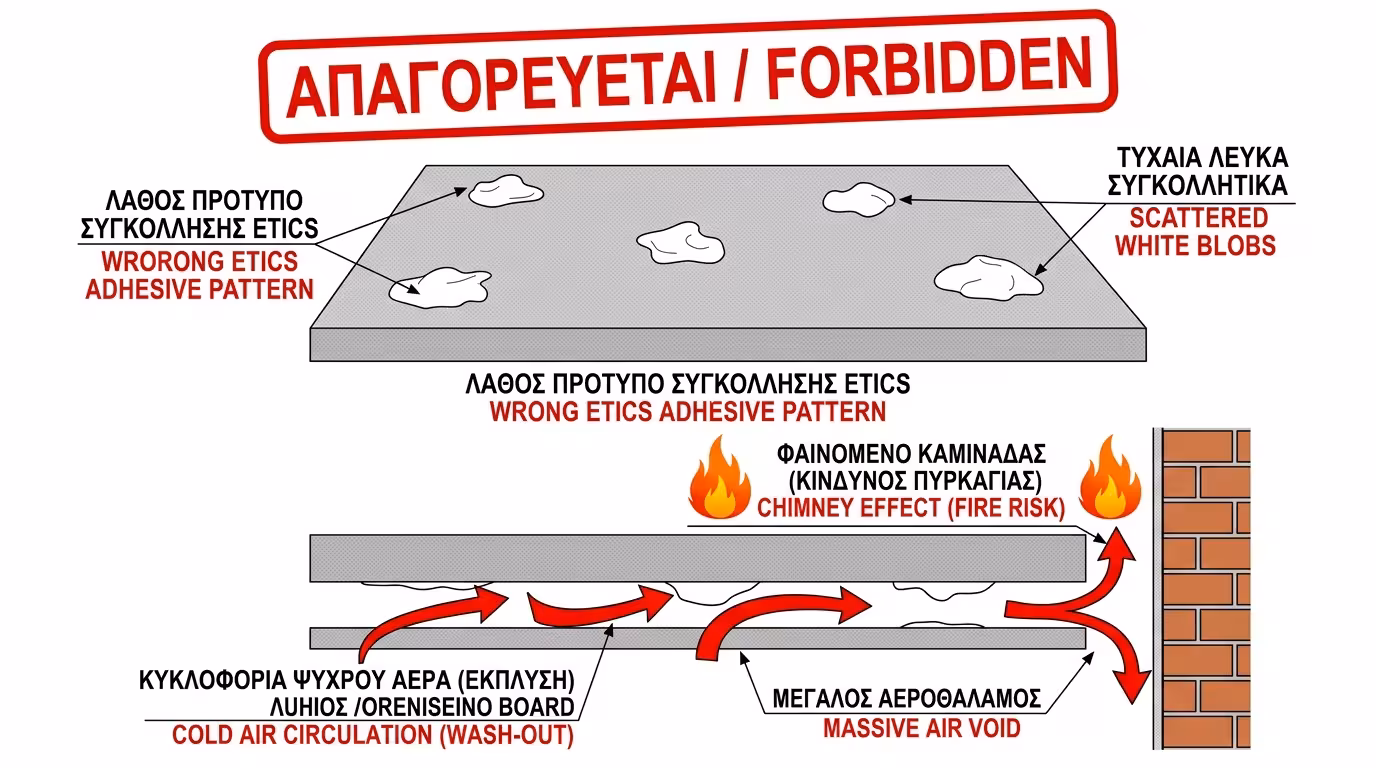
🌡️ Insulation Cancelled

When the board is bonded this way, a huge air void is created between the polystyrene and the wall, freely connected to every neighbouring board. Cold outside air finds a crack, sneaks behind the insulation and circulates freely between the board and the brick. In practice, your insulation is... cancelled!

🔥 The Chimney Effect (Fire Hazard)

The worst-case scenario. If a fire breaks out at the base of the building, this continuous air void acts literally like a fireplace chimney. It draws flames and air upwards, and the building can be engulfed in flames in no time.

2. Correct Method #1: Perimeter & Spot (For Uneven Walls)

If your wall is old, built with bricks and render that have "bumps" and "teeth", this is the only correct method. The worker applies a continuous, thick "bead" of adhesive around the entire perimeter of the board (all 4 edges). Then he adds 3-4 large blobs in the centre.

Perimeter adhesive bead - correct ETICS method

✅ Why It Works

When the board is pressed to the wall, the perimeter bead seals airtight! Even if some air remains in the middle, it is trapped (it does not communicate with neighbouring boards). There is no air circulation to cool the wall, and crucially, no "chimney" in case of fire.

📐 Golden Rule: The adhesive must cover at least 40% of the total board surface when pressed against the wall.

3. Correct Method #2: Full-Surface Bonding (For Perfect Walls)

If your wall is perfectly level (e.g. a new building with exposed, smooth concrete or perfectly floated render), then we go for the ultimate solution. The worker does not apply "beads". He spreads the adhesive over the entire board surface with a notched trowel (the so-called "comb"), creating parallel lines.

Full-surface bonding with notched trowel

🏗️ The Result

The polystyrene literally becomes "one body" with the wall. The mechanical resistance to wind pressure and impacts is the maximum possible, and the chance of air passing behind the insulation is absolutely zero.

4. The 10x10 Model Experiment

10x10 experiment - blob vs perimeter adhesive

We have a freezing night with very strong, icy wind (gale-force 8 Beaufort).

❌ Scenario A (Blob Bonding)

The wind finds a small hole at the base of the thermal facade. Because behind the polystyrene there is a continuous void network, the freezing air enters and "washes out" the wall's heat. The radiators work, but the house gets cold, despite having 8cm of polystyrene!

✅ Scenario B (Perimeter & Spot)

The same freezing wind hits the wall. Even if it manages to get behind the first board, it stops there! The perimeter adhesive of the next board acts as a barrier. The air cannot circulate, wash-out is prevented, and the house stays warm.

The Final Conclusion: Next time you see the worker about to bond polystyrene to your wall, stand over him. If you see him throw only 4 blobs of adhesive, leaving the edges bare, stop him. The "perimeter bead" is not optional - it is the essential safety and performance specification of the entire system!

Related Articles

Application & Construction Details: Correct Installation Guide

Return to category.

Go to category

Preview