Mould Risk in Internal Insulation - Dew Point & Solutions

One of the biggest "taboos" in renovations is internal insulation. Many owners and even tradespeople avoid it, saying: "Don't close the wall from inside, it'll grow mould and rot the house."

The truth lies somewhere in between. Yes, internal insulation carries a huge condensation risk. But no, it's not the insulation's fault - it's incorrect installation and ignorance of basic building physics. In this article we'll explain the mechanism in plain language and show you the one simple measure that makes internal insulation 100% safe.

1. The Physics: What Is the Dew Point?

The warm air inside the house (from breathing, cooking, bathing) contains large quantities of invisible water vapour. When this warm, moist air comes into contact with a very cold surface, it can no longer hold its moisture.

Dew point temperature diagram relative to humidity

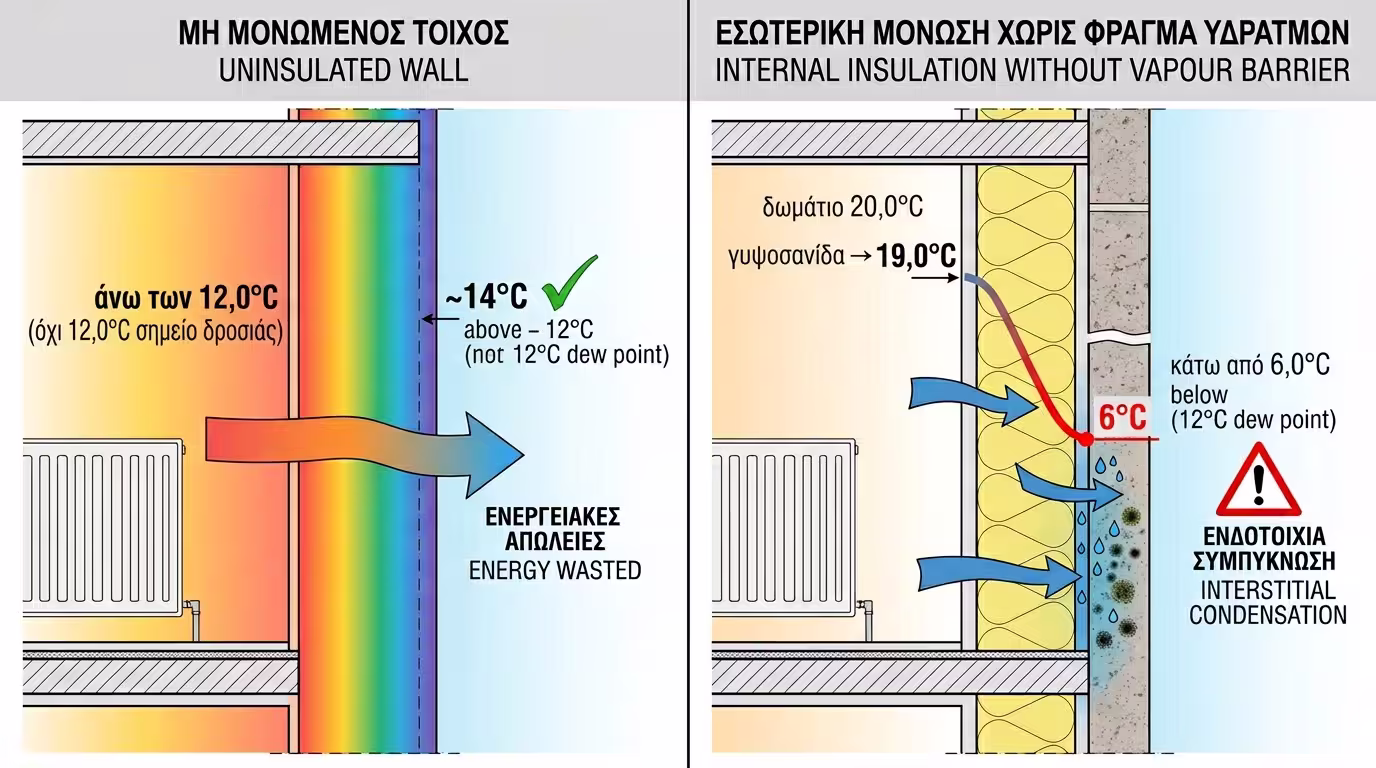
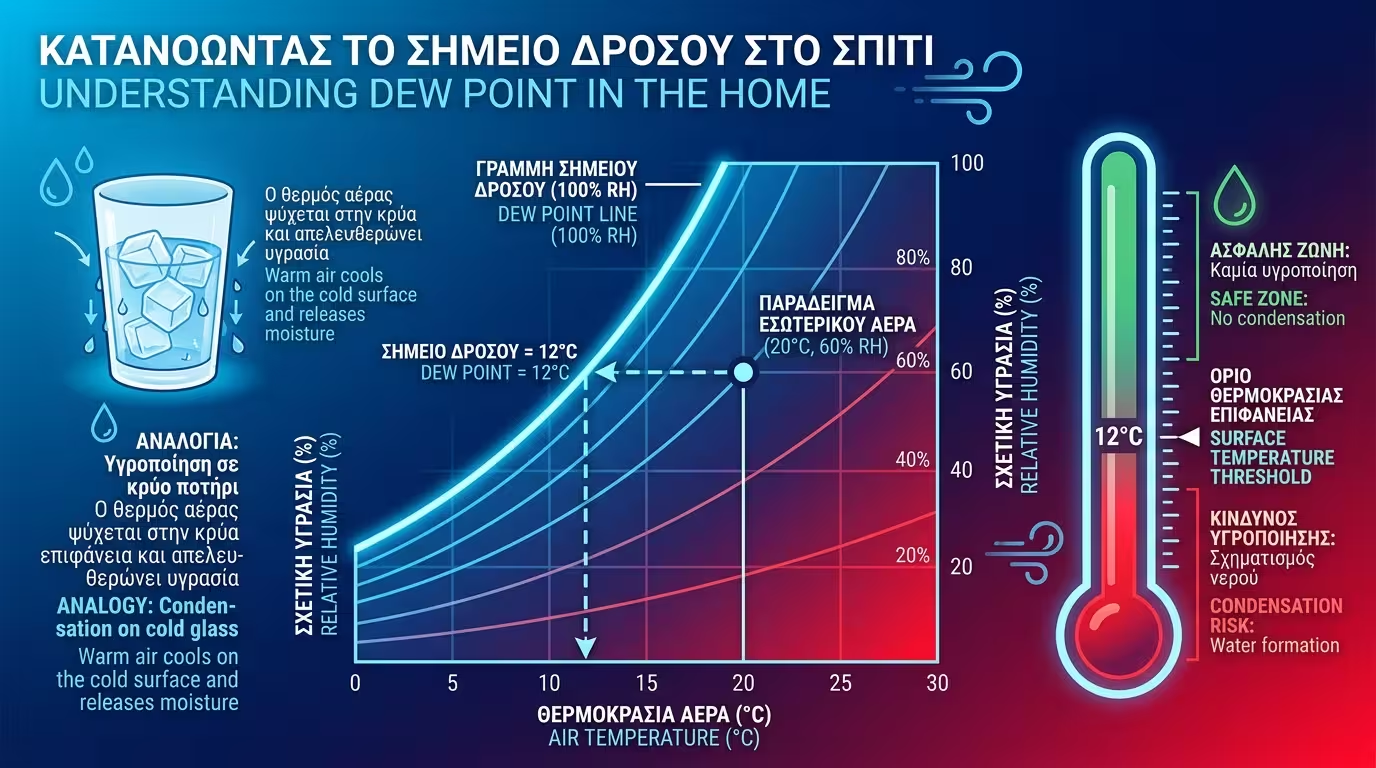
💧 The Condensation Mechanism

The vapour turns into water droplets. This "condensation" temperature is called the Dew Point. It's exactly the same phenomenon as a glass of ice water "sweating" on a summer day. In a house at 20°C with 60% relative humidity, the Dew Point sits at approximately 12°C. Any surface colder than 12°C will attract condensation.

2. Why Internal Insulation Makes It Worse

In an uninsulated wall, the heater's warmth "hits" the bricks and keeps them lukewarm (above the Dew Point). When you add internal insulation, you cut that contact. The wall no longer receives any heat from the room.

Wall cross-section - interstitial condensation without vapour barrier

⚠️ Interstitial Condensation

The old wall freezes completely because it's no longer heated from the room side. Meanwhile, the warm, moist room air passes through the plasterboard (which is permeable), travels through the rock wool, reaches the frozen wall surface (which is well below the Dew Point) and turns into liquid water. Black mould starts growing invisibly inside your wall, between the insulation and the brickwork. By the time you notice - a musty smell or dark stains - the damage is already extensive.

3. The Ultimate Solution: The Vapour Barrier

Since we cannot heat the external wall (the insulation blocks the heat), the only solution is not to let the moist air reach it in the first place. We need an impermeable barrier.

Correct layer order - vapour barrier on the warm side

🛡️ The Golden Placement Rule

The vapour barrier is placed ALWAYS on the warm side. Correct order (inside→outside): Paint → Plasterboard → Vapour Barrier → Rock Wool → Old wall.

📋 Attention to Detail

The membrane must not simply be stapled in place. Every joint, every cable hole or socket penetration, and every floor/ceiling junction must be hermetically sealed with special adhesive tapes (butyl or acrylic). One single gap is enough for moist air to bypass the barrier and cause condensation behind it.

4. The 10x10 Model Experiment

Let's run three scenarios on a cold day: 5°C outside, 20°C inside, relative humidity 60%. The calculated Dew Point is approximately 12°C.

Three moisture scenarios in the 10x10 Model

🟢 Scenario A: Uninsulated Wall

The inner surface of the uninsulated wall sits at approximately 14°C. This is above the Dew Point (12°C), so there's no condensation. But you're freezing cold because the wall radiates coldness into the room.

🔴 Scenario B: Insulation WITHOUT Barrier

The room air is cosy at 20°C, but behind the insulation the brick wall has dropped to just 6°C. Warm, moist air passes through the plasterboard, hits the 6°C surface and instantly condenses. Result: mould within 48 hours.

✅ Scenario C: Insulation WITH Barrier

The vapour barrier membrane sits behind the plasterboard at 19°C. The moist air hits the membrane and stops right there - it cannot pass. It never condenses. The frozen wall behind stays completely dry. We get all the thermal benefit with zero moisture risk. We win!

💡 Conclusion: Internal insulation is perfectly safe and highly effective, provided the tradesperson doesn't "forget" or skimp on the vapour barrier nylon that costs less than €1 per sq.m. It is the single most important detail in any internal insulation project.

Related Articles

Insulation Systems: Complete Solutions for Every Building

Return to category.

Go to category

Preview