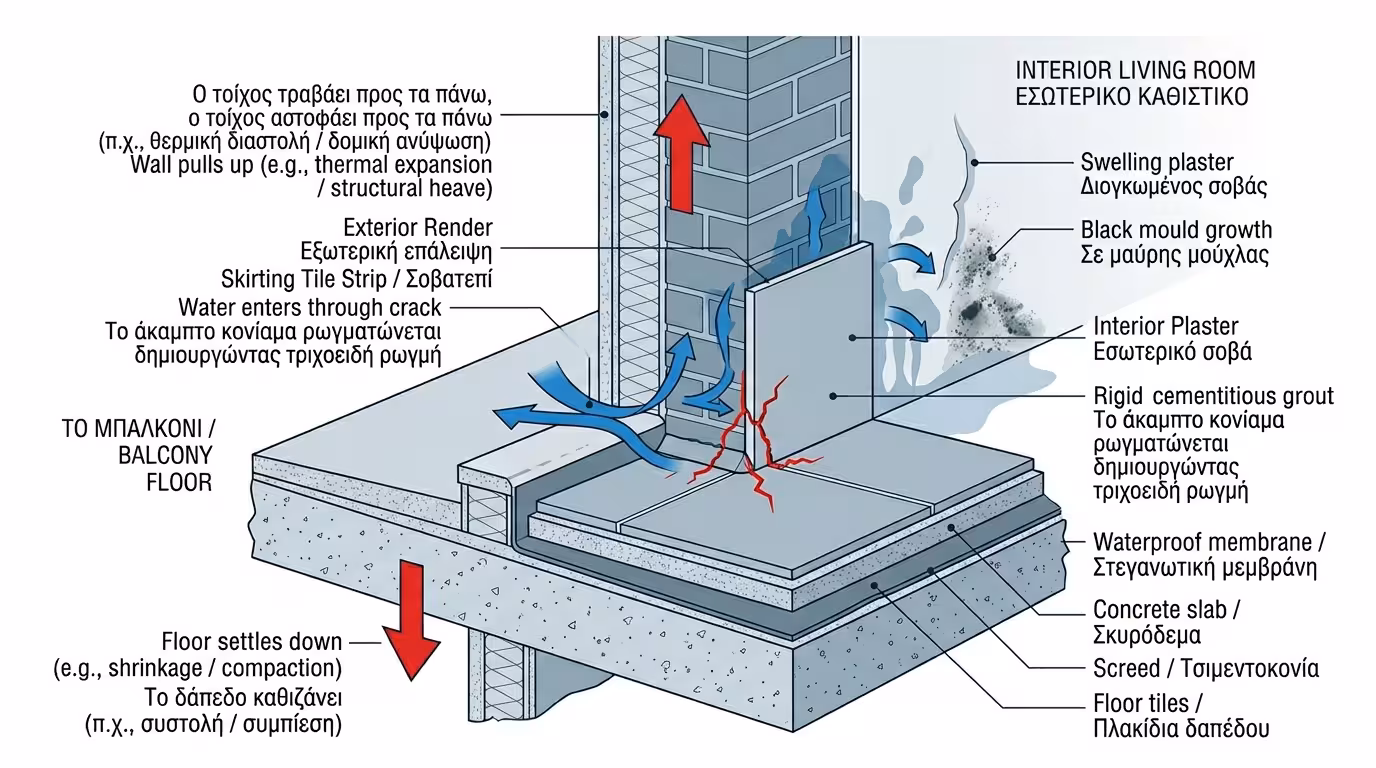
Skirting Board and Wall Junction: The "Achilles Heel" of Waterproofing and How to Seal It with Polyurethane Sealant

When it rains, water hits the exterior wall and runs downward. Where does it end up? Right at the 90° corner where the vertical wall meets the horizontal balcony floor. That's exactly where the skirting board (the narrow strip of tile standing upright on the wall) is placed.

This corner is the most vulnerable point of the entire construction, for a very simple physics reason: The floor and the wall move independently.

1. The Big Mistake: The "Rigid" Joint

What does the tiler usually do? He fills the corner between floor and skirting with the same rigid cementitious grout used on the rest of the balcony.

Rigid grout at the skirting corner - cracking, water ingress

❌ The Crack

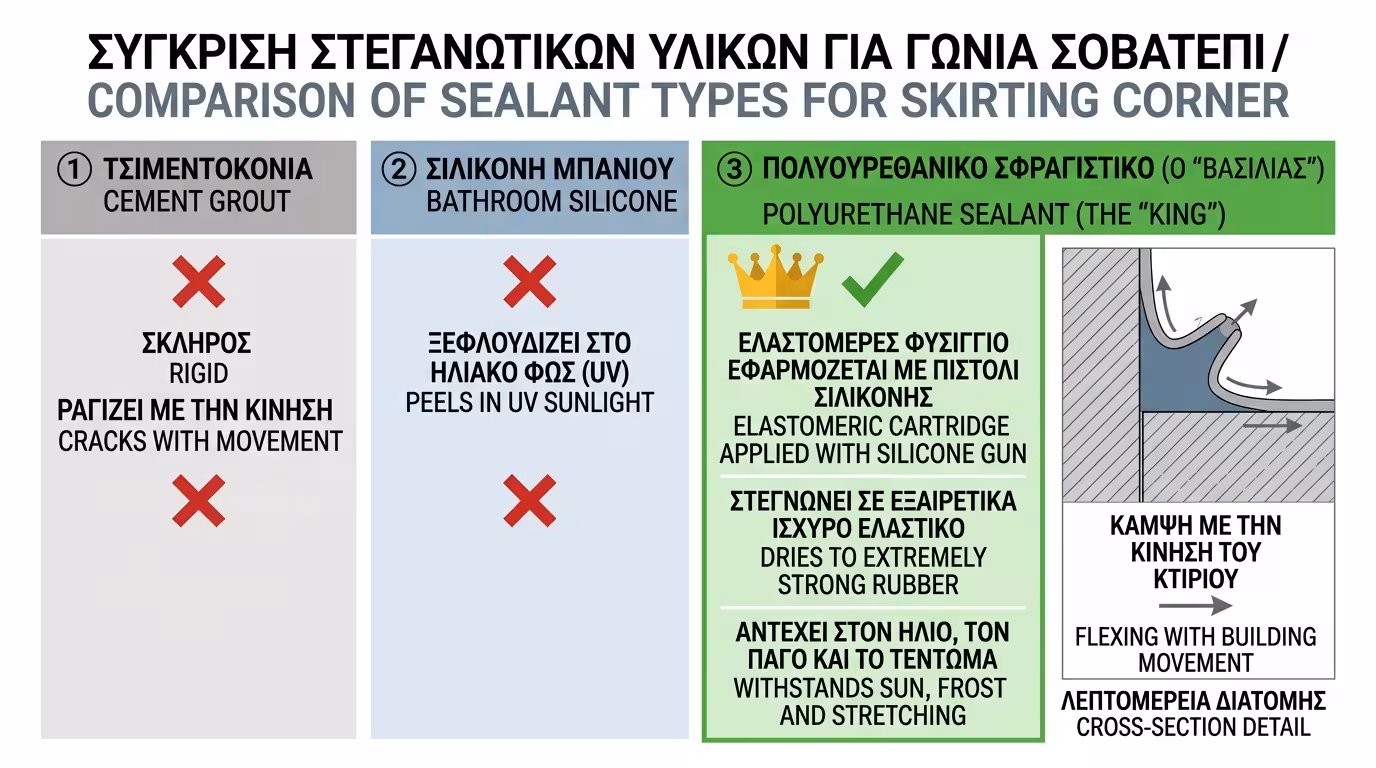
As months pass, the building absorbs micro-vibrations (from traffic, earthquakes or thermal movement). The wall "pulls" upward, the floor "settles" downward. The rigid cementitious grout at the corner can't follow this differential movement and cracks. A hairline fissure forms (often so thin it's barely visible with the naked eye).

💧 Water Invasion

Rainwater enters through this crack. Since there's brickwork behind the skirting (your living room wall), water soaks into the brick. Within weeks, you see the interior plaster swelling and turning black.

2. The Ultimate Solution: Polyurethane Sealant

To seal a corner that moves, we need a material that moves with it. Cement is out. Silicone (the plain, clear bathroom type) peels in sunlight.

Polyurethane sealant - elastomeric corner sealing

👑 The "King" of Sealing

The undisputed "king" for this job is Polyurethane Sealant (elastomeric polyurethane in a cartridge). It's a thick material applied with a silicone gun. Once dry, it becomes an extremely strong rubber that withstands sun, frost and stretching.

3. DIY: How to Fix It Yourself in 4 Steps

If you already have the problem, you don't need a professional. It's a half-hour job:

4-step DIY skirting seal - scrape, clean, tape, sealant

1️⃣ Remove

With a utility knife or flat screwdriver, scrape out all the old, cracked grout from the corner (between floor and skirting).

2️⃣ Clean

Wipe thoroughly. The corner must be completely dry and absolutely dust-free.

3️⃣ Masking Tape (The Pro's Secret)

Place masking tape on the floor and another on the skirting, leaving only the corner exposed. This way you won't smear the tiles.

4️⃣ Apply

Squeeze the polyurethane sealant along the entire corner with the gun. Wet your finger with a little soapy water (so it doesn't stick) and press/smooth the sealant gently. Remove the masking tape immediately before the material dries. Done!

4. The 10 × 2 m Balcony Invasion Experiment

Balcony experiment - ghost chasing vs smart inspection

Our balcony is beautiful, but in winter the living room shows moisture low down near the balcony door.

🔴 Scenario A (Ghost Chasing)

We call a plumber, thinking the radiator pipe is leaking. We break the wall from inside. The pipe is fine. We call a window fitter, thinking the balcony door leaks. He replaces the gaskets. The moisture continues. We've spent €300 and the living room is wrecked.

🟢 Scenario B (The Smart Inspection)

We step onto the balcony and carefully examine the skirting joint. We spot a crack along the entire length. We buy a cartridge of polyurethane sealant (€5-8) and seal the corner. In the next storm, water meets an elastic "wall" and nothing passes through. The living room wall dries permanently. We solved the problem for €8!

The Final Conclusion: Protecting your home starts with the details. The junction between balcony and wall must always be sealed with flexible polyurethane sealant, whether you're building a new home or maintaining an old one. It's the cheapest and most effective insurance you can buy.

Related Articles

Waterproofing: The Ultimate Shield Against Moisture

Return to category.

Go to category

Preview