Staggered Board Placement: Why It Goes Like Bricks and How Corners Lock

When you look at a wall with a ready thermal facade (before the render is applied), the arrangement of the white boards must not look like your bathroom tiles (where joints form a perfect cross). It must resemble a traditional red-brick wall.

This method is called staggered or running bond placement (staggered joints). It is the absolute specification of ETICS systems to prevent cracks in the exterior paint of your house. Let us look at the 3 golden rules of "building".

1. The Facade Rule (Staggered Placement)

Every new row of insulation boards placed on the wall must be offset from the row below. The vertical joints of one row must never align with those of the next. This offset must be at least 20 centimetres.

Running-bond board placement - ≥20cm offset

⚠️ Why It Is Essential

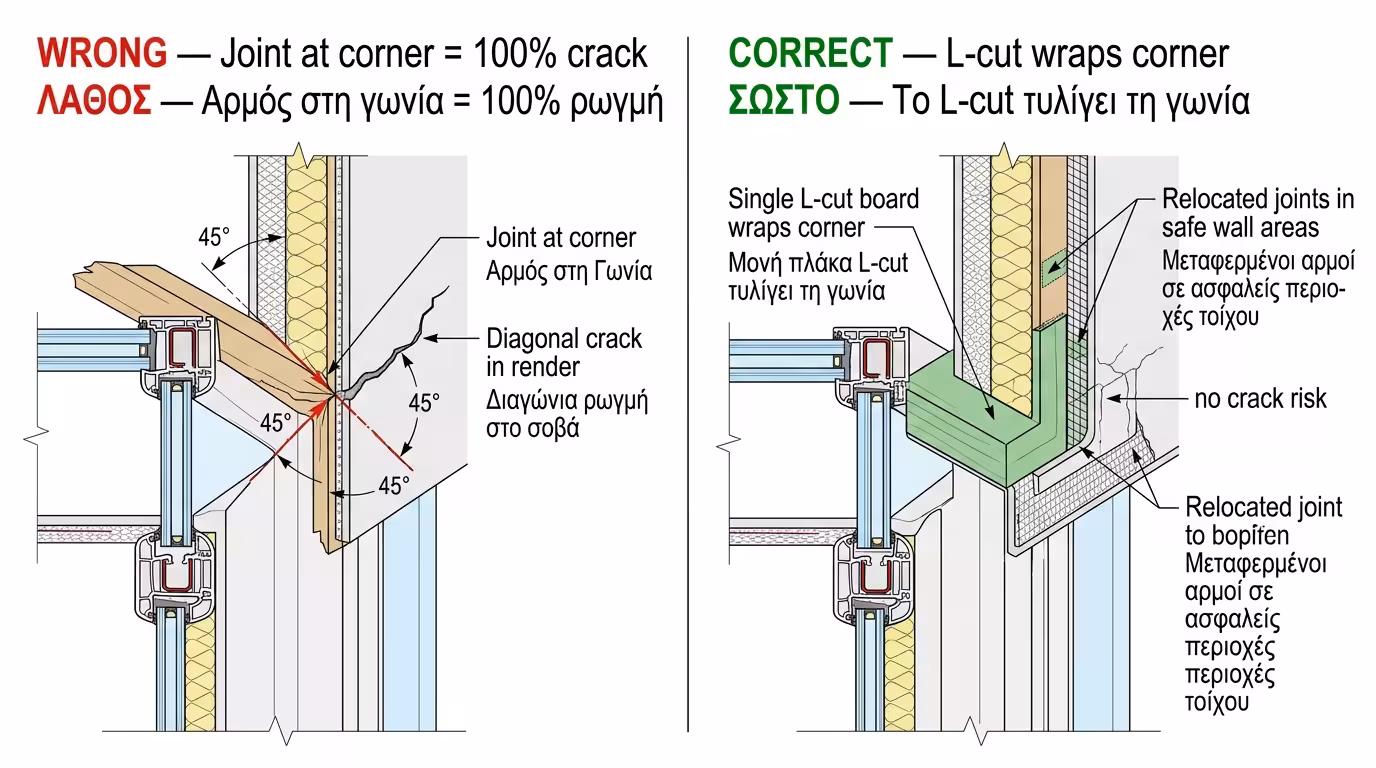
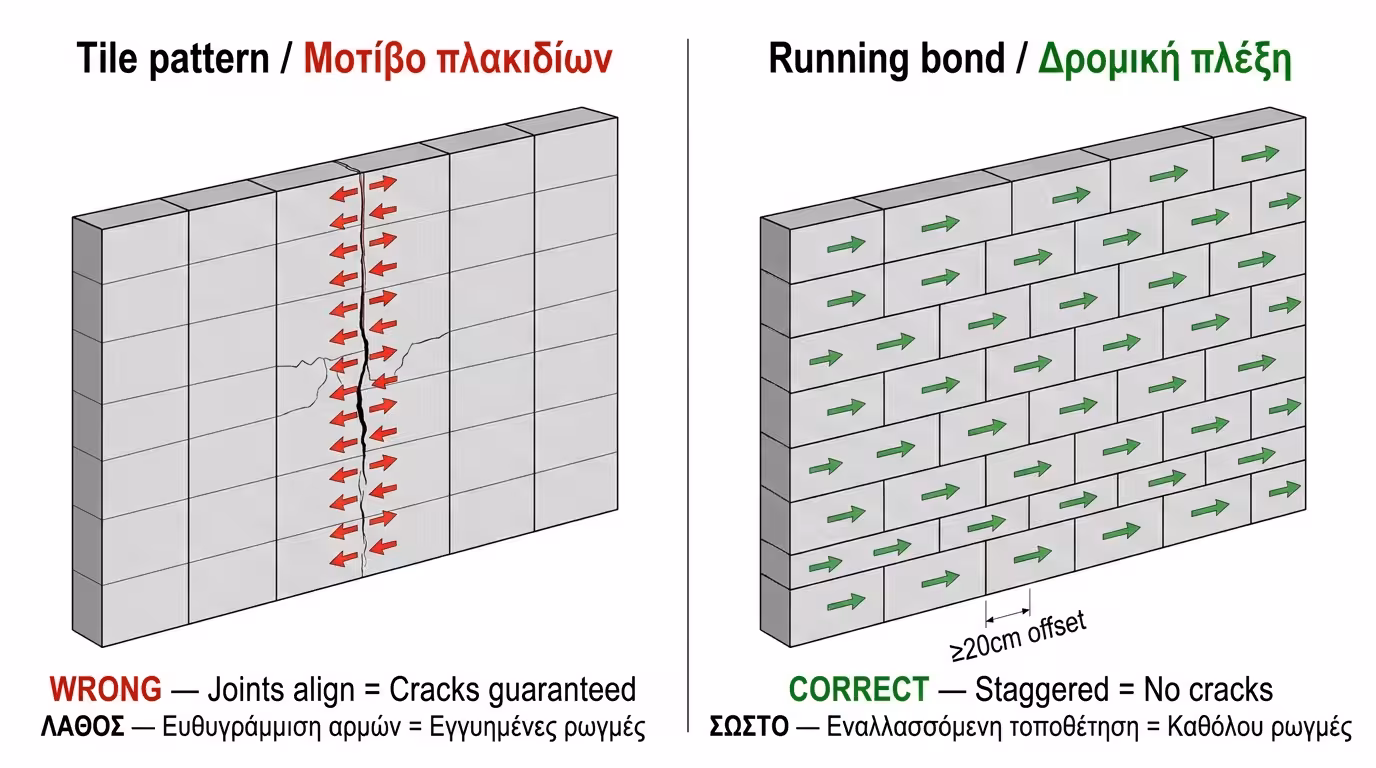
A building "moves" slightly due to thermal expansion (heat/cold) and micro-earthquakes. If the joints form a single, continuous vertical line from floor to roof, all mechanical stress will concentrate there. Within months, the render will split exactly along that line, allowing rainwater to enter the insulation.

2. The "Zip" at External Corners

The external corners of your house are the points that suffer the greatest stress from wind. There, the boards from one wall face meet those of the other. The rule here says the boards must interlock like the teeth of a zip (or like your fingers when you weave them together).

Zip-lock board weave at external corners

1️⃣ First Row

The board from the left wall overhangs and covers the edge of the right.

2️⃣ Second Row

The reverse happens: the board from the right wall overhangs and "locks" the left. This criss-cross bond creates a rigid, extremely strong corner that nothing can pry open.

3. The Window Corner (The "Pistol" Cut)

This is where 90% of mistakes by amateur contractors happen. When we reach the corner of a window or door, the building's mechanical stresses are concentrated precisely at that corner (at a 45° angle).

L-shaped pistol cut around window opening

❌ What Is Forbidden

It is strictly forbidden for the joint of two boards (vertical or horizontal) to fall on the window corner! If it does, a crack in the render is 100% guaranteed.

✅ The Correct Solution

The worker takes a whole, large polystyrene board and cuts a piece in an "L" shape (the so-called "pistol"). This single board wraps the window corner, transferring the joints further away to the safe parts of the wall.

4. The 10x10 Model Experiment

10x10 experiment - tile vs staggered placement

We are finishing the south side which has a large balcony door.

❌ Scenario A ("Tile" Placement)

The worker places the boards exactly one on top of the other, forming crosses. At the balcony door corner, he joins two boards exactly at the edge. Summer comes, the wall heats up and expands. The render cannot withstand the concentrated stresses. An enormous diagonal crack appears above the door and a huge vertical crack in the middle of the wall. Winter rain will enter through them.

✅ Scenario B (Staggered Placement & Pistols)

The worker lays the boards in running bond. At the house corners he weaves them "zip" style, and around the balcony door he uses "L" pieces. The system now works like a unified, flexible mesh. It absorbs thermal expansion uniformly. 15 years pass and the render has not a single hairline crack!

The Final Conclusion: The thermal facade is not just gluing materials; it is building. The geometry of placement is what distributes loads and stresses. Before you let the contractor apply the mesh and render, do a visual check: If you see joints forming crosses, or joins right at window corners, demand they be torn out immediately!

Related Articles

Application & Construction Details: Correct Installation Guide

Return to category.

Go to category

Preview