Balcony Waterproofing Before Tiling: The Step Most Contractors "Forget"
Let's start by debunking a massive misconception that costs thousands of
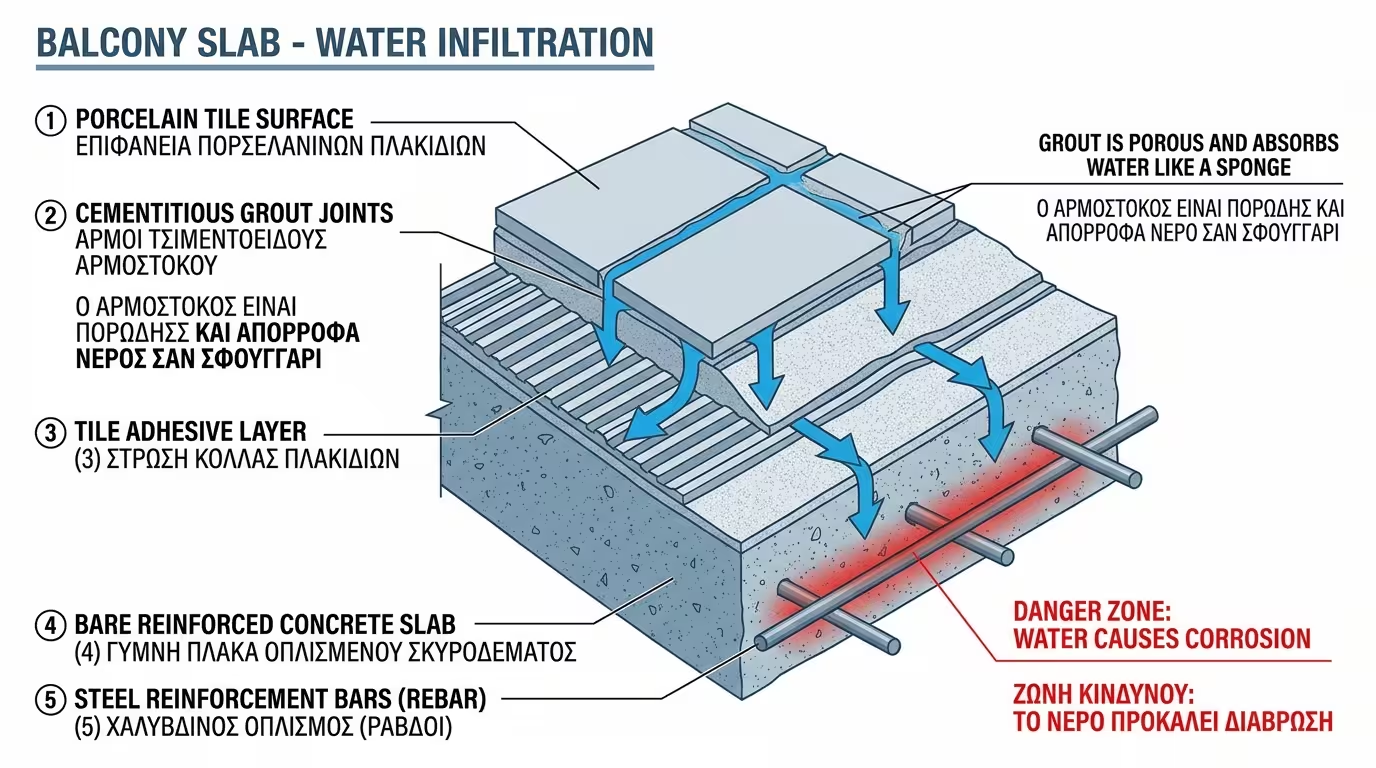
euros in renovations: Tiles are NOT waterproofing. The tile
surface itself may not absorb water, but your balcony isn't a single tile.
It's made of dozens of pieces joined together with grout. And standard (cementitious) grout is porous. It absorbs water like a
sponge! When it rains or when you hose down the balcony, some water
seeps through the joints, passes through the adhesive and reaches
the bare concrete slab.
If the contractor hasn't applied waterproofing under
the tiles, the countdown to your balcony's destruction has already begun.
1. The Anatomy of the Crime (Water's Journey)
What happens when water sneaks under the tiles of an unprotected
balcony?
💧 Entrapment
The water can't evaporate easily because the tiles block it from
above. It stays trapped inside the adhesive layer and the screed
(the cement slope layer), unable to escape. Over time, this
permanent entrapment saturates the concrete and starts attacking the
internal structure of the balcony.
🧪 Salts (The White Tears)
The water dissolves cement salts. When it finally finds an exit
(usually from the balcony edge or through joints in summer), the
salts emerge on the surface creating those ugly, white stains.
🔴 The Reinforcement Nightmare (Rust)
The water advances deep into the slab's concrete until it reaches
the steel reinforcement. The steel rusts. When it rusts, it expands
(up to 7× its volume). This expansion is so powerful it cracks the concrete from inside out
! Result? The neighbour below sees the balcony soffit
"exploding" as chunks of plaster and concrete fall, revealing the
rusted steel bars.
2. The Correct Step: Waterproofing Under the Adhesive
To avoid this nightmare, there is one strict rule during construction
or renovation: Waterproofing goes ABOVE the slopes and BELOW the tile adhesive.
1️⃣ Bare Concrete Slab
The base on which the entire system is built.
2️⃣ Screed Slopes
Provides gradient toward the drain so water flows.
3️⃣ The Shield (2-Component Cementitious Coating)
Applied in 2-3 cross coats. Creates a flexible,
completely waterproof membrane that bonds perfectly with the cement
substrate beneath it. This membrane is the critical barrier between
water and your concrete slab.
4️⃣ Flexible Tile Adhesive (C2TE S1)
Must be flexible (S1) to follow thermal expansion. Applied directly
onto the dried waterproofing.
5️⃣ Tile & Waterproof Grout
Ideally epoxy or water-repellent grout for maximum protection.
This way, whatever water manages to pass through the joints will stop at
the waterproofing membrane and (thanks to the slope) will be guided
slowly toward the drain through the adhesive, without ever touching the
concrete slab!
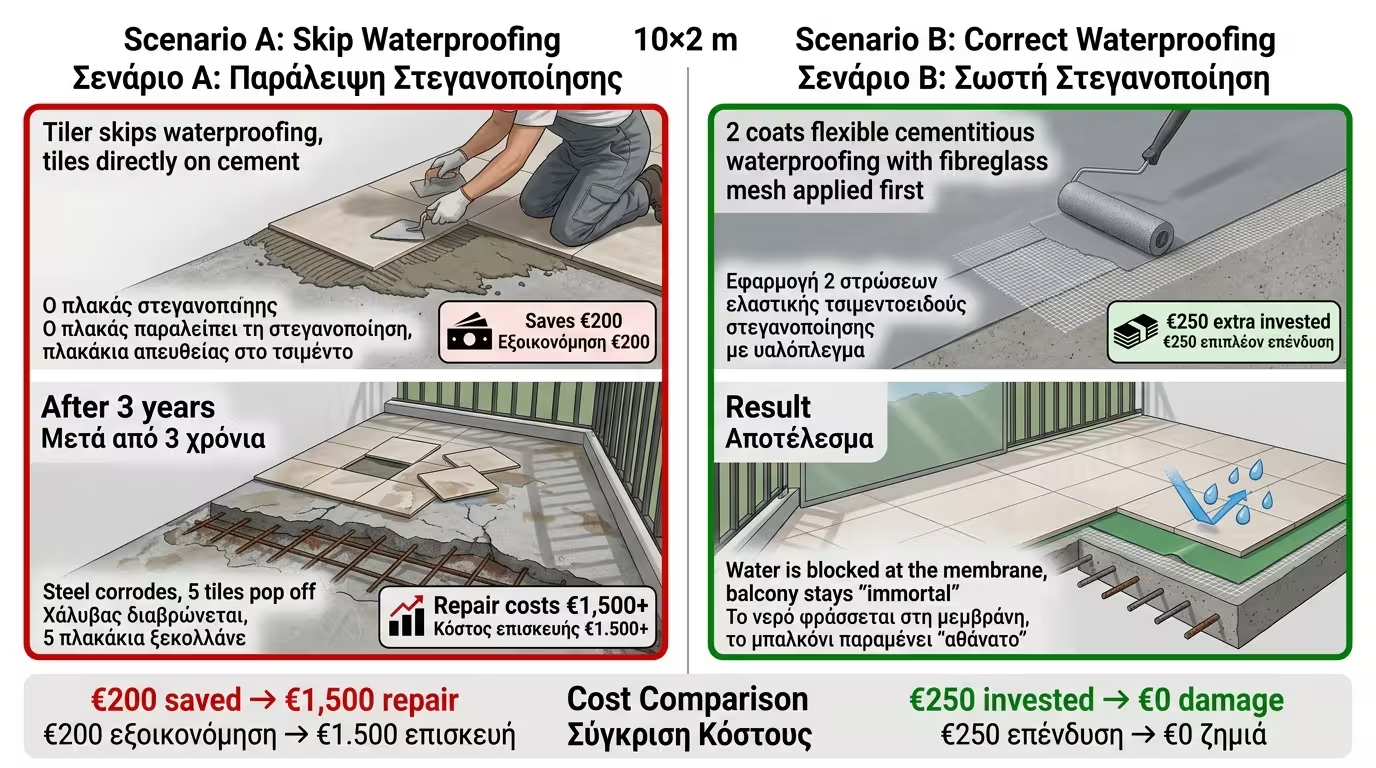
3. The 10 × 2 m Balcony Experiment
We've removed the old mosaic tiles and we're down to bare cement.
We've bought expensive granite porcelain tiles.
🔴 Scenario A (The "Budget" Approach)
The tiler says "Come on, you don't need waterproofing, we'll use
good grout". He sticks the tiles directly onto the cement. We save €200 on waterproofing materials. After 3 years, the slab's steel corrodes,
the slab swells and 5 tiles "pop off" and shatter. To fix it, we must
rip ALL of them out, costing over
€1,500.
🟢 Scenario B (By The Book)
We insist the tiler applies 2 coats of flexible cementitious
waterproofing (with fibreglass mesh at corners) before tiling. We
pay €250 extra for waterproofing materials and labour.
It pours with rain, we hose the balcony daily. The water stops at the
membrane. Our balcony remains "immortal" and the neighbour below sleeps
soundly!
The Final Conclusion: Trying to save money by skipping waterproofing
under tiles is a recipe for total destruction. Never let the tiler start until
you see the grey/blue waterproof membrane covering the entire balcony floor.