Priming Before Plastering - The Complete Guide to Choosing the Right Primer for Every Surface

Have you ever tapped a freshly plastered wall and heard a hollow, drum-like sound? That "hollow" render is a ticking time bomb - it will eventually crack and fall off. In 90% of cases, render failure is not caused by the plaster mix itself, but by one of two things: the wrong primer, or no primer at all.

1. Why Priming Is the Most Critical Step in Any Plastering Job

Primer is not paint, and it is not glue. It is a specialised preparation liquid that serves two absolutely critical functions depending on the surface it is applied to. Understanding these two functions is the key to choosing the right product:

Wall priming before plastering – adhesion and absorption control

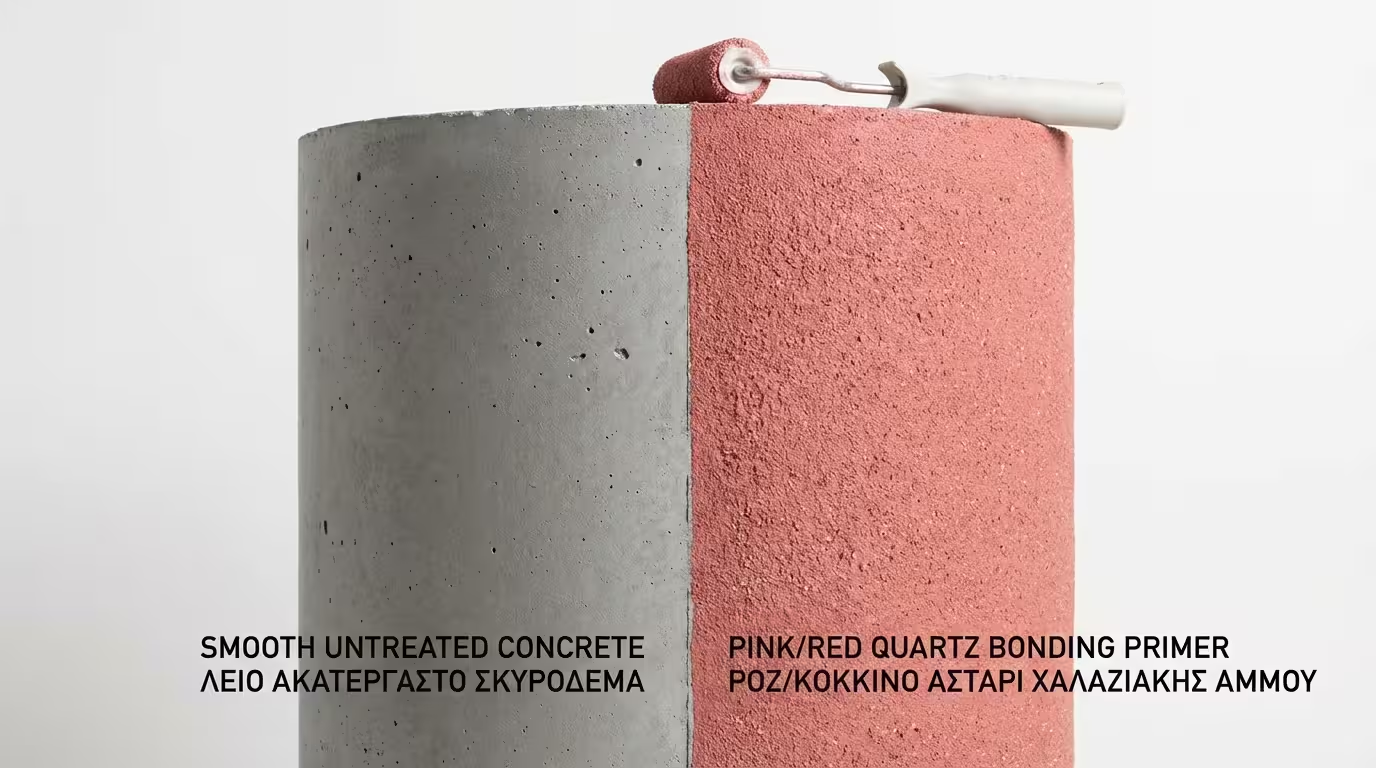
🪨 Mechanical Adhesion (On Smooth Surfaces)

Smooth concrete (columns, beams, ceilings cast in steel formwork) has zero porosity. The plaster has nothing to grip onto and simply slides off under its own weight. A quartz-based bonding primer deposits rough grains on the surface - it's like gluing sandpaper to the concrete, giving the render millions of tiny anchor points to cling to.

💧 Absorption Control (On Porous Surfaces)

Highly porous materials (Ytong/aircrete blocks, old brick, cinder blocks) act like a sponge. When you apply wet plaster against them, they instantly suck the water out of the mix. Without that water, the cement cannot hydrate properly, the mix becomes powder-dry within minutes, and the render cracks all over. A deep-penetrating acrylic primer seals these pores, dramatically reducing absorption and allowing the plaster to cure at its proper pace.

2. Quartz Bonding Primer - For Smooth Concrete

This is the "hero product" for all smooth concrete surfaces. It is a thick, viscous liquid (typically pink, red or blue in colour), packed with hard quartz sand grains. The most well-known brand name in the market is Betokontakt (by Knauf), though many manufacturers produce equivalent products.

You apply it with a roller or a stiff brush. After drying (12-24 hours minimum), the quartz grains remain bonded to the concrete, transforming the surface from marble-smooth to rough like coarse sandpaper. This creates the perfect mechanical key for gypsum or cement render to grip onto.

Applying Betokontakt quartz primer with a roller on a concrete column

3. Acrylic Deep-Penetrating Primer - For Porous Surfaces (Ytong, Brick, Plasterboard)

Unlike quartz primers that sit on the surface, acrylic primers penetrate deep into the pore structure of the material. They deposit microscopic resin particles inside the pores, effectively "sealing" them from the inside and dramatically reducing the wall's water absorption rate.

Acrylic deep-penetrating primer on porous Ytong block

🧱 Ytong / Aircrete Blocks

These blocks are extremely porous. A deep-penetrating acrylic primer is mandatory. Without it, the render dries out within minutes and cracks everywhere. Apply liberally - the block should visibly darken.

🎨 Previously Painted Walls

When you need to plaster over old paint (e.g., during a renovation), use a high-adhesion primer (sometimes sold as "Super Contact" or "All-surface bonding primer"). This creates an adhesion bridge between the slick paint layer and the new render.

📋 Plasterboard (Drywall)

Before skimming plasterboard, a micro-molecular acrylic primer equalises the wildly different absorption rates between the paper face and the filler joints. Without it, you'll see "ghost lines" where every joint shows through.

4. Primer Selection Table - Which Product for Each Surface

Primer selection table by surface type

Choosing the wrong primer is as bad as using no primer at all. Use this table to match the correct product to your surface:

Surface TypeRecommended PrimerPrimary Function
Smooth concrete (columns, ceilings)Quartz bonding primer (e.g., Betokontakt)Creates rough grip surface for render
Ytong / Aircrete blocksAcrylic deep-penetratingDramatically reduces water absorption
Old brick / Cinder blocksAcrylic (diluted 1:3 or 1:4 with water)Stabilises dust and loose pores
Painted walls / TilesHigh-adhesion bonding primerCreates adhesion bridge over slick surface

5. Essential Tips for DIYers & Professionals

💡 Always Stir the Quartz Primer: Quartz bonding primers settle over time - the heavy sand grains sink to the bottom of the container. If you apply it without stirring, you're essentially painting the wall with resin only, losing most of the bonding effect. Stir vigorously with a drill mixer every 10-15 minutes during application.

🧹 The Dust Rule - Non-Negotiable

The most expensive primer on the market is completely useless if applied to a dusty wall. Before priming, sweep the entire surface thoroughly with a stiff broom. If you see cobwebs, spider nests, or find that the material crumbles when you rub it, you must clean even more aggressively.

💧 Don't Over-Dilute

Some tradespeople dilute primers heavily to cover more area. This destroys the active resins and effectively turns the primer into coloured water. Always follow the manufacturer's recommended dilution ratio - typically 1:3 or 1:4 for standard acrylic, and undiluted for quartz.

⏰ Respect the Drying Time

Quartz primers need 12-24 hours to fully cure. Plastering over wet primer guarantees complete failure - the render will slide off the wall within days. Touch-test: the surface should feel bone-dry and rough, with grains firmly bonded.

Conclusion

Priming is the "invisible" investment that makes the difference between render that lasts decades and render that cracks and falls off within months. Choose the correct primer for each surface, apply it generously, and respect the drying time.

Related Articles

Application, DIY Techniques & Project Management

Return to category.

Go to category

Preview