Plaster Blistering: Trapped Moisture and Poor Breathability

You look at your freshly painted wall and notice something strange: the paint or the thin outer layer of the render has lifted locally, forming small or large "blisters". If you press them with your finger, you feel there is air or water behind them, and they often "pop", peeling off the wall.

This phenomenon is (almost never) due to poor quality paint. It is the most classic symptom of trapped moisture. Your wall is trying to "breathe", but something is blocking its way. Let's look at the mechanism behind blistering and how to stop it.

How Blisters Form (The Mechanism)

Imagine the wall (the bricks and the internal render) as a large sponge that has soaked up water. When the temperature rises (e.g., when the sun hits it externally or when you turn on the radiator internally), this water heats up and turns into water vapour (gas).

As the water vapour expands, it seeks an exit outwards. If the outer layer of the wall (the paint or the final pasty render) acts like a "plastic bag", the steam gets trapped behind it. The immense pressure developed by the steam pushes the paint membrane outwards, creating the blister.

Mechanism: water → steam → pressure behind paint → blister

The 3 Usual Suspects (Where did the moisture come from?)

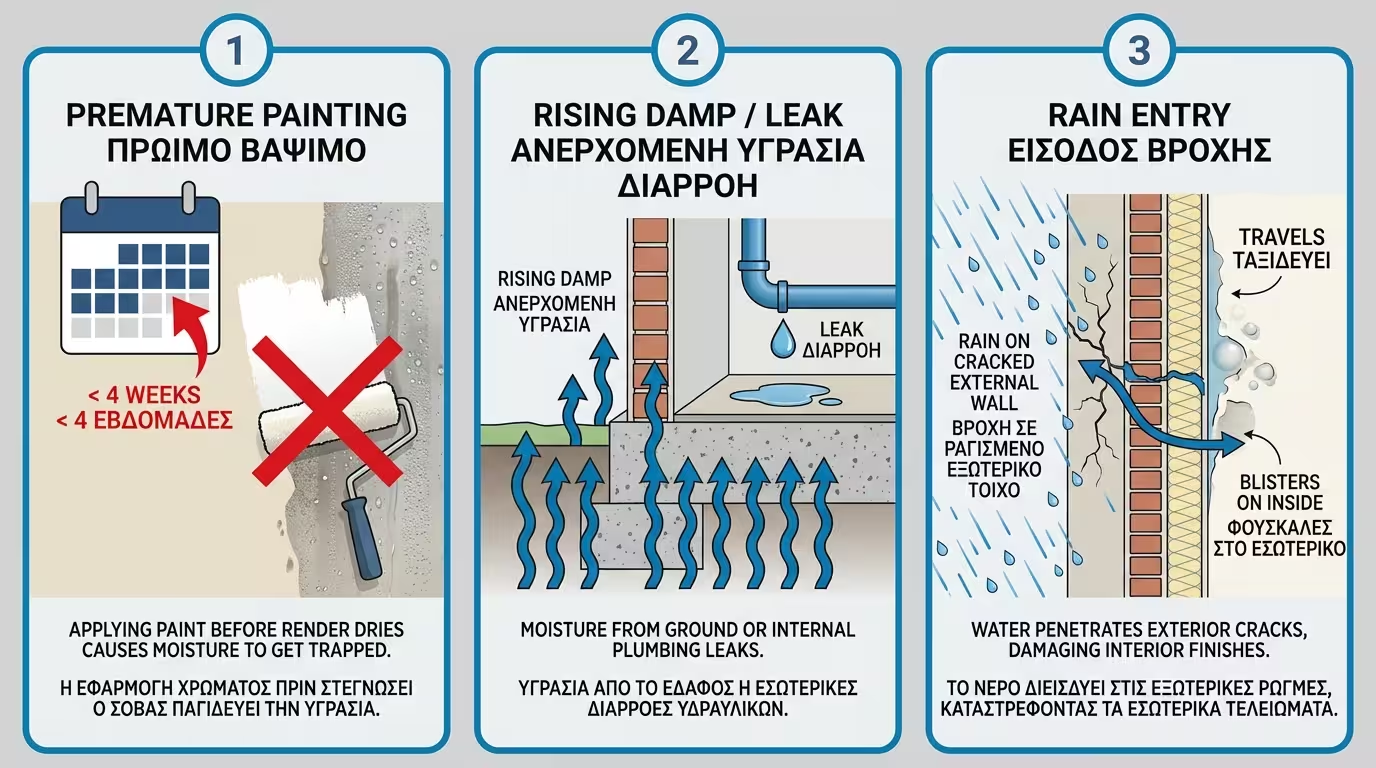
1️⃣ Premature Painting (Damp Render)

This is the #1 mistake in new builds. Traditional render contains tons of water. If the painter rushes to fill and paint the wall before 3-4 weeks have passed (to allow its moisture to drop below 5%), the water will be trapped. With the first heat, the wall will be covered in blisters.

2️⃣ Rising Damp & Leaks

As we saw in previous articles, if water comes continuously from the foundations or a broken pipe, the wall will be permanently wet.

3️⃣ Moisture from the Back Side

If your external wall has cracks and lets rainwater in, this water will travel through the brick and try to exit into your living room, blistering the internal paint.

3 suspects: premature painting, rising damp, rain entry

The Problem of Poor Breathability (Wrong Materials)

Even with a little moisture in the wall, no damage would occur if the wall could breathe. The problem arises when we "seal" the wall with the wrong materials.

  • The Trap of Plastic Paints: Many cheap plastic (internal) or acrylic (external) paints create an impermeable elastic membrane. They have a high Sd value (Water vapour diffusion resistance). They are excellent at keeping water out, but disastrous because they don't let steam out.
  • The Wrong Primer: Often, even if you choose a good breathable paint, the problem lies in the primer. A plastic primer hermetically seals the pores of the render.

Material Comparison: What allows the wall to "breathe"?

Comparison: acrylic, elastomeric, silicone, silicate
Finish MaterialBreathabilityBlistering Risk
Standard Plastic/Acrylic Paint Low Very High (if moisture is present)
Elastomeric Waterproofing (100%) Very Low Extreme (seals the wall)
Silicone Paint / Render High Low
Mineral/Silicate Paint Excellent (Max Breathability) Minimal (Ideal for old/damp buildings)

How to Repair a Blistered Wall (3 Steps)

⚠️ Caution: Do not scrape the blister and immediately cover it with new filler. It will blister again at the next weather change!

1️⃣ Removal (Scraping)

Take a scraper and scrape off all the blisters. You must remove all the paint and loose filler until you reach the solid, hard render underneath. Extend the scraping 5-10 centimetres around the blister.

2️⃣ Drying (The most critical step)

Leave the "wound" open. The wall must dry 100%. If the blister resulted from a leak, fix it first. Aid the drying with a dehumidifier or by leaving the room well-ventilated for several days.

3️⃣ Repainting with Correct Materials

Once fully dry, apply a micro-molecular water-based primer (breathable), fill (if necessary) with fine-grained acrylic filler, and paint with high-breathability paint.

Scrape → dry → repaint with breathable materials

Related Articles

Preview