Corner Beads & Render Guides - The Complete Guide to Perfectly Level Walls

Have you ever noticed a wall that bulges when side-lighting hits it, or kitchen cabinets that leave large gaps where they meet the masonry? That's the result of poor plastering. In construction, the eye can be fooled - the only thing that always tells the truth is the spirit level.

1. What Are Render Guides?

To achieve perfectly flat surfaces and crisp external corners that won't chip at the slightest knock, a tradesperson or DIYer uses two essential accessories: render guides and corner beads.

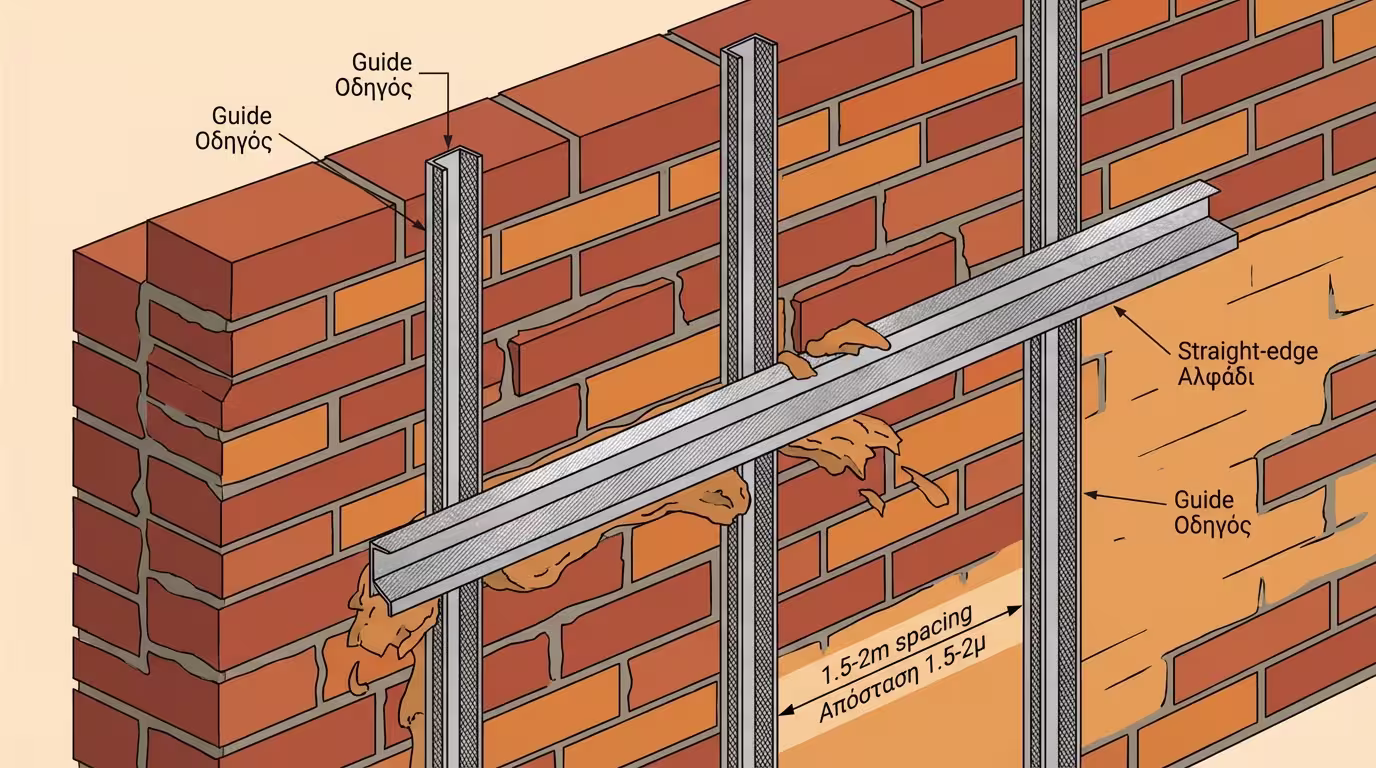
Render guides are thin, vertical bars (usually galvanised steel) fixed to the wall before plastering begins. They act as "rails" on which the aluminium straightedge rides. By spacing guides 1.5-2 metres apart and levelling them perfectly, all you need to do is fill the gap between them with mortar and draw the material upward. The straightedge "rides" over the two guides and scrapes off excess material, leaving a wall as flat as glass. Guides are typically removed once the render has set, and the small void left behind is filled with fresh mortar.

Render guides installed vertically on a wall - rails for the straightedge

2. Types of Corner Beads & When to Use Each

Corner beads are angular profiles installed on all external edges (e.g., columns, window reveals, beams). They serve a dual purpose: they create a perfectly straight (vertical) edge for the straightedge to ride on, and they protect the corner from chipping (since render on edges is extremely vulnerable to impact).

Three types of corner beads: galvanised, aluminium and PVC with mesh

🔩 Galvanised Corner Beads

The traditional and most economical option for interior spaces. Never use them on exterior walls or bathrooms, as moisture will cause corrosion. Rust "travels" through the render and appears as brown stains on your paintwork!

🪶 Aluminium / Stainless Steel

Lightweight, easy to cut and most importantly, they never rust. The ideal choice for external renders (cement-based) and areas with heavy moisture exposure.

🛡️ PVC with Integrated Fibreglass Mesh

The ultimate accessories of modern construction, mandatory for External Thermal Insulation Composite Systems (ETICS). The plastic corner won't corrode, while the protruding mesh is embedded in the adhesive base coat, "tying" the corner to the rest of the wall surface and definitively preventing cracks at windows and doors.

3. Comparison & Selection Table

Corner bead and render guide comparison table by application
Profile TypeMaterialIdeal ApplicationCorrosion Risk
Standard GuideGalvanisedInterior / Exterior wallsModerate (usually removed)
Interior Corner BeadGalvanisedLiving rooms, bedrooms, dry roomsHigh if wet
Exterior Corner BeadAluminium / InoxBalconies, external edges, bathroomsZero
ETICS Corner BeadPVC + Fibreglass MeshETICS systems, window edgesZero

4. Correct Installation (Step-by-Step for DIYers)

Corner bead installation must be done at least one day before the main plastering work, to allow time for the fixing mortar to dry and stabilise.

Step-by-step corner bead installation with spirit level

1️⃣ Measure & Cut

Measure the height of the corner and cut the bead to length using tin snips.

2️⃣ Dabs of Mortar

Apply small dabs of quick-setting render, cement or adhesive every 30-40 cm along the brick edge.

3️⃣ Position & Level

Press the corner bead gently into the mortar. Use a long spirit level (or laser if available) to check plumb. Adjust pressure until the bubble sits dead centre.

4️⃣ Clean Up

Remove excess mortar that squeezed through the profile holes using a spatula. Allow to dry completely.

5. Useful Tips & Common Mistakes

⚠️ The Plaster-of-Paris Mistake: Never, ever use plaster-of-Paris (gypsum plaster) to fix corner beads or guides on exterior walls or in bathrooms. Plaster-of-Paris sets in 5 minutes (making the tradesperson's job easy), but when it gets wet from rain it swells, rots and pushes the external render off - creating enormous bumps on the corners of the building.

🧵 Using a String Line

If you're plastering a very long wall (e.g., 10 metres), a spirit level alone isn't enough. First fix the two end guides, stretch a string line between them, and position the intermediate guides so they just "kiss" the string. This ensures the wall won't bulge in the middle.

🔨 Don't Hit the Profiles

If an aluminium corner bead gets slightly bent during transport, throw it away. Don't try to straighten it with a hammer. A bent profile will lead with mathematical precision to a bent wall.

Conclusion

Render guides and corner beads aren't "extras" - they're the foundation of every proper plastering job. Choose the right material for each application (galvanised for interiors only, aluminium/PVC for exteriors), level perfectly, and let the straightedge do the hard work for you.

Related Articles

Application, DIY Techniques & Project Management

Return to category.

Go to category

Preview