Protecting Windows, Floors & Surfaces During Plastering - Professional Tips for a Clean Worksite

Plastering (especially traditional cement-and-sand render) is a "wet" and extraordinarily messy process. Many homeowners and DIYers assume a quick mop-up at the end of the day will sort everything out. But the harsh reality is: render doesn't just make a mess - it destroys.

1. Why Render Destroys Surfaces - The Dual Damage Mechanism

The damage that mortar causes to delicate materials (such as aluminium, glass, wood and marble) is twofold. Preparation and proper masking of the space before opening even one bag of cement is the most profitable time investment you can make:

Chemical burn from cement on aluminium and scratches on tiles

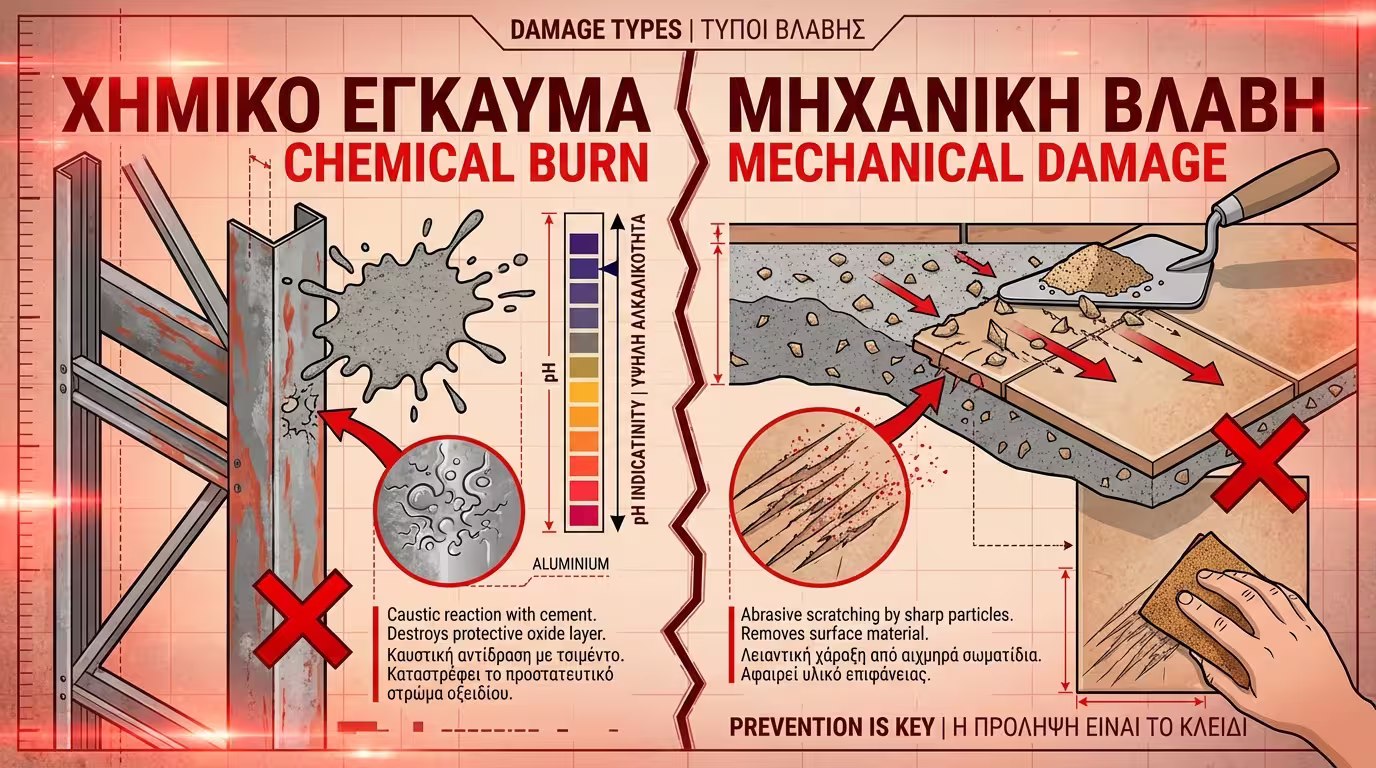
🧪 Chemical Burns (Corrosion)

Cement and lime are extremely alkaline materials (very high pH). If a drop of fresh render falls on an anodised aluminium frame or a glass pane and is left there for a few hours, it will cause permanent "burning" (clouding) that cannot be removed by any cleaning product.

🪨 Mechanical Damage (Scratching)

Render contains sand. If mortar falls on the floor and you step on it, or if you try to wipe it clumsily from a window, the sand grains act like sandpaper, scratching the surface irreversibly.

2. Floor Protection (Tiles, Marble, Wood)

Floors are at risk not only from mortar splashes but also from dropped tools (e.g. a trowel or straightedge falling edge-first can crack a tile).

Corrugated cardboard covering floor tiles during plastering

📦 The Professional Solution: Corrugated Cardboard

Buy rolls of corrugated cardboard (ondulé). Lay it across the entire floor, ensuring strips overlap by at least 10 centimetres. Join the overlaps with wide fabric tape (duct tape), not masking tape which will tear. Secure the edges along the skirting boards.

🪵 Wooden Floors (Parquet)

If you have delicate parquet flooring, first lay a geotextile (or specialist absorbent cloth with waterproof backing) and place the cardboard on top, to prevent scratches from the friction of the cardboard itself.

❌ Avoid Thin Plastic Sheeting

Thin plastic tears immediately when walked on and offers no impact protection whatsoever. Never use it on its own.

3. Window & Frame Protection (Aluminium, PVC & Glass)

Here the goal is complete sealing, without leaving any adhesive residue when the job is finished.

Masking an aluminium window with film and blue UV tape

🎬 Self-Adhesive Masking Film

Specialist rolls of plastic film are available that have integrated masking tape along one edge. You stick the tape to the top of the window frame and unfold the film downward (like a curtain) until it covers the entire opening.

🔵 Blue UV Masking Tape - The Correct Choice

Never use standard, cheap (white/yellowish) masking tape on external aluminium frames. Always choose blue UV-resistant masking tape or orange PVC tape. These resist sun and moisture and peel away cleanly without leaving adhesive residue.

4. Protection Materials Table - The Right Material for Each Surface

Correct protection materials by surface type
Surface to ProtectIdeal Protection MaterialRecommended TapeWhat to Avoid
Interior Floors (Tile/Marble)Corrugated CardboardFabric (Duct tape)Thin plastic (tears easily)
Aluminium Frames (Exterior)Thick Plastic SheetingBlue UV Masking TapeStandard painter's tape
Glass (Window Panes)Integrated Film with TapeLow-Tack TapeNewspaper (dissolves with water)
Wooden Floors (Parquet)Absorbent Cloth + CardboardSpecialist Floor-Safe TapeHard plastics (scratch)

5. Practical Tips for DIYers & Professionals

⚠️ The Baked Tape Nightmare: The most expensive mistake in renovation is leaving masking tape stuck on aluminium frames for days, exposed to the summer sun. The adhesive "bakes", polymerises with the aluminium and cannot be removed even with solvent, destroying the frame. Remove all tape as soon as possible, ideally as soon as the render dries (within 2-3 days).

🧽 Immediate Stain Removal

No matter how well you've masked, the odd splash of render or primer can escape. If fresh mortar lands on an uncovered tile or aluminium frame, clean it immediately with a wet sponge. Don't leave it to dry with the logic "I'll scrape it later" - the scraping is where the real damage happens.

🔌 Protecting Sockets & Switches

Before plastering, remove the plastic faceplates from all sockets and switches. Stuff some crumpled paper (or specialist painter's caps) into the back boxes to prevent mortar from filling the mechanism and wiring.

🚿 Water: Your Best Cleaning Ally

At the end of every working day, wash all your tools (trowels, spatulas, straightedges, buckets) thoroughly with plenty of water. Dried render on tools renders them useless for the next day.

Conclusion

30 minutes of proper masking saves you from irreparable damage to windows and floors. Prevention always costs less than replacement.

Related Articles

Application, DIY Techniques & Project Management

Return to category.

Go to category

Preview