Cracks in ETICS (External Insulation): Layer Failure or Bad Mesh Application?

External wall insulation (ETICS) is perhaps the best investment you can make for your home's energy upgrade. But what happens when, just months after application, fine cracks start appearing across your brand-new, coloured render?

Why Does ETICS Render Crack?

Unlike traditional cement render thrown directly onto the wall, ETICS is a multi-layered "sandwich" of materials (insulation board, base coat, fibreglass mesh, primer, final paste render). Every crack indicates that one of these layers failed or was applied incorrectly. Let's look at the usual suspects.

Correct vs incorrect mesh placement in ETICS base coat

1. The Biggest Mistake: Poor Mesh Application

The fibreglass mesh is the "armour" of the ETICS system. Because EPS/XPS or mineral wool are soft materials, they can't hold the final render on their own. If the mesh isn't installed correctly, the render will crack at the first thermal cycle.

Staggered vs aligned EPS board layout

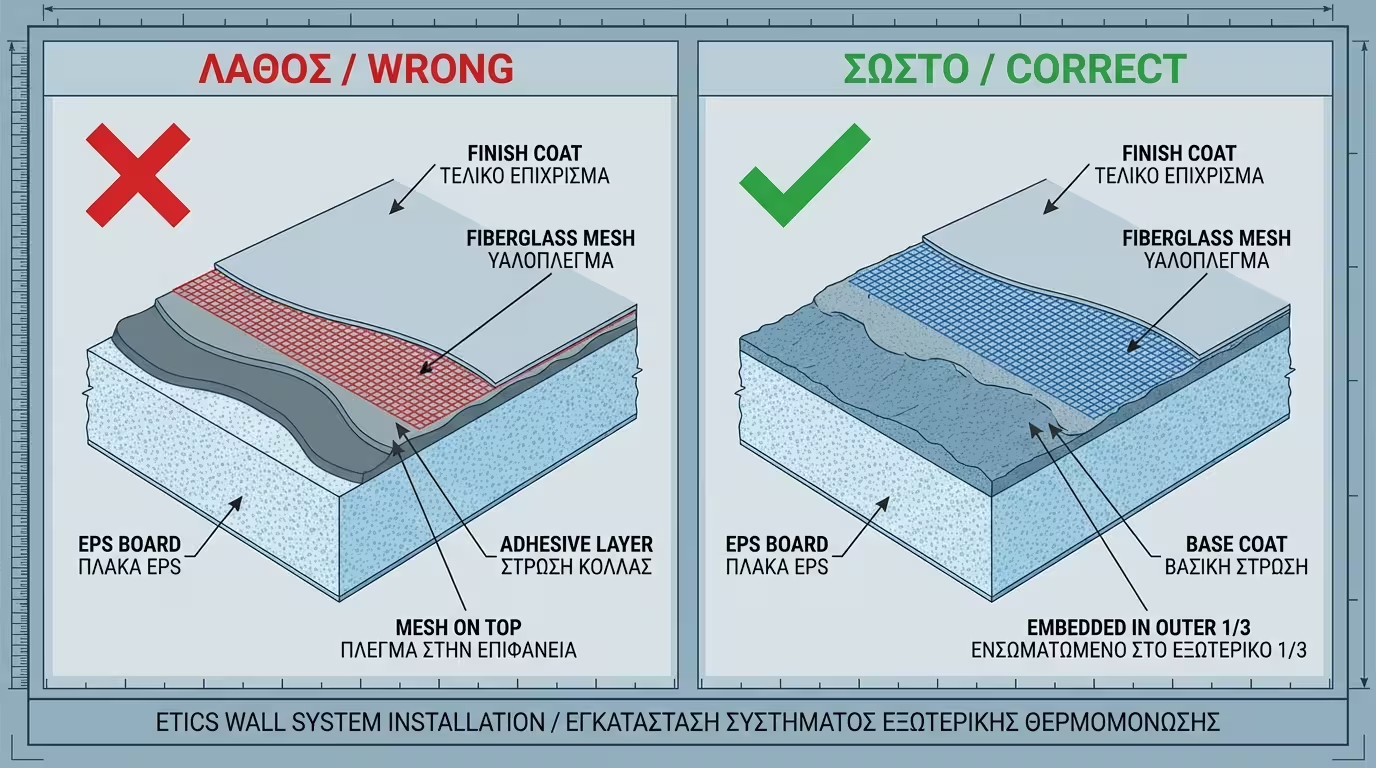
🚫 Wrong Embedment (Mesh "Floating")

The most catastrophic site error is when the installer pins or lays the mesh directly on the EPS board and then applies the adhesive (base coat) over it. This is prohibited! The mesh must "swim" inside the wet material (in the outer 1/3 of the adhesive thickness).

📏 No Overlap

Mesh rolls must overlap by at least 10 centimetres. If they're butted edge-to-edge, a huge vertical crack (a straight line) will form at that exact junction from top to bottom.

🕊️ Missing Diagonal Patches

At window and door corners enormous diagonal stresses develop. Extra mesh pieces (approx. 20×40cm) at 45° must be placed there. Without them, cracks will start from the frame corners.

2. Insulation Board Installation Failures

Often the crack isn't caused by the final render or the mesh, but by how the EPS board itself was adhered to the wall.

ETICS crack pattern identification table

🧱 Non-Staggered Layout

Boards must be laid like brickwork (interlocked) so the vertical joints don't form a continuous straight line. If the joints align, they create a weak zone that cracks easily.

🔥 Adhesive in Board Gaps

When a gap is left between two EPS boards, many installers fill it with cementitious adhesive. Wrong! The adhesive creates a thermal bridge (cold spot) and is rigid. Gaps must be filled exclusively with low-expansion PU foam or strips of the insulation material itself.

Crack Type Identification

Crack Pattern Most Likely Cause Risk Level
Long straight vertical/horizontal line Missing mesh overlap (10cm) or board joint error 🔴 High (water ingress behind insulation)
Diagonal from window corners No diagonal mesh patches installed 🟡 Medium-High
Spider-web (surface only) Thin base coat or rapid drying 🟢 Low-Medium
Circular/oval at regular intervals Over-tightened fixings / missing EPS caps 🟡 Medium (indicates thermal bridges)

What to Do If Cracks Appear

ETICS is a "sealed" system. If you don't address cracks promptly, the consequences can be devastating.

ETICS repair: grinding, new mesh, new top coat
⚠️ Don't leave them open in winter: If rainwater enters through a crack, it will be trapped between the render and the EPS board. In winter, that water will freeze, expand and delaminate (blow off) entire sections of render.

❌ The Painting Mistake

Applying a simple elastomeric paint over an ETICS crack (especially one caused by mesh failure) offers only temporary cosmetic relief. At the next thermal cycle, the paint will tear again.

✅ The Correct Repair

For serious cracks (straight lines due to missing overlap), the only proper fix is grinding open the area, embedding a new mesh "patch" with fresh adhesive, priming properly, and reapplying the final paste render (which will unfortunately leave a visible "patch" unless the entire wall is repainted).

Related Articles

Preview