Three-Coat Render System: Scratch, Brown & Finish Coat

From modern urban buildings to traditional homes, the three-coat render system is the most proven and reliable plastering method in Greek construction. Whether you are an owner wanting to understand exactly what you are paying for in a renovation, a DIYer getting ready for your first patching job, or a new professional looking for a technical overview, this guide will answer every question.

Let's look closely at how this "living" wall protection system works, which is literally built layer by layer.

Anatomy of the Three-Coat Render: The 3 Critical Stages

The philosophy of traditional rendering is based on gradually decreasing strength and increasing flexibility from inside to outside. If this rule is violated, the wall will sooner or later crack.

Wall cross-section showing three render layers: scratch, brown and finish coat

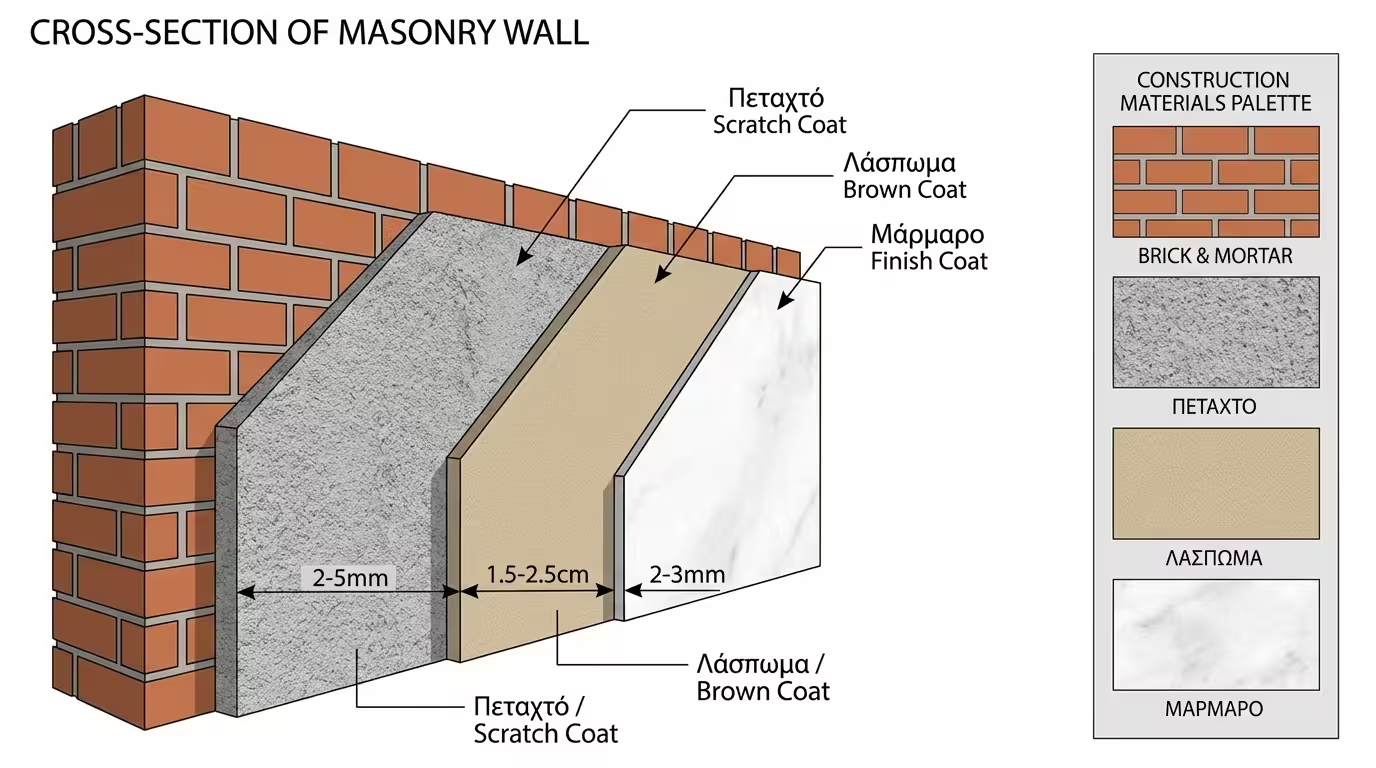
1. The Scratch Coat (The "Anchor")

The first coat is the foundation of the entire system. It is called "scratch" or "thrown" because the material is literally thrown with force onto the brick or concrete using a trowel or pump.

  • Purpose: To create a rough, textured surface for the next, thicker layer to "hook" onto.
  • Mix: It is a very strong mix, rich in cement, with coarse sand (concrete sand) and plenty of water. It contains absolutely no lime.
  • Thickness: It forms a very thin layer, usually 2-5 millimeters, just enough to cover the surface.

2. The Brown Coat (The "Fill")

The second coat is the heart of the render system. It is the layer that provides volume, levels the wall, and covers imperfections, cables and pipes.

  • Purpose: The absolute levelling (plumb/true) of the wall. This is where guide rails (corner beads) are used.
  • Mix: Contains cement, fine sand, water and lime (to make the mix plastic, workable and to give it breathability).
  • Thickness: It is the thickest layer, typically ranging from 1.5 to 2.5 centimeters. At this stage, fibreglass mesh is embedded at the joints of different materials (e.g. brick with concrete) to prevent cracking.

3. The Finish Coat (The "Marble")

The third and final coat is the one we see and touch. It is called "marble" because in Greece we traditionally use marble dust instead of common sand, in order to achieve a perfectly smooth and white surface.

  • Purpose: To seal the wall, protect it from weather conditions and create the ideal surface for final rubbing and painting.
  • Mix: Marble dust, white cement and lime.
  • Thickness: Very thin, around 2-3 millimeters.

Comparison: Advantages & Disadvantages

Comparison table of advantages and disadvantages of the three-coat render

To get a complete picture before choosing whether to go with the traditional method or factory-mixed renders, see the table below:

Advantages of Three-Coat Render Disadvantages of Three-Coat Render
Durability over time: A system tested for decades. Time-consuming: Requires waiting time between coats.
Material economy: Sand and cement are cheap materials. Reliance on the craftsman: Mix ratios are done "by eye".
Breathability: Allows the wall to "breathe", preventing mould. Mess: Mixing on-site creates significant dust and waste.

Practical Tips for DIYers and Professionals

The Golden Rule of Waiting: The biggest mistake in rendering is rushing. Each coat must "set" (dry partially) before the next is applied. If you apply the brown coat over a wet scratch coat, the render will sag.
DIY plastering - preparation and application steps

1. Wetting the Substrate

Before starting the scratch coat, wet the wall thoroughly (especially if it's summer). If the dry brick "sucks" the water out of the render abruptly, the mix will burn and will never bond.

2. Curing

After the rendering is completed, especially in the fine summer months, the wall must be lightly sprayed with water for the next 2-3 days. This prevents shrinkage cracks (the well-known "popping").

3. Clean Sand

Make sure the sand you source (whether sea or river) is well-washed and contains no salts or soil, because these will appear later as stains in your paint.

Related Articles

Preview