Hairline Cracks: When They're Harmless and When They Sound the Alarm

It's a sight that causes anxiety for every homeowner: you're sitting on the sofa, the sunlight hits the wall at an angle, and suddenly you notice fine lines - thin as a hair - running across your otherwise perfect render.

What Are Hairline Cracks?

Before you panic and start looking for your structural engineer's number, you need to know a fundamental construction secret: buildings are not dead objects, they move, breathe and "settle". Hairline cracks (less than 1 mm wide) are the most common phenomenon. But when can we ignore them and when should we take action?

As their name suggests, they are extremely fine cracks, often so shallow that a sheet of paper barely fits inside. They appear on the outer skin of the render (the finish or paint) and rarely penetrate in depth to the brick.

Hairline cracks on new-build wall - cosmetic only

When They're Absolutely HARMLESS (A Purely Aesthetic Issue)

In 90% of cases, these fine lines do not indicate any structural problem. They usually appear for the following reasons:

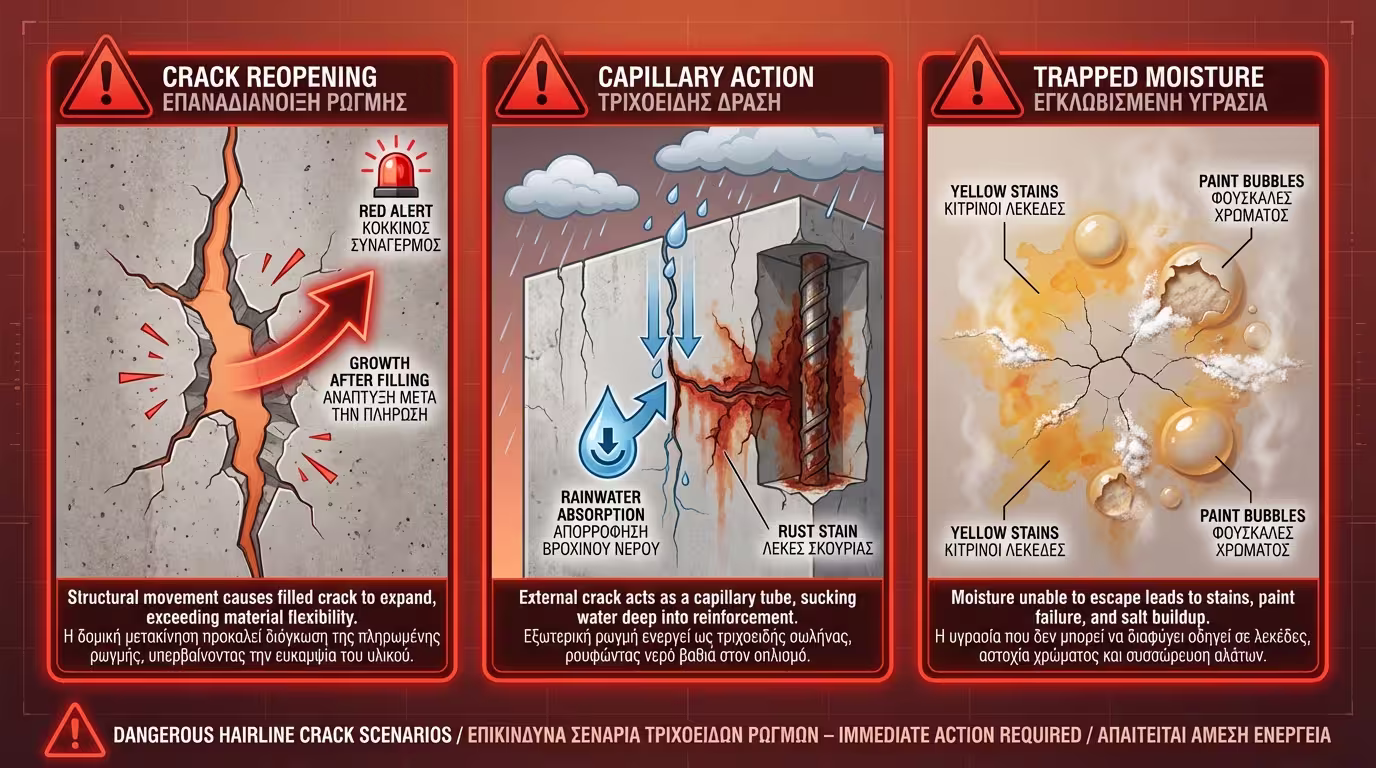
1. Normal "Settling" of a New Building

A newly built house needs about 1 to 2 years to find its final equilibrium in the ground and for all its structural materials (concrete, mortars, renders) to dry fully. This micro-movement almost always creates small, hairline cracks.

2. Shrinkage Cracking (Drying)

As we've seen, if the render dried slightly faster than normal, its surface develops "crazing" (like a spider web). This is superficial and affects only the paint.

3. Internal Thermal Changes

If a wall is directly behind a powerful radiator or a fireplace, the constant temperature swings (hot-cold) dry out the render and filler, causing micro-cracks.

Their Solution: These cracks are easily dealt with at the next renovation. A light scrape, application of an acrylic elastomeric filler (which has elasticity) and a good painting are enough to make them disappear for good.

When They SOUND THE ALARM

Although thin, there are 3 cases where hairline cracks (especially on external facades) should worry you:

Hairline crack with moisture stains and salt deposits

1. When They "Persist" and Grow (Active Cracks)

If you close a fine crack with filler and a few months later see it reopening in the exact same spot, and even wider, it means the cause that created it is still active. There may be ongoing building movement or it is a deep structural crack that simply hasn't revealed its full size yet.

2. When They Are a Water Pathway (Externally)

A hairline crack on the external render (especially in areas that are heavily "hit" by rain) acts like a capillary tube that sucks water inward. If the water passes the render and reaches the rebars of the column, it will cause rust (oxidation). The iron will swell and blow off entire chunks of concrete (spalling). Do not leave external cracks open in winter!

3. When They Show Moisture "Stains" or Salts

If around the fine crack you notice yellowing, paint blistering, or white powder (salts) resembling snow, it means the crack wasn't created by shrinkage, but by trapped moisture trying to escape the wall under pressure, destroying the render.

3 Practical Steps for the Homeowner (Checklist)

Don't rush to call an engineer. Check first yourself:

Pencil technique - mark, wait, check

1. Monitoring (The Pencil Technique)

If you see a new crack, grab a pencil. Draw a small, vertical line exactly at the point where the crack ends and write the date next to it. Check it again after 2-3 months. If the crack has passed your mark, it means it is growing (it is active) and may need a technical inspection.

2. No to Simple Filler (Externally)

Do not close external hairline cracks with simple decorators filler, because it is rigid and will crack again. Use elastomeric acrylic mastic (which can be painted) and elastomeric (insulating) external wall paints that "bridge" the microcracks.

3. Cleaning Before the Repair

For the repair material to "catch" inside such a narrow crack, the painter must first "dig" it slightly with the edge of the spatula (to make it a bit wider, in a V shape), dust it and then explicitly apply the material.

Related Articles

Preview