Bathroom Exhaust Fans: Automatic, with Timer and Humidity Sensors
(Selection & Installation Guide)
If your bathroom ceiling is peeling and the grout on the shower tiles
has turned black, the problem is not cleanliness. The
problem is trapped water vapour.
For decades, the typical installation in Greek homes was a simple wall
fan connected to the light switch. You walked in,
turned on the light, it ran. You walked out, turned off the light, it
stopped. The huge mistake: When you finish a hot shower,
the bathroom is full of dense steam. By turning off the light as you leave,
you also turn off the fan at exactly the moment you need it the most! The steam stays inside, condenses on cold walls, and mould has a field day.
The solution lies in "smart" exhaust fans.
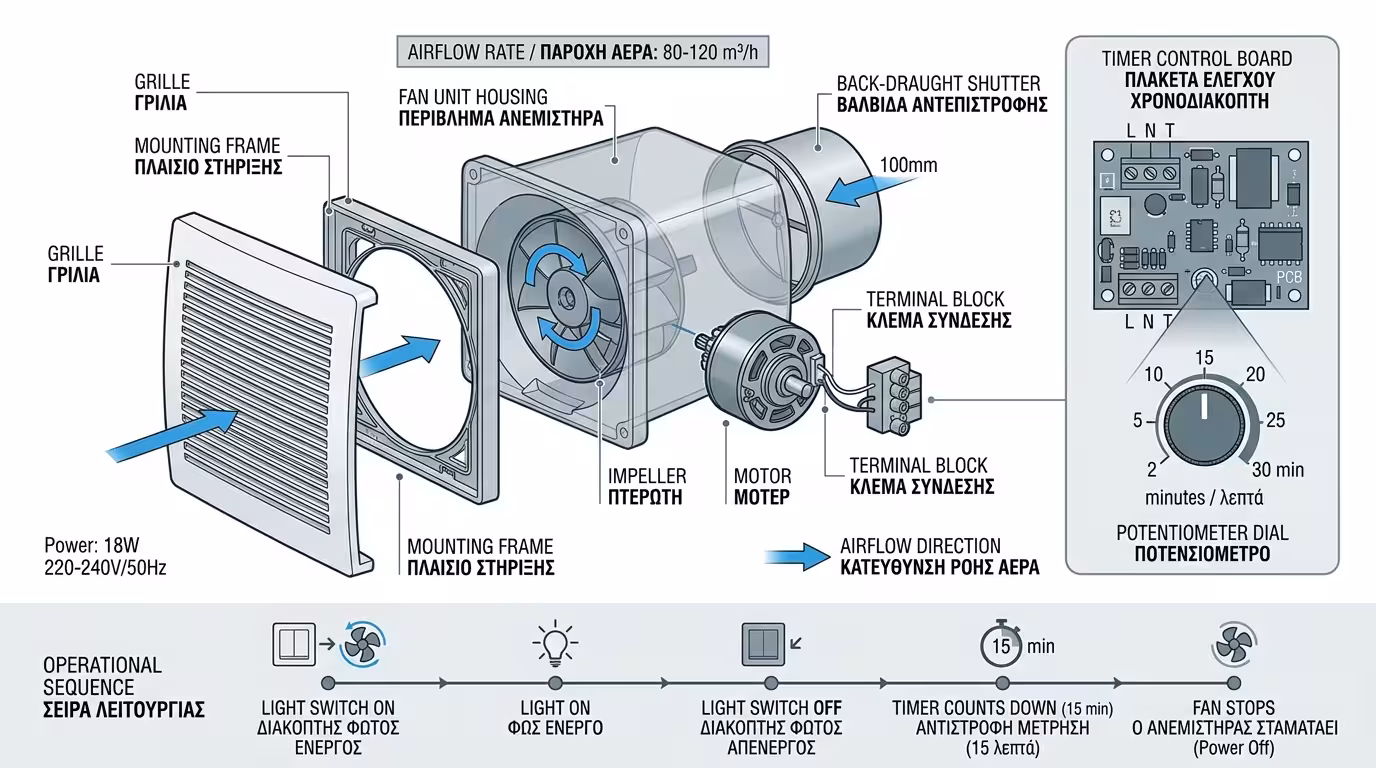
1. Exhaust Fans with Overrun Timer
This is the best value-for-money upgrade you can make.
The Timer fan is connected to the light switch, but includes its own extra control board and a permanent power supply (L and N permanently connected, Switched
Live from the light switch).
⏱️ How it works
You walk into the bathroom and turn on the light. The fan starts.
When you finish and switch the light off, the fan does not stop. It continues running for a preset period (5, 10 or 15 minutes) and then shuts off by itself! The run-on time is usually set via
a small potentiometer on the unit body.
✅ The result
It gives you the necessary time to extract all the steam
from a shower (or unpleasant odours), while you have already left and
the light is off for economy. No need to remember anything - the fan does its job on its own.
💶 The cost
A fan with a Timer costs just €40-70. Installation
is simple (it replaces the old fan 1:1, provided there is a
permanent power supply at the back box). It will save your bathroom
from frequent repainting and tile re-grouting.
🔌 The correct wiring
3 cables: Permanent Live (L), Neutral (N) and Switched
Live (SL) from the light switch. The fan is powered permanently but only
activates when it receives a signal from the switch. If your home has
only 2 cables in the back box, a separate line needs
to be run.
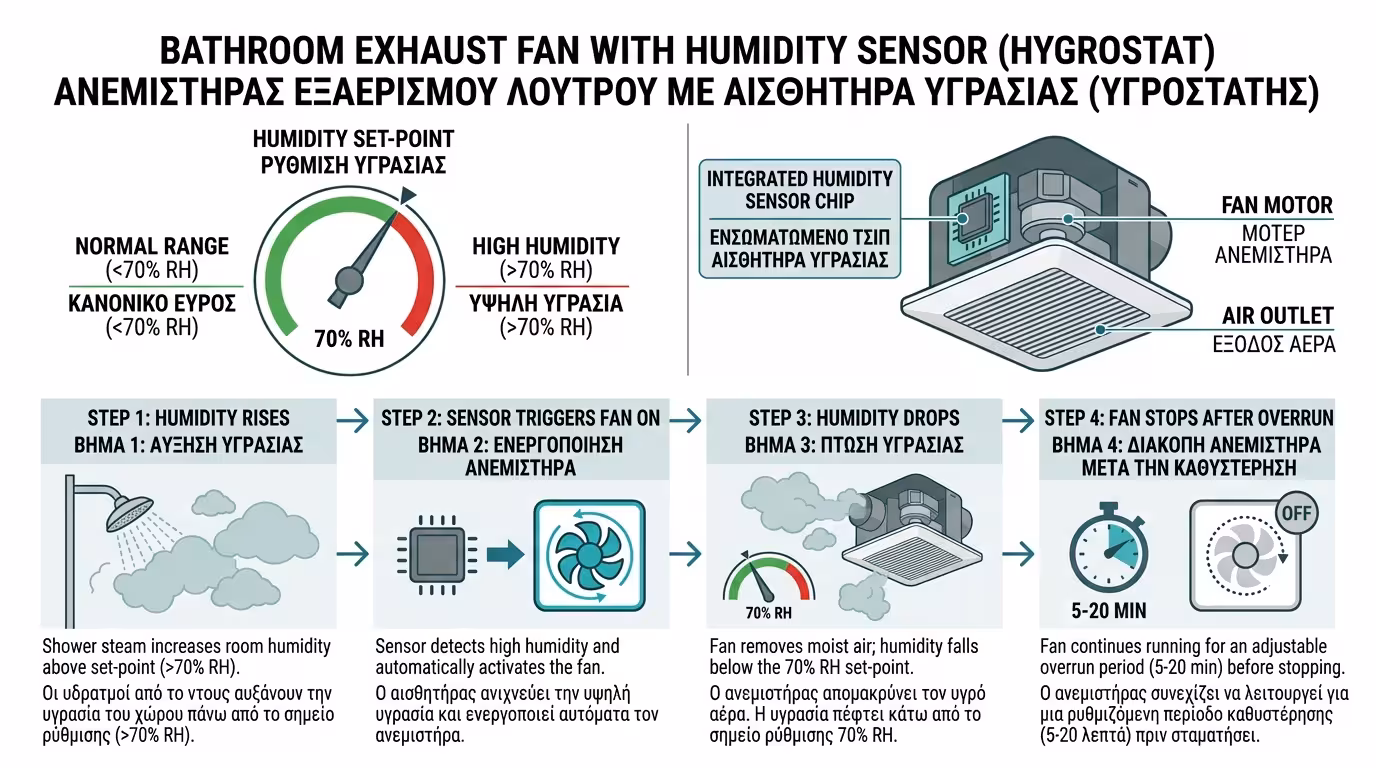
2. Exhaust Fans with Humidity Sensor (Hygrostat)
Here we move to total automation. The unit has a
built-in sensor (hygrostat) that continuously measures
the humidity levels in the bathroom air. You can set the threshold (e.g.
at 60% humidity).
🧠 The "thinking" machine
If you simply use the toilet or wash your hands, humidity does not
rise significantly - the fan works as a simple Timer. But if you
take a hot shower, humidity rockets to 80-90%. The
unit detects this and will continue running at full speed,
even if the Timer period has already elapsed.
💧 When does it switch off?
Only when humidity drops back below the threshold (e.g.
60%). Then and only then will it stop. This means after a summer shower
(lower water temperature) it will stop sooner, while after a winter steam
bath it will run much longer until the space is dry.
🛡️ Ultimate protection
Your bathroom remains permanently "dry" and protected,
entirely automatically. No need to think about switching anything on or
off. The fan takes care of everything by itself - it
is the best ally against mould.
🔧 Combined Timer + Hygrostat
The best models combine both functions. After the
light is switched off, they run the Timer. If humidity remains high,
the hygrostat extends operation. This covers every scenario - from a quick hand wash to a marathon steam bath.
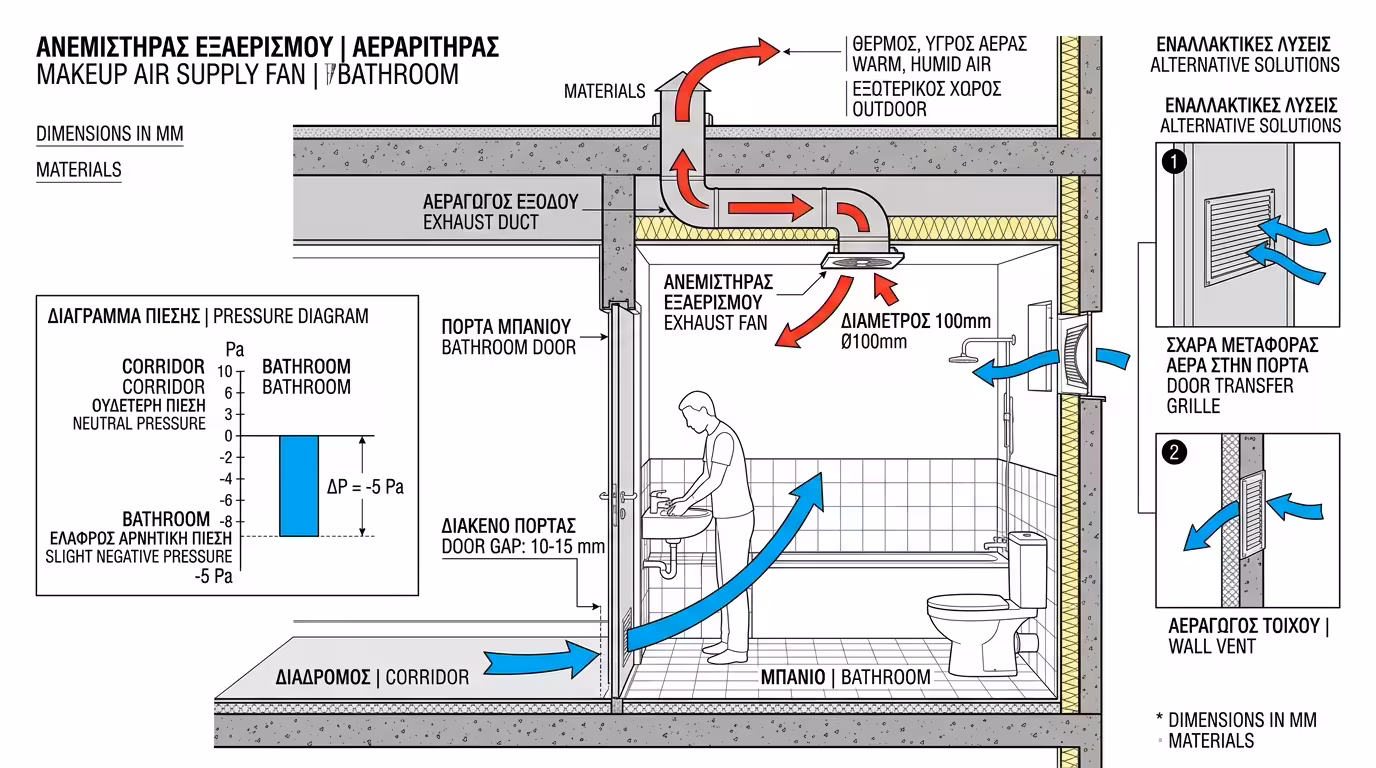
3. The Golden Installation Rule (The Door Gap)
Even if you buy the most expensive fan, it will do absolutely nothing unless you obey one basic rule of physics: To extract air from a room, new air must enter from somewhere
(Makeup Air).
🚪 The 1-2 cm gap
The internal bathroom door must never seal against the floor. It must have a mandatory 1-2 centimetre gap at the
bottom. Alternatively, fit a special plastic grille low on the door. Without
this, the fan creates negative pressure and spins uselessly!
📐 The correct position
The fan goes high up (on the wall or ceiling), ideally
opposite the door. This layout creates a diagonal airflow: dry air enters low through the gap, sweeps the bathroom
diagonally, and the moist air is extracted high up.
❌ Installation mistakes
Mistake 1: Fan next to the door - fresh air enters and
exits immediately without cleaning the room. Mistake 2: Fan on the same wall as the window - it "short-circuits" the air. Mistake 3: Door without a gap - the fan makes noise but extracts nothing.
🔄 The exhaust duct
The fan must discharge air to the outside (not into a
false ceiling or attic!). Use a Ø100 or Ø125 mm duct in a straight line or with minimal bends. Every 90° elbow reduces performance by 15-20%. At the external outlet, fit a gravity backdraft shutter to
prevent cold air from blowing back.
4. Shower Safety (IP Rating & Zones)
Electricity and water are deadly enemies. You cannot
install just any fan directly above the shower or bathtub
(specifically in Zone 1 according to the electrical regulation).
🔴 Zones 0 & 1 (Danger!)
Zone 0: Inside the bathtub/shower tray - ALL electrical appliances FORBIDDEN. Zone 1: The ceiling directly above the bathtub - only
devices rated IP45+ or low-voltage 12V (SELV) are allowed.
The 220V→12V transformer is hidden safely outside the shower zone.
🟢 Zone 2 & Outside (Safe)
Zone 2: The area 0.6 m around the bathtub - requires
at least IP44. Outside zones: If the
fan is 1+ metres from the shower, IP20-IP24 is sufficient.
This is the safest and most economical position.
⚡ Low voltage (12V SELV)
The ideal solution for a fan inside the shower zone: 12 Volt SELV. Even if water falls directly onto the motor, there is no risk of
electrocution. The transformer is mounted in the adjacent room or in
the back box behind the wall.
📋 The regulation (ELOT HD 384)
The Greek electrical installations regulation (ELOT HD 384, Section
701) strictly defines protection zones in rooms with baths/showers. Do not ignore these rules - your life literally depends on correct installation!
🚿 Ditch the simple, noisy fans that switch off with the light. A unit
with Timer and Hygrostat costs €40-70, but it will save your bathroom
from mould, eliminate black grout and keep your mirrors fog-free!