Heat Pump with Old Radiators (Cast-Iron / Panel): Does It Actually Work?

It's the ultimate renovation dilemma. You have a 20- or 30-year-old house, you want to ditch the oil boiler and switch to a heat pump, but you don't want to rip up the floors or throw away the cast-iron radiators (AKAN sections) or the classic panel radiators you already have.

The answer to "Can it be done?" is: Yes, but under very strict conditions.

1. The Problem: The Temperature Clash

To understand why there is a problem, we need to look at how the two systems work. The old boiler sent water at 75–80 °C. Because the water was scalding hot, even a small radiator burned "like an iron" - it didn't need a large surface area to heat the room.

Temperature clash – boiler 75°C vs heat pump 50°C, radiators

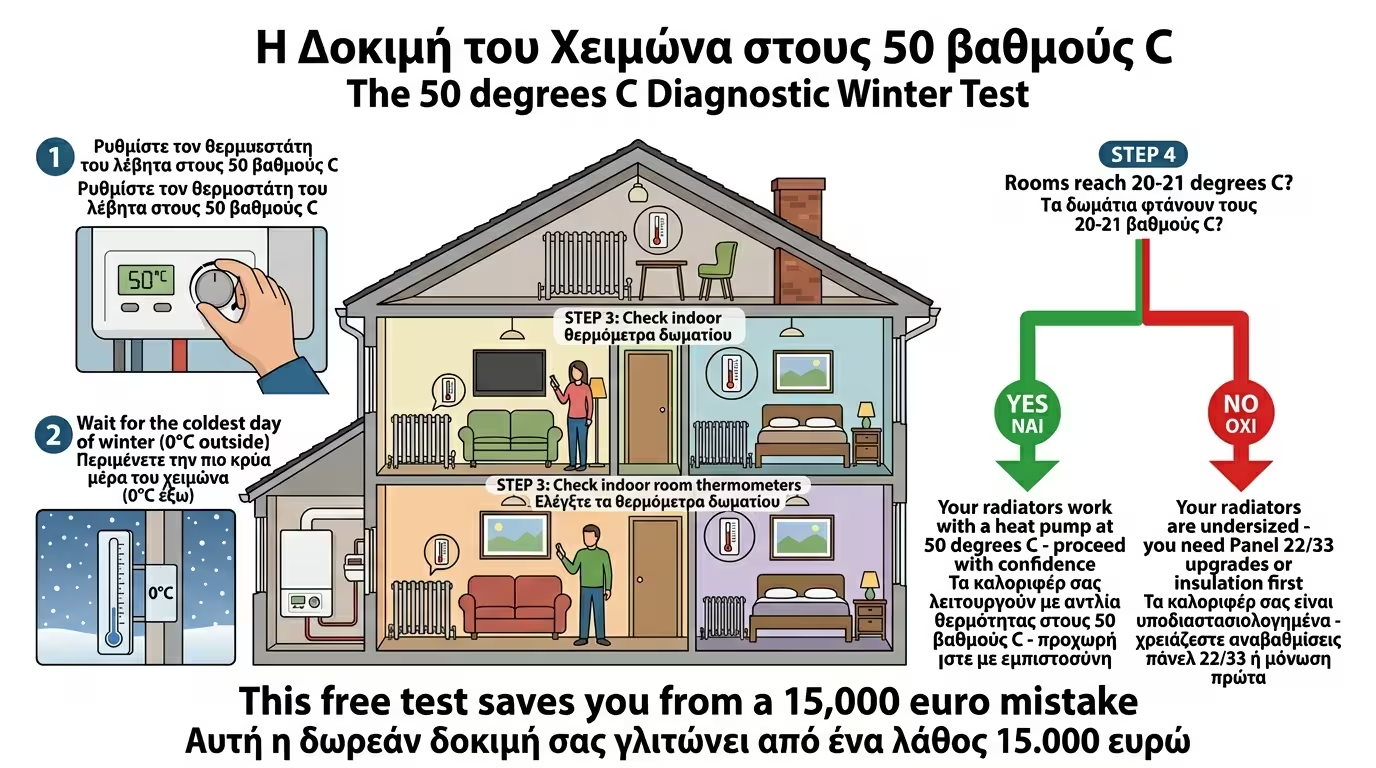
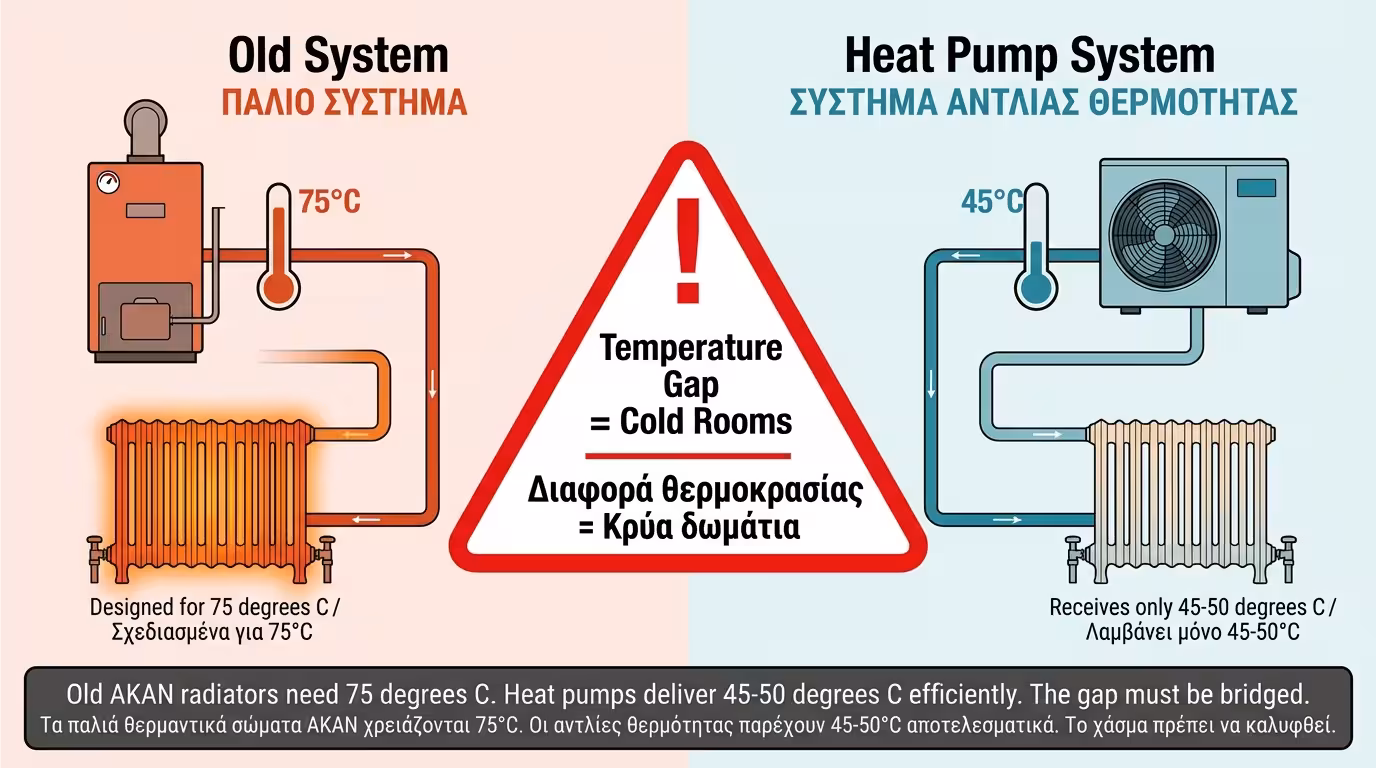
🔥 The Oil/Gas Boiler

Flow temperature: 75–80 °C. With water this hot, radiators act like furnaces: even a single-panel type (Type 11) or a small cast-iron section (AKAN) is enough for a 15 m² room. That's why old radiators were designed small - they saved wall space.

❄️ The Heat Pump

Flow temperature: 45–55 °C. The heat pump produces hot water at a much lower temperature. This is what delivers the high efficiency (COP 3.5–4.0). If you push 50 °C water through the old small radiators, you'll feel only a lukewarm "caress" - not enough to beat the cold.

⚡ Why Not Just Crank Up the Temperature?

You could, but then the COP drops dramatically: instead of 3.5 kW of heat per 1 kW of electricity, you get 2.0 or even 1.5. In effect, you lose the entire economic advantage of the heat pump. The solution isn't to strain the machine, but to adapt the distribution network.

📐 The ΔT50 ↔ ΔT30 Rule

Radiators are rated at ΔT50 (water 75/65 °C, room 20 °C). With a heat pump (water 50/45 °C, ΔT30), a radiator delivers only about 50 % of its catalogue output. This means if you need 1,000 W, you need a radiator rated at 2,000 W. If the existing unit is smaller, it must be replaced or the building must be insulated.

2. The 50 °C Test (Before Buying a Heat Pump)

50 °C test – winter, boiler thermostat, radiator performance

Before spending thousands of euros, run a free test during winter using your existing boiler. It's the most reliable method to see whether your current radiators can handle the lower flow temperature.

📋 Step 1: Conditions

Wait for a genuinely cold day (e.g. outdoor temperature of 2–5 °C), so the test represents real winter conditions. A mild November afternoon of 15 °C won't reveal anything - you need the "real winter" test.

🔧 Step 2: Set the Thermostat

Go to the boiler room and turn the aquastat down to 50 °C (instead of the 75 °C where it's probably set). Leave the heating running for 24 hours straight - the radiators need time to reach equilibrium at the lower flow temperature.

✅ Result: It Warmed Up!

Bingo! Your radiators are already oversized - the old plumber, by accident or tradition, installed bigger units than strictly needed. You can install a standard medium-temperature heat pump immediately, with zero radiator changes!

❌ Result: Still Freezing

If the house didn't exceed 18–19 °C within 24 hours or remained uncomfortably cold, the radiators are too small for low-temperature water. Don't give up - there are 3 realistic solutions (see below).

3. Solutions If the Test "Fails"

If the existing radiators can't cope with lukewarm water, you have three clear alternatives - listed in order of priority, from best to "last resort". You don't always need to rip out the entire piping network!

Solutions – insulation, panel Type 22/33, high-temperature cascade heat pump

🏠 Solution A: Fabric First (Insulate First)

The No. 1 investment. If you add external wall insulation and upgrade to energy-efficient windows, the building's heat losses are cut in half. Suddenly, those same "weak" radiators - even with 50 °C water - become more than sufficient to heat a now well-insulated building. Bonus: insulation also reduces the kW rating of the heat pump, meaning you buy a smaller, cheaper machine!

🔩 Solution B: Upgrade the "Weak" Radiators

If you can't (or don't want to) insulate, simply swap the 2–3 critical radiators for a larger panel type. Remove a single-panel (Type 11) and bolt on a double or triple panel (Type 22 or Type 33) in exactly the same position. Same wall space, but 2–3× the heat output at low water temperatures. No piping changes needed.

🌡️ Solution C: High-Temperature Heat Pump

The "last resort". If you won't insulate or change radiators (e.g. because of the aesthetic value of cast-iron AKAN units), you can install a high-temperature heat pump with two compressors (cascade), capable of producing water up to 80 °C - just like the old boiler.

⚠️ High-Temp Drawbacks

A high-temperature unit costs 30–50 % more to buy compared to a standard medium-temperature heat pump. Because it "strains" to reach 80 °C, the COP drops to 2.0–2.5. Still, it remains 50–60 % cheaper to run than an oil boiler. Ideally, combine it with at least basic insulation to maintain a decent COP.

4. Power Flushing: The Non-Negotiable Rule

Whatever you decide, there is one non-negotiable rule: before the new heat pump is connected to the old pipework, a chemical flush (Power Flushing) MUST be performed. This isn't "nice to have" - it's mandatory.

Summary – power flushing, black sludge, heat pump, radiator, renovation

🛢️ What Lurks Inside the Radiators

Old radiators and steel pipes that have been in service for decades contain black sludge, rust and iron filings (magnetite). This sludge looks like thick crude oil and reduces water flow, destroys valves and clogs radiators (especially the bottom - that's why many are "cold at the bottom").

⚙️ Why It's Critical

The new heat pump contains precision Inverter circulators with millimetre tolerances. If this black sludge passes through them, it will destroy them within weeks. Repair costs €500–1,000, while a proper Power Flush costs €200–400 for an apartment building. Do the maths.

🧪 How It's Done

A specialist connects a high-pressure flushing machine to the system, adds a chemical solvent (acid flush or alkaline cleaner), and circulates hot water under pressure through each radiator individually. The sludge comes out into a bucket (literally black water). Afterwards, a corrosion inhibitor is added to protect surfaces long-term.

✅ Summary

Yes, a heat pump and old radiators can work together. The secret: help the system. Power flush the pipework, upgrade 2–3 critical radiators to Type 22/33, and - ideally - insulate first. With these minimal interventions, you'll enjoy annual savings of €1,000–1,500 vs oil, without turning your home into a building site.

🔑 Golden rule: First insulate → then swap radiators (if needed) → finally, heat pump. This sequence ensures a smaller machine, higher COP and faster payback.

Related Articles

Retrofitting, Installation & Troubleshooting

Return to category.

Go to category

Preview