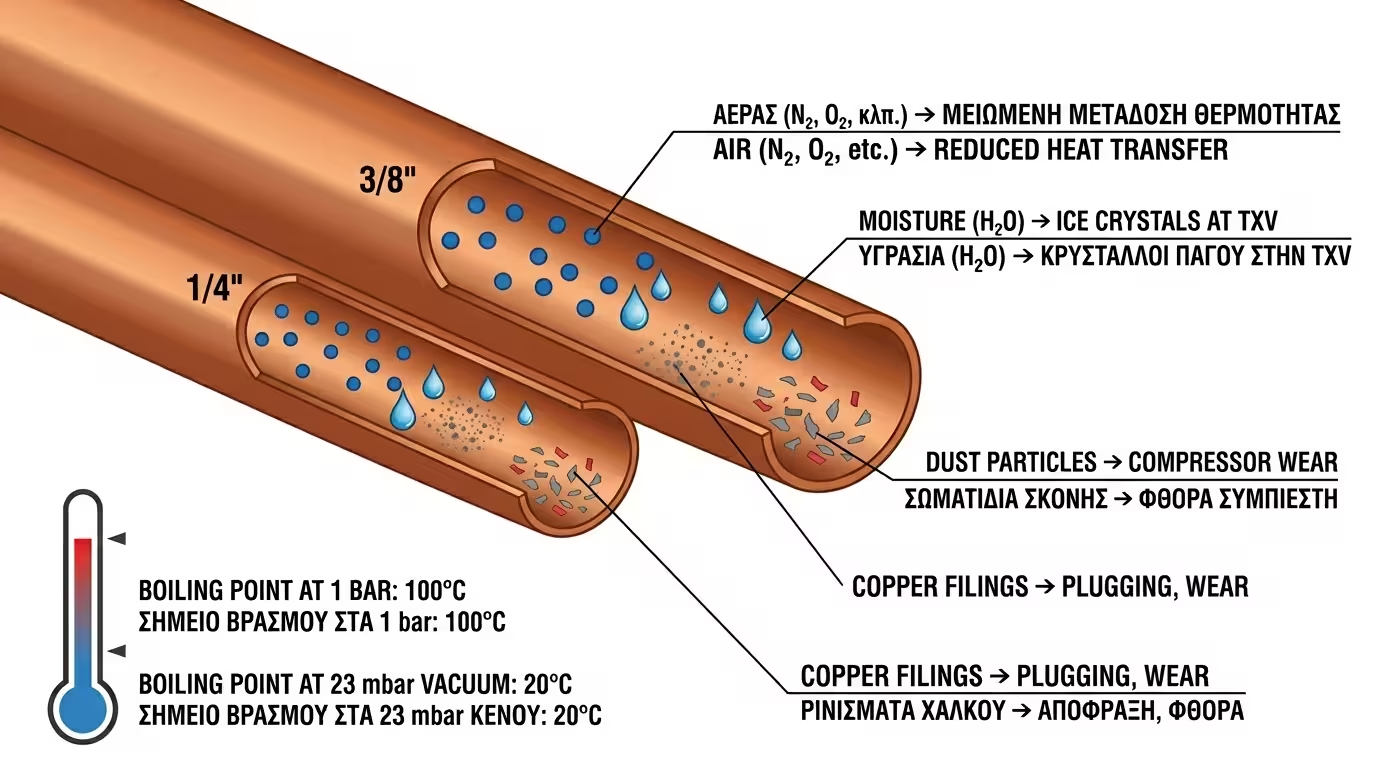
Vacuum Creation: The Critical Step That Separates a Professional from a Cowboy Installer

The refrigeration technician arrives, screws on the copper pipes, opens the refrigerant valve, lets out a quick "pssst" to bleed some air, and tells you: "All done, boss - turn it on!".

If you see this happening, stop them immediately. They have just condemned your compressor to a slow, agonising death. The Vacuum Pump is not a luxury - it is the most sacred tool in every refrigeration installation.

1. The Invisible Enemy: What Hides Inside New Pipes?

When the technician unrolls a new copper pipe to connect the indoor and outdoor units, the pipe is not empty. It is filled with atmospheric air - and air always contains water vapour (moisture).

Air and moisture trapped inside new copper pipe during AC installation

🌬️ Atmospheric air

Even on a dry day, the relative humidity inside the pipes can reach 40-60%. Within 6 metres of copper tubing, enough water droplets can hide to become lethal. The water does not evaporate on its own - it requires an artificial vacuum.

💧 Trapped water vapour

Moisture clings to the inner walls of the copper tube like an invisible film. It cannot be removed by blowing or purging air - only evaporation under vacuum can lift it. What you cannot see is exactly what will kill the compressor.

🔧 Dust and swarf

Besides moisture, cutting the copper tubes creates microscopic metal filings (swarf). If these enter the refrigerant circuit, they jam the expansion valve or EEV, blocking the system from functioning properly.

⚠️ Time matters

The longer pipes stay open on a construction site, the more moisture they absorb. In humid climates (islands, coastal areas), pipes must be sealed with caps as soon as they are cut - otherwise they fill with moisture within minutes.

2. The Chemical Cocktail of Death (Moisture + Oil = Acid)

Acid and sludge inside a compressor caused by moisture – winding destruction

The compressor is the "heart" of the machine. Inside it circulates a special synthetic lubricant - extremely hygroscopic. When it mixes with water and refrigerant, the chemistry becomes nightmarish.

🧪 Chemical reaction

Refrigerant + synthetic oil + water → acid + sludge. This is not a joke. Modern refrigerants (R410A, R32, R290) react even more violently with moisture compared to older R22. The danger is greater than ever.

🔩 Sludge in valves

The sludge that forms clogs the microscopic expansion valves (EEV) of the machine. The refrigerant cannot circulate properly, performance drops dramatically, and the compressor is forced to work unnaturally hard.

⚡ Acid on windings

The acid "eats" the insulation of the copper windings inside the compressor. Electrical resistance changes, creating localised short circuits, and the compressor burns out. It literally rots from the inside out.

⏰ 2-4 years later

The machine does not fail immediately - it seems to work perfectly. After 2-4 years, the compressor suddenly dies. The owner believes it was "defective", when in reality the damage started on installation day.

3. The Purging Fraud

Many rushed technicians, in order to save 20 minutes, perform the infamous "purging": they crack open the refrigerant valve, let it push the air out, and declare "all done". This practice is doubly criminal.

Purging – illegal refrigerant venting, moisture remains in pipes

❌ Does not remove moisture

The refrigerant pushes out the bulk air, but the microscopic moisture droplets remain stuck to the copper walls. It is like sweeping the floor instead of mopping - the dirt appears gone, but the moisture remains.

🚫 It is illegal

Deliberate venting of refrigerant into the atmosphere is strictly prohibited under EU legislation (Regulation 517/2014 F-Gas). Modern refrigerants (R32, R410A) dramatically boost global warming. The fines are enormous.

💸 False economy

The technician saves 20 minutes of work. You lose €2,000-5,000 for a new compressor in 3 years. Do not sacrifice a multi-thousand euro investment so your technician can avoid 20 minutes of waiting.

📝 Warranty voided

Every manufacturer (Daikin, Mitsubishi, LG, Samsung) clearly states in the installation manual: "Mandatory vacuum evacuation required". If the compressor fails and they find moisture or acid inside, the warranty is automatically voided.

4. The Correct Procedure: Vacuum Pump

The only scientifically correct method is vacuum evacuation. The Vacuum Pump achieves something remarkable: it drops the pressure so low that the boiling point of water falls below room temperature. The moisture boils, turns to vapour and is extracted.

Vacuum pump, micron gauge, copper pipes – correct evacuation procedure

🔧 The 4 steps

1. Connect the vacuum pump to the pipes via a manifold gauge set. 2. Start the pump - it extracts air + moisture. 3. Monitor the micron gauge (digital vacuum gauge). 4. Close the valve and perform a 15-minute hold test.

⏱️ How long?

Residential split unit: 15-20 minutes minimum. Multi-split (3-4 indoor units): 30-45 minutes. VRV or air-to-air heat pump: can take 1-2 hours depending on pipe lengths. The time is not "wasted" - it is insurance.

📊 Micron Gauge (The proof)

A proper technician does not evacuate "by feel" . They use a digital Vacuum Gauge that measures in microns. Target: below 500 microns. Ideally: 200-300 microns. Only then are the pipes 100% dry.

🧪 Hold Test (Retention Test)

After reaching the target microns, the technician shuts off the pump and waits 15 minutes. If the reading rises above 500 microns, there is still moisture or a micro-leak in the connections. The pump must run again until the reading stabilises.

🔑 Before hiring a technician, ask: "You will evacuate with a vacuum pump, correct?". If they start making excuses ("It's only 2 metres of pipe, no need"), pay them for the visit and ask them to leave. The Vacuum Pump is the "life insurance" of your machine.

Related Articles

Retrofitting, Installation & Troubleshooting

Return to category.

Go to category

Preview