Underfloor Heating in Renovation (Dry Construction): How to Install It Over Your Existing Floor

Your dream is to walk barefoot in winter. You want underfloor heating, because it's the perfect match for a heat pump (works with 35 °C water) and eliminates ugly radiators.

Don't be put off by the "nightmare" of concrete. Modern technology has the answer, and it's called Dry Construction Underfloor Heating (Low-Profile). It sits literally on top of your existing floor!

1. The "Nightmare" of Traditional (Wet) Underfloor

In new builds, underfloor heating uses "wet construction": insulation, pipes and then screed (thermobeton) 5-7 cm thick. In an old apartment renovation, this creates two insurmountable obstacles.

Wet underfloor problem – 10-12 cm thickness, 130 kg/m² weight, concrete, renovation

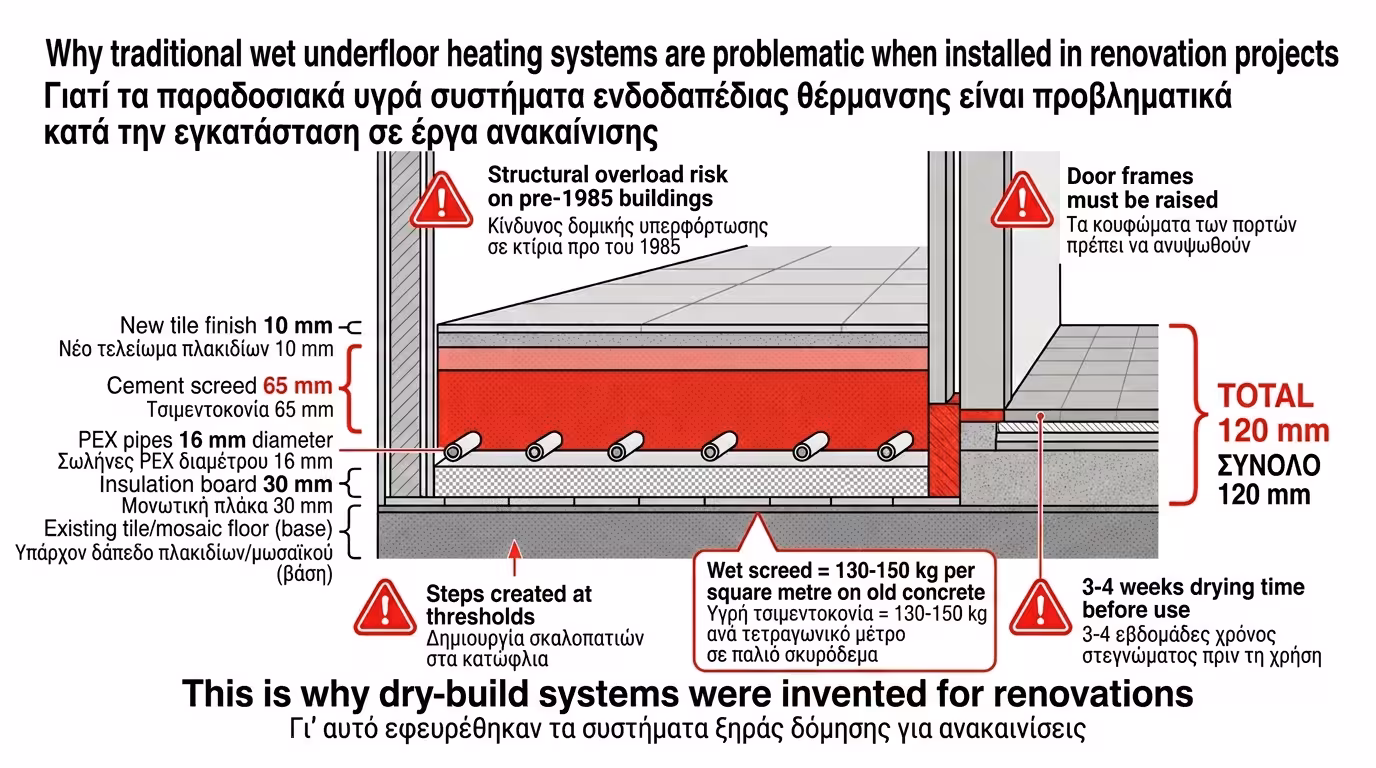
📏 Thickness (10-12 cm)

The total build-up (insulation + screed + tiles) reaches 10-12 cm. Laid over the existing floor, the ceiling drops dangerously, all doors must be trimmed and balcony doors won't open. In a 2.60 m-high flat, you lose almost 5% of your interior space.

⚖️ Weight (100-130 kg/m²)

The screed weighs 100-130 kg/m². In a 100 m² apartment that's 10-13 tonnes of extra load. A 1970s slab may not support this, creating a structural risk. Structural engineer approval is needed before proceeding.

🔨 Demolition & Rubble

To make room without raising the floor excessively, many owners demolish the entire old floor (mosaic or tiles) down to the concrete slab. That means jackhammers, rubble, skip hire and weeks of dust - costs that skyrocket.

⏰ Drying Time (21-28 days)

After pouring, the screed needs 21-28 days to cure before heating can start. Starting too early risks cracks and underperformance. All this time, the home is unusable.

2. The Solution: Dry Construction Systems (Low-Profile)

Dry construction – aluminium heat spreader plates, pipes, insulation, no concrete

The industry solved the problem by eliminating concrete entirely. Dry construction systems are designed exclusively for renovations and sit directly on top of the existing tiles, wood or mosaic (as long as it's level).

🧱 Layer 1: The Base (Insulation)

Instead of the classic "egg-crate" board, special rigid EPS or XPS panels are laid - already pre-grooved with channels. The insulation keeps heat pushing upwards (towards your feet) and prevents loss through the concrete slab below.

✨ Layer 2: The Heat Spreader

This is the "secret". Since there's no concrete, aluminium heat spreader plates are placed inside the grooves. The aluminium wraps around the pipe and transfers heat to the entire floor surface almost instantly - like a giant griddle.

🔵 Layer 3: The Pipe

The water pipe clips into the aluminium channels - usually slightly narrower (12 mm or 14 mm) than standard underfloor (16-20 mm). The smaller diameter keeps the profile low without meaningfully affecting flow rate.

🪵 Layer 4: The Finished Floor

On top of the aluminium, without a drop of concrete , you can lay a floating laminate floor directly, or a thin fibre-gypsum board (5 mm) if you prefer tiles. Installation is complete in 2-3 days, with zero curing wait.

3. The 3 Huge Advantages

Beyond saving you from demolition, dry construction systems also excel in technical performance that even the traditional method can't match.

Advantages – 15-20 mm thickness, 5-10 kg/m² weight, 30-minute response

📐 Ultra-Low Profile

Some systems have a total thickness (including pipe) starting at just 15-20 mm - less than 2 cm! No need to trim any balcony doors or "lose" ceiling height. Compared to the traditional method's 100-120 mm, that's 5-6 times less.

🪶 Featherweight

Weight is just 5-10 kg/m². In a 100 m² flat, that's only 500 kg - compared to the 13 tonnes of screed! Your floor slab won't even "notice" the installation. Zero structural risk.

⚡ Lightning-Fast Response

Perhaps the biggest advantage. Traditional underfloor with concrete (massive thermal inertia) takes 5-6 hours to heat up. The dry construction system, with aluminium right below your feet, heats the room in 30-40 minutes ! You can switch it on and off like a radiator - ideal for the mild Greek winter.

💶 What to Watch Out For (Cost)

Dry construction materials (special aluminium plates) are more expensive per m² than standard wet screed components. However, when you factor in jackhammer labour, rubble disposal, concrete purchase, and the 30-day curing wait, the overall renovation cost often comes out even or cheaper!

4. Summary: Dry Construction as the Only Path

If you're undertaking a major apartment renovation and want the ultimate luxury of underfloor heating combined with the economy of a heat pump, dry construction is the only realistic path.

Summary – underfloor renovation, heat pump, luxury, dry construction

🏗️ Perfect for Renovation

Thin (15-20 mm), featherweight (5-10 kg/m²), fast to install (2-3 days). Preserves the character and structural integrity of the old building - no demolition, rubble, or dust.

🤝 Perfect Match for Heat Pumps

Underfloor heating works with 35 °C water - exactly where heat pumps achieve their maximum COP . The combination delivers the lowest possible running costs: 70-80% savings compared to oil.

🏠 Invisible & Uniform

Takes no wall space (no radiators), heats the entire floor uniformly, eliminates cold spots near windows, and offers invisible luxury. Walk barefoot on warm tiles - even in January.

📞 Next Step

Contact a specialist engineer for an on-site survey of your floor, check if it's level, and decide between laminate (easier) or tiles (requires fibre-gypsum board). Installation can be finished in a single weekend!

🔑 Dry construction isn't a compromise - it's an evolution. Less thickness, zero weight, instant heating. The luxury of underfloor, without the nightmares of concrete.

Related Articles

Retrofitting, Installation & Troubleshooting

Return to category.

Go to category

Preview