Thermal Screed Thickness & Special Additives: The "Golden Rule" to prevent cracking and sluggish underfloor heating

The thermal screed has two critically important missions: Mechanical Strength (to support the tiles, furniture and people while protecting the delicate plastic pipes) and Thermal Conductivity (to absorb heat from the pipes and distribute it evenly across the room).

To achieve both, it must have exactly the right thickness and the right chemical composition. Let us examine the "Golden Rule" and the two magic additives.

1. The Ideal Thickness: Neither too thin, nor too thick

The most frequent question during renovations is: "How much height do I lose from the underfloor heating cement?" The strict European regulation (DIN) for traditional thermal screeds specifies that the concrete thickness ABOVE the crown of the pipe must be at least 4 to 4.5 centimetres.

Thermal screed cross-section for underfloor heating - ideal thickness of 4.5 cm above the pipe

📐 The DIN regulation

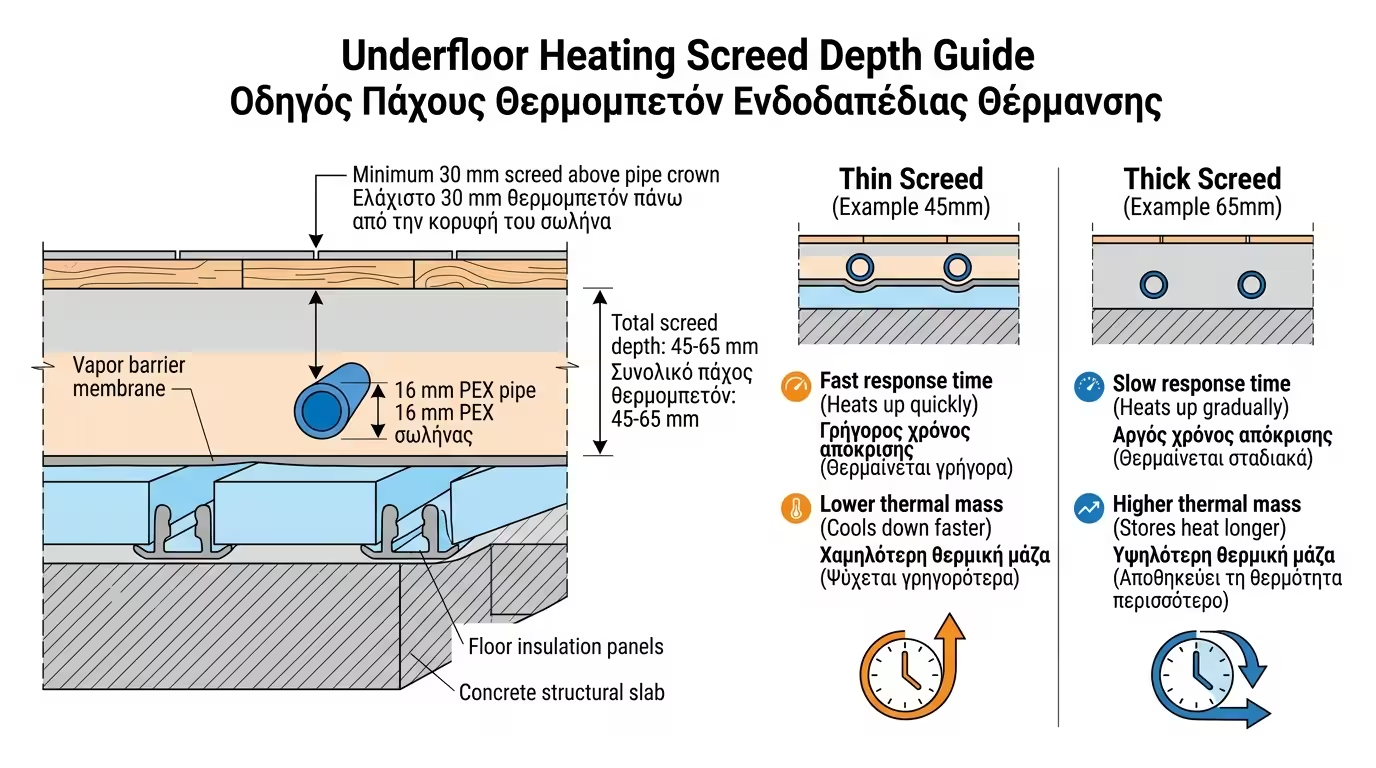
Considering that the pipe together with the insulation board (the "teeth") has a height of approximately 2–3 centimetres, the total screed thickness comes to 6.5 to 7 centimetres. This is the minimum acceptable thickness according to the European standard.

❌ Too thin (2 cm above)

The floor will lack structural strength. Under the first heavy piece of furniture, it will crack and "pop" the tiles. Furthermore, the Zebra Effect appears: walking barefoot, you feel a burning strip (directly above the pipe) and a cold strip right next to it.

❌ Too thick (8–10 cm above)

Enormous Thermal Inertia: The house will take 2 to 3 days to warm up from the moment you switch on the Heat Pump! The excessive cement thickness acts like a "brake" on the heat, dramatically slowing down the system's response time.

✅ The sweet spot: 4.5 cm

With exactly 4 to 4.5 centimetres above the pipe, the thermal screed ensures adequate mechanical strength, uniform temperature distribution (no zebra zones) and a reasonable heating response time.

2. The Plasticizer: The air expeller

Standard cement is thick and viscous, trapping thousands of microscopic air bubbles inside. As we know, air is one of the best insulating materials. If the cement around the pipes contains air bubbles, heat simply cannot transfer to the floor surface!

Thermal screed plasticizer - self-levelling mix hugging pipe 360 degrees without air bubbles

🧪 What is a plasticizer?

It is a chemical liquid additive that installers pour into the mixer (or pump). It makes the mix "runny" (self-levelling) without needing to add extra water - which would significantly reduce the screed's structural strength.

🔴 360° pipe embrace

The fluid concrete hugs the pipe tightly at 360 degrees, expelling all trapped air and ensuring perfect thermal conductivity. The result is maximum possible heat transfer from the pipe to the floor surface.

⚠️ No extra water

The classic "solution" to make cement more fluid is to add water. This is forbidden in thermal screed. Extra water leaves voids as it evaporates, reducing both strength and thermal conductivity. The plasticizer achieves the same result chemically.

🌡️ Thermal conductivity

By eliminating air bubbles, the plasticizer dramatically increases the thermal conductivity of the screed. The floor heats up faster, more uniformly, and the Heat Pump operates more efficiently.

3. Polypropylene Fibres: The invisible reinforcement replacing metal mesh

Polypropylene fibres inside thermal screed - three-dimensional net instead of metal mesh

In the past, metal mesh was embedded in the screed to prevent cracking. Today, millions of microscopic synthetic fibres (like tiny hairs) are mixed directly into the cement, fundamentally changing the material's behaviour.

🕸️ Three-dimensional net

As the cement dries or expands due to underfloor heat, it tends to develop "hairline" cracks. The fibres act as a three-dimensional net that holds the material together in every direction, preventing these micro-cracks from forming.

💪 Elasticity & tensile strength

The fibres dramatically increase the elasticity and tensile strength of the thermal screed. The cement can tolerate temperature fluctuations without forming cracks that would destroy the tiles above.

✅ Modern replacement

Metal mesh was difficult to install and risked damaging the delicate plastic pipes. Polypropylene fibres are simply poured into the mix, distribute uniformly throughout the cement, and cannot damage the flexible heating pipes.

📋 Correct dosage

The quantity of fibres must follow the manufacturer's instructions. Too many fibres can make the mix difficult to apply, while too few do not provide adequate crack protection. Getting the balance right is essential.

4. Drying & the "Thermal Shock": Why rushing destroys the floor

The biggest mistake a rushed homeowner can make is to lay tiles as soon as the concrete appears dry on the surface. The correct procedure requires patience and a strict heating protocol.

Underfloor heating thermal shock protocol - gradual water temperature increase of 5°C per day

⏰ 21–28 days drying

Traditional thermal screed requires approximately 21 to 28 days to dry naturally and expel its moisture. Surface dryness does not mean the interior of the cement has matured fully.

🌡️ Heating protocol

After 28 days, and BEFORE tiles or wood are installed, the installer fires up the Heat Pump. The water temperature is raised gradually (5°C per day) until it reaches the maximum (e.g. 45°C).

🔥 Hold at maximum

The temperature holds at maximum (45°C) for 3–4 days and then ramps back down gradually. We force the cement to expand and contract to its maximum extent, releasing all hidden stresses and trapped moisture.

🎯 The purpose

If something is going to crack, it will crack now, BEFORE your expensive tiles are laid! Cracks can be repaired at this stage. After tiles are installed, repair requires their complete removal and destruction.

💡 Demand that your contractor adheres to: a minimum of 4.5 centimetres of screed above the pipe, use of plasticizer and polypropylene fibres, and execution of the "thermal shock" protocol before the tiler enters the house. These three steps are the safety net for a floor that will last forever.

Related Articles

Emission Systems: Underfloor, Fancoils & Radiators

Return to category.

Go to category

Preview