🏗️ The slab problem
Typically, electrical conduits and plumbing pipes already run across the concrete slab. The insulation boards cannot be laid on top of these obstacles because they would be sitting on hollow voids, rocking in mid-air.
Underfloor heating is not simply "throwing pipes on the floor and covering them with cement". It is a strictly engineered "sandwich" of materials. Each layer plays its own critical role, either directing heat upward or protecting the floor from cracking.
Let us take an "X-ray" of the floor of a modern home (Wet Build) and examine the layers one by one, starting from the bottom (the structural slab) and moving upward.
Before any underfloor heating material is installed, the concrete slab must be absolutely clean and level. On top of the prepared, smooth surface, the Vapour Barrier is laid - a thick, transparent polyethylene sheet (nylon) with a minimum thickness of 0.2 mm.
Typically, electrical conduits and plumbing pipes already run across the concrete slab. The insulation boards cannot be laid on top of these obstacles because they would be sitting on hollow voids, rocking in mid-air.
A first, lightweight fill layer is poured. This is usually lightweight concrete (known as foamed concrete). It covers all cables, levels the floor and creates a perfect, smooth canvas for the underfloor heating system to sit on.
On top of the smooth foamed concrete (once it has dried properly), the Vapour Barrier is laid. The sheets must overlap by 10 to 20 centimetres and be sealed together with special tape to create an airtight layer.
It protects the underfloor heating insulation from rising moisture in the slab. If moisture passes through from below, the thermal insulation will be destroyed and the system will lose a significant portion of its efficiency.
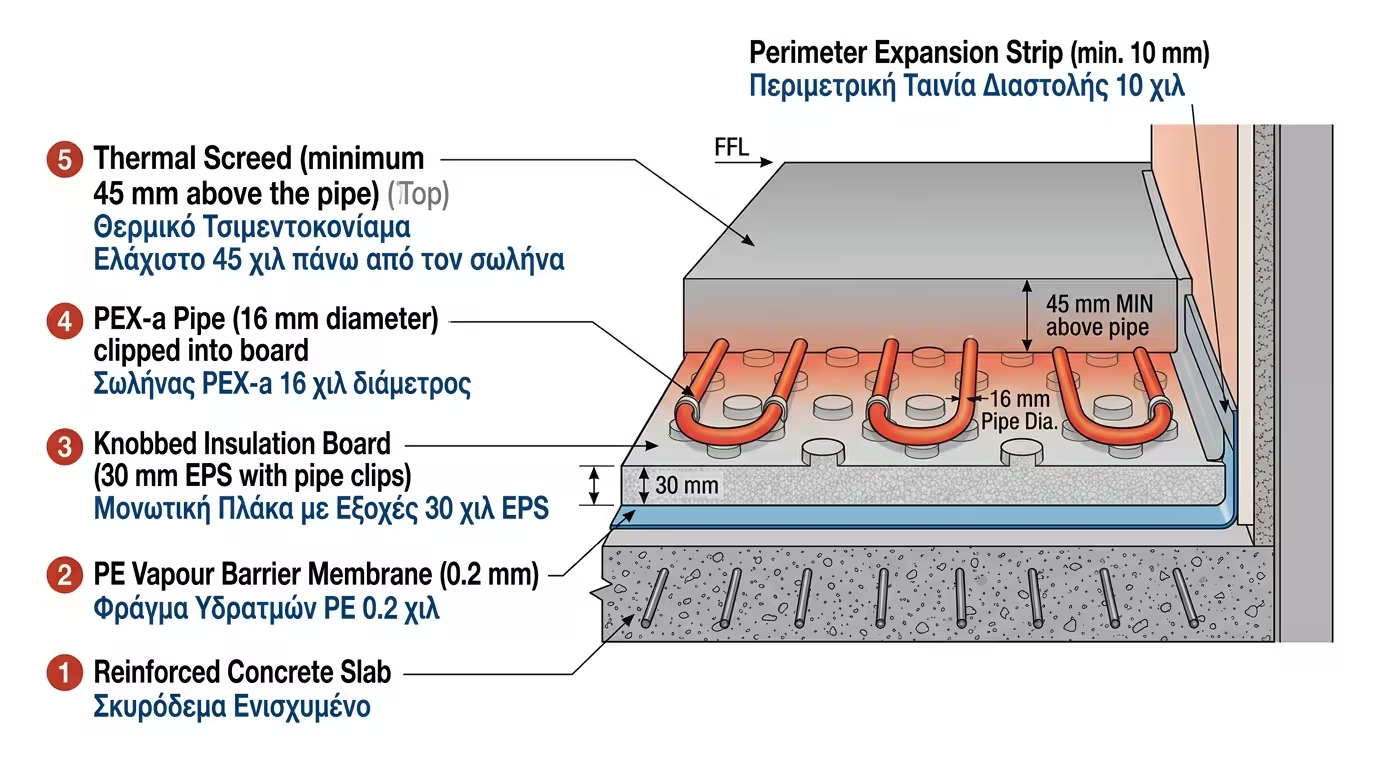
Before the insulation material is laid, the installer unrolls a foam tape (usually light blue or white, made of polyethylene) and sticks it around all walls, columns and door frames, from the floor to plaster height. The thermal insulation board is then laid across the entire floor area.
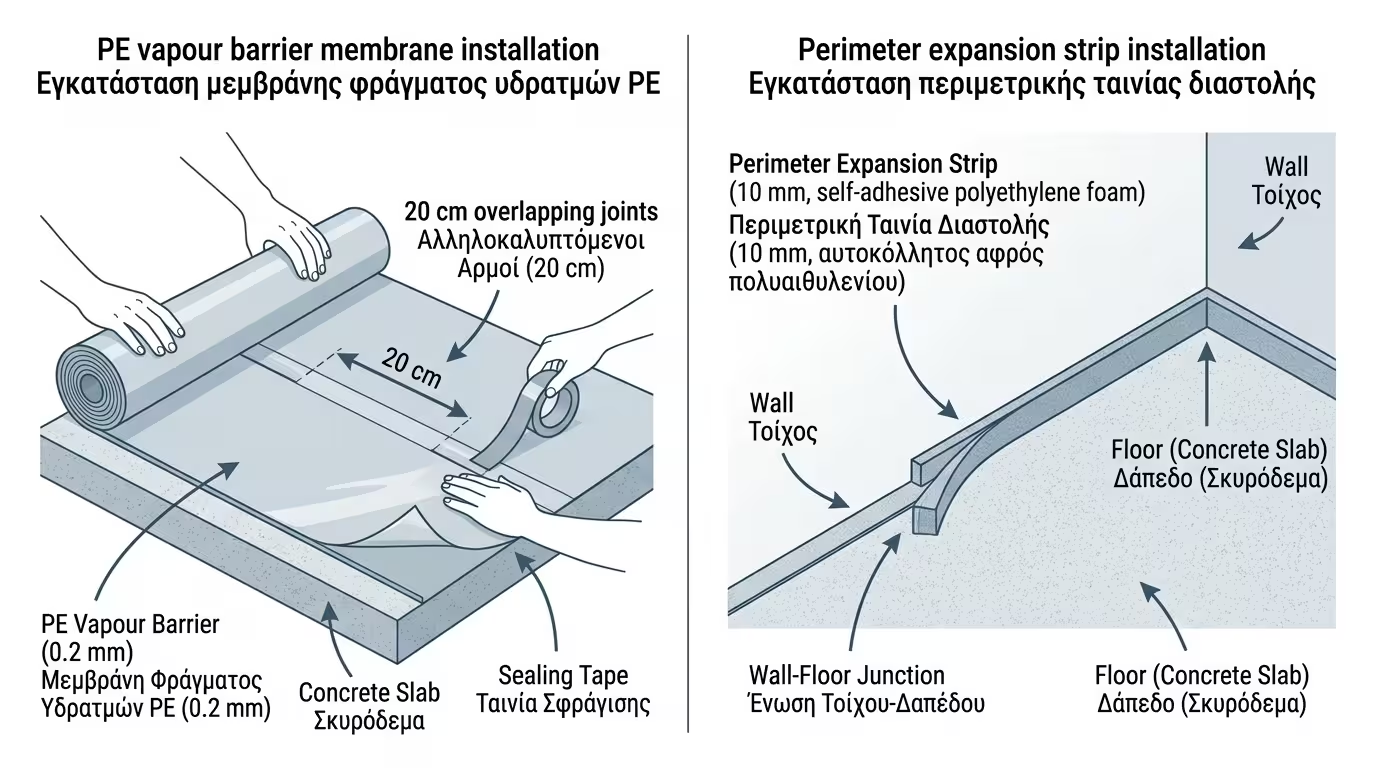
It is perhaps the most underrated yet critical material! When the floor heats up, it expands. If the cement sits directly against the wall, it will crack. The perimeter tape acts as a soft cushion that compresses, allowing the floor to "breathe" without cracking the tiles.
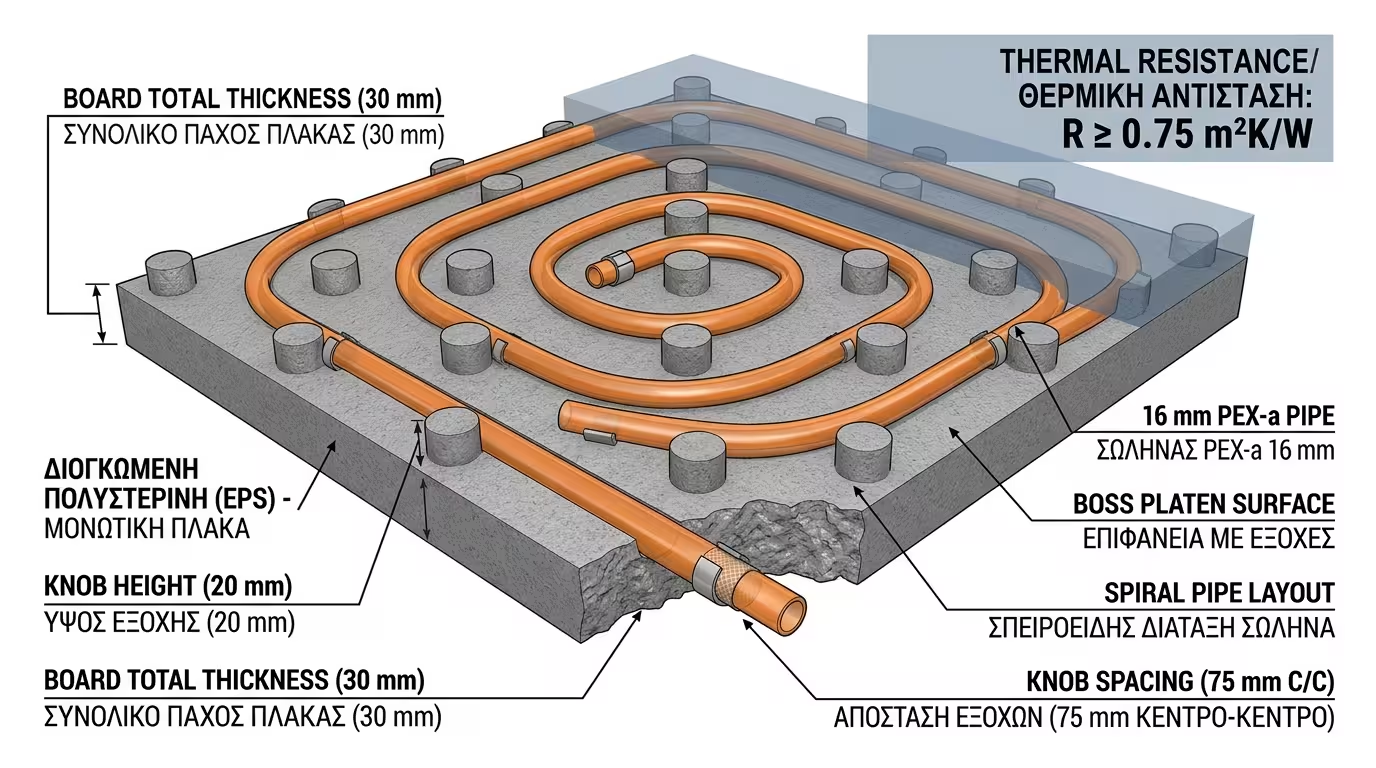
Now we get to the "heart" of the system. The board is usually made of expanded polystyrene (EPS) of high density. Without the insulation, the pipes would heat the concrete slab and you would be paying electricity to heat the ceiling of the… downstairs neighbour!
The insulation forces all heat to travel exclusively upward (into your own home). Without it, a significant percentage of energy is lost downward, dramatically increasing electricity bills.
The insulation board can be flat (in which case pipes are pinned to it with plastic clips - tacker) or a Knob Plate, which features raised plastic "teeth" (knobs) between which the pipe snaps in tightly. The knob plate is the most popular today thanks to its installation speed.
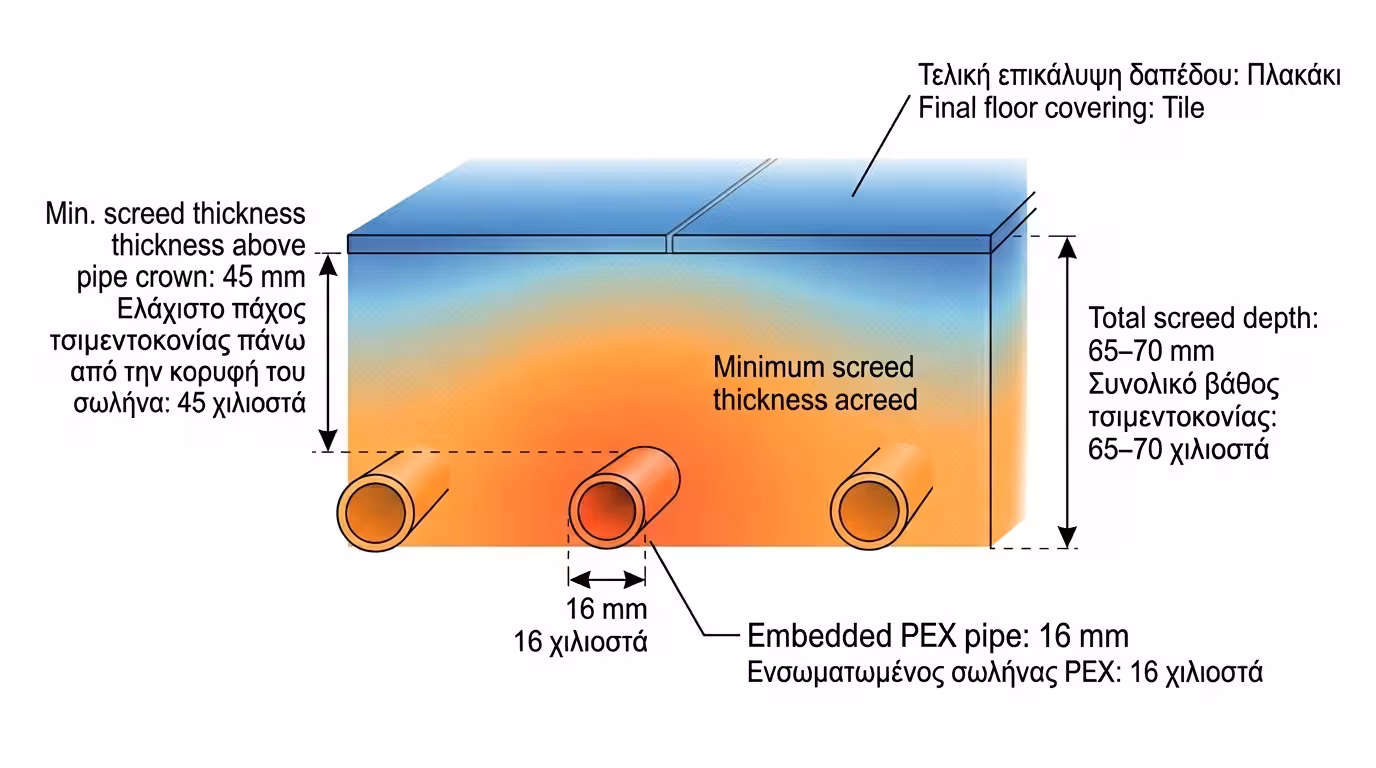
On top of (or inside) the insulation board, the pipe is unrolled and snapped in. Only plastic pipes with an oxygen barrier are used, typically PEX-a, PEX-c or Multilayer (PE-RT/Al/PE-RT). Once the pipes are laid and the network is pressure-tested with water, the final cement is poured - the Thermal Screed.
The pipe is laid in a "snail" (bifilar) pattern to achieve absolute temperature uniformity across the floor. The hot supply water runs alongside the cooler return water, eliminating temperature differences from one side of the room to the other.
After the pipes are installed, the network is pressure-tested with water (to confirm there is no leak). Only after the test passes does the team proceed to pour the thermal screed that will "bury" the pipes.
The thermal screed is not ordinary cement. It is not just something to walk on. It functions as Thermal Mass - it absorbs heat from the pipes and emits it uniformly into the room (like a giant, warm sponge).
It also provides the necessary mechanical strength to support the furniture, people, and the weight of the final floor covering (tiles, marble, etc.). Without sufficient screed thickness, the underfloor system will fail structurally.
After the thermal screed has fully cured and the "initial heating" (shock) procedure has been followed to drive out residual moisture, the adhesive and final floor finish of your choice is applied - tile, marble, or specialist laminate.
Traditional thermal screed requires approximately 21 to 28 days to dry naturally and expel its moisture. Do not lay tiles as soon as the surface appears dry - the screed must mature fully through its entire depth.
After 28 days, and BEFORE tiles or wood are laid, the installer fires up the Heat Pump. The water temperature is raised gradually (5°C per day) until it reaches maximum (e.g. 45°C), holds there for 3–4 days, then ramps back down gradually.
We force the cement to expand and contract to its maximum extent, releasing all hidden stresses and trapped moisture. If something is going to crack, it will crack now, BEFORE your expensive tiles are laid!
Adding all these layers together, the overall height (thickness) of a traditional underfloor system (excluding the foamed concrete levelling layer) is usually around 8 to 10 centimetres. This means the architect must have planned for this "step" in the door and window heights of a new build.
⚠️ If you are designing a new build, inform the architect from the outset that you want underfloor heating. The extra 8–10 centimetres of height must be factored into the construction drawings, particularly the heights of doors, windows and patio doors.
Return to category.
Go to categoryReturn to the central guide.
Go to guide