🌡️ Step 1: Heat
When the room temperature starts to rise, the wax inside the capsule heats up and expands. As it expands, it pushes a small metal pin (plunger) downwards towards the valve body.
The central thermostat in the living room reads 21°C. The boiler runs full blast. But the bedroom (facing south) is sweltering at 24°C, while the empty guest room wastes energy for nothing.
The solution: a small, smart device that screws onto the radiator - the Thermostatic Radiator Valve (TRV). It turns every radiator into an independent heating zone, with no electricity needed.
No electricity, batteries or wires needed! It works on pure physics alone. Inside the plastic knob there is a small capsule filled with special wax or liquid that reacts to temperature changes. In old radiators, the handle worked like a simple tap: either fully open or fully closed. The TRV replaces this "dumb" handle, turning every radiator into a 100% independent heating zone with its own built-in thermostat.
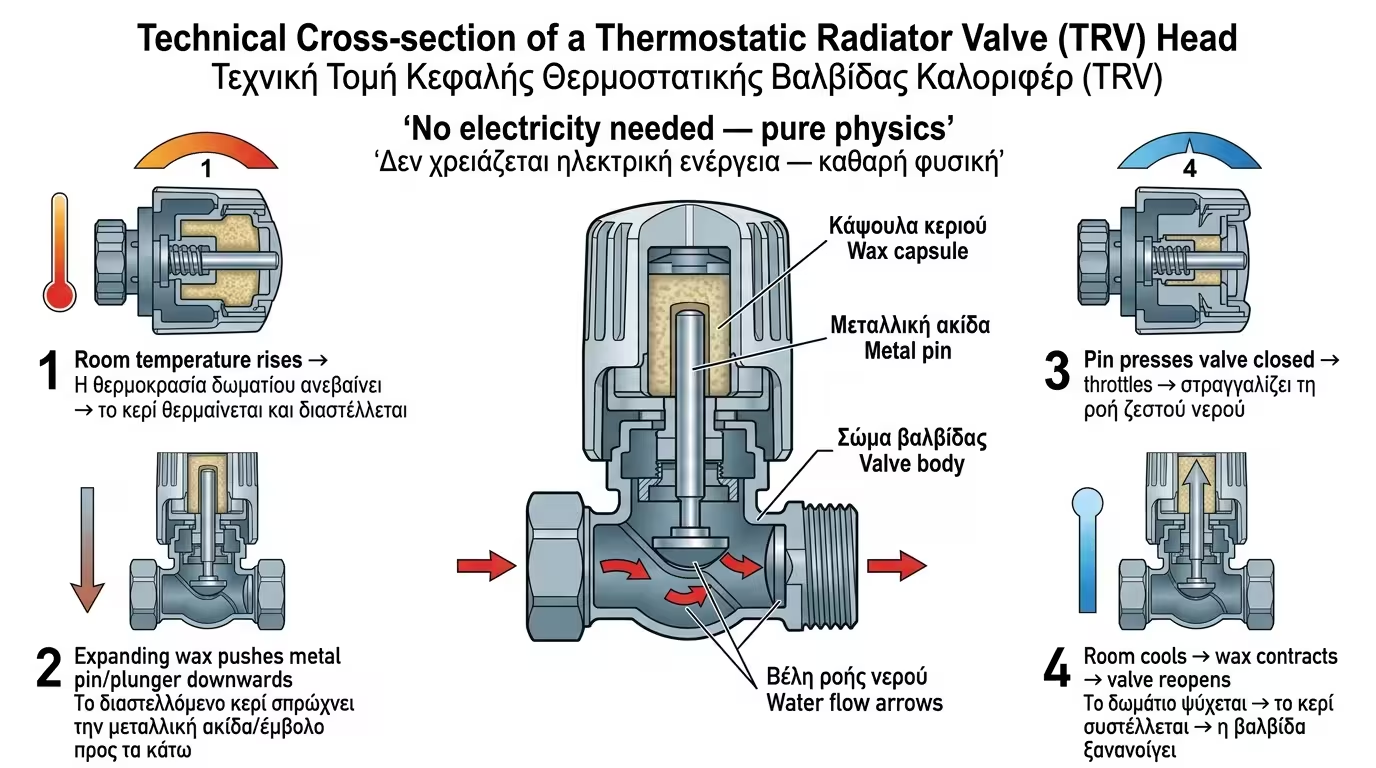
When the room temperature starts to rise, the wax inside the capsule heats up and expands. As it expands, it pushes a small metal pin (plunger) downwards towards the valve body.
The pin presses the valve and throttles the flow of hot water. The radiator gradually cools down.
The room does not overheat, and the "surplus" hot water that was saved travels to the remaining, colder rooms of the house. Automatic balancing without any human intervention - the entire home heats more evenly and efficiently.
When the room cools again, the wax contracts, the valve re-opens and the radiator heats up again. In short, the radiator "understands" when the room has reached the desired temperature, shuts itself off, and reopens only when needed. An automatic, perpetual cycle - zero energy waste.
The biggest mistake: users treat the TRV like a car's "throttle". Setting it to 5 does not heat faster - it simply never stops!

Frost protection (6-8°C). Practically off - the radiator opens just slightly, only if the temperature drops near freezing, solely to prevent pipes from bursting due to ice formation. Ideal for holiday homes that remain empty during winter.
Target 12-16°C. Ideal for hallways, staircases, storage rooms or guest bedrooms that you do not use at all. You maintain the space at a basic temperature without wasting energy. The savings are significant - why heat an empty room to 20°C?
Corresponds to ~20°C. Perfect for living room, dining room, children's room. Sleep tip: set the bedroom TRV to 2.5 (approximately 18°C) - you will sleep far more comfortably and will not wake up with a dry throat.
Setting 4 = 22-24°C (bathroom after a shower). Setting 5 = 26°C+ - overkill. You are telling the radiator "never stop". It does not heat faster, it just wastes energy.
Good news! If your home is relatively modern (or the radiator valves were replaced in the last 10-15 years), you likely already have TRV-ready valves installed.
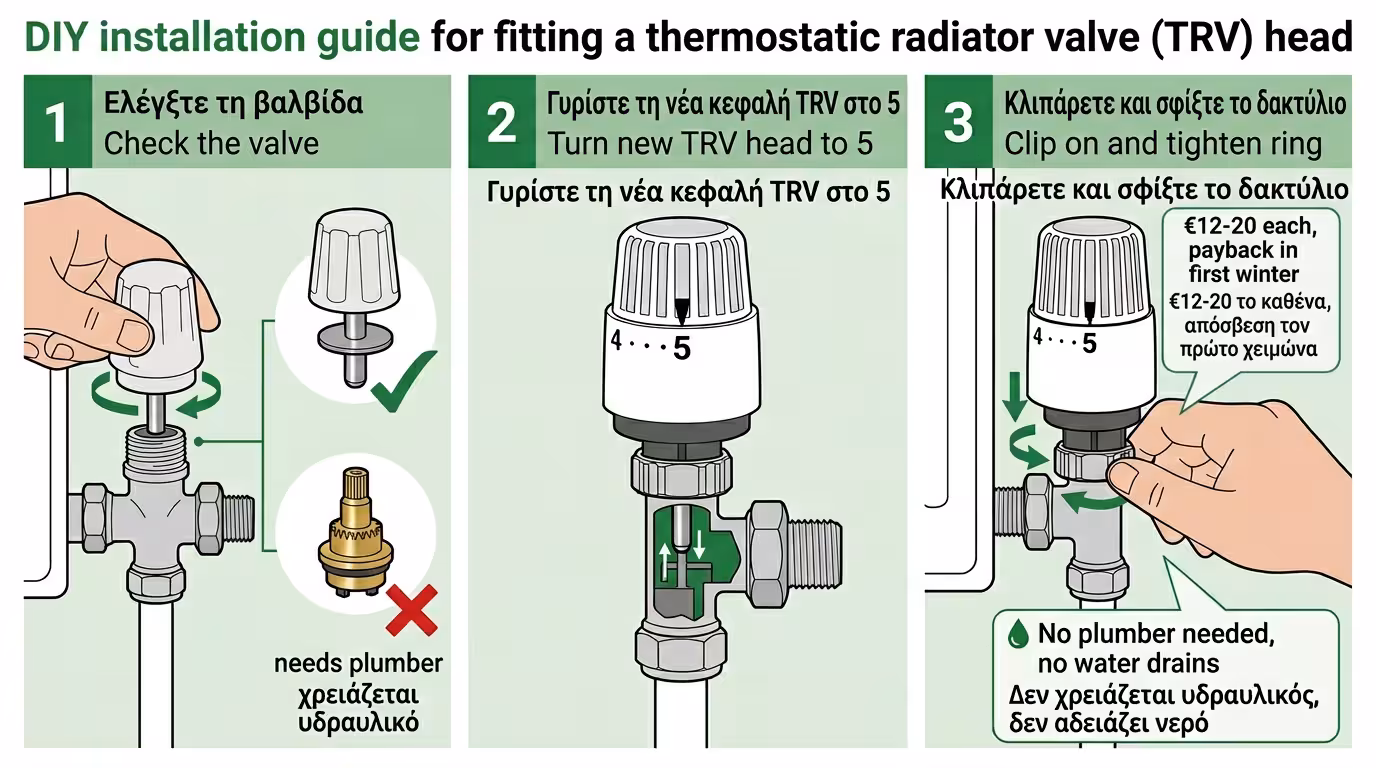
Unscrew (by hand) the plain plastic handle from the radiator valve. If underneath you see a metal pin (a small plunger that pushes in and springs back when pressed), then you are in luck - you have TRV-ready valves already installed! Simply buy the thermostatic heads and clip them on. However, if you remove the handle and see a brass spindle with "teeth", unfortunately you have old manual valves. In that case, you will need a plumber to drain the system and replace the entire brass valve body.
Turn the new head to "5" (its pin retracts - making space). Slide it onto the radiator valve body.
Tighten the metal or plastic coupling ring at the base. No plumber needed! No water flows, you are not touching the water circuit at all.
€12-20 each. For a 4-room house: ~€60-80 total. The payback happens within the first winter from energy savings alone.
For proper operation, you must respect two rules - otherwise TRVs will give you cold rooms or a burnt-out circulator pump.
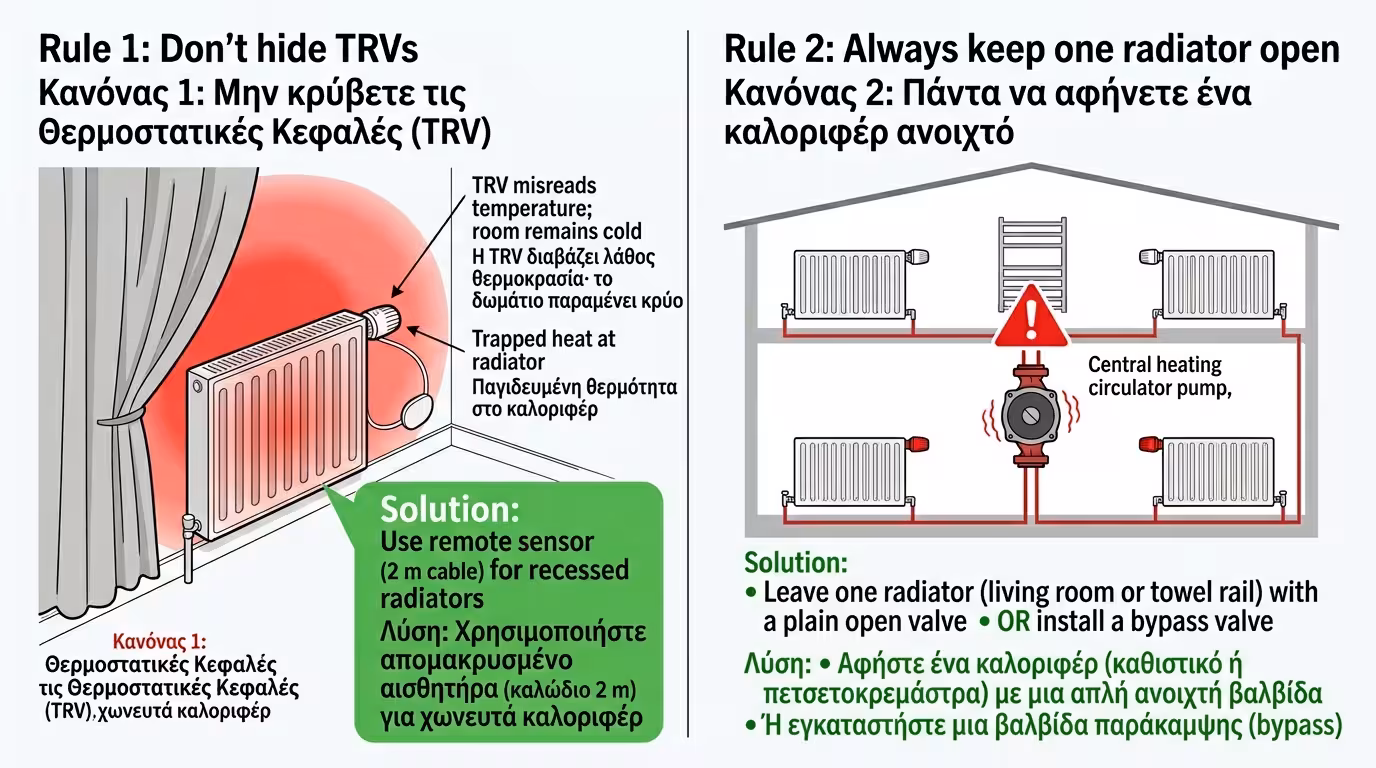
The head "reads" the air temperature around it. If the radiator is behind a heavy curtain or inside furniture, the heat is trapped there. The TRV thinks "it's warm" and closes - while you freeze.
Some TRVs have an external sensor (2 m cable) placed away from the radiator, in the open air of the room. Ideal for radiators in recesses or behind furniture.
NEVER fit TRVs on every single radiator! Always leave one radiator (typically the large one in the living room or the bathroom towel rail) with a plain open valve. Why? If all TRV heads close simultaneously (which seems unlikely, but does happen on warm sunny days), the circulator pump will try to push water through the system, find every "door" closed, strain under excessive pressure, and ultimately burn out. There must always be an escape pathway for the water to circulate.
If you want TRVs on every radiator, a plumber can install a Bypass valve (differential pressure valve) in the system - it always ensures a water pathway.
💡 €12-20 per radiator. Zero electricity. Room-by-room control. TRVs are the cheapest and most immediately effective heating investment!
Return to category.
Go to categoryReturn to the central guide.
Go to guide