
Drainage
Falls direct rain towards outlets so it can drain from the roof.
M01.L01 · 5–7 min
Water can enter a roof in more than one way. Protection depends on drainage, a continuous waterproofing layer, and well-designed connections to parapets, drains, and penetrations. If that continuity breaks somewhere, water may enter the construction. A ceiling stain helps guide an investigation, but it does not always identify the exact entry point.
A roof manages water as a whole. Three elements work together to drain it and limit water entry.
The exact arrangement depends on the system and construction of the roof in question. [1] [2]
Water may collect when drainage does not work as intended. Ponding extends the time the roof stays wet and can add stress to the assembly, but it does not by itself prove that the membrane has a hole. The cause needs to be checked on the specific project.
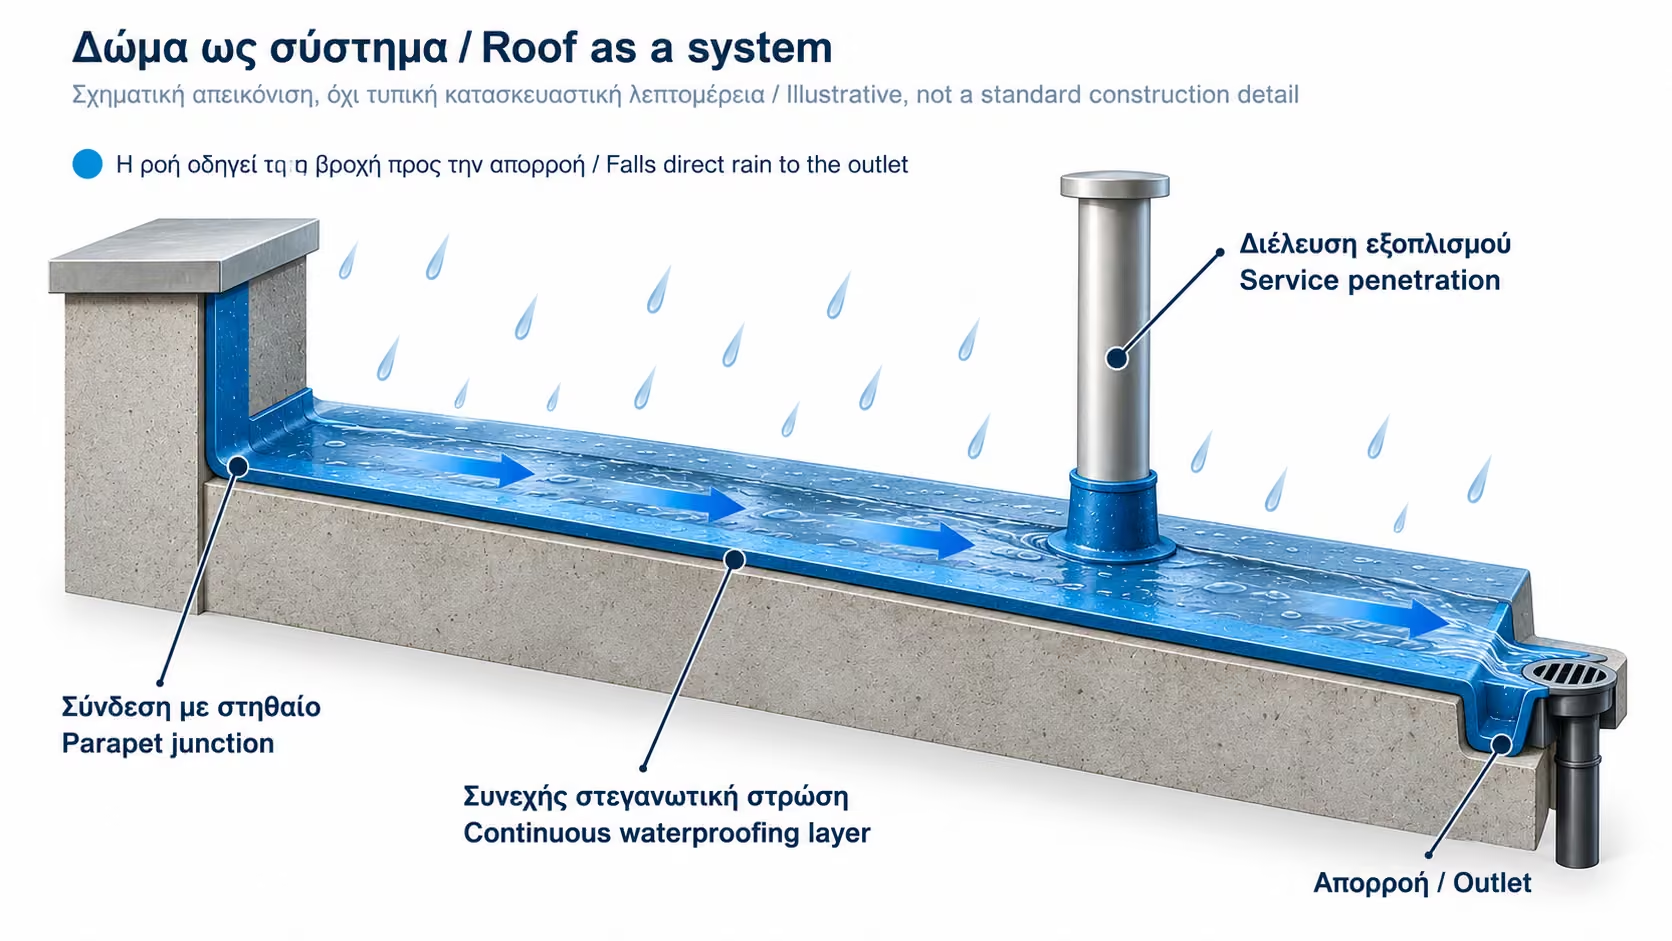
Falls direct rain towards outlets so it can drain from the roof.
The layer limits water entry and stays continuous at seams, changes in level, and around penetrations.
The membrane needs continuity where it terminates at a parapet and around elements that pass through it, such as pipes. These connection details complete the protection.
About the diagramThe diagrams show possible ways water can enter and travel. They are not a standard roof section or installation instructions for every roof.
An investigation often starts where the waterproofing surface is interrupted, changes direction, or connects to another element. The areas below are inspection points, not a list of guaranteed failures.
A membrane may look intact from a distance while a critical connection is concealed or difficult to assess. Details around penetrations, outlets, and parapets need particular attention because they bring different surfaces and functions together. [1] [3] [4]
Blisters, wrinkles, discoloration, and old repairs do not by themselves prove an active leak. They are visible signs that may need to be assessed in the context of the specific system.
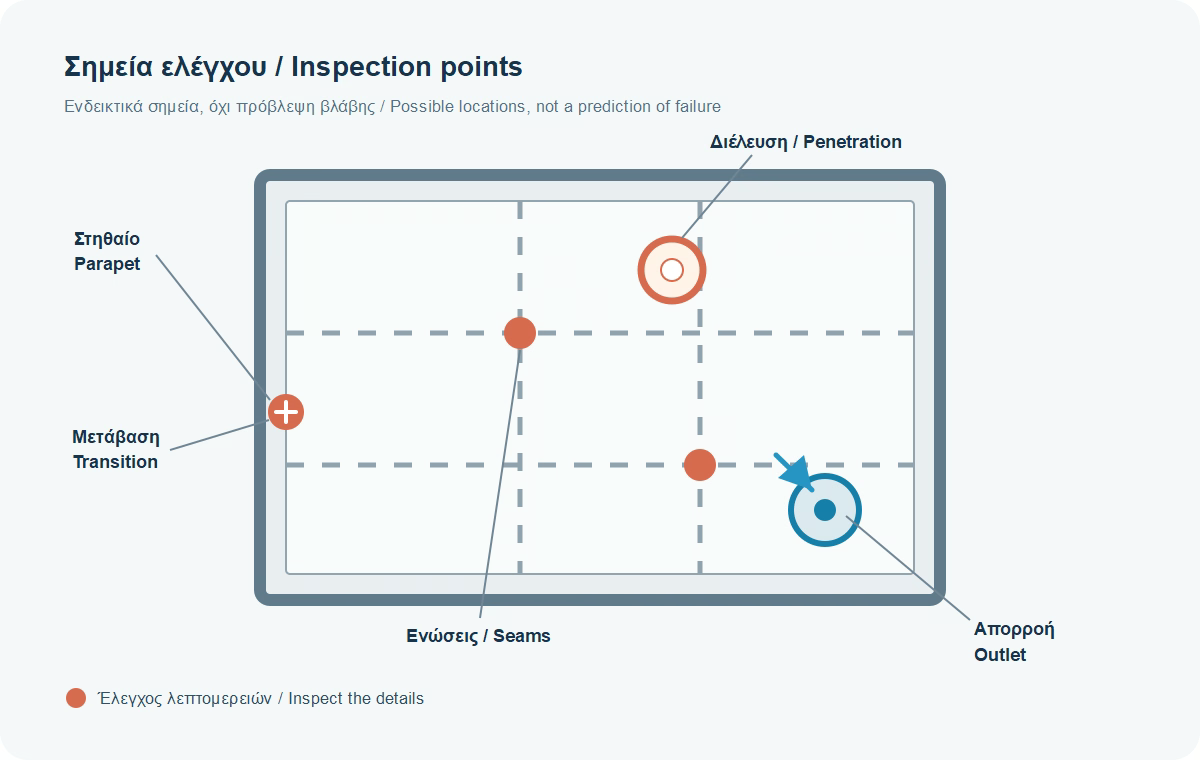
Check for possible punctures, cracks, deterioration, or debonding.
Inspect the seams and overlaps between membrane sheets.
The roof-to-wall junction needs continuity in the waterproofing.
Pipes, vents, supports, equipment, and roof outlets need properly integrated details.
Inspect connections between different materials or parts of the construction.
Water moves when it meets an opening or discontinuity in the layer that holds it back. Gravity, wind, pressure differences, and effects in small gaps can influence its path. [5] [6]
The sources describe five individual mechanisms, grouped here into three for easier understanding. This is a teaching simplification; the mechanisms are not identical.
These mechanisms can occur together. They do not mean that water passes through an intact, continuous waterproofing membrane.
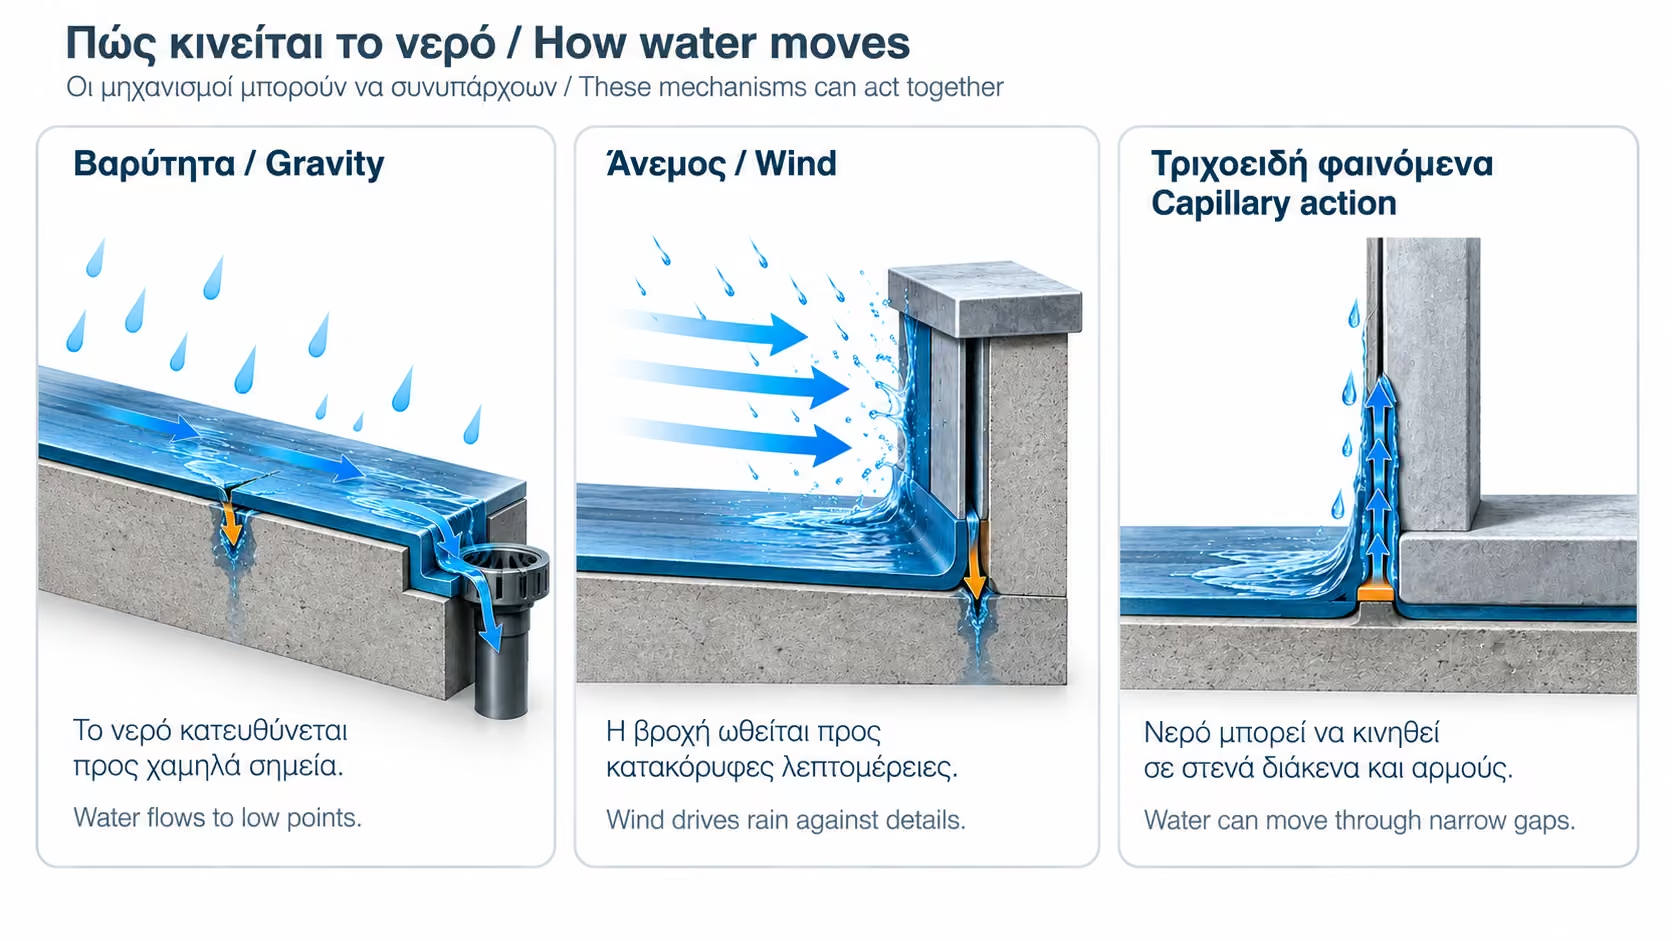
Gravity carries water to low areas and outlets. If it collects, its depth may add pressure at a defect.
Wind and raindrop momentum can drive rain against vertical surfaces and details. Air pressure differences can affect water moving through available openings.
In narrow gaps, joints, and porous materials, water can be held or drawn along a surface.
After passing an outer layer, water may move sideways or at an angle over or between layers in some roof assemblies before becoming visible indoors. Its path depends on the build-up, materials, adhesion, and roof details. Time may also pass between rainfall and the appearance of moisture. The location and timing are useful evidence, but they do not prove the exact entry point. [7] [8]
For example, moisture may appear near an external wall after wind-driven rain while the roof above has a parapet and a vent pipe. The connection with rain and wind helps organize the investigation. It is not enough to identify either detail as the cause.
This lesson focuses on rainwater entry. Moisture on a ceiling can also come from condensation or another source. The next lesson in the series explains how to tell these situations apart.
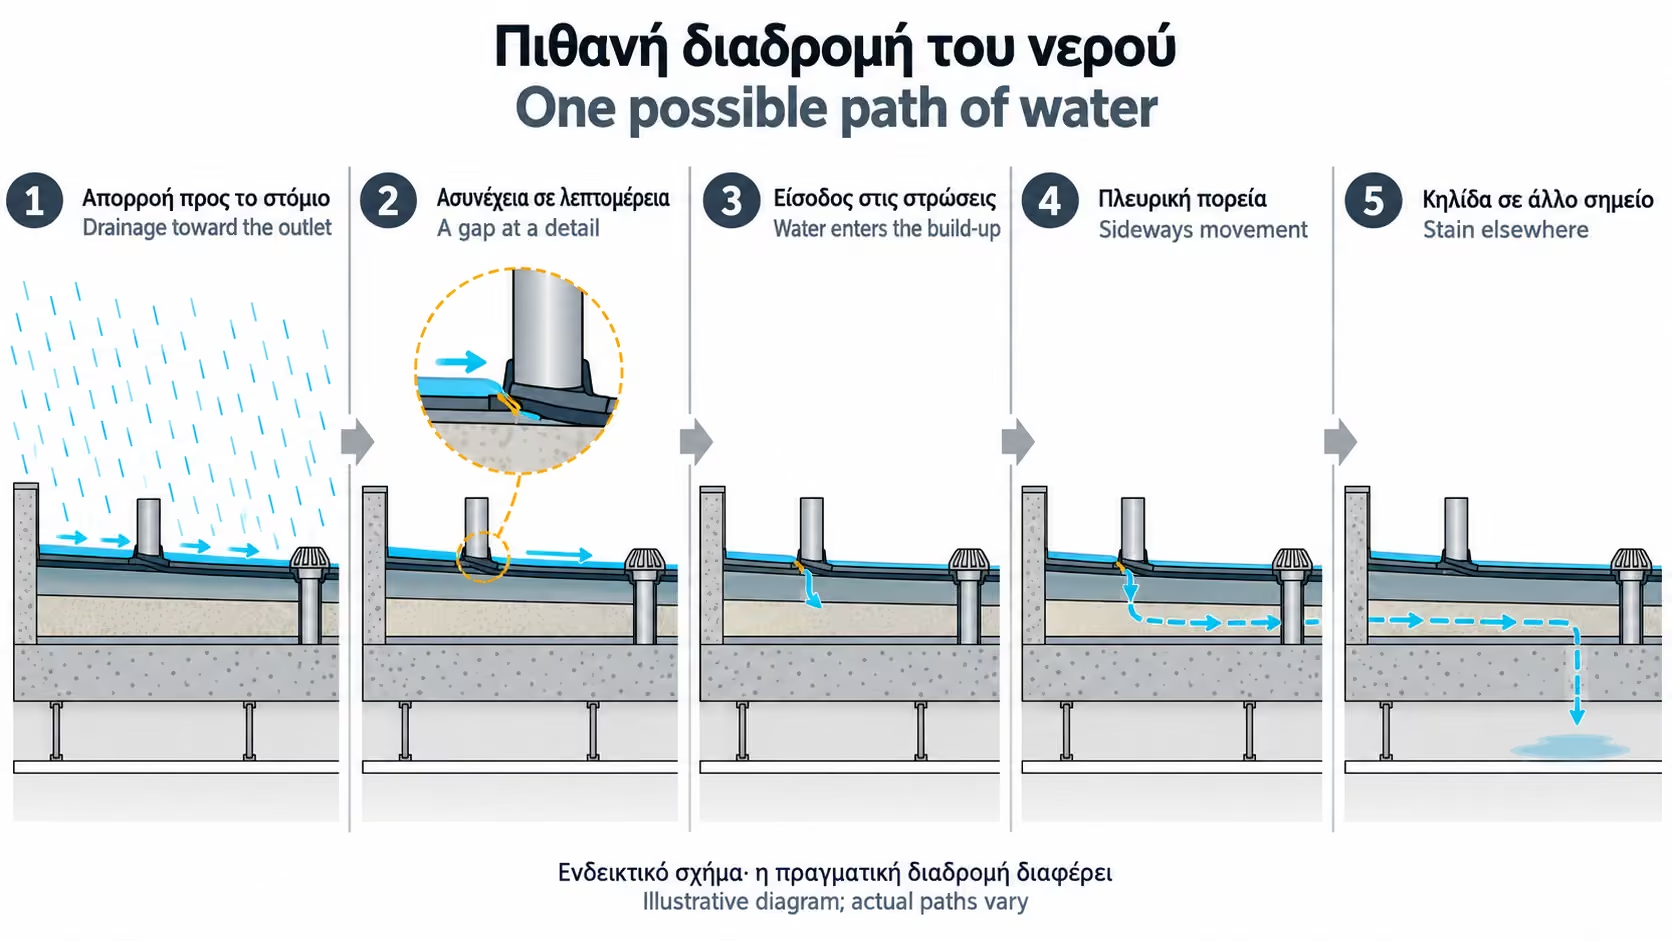
Keep in mindThe stain’s location is evidence to investigate. It is not, by itself, a diagnosis of the entry point.
Without intervening on the roof, an owner can record useful information for a professional:
⚠️ Safe observation limitsAvoid: Do not walk on a wet roof, go near an edge, or open the roof build-up. Do not block outlets, use a torch, or carry out an uncontrolled water test.
Flood testing: It adds a significant water load and requires planning for the specific roof, safe drainage, and an assessment of structural capacity. [7]
Before a repair: Identify the cause and the existing system first. A generic surface coating is not a universal solution.
Get prompt help: If water is actively entering near electrical equipment or a large area is getting wet, protect occupants first and contact a qualified professional promptly.
No. Ponding means the drainage, falls, and waterproofing layer should be assessed. It does not by itself prove a puncture or leak.
Not necessarily. Depending on the layers and connections, water may travel before becoming visible. The stain is one clue in the investigation.
No. A distant visual check may not assess seams, terminations, outlets, or areas concealed by other materials.
No. Condensation and other moisture sources can produce similar signs. Distinguishing between them is the subject of the next lesson.
Not without technical planning. The test can add a dangerous load or cause more water ingress if the waterproofing or drainage fails. [7]
The sources below support general principles for rainwater management, water movement, and membrane testing. They include North American guides and examples. They are not Greek regulations, a standard section for a Greek roof, or installation instructions for a particular product. For design, inspection, and repairs, consider the actual construction, applicable requirements, and the instructions for the selected system.
M01.L02 · Planned
The next lesson will explain how to distinguish possible moisture sources. Until it is published, you can view all lessons in module M01.
Return to category.
Go to categoryReturn to the central guide.
Go to guide