
Bathroom DIY, Maintenance & Styling
Return to category.
Go to categoryJoints are one of the fastest aging parts of a bathroom. The tiles may still be in good condition, the layout may not bother you and the bathroom may not need a complete renovation, but the joints may have turned grey, yellow, brown or permanently stained. Then the whole surface looks old, no matter how much you clean.
Many owners try again and again to whiten the joints with soda, oxygen, special cleaners, bleach or brushes. In some cases this works. In others, however, the stains have gone deeper, the grout has watered down, deteriorated or acquired a permanent shade. There the bleaching effort becomes futile. It cleans superficially, but the joint never returns to its original image.
In such cases, refreshing with color is a smart solution. Instead of struggling to make the grout white again, you can paint it with a special grout pen or grout colorant. So you don't just cover stains; you deliberately change the aesthetics of the bathroom. An old white joint can be turned grey, charcoal or black and create a sharp, modern contrast to the tiles.
Changing from white to black grout, especially on white subway tiles or simple square tiles, can completely transform a space. The bathroom acquires a more graphic, industrial or contemporary character. The lines of the tiles are accentuated, the surface gains rhythm and the old "faded" effect becomes a design choice. Instead of looking dirty, it looks intentional.
But joint painting is not a magic solution for every situation. Does not fix broken, loose or moldy joints in depth. It does not waterproof a damaged shower. It should not come in contact with active mold, moisture or loose grout. To succeed, it needs a clean, dry and stable base. In this guide we'll see when it's worth using a grout pen or colorant, how to apply it correctly, what color to choose, what mistakes to avoid and when it's better to scrape and re-grout the joints from scratch.
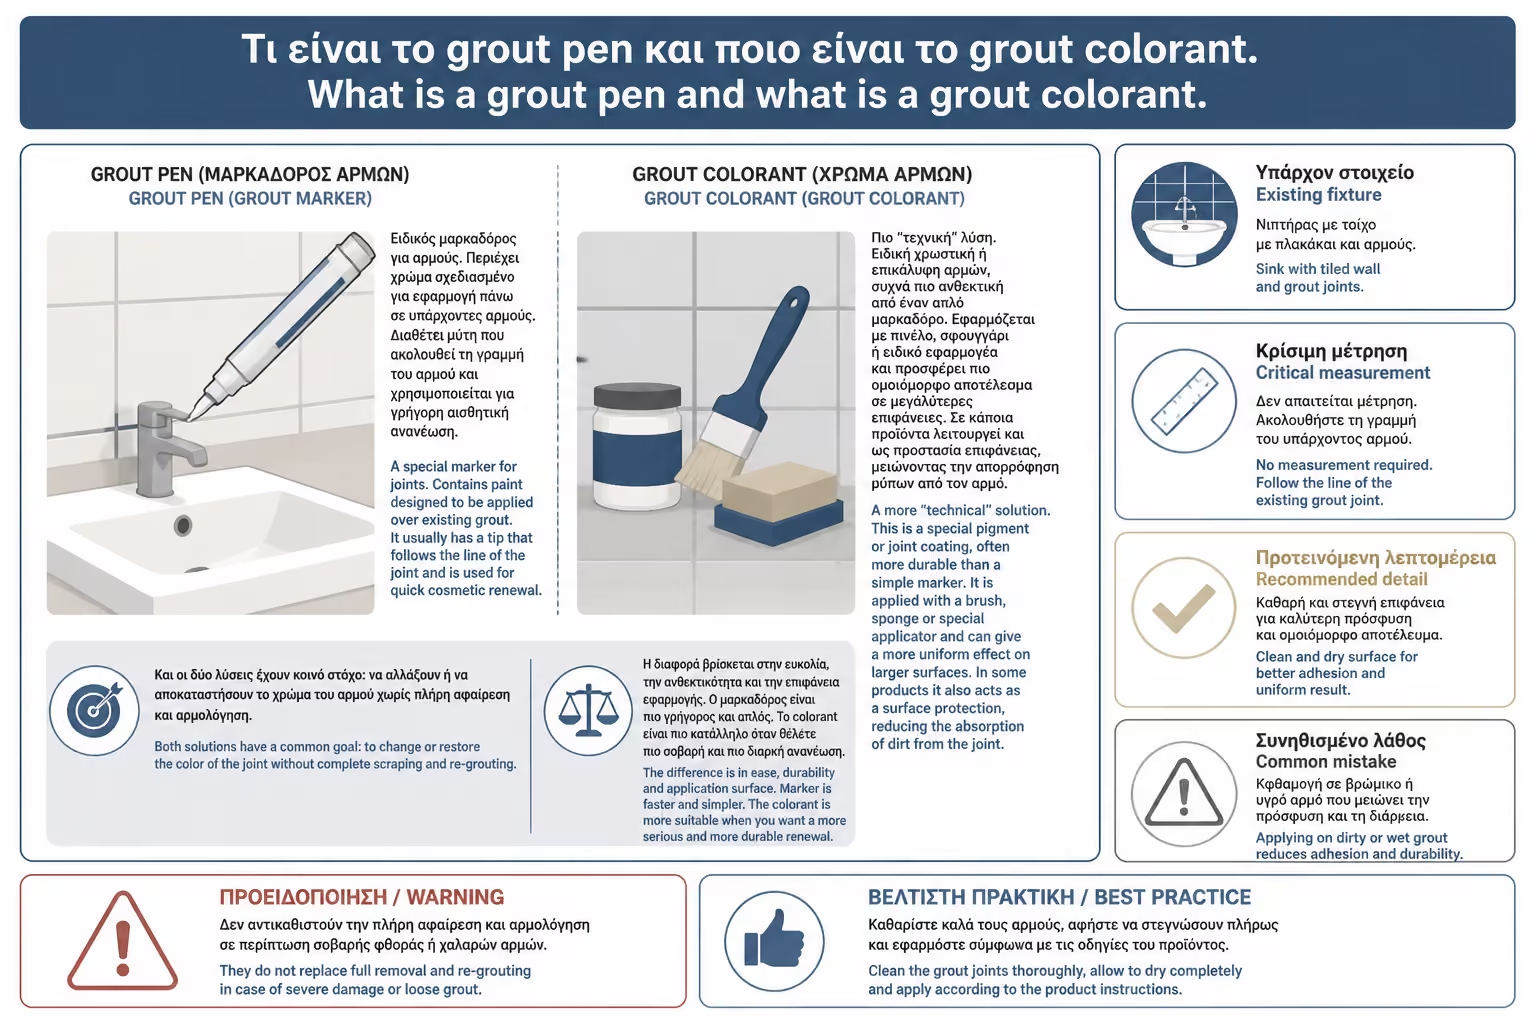
The grout pen is a special marker for joints. Contains paint designed to be applied over existing grout. It usually has a tip that follows the line of the joint and is used for quick cosmetic renewal. It is easy to use, economical and ideal for small surfaces, such as around the sink, in a guest WC or a section of wall that you want to freshen up.
Grout colorant is a more "technical" solution. This is a special pigment or joint coating, often more durable than a simple marker. It is applied with a brush, sponge or special applicator and can give a more uniform effect on larger surfaces. In some products it also acts as a surface protection, reducing the absorption of dirt from the joint.
Both solutions have a common goal: to change or restore the color of the joint without complete scraping and re-grouting. The difference is in ease, durability and application surface. Marker is faster and simpler. The colorant is more suitable when you want a more serious and more durable renewal.
In any case, we are talking about a superficial renewal. The material colors the existing joint. It does not replace deep grout. If the joint is gone, cracked, rubbed, or has mold coming back from the inside, it needs repair before any paint.
Painting is worthwhile when the joints are firm but stained. That is, no missing material, no large gaps, no finger rubbing and no active mold. If they have simply lost their original color or have become permanently gray from years of use, the grout pen or colorant can give an impressive result.
It's also worth it when you want a cosmetic change, not just cleaning. For example, on white tiles with old white joints that have turned yellow, you can choose gray or black and create a modern contrast. If you do it right, the result looks like it was designed that way from the beginning.
Worth it on small and medium surfaces where complete joint removal is impractical. A small WC, a zone behind the sink, the wall around the mirror or a strip of tiles can be renewed relatively easily. On very large surfaces, the work becomes more tedious and perhaps requires a more organized application with colorant instead of a marker.
Not worth it when the problem is technical. If the joints are open inside the shower, if there are cracks, if water is seeping behind tiles, or if mold reappears a few days after cleaning, painting will only temporarily hide the picture. There it needs checking, cleaning, removal of old grout and new grouting where necessary.
You should not paint over mold. If the joint is black from mold, it must first be cleaned and completely dried. If the mold has gone deep into the joint or keeps coming back, the paint will only cover it superficially. Moisture will still be present and the paint may peel or stain underneath.
Do not paint over wet grout. Joints absorb water and may appear dry on the surface, while inside they retain moisture. Especially in a shower or bathtub, it must have been unused for a long time and there must be good ventilation. If you close moisture under the color, the effect will be weak.
Do not paint over loose or chipped grout. If it rubs, if it has gaps or if it has come off the corners, it needs repair first. The grout pen does not fill gaps. It can darken them and make them less visible, but it does not restore the function of the joint.
It's also not a good idea to paint joints in natural stone without testing. Marble, travertine, porous tiles or rough surfaces can be stained by paint. In such materials, color error removal can be difficult. Always test in a small, hidden spot.
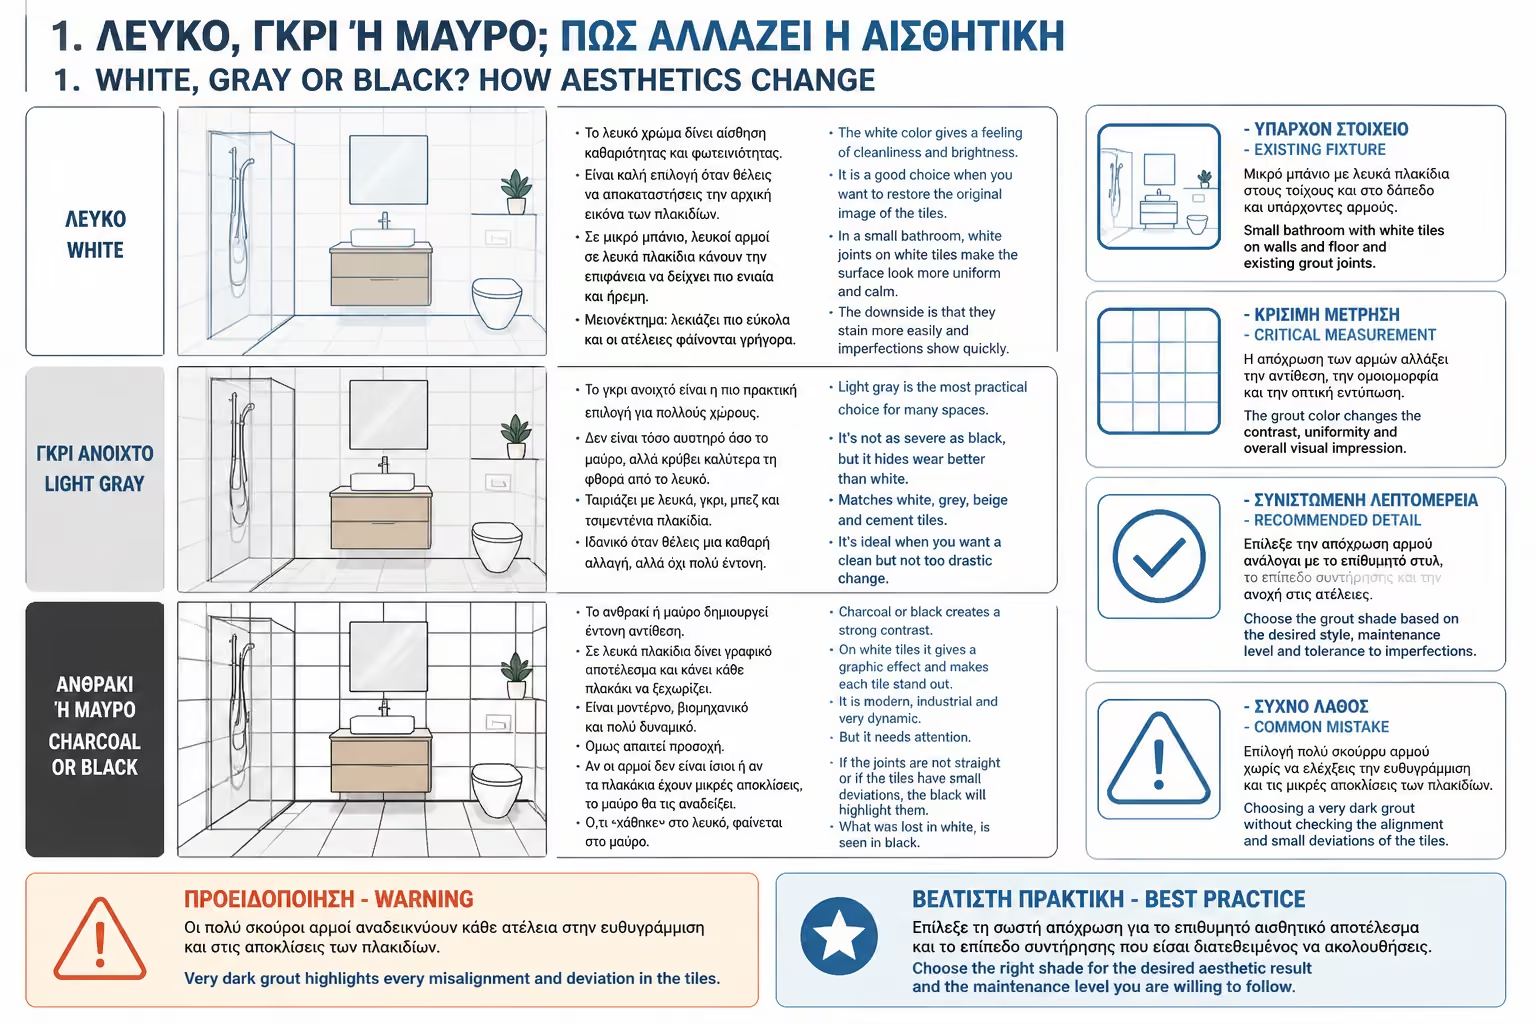
The white color gives a feeling of cleanliness and brightness. It is a good choice when you want to restore the original image of the tiles. In a small bathroom, white joints on white tiles make the surface look more uniform and calm. The downside is that they stain more easily and imperfections show quickly.
Light gray is the most practical choice for many spaces. It's not as severe as black, but it hides wear better than white. Matches white, grey, beige and cement tiles. It's ideal when you want a clean but not too drastic change.
Charcoal or black creates a strong contrast. On white tiles it gives a graphic effect and makes each tile stand out. It is modern, industrial and very dynamic. But it needs attention. If the joints are not straight or if the tiles have small deviations, the black will highlight them. What was lost in white, is seen in black.
On old tiles with irregular lines, a medium gray might be better instead of black. Gray refreshes without highlighting every squint. Black is striking, but requires relatively clean geometry.
The change from white to black joint is very strong when the tiles are plain and light colored. White subway tiles, white 15x15 squares, simple rectangular tiles or light gray tiles immediately acquire a more modern image. The wall becomes more "graphic" and the bathroom acquires character.
It is a good idea when there are other black elements in the space. A black faucet, black mirror frame, black knobs, black bath screen or black accessories make the black joint look part of a design. If everything else is chrome, white and very classic, the black joint can look more out of place.
Not always a good idea in very small bathrooms with lots of small tiles. When each line turns black, the surface acquires a strong grid. This can look beautiful, but it can also be tiring or visually reduce the space. In such cases, test on a small band first.
It's also not a good idea if the joints have different widths, crooked lines or lots of old repairs. Black is unforgiving. If you want a safer refresh, choose gray or beige-gray. If you want a strong design effect and the lines are good, black can really transform the bathroom.
Preparation determines endurance. The joints must be clean of soaps, salts, grease, dust and mold. If you paint over dirt, the paint will soak into the film and not the joint. So it can go away quickly or look patchy.
Start by cleaning the joints with a suitable cleaner and brush. In areas with salts, descaling is needed, but with attention to the surrounding materials. We do not use acidic products without instructions on natural stone or sensitive surfaces. On common ceramic tiles, cleaning is simpler.
If there is mold, treat it first. Use a product suitable for mold, ventilate well and allow the area to dry. Never mix bleach with vinegar, acids, ammonia, oxygen or other cleaners. Cleaning mixtures can create hazardous fumes.
After cleaning, rinse where necessary and allow the joints to dry completely. This can mean several hours or even 24 hours, especially in a shower. Don't rush. The color needs a dry base.
Before painting the entire bathroom, do a test. Choose a small, relatively hidden spot, apply the product and see how it writes on the joint and if it cleans easily from the tile. Let it dry and check the color in natural and artificial light.
The test is especially important when you make a drastic color change, such as from white to black. Black may look very pretty on the packaging, but in your space it may look harsher than you expected. Gray can come out bluer or browner depending on the light and the tiles.
Also check if the product stains the tiles. On glazed ceramic tiles, the excess is usually easy to clean while it is fresh. On matte, porous or embossed tiles, the color can remain in the microtexture. There the application must be much more careful.
Don't skip the test because the task seems simple. If you paint a large area with a color you don't like or it stains the tile, the correction will be much more difficult than the original application.
After cleaning and drying the joints, shake the marker well according to the instructions. Press the nib onto a scrap paper or test spot until the ink comes off. Don't start directly from the most obvious spot, because a lot or a little color may come out at first.
Run the marker over the joint in a slow, steady motion. Don't push too hard. If the tip spits out too much paint, it will stain the tiles. If not enough, the result will be uneven. Better two minute passes than one heavy and sketchy one.
Work in small zones. Don't try to paint the entire bathroom at once. Pass a few lines, clean any excess off the tiles while they are still fresh and continue. If you let the paint dry on the tile, it may need sanding and spoil the effect.
At joint intersections, be careful not to create "cloaks" of color. There the tip of the marker goes over twice and more amount can be left. Brush lightly and clean the sides immediately.
The grout colorant is usually applied with a small brush, applicator or sponge. It is more suitable for larger surfaces and for more durable color change. But it needs more attention, because it can be spread more easily on the tile.
Spread the material over the joint, covering the entire line evenly. Let it sit for the time recommended by the manufacturer and clean the excess off the tiles. Each product has different instructions. Some clear up almost immediately. Some need some time before they are wiped. Don't improvise.
On large surfaces, work with a system. Complete a small area first, clear it, then move on. If you do the whole wall and then try to clean off the excess, it may have dried. This is especially important on matte tiles.
Colorant can give a fuller and more even result than marker, but it requires patience. If you want to change from white to black in the whole bathroom, it might be a better choice than a simple grout pen. If you only want minor correction, marker is easier.
Excess should be cleaned while the product is still manageable. On glossy tiles, a damp cloth or sponge is usually sufficient, depending on the instructions. On matte or embossed tiles, more care is needed because the color can remain in the pores and textures.
Do not use harsh abrasives on the fresh joint. You may remove the color from the line you just crossed. Gently wipe the sides of the tile and allow the joint to dry. If a second coat is needed, do it after the first coat has dried.
If the paint dries on a glossy tile, it can be removed by careful sanding or with a suitable cleaner, but this depends on the product. On porous tiles, removal can be difficult. That's why testing and immediate cleaning are critical.
Do not use metal spatulas or sharp tools on tiles. You may scratch them. If a small residue needs to be removed, work with a plastic card or soft tool, and always carefully.
Durability depends on product, preparation, use and site. On a wall that doesn't get wet right away, a good grout pen or colorant can hold up quite well. On a floor, shower or zone with daily wetting, the strain is much greater and the strength may be less.
The joints in the floor are subject to being stepped on, mopped, cleaned and rubbed. There the paint wears off more easily. If you want to paint a floor, prefer a product specially suitable for floors and high resistance. A simple marker may not be enough.
In the shower, the condition of the joints is even more critical. If the joints are healthy and just stained, it can be applied with the right product. But if there are gaps, mold or moisture, painting is not a solution. The shower is a wet zone and needs functional grout.
Duration increases when joints are gently cleaned. Hard brushes, strong cleaners and frequent scrubbing can wear down the paint. If you want the new image to last, the cleaning method also changes.
On a wall outside the shower, renewing joints with paint is safer. The joints receive less water and less friction. The application is easier and the result lasts better. That is why it is an ideal solution for zones around a sink, mirror or WC.
On the floor, it needs more strength. The joint is pressed, the lines are dirty and cleaned more often. If you choose a very dark color, it may look good at first, but the dust, salts or soap scum will show. If you choose too light, it may stain again.
In a shower or bathtub, paint should only be used on healthy joints. If there is damage, repair first. If the joints are just stained and dry, you can proceed with a suitable product. Allow sufficient drying time before using the shower again.
In the corners, however, there is often silicone, not grout. The grout pen is not for silicone. If the silicone is blackened or peeling, it must be removed and replaced with new bath silicone. Don't try to paint it like a joint.
Black grout on white tiles is striking, but requires clean application. Every crooked line shows. Every excess on the white tile is visible. Any difference in width at the joints is highlighted. If the surface is old and uneven, the result can be more "edgy" than you expected.
Before painting the entire wall, test a small square. See it from a distance. If you like contrast, go for it. If it looks too bold for you, choose charcoal or medium gray. The difference between black and charcoal may be small in packaging, but big in space.
The black joint goes well with black accessories. If there is no other black element, add something small: a black dispenser, a black hook, black knobs or a black mirror frame. So the joint does not look like a random choice, but as part of the aesthetics.
Be careful when cleaning. White salts or soap residue may be visible on black joints. It doesn't mean they are dirty, but the contrast shows them. In a hard water area, perhaps dark gray is more practical than absolute black.
Gray joint is often the best solution when you want a refresh without overdoing it. It hides old stains better than white, is not as harsh as black, and matches many tiles. On white tiles it gives clear contrast, but softer. It looks natural on beige or gray tiles.
The light gray makes the surface look fresh and modern. Medium gray is more practical for floors and utility zones. Charcoal gives a more intense effect, close to black, but a little more forgiving.
If you're not sure about black, start with gray. It is safer for old bathrooms, for small spaces and for tiles that are not perfectly aligned. Also, if you want a more intense effect later, you can go to a darker shade more easily than going back from black to white.
Gray is easily combined with chrome, inox, black or wooden accessories. It is a neutral base and therefore often looks more "expensive" than a very intense color that does not match the space.
If the tiles are marble, travertine, natural stone or porous materials, special care is needed. The paint can seep into the surface and leave a permanent stain. Also, many preparation or residue remover cleaners may be unsuitable for stone.
On such surfaces, hidden spot testing is mandatory. Ideally, ask the product supplier or a technician familiar with natural stone for instructions. Do not apply black colorant next to light marble without being sure that the excess is completely cleaned off.
Natural stones often need sealing. If they are unsealed or porous, they absorb paint and dirt more easily. Renewing joints in such materials is not a simple DIY job as in glossy ceramic tiles.
If in doubt, avoid large color changes. A color close to the existing joint is safer than a strong contrast that can stain the stone.
The quantity depends on the size of the tiles, the width of the joints and the surface. Small tiles have more joint meters per square. Large tiles have fewer. So a bathroom with a small mosaic will need much more product and time than a wall with large tiles.
Grout pens often cover a limited area. If you only make a small zone, a marker can reach. If you are doing the whole bath, you will need more. Better to buy a little more, especially if you want color uniformity. Different batches may have slight differences.
Grout colorant is usually more efficient for larger surfaces. If you plan to do a floor or a large wall, it might be more convenient. Always check the stated cover, but also factor in losses from testing, second hand or cleaning.
Don't forget the accessories: cleaner, joint brush, microfiber cloths, tape where needed, gloves and good lighting. Color alone is not enough. Clean application requires little preparation.
After painting, allow joints to dry and cure according to product instructions. Do not use a shower or sponge immediately. Surface drying does not mean full strength. If you wet or rub early, you may spoil the result.
For daily cleaning, use mild products. Avoid hard brushes, wires and very strong chemicals, especially in the first few days. If you have painted in a dark color, wipe off the salts before they form a white film. If you have painted white, clean regularly to prevent it from getting dirty again.
In the shower, good ventilation and drying after use help a lot. The less moisture that remains in the joints, the better the effect holds. If the bathroom is not ventilated, the mold can return, regardless of the color.
Keep some product for future touch-ups. If a joint is chipped or worn locally, you can go over it again. The possibility of local renewal is one of the advantages of these solutions.
The grout pen is an aesthetic renewal solution. The new grouting is a technical restoration. It's not the same. If the joint is firm but stained, the grout pen may be sufficient. If the joint is lost, cracked, loose or leaking, re-grouting is required.
New grouting requires scraping the old grout to a sufficient depth, cleaning, application of new grout and proper finishing. It is more difficult, more time-consuming and more "dirty", but it restores the function. The grout pen simply colors the surface.
In a shower, if there is any doubt about the tightness, it is better to evaluate the joint technically. Don't rely on paint to solve a water problem. On a wall outside the wet zone, the risk is lower and the aesthetic solution is more acceptable.
Sometimes the right combination is local re-grouting in damaged areas and then color consolidation with colorant over the entire surface. This fixes the base and then unifies the image.
The renewal of joints with paint is one of the most economical aesthetic interventions, especially on small surfaces. Costs rise when the surface is large, when many products are needed, or when serious cleaning and repair must be done first.
The prices are indicative and depend on the store, product quality, surface, VAT and condition of the joints. If the joints are healthy, the solution is very economical. If they need repair, mold cleaning or new stucco, the actual cost goes up but the result is more correct.

| Material / Labor | Indicative cost picture 2026 |
|---|---|
| Simple grout pen | about €4–12 per piece |
| Best grout pen / marker set | around €10–25 |
| Grout colorant / joint colorant | around €10–35 |
| Joint brush | around €2–8 |
| Preparation cleaners | around €3–15 |
| Gloves, cloths, micro-materials | around €3–10 |
| DIY small wall zone | around €10–30 |
| DIY larger surface | about 25–80€+ |
| Professional joint cleaning/painting | case by case |
| New grouting in worn joints | higher cost, depending on surface area |
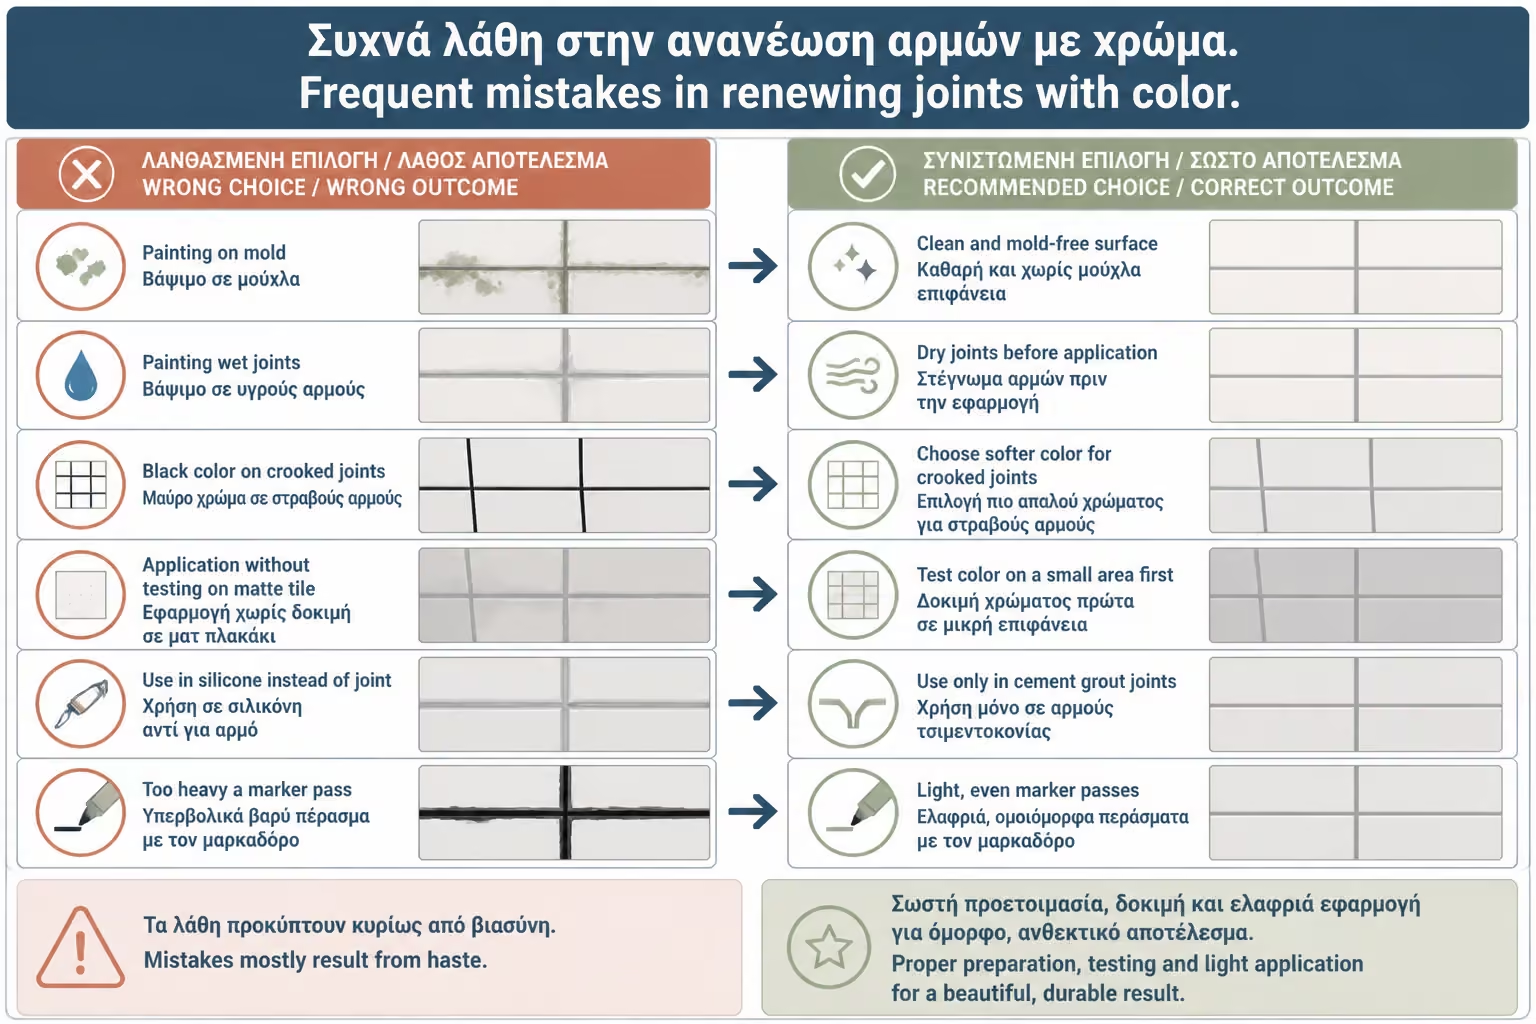
Mistakes mostly result from haste. Because the marker looks simple, many paint without cleaning, without drying and without testing. The result is uneven, stains the tiles or wears off quickly.
A prime example is changing white grout to black on old white tiles without testing. After application, small deviations in joints and crooked tiles are much more visible. The result is not modern, but "edgy". If there had been a trial, perhaps charcoal or medium gray would have been chosen.
| Error | What does it cause? | Correct practice |
|---|---|---|
| Painting on mold | Stain return and poor adhesion | First cleaning and drying |
| Painting wet joints | Flaking or unevenness | Complete drying |
| Black color on crooked joints | All imperfections are highlighted | Test or choose gray |
| Application without testing on matte tile | Stains on the surface | Hidden spot test |
| Use in silicone instead of joint | Poor adhesion | Silicone replacement |
| Too heavy a marker pass | Plugs and stains | Fine, steady passages |
| Delay in clearing excess | Difficult removal | Cleaning per small zone |
| Use strong cleaners afterwards | Color wear | Gentle maintenance |
A professional is needed when the joints are loose, when there is moisture behind tiles, when mold keeps coming back, when it is a shower with a possible sealing problem, or when the tiles are natural stone and there is a risk of staining. In these cases, the issue is not merely aesthetic.
A tiler can assess whether a new grout is needed instead of paint. It can also remove old grout without damaging the tiles, which isn't always easy for DIYers. In small zone, you can do it yourself. In a large shower, professional work can be worth it.
If there is a bad smell, moisture on the adjacent wall, blown paint or a stain on the other side of the bathroom, we do not deal with the color of the joints first. First a leak or condensation check is done. Joints can be a symptom, not a cause.
If you just want an aesthetic change in healthy joints, DIY is realistic. If you want to restore operation in a wet zone, ask for a technical opinion.
| Inquiry | Yes / No |
|---|---|
| Are the joints firm and not rubbing? | Yes / No |
| Are there no gaps, cracks or missing grout spots? | Yes / No |
| Has the surface been completely cleaned of soaps, salts and dirt? | Yes / No |
| Has any mold been treated before painting? | Yes / No |
| Are the joints completely dry? | Yes / No |
| Has it been tested in a small, hidden spot? | Yes / No |
| Does the color match the bathroom tiles and accessories? | Yes / No |
| If black is selected, are the tile lines clear enough? | Yes / No |
| Is the product suitable for wall, floor or wet zone, depending on the use? | Yes / No |
| Are the tiles not porous or natural stone without testing? | Yes / No |
| Is there a drying time before the shower can be used again? | Yes / No |
| Have you provided for gentle cleaning after application? | Yes / No |
If the answer is “No” to the points about mold, firmness or drying, do not proceed yet. Joint painting is only successful when the base is healthy.
The grout pen is a very good tool for aesthetic renewal, not for waterproofing repair. If the joints are stable but permanently stained, you can change their color and give a striking new style to the bathroom. However, if the grout is missing, there is deep mold or water seeping through, a repair is made first. For black grout on white tiles, always test. Black gives character, but accentuates every crooked line. Many times a good gray is more stylish and safer.
The renewal of joints with paint is one of the most economical and impressive interventions in a bathroom that looks old without the need for renovation. With a grout pen or a grout colorant you can restore white joints, cover permanent stains or completely change aesthetics, going from white to grey, charcoal or black. On the right surface, the result can look like a small design makeover.
The key is to know what you are fixing. If the problem is cosmetic, joint paint can work very well. If the problem is technical, such as loose joints, mold, moisture or gaps, then paint is not enough. First cleaning, drying and repair. Then color. Otherwise, the new result will last a while and may hide problems that need attention.
Changing to black grout can transform white tiles and provide a modern contrast, especially when combined with black accessories or industrial details. Gray is a safer and more practical solution for old bathrooms or irregular lines. Whatever color you choose, do a test first, work in small areas and carefully clean off the excess. So the old stained joints can become part of the aesthetics of the bathroom again, instead of being the point that spoils the whole picture.
Return to category.
Go to categoryReturn to the central guide.
Go to guide