

Bathroom DIY, Maintenance & Styling
Return to category.
Go to categoryExposed pipes are one of those details that can spoil the image of a bathroom, even if everything else is clean and tidy. A water pipe running down the wall, an exposed siphon under the sink, an old vertical drain, radiator pipes or sketchy exterior routes can make the space look half-finished, old or technically "sloppy".
In an ideal renovation, piping is concealed within the wall, floor, or properly designed falsework. But this is not always possible. In old apartments, in rented houses, in small WCs, in bathrooms where we don't want to remove tiles or in cases where the budget is limited, the transfer and installation of pipes is not a realistic option. That's where smart, lightweight and economical camouflage solutions are needed.
The key is to not only think "how do I hide the pipe", but "how do I hide it without causing a problem". Piping is not a decorative mistake. They are functional elements. Switches, fittings, siphons and unions may need to be checked, repaired, replaced or accessed. If you permanently seal them behind construction without a hatch or removable feature, a small future leak can become a big problem.
That's why the best DIY solutions are reversible or at least accessible. A removable wooden cover, a plasterboard box with a door, a shelf that visually hides pipes but allows access, a paint job in the color of the wall or a well-placed plant can greatly improve the image without sacrificing functionality. Conversely, a rough permanent covering with silicones, adhesives and closed surfaces can create moisture, mold and difficult maintenance.
In this guide we'll see when it's worth hiding exposed pipes, what solutions you can apply without a builder, when you need a technician, how to use plasterboard, wooden coverings, paint, shelves or plants, and what mistakes to avoid so that the aesthetic improvement does not become a technical trap.
Before you hide any piping, you need to make sure it's not a problem. This is the most important step. If there is a leak, moisture, salts around a joint, rust, drips, mold on the wall or a sewer smell, we do not start with camouflage. First it is checked and repaired.
Exposed pipes have one advantage: they can be seen. If there is a drop, you see it. If a joint sweats, you understand it. If a siphon leaks, you spot it quickly. When you hide them, you lose that instant visibility. So you need to start with pipes that are dry, clean and functional.
Check especially the connection points: corner switches under the sink, supply hose, siphon, fittings, drain joints, radiator pipes, points where they pass through a wall or floor. If there are white salts, brown rust or green oxidation on metal parts, there may be old moisture or a leak.
A practical check is to wipe the pipes thoroughly, use the bathroom as normal and after a while pass dry paper on the joints. If the paper gets wet, there is a problem. In this case, do not hide anything until the cause is solved.
Points that need access should not be permanently closed. These include corner switches, valves, siphons, fittings, drain plug cleaners, cistern mechanisms, joints that may need loosening and any point that has a history of leaking. If you do cover them, there should be a hatch, removable lid, or break-free access.
Especially under the sink, many people want to hide the faucet and supplies. This is done, but it should not be stamped as if it does not exist. The siphon may need cleaning, gasket replacement or loosening. Shutoff valves must stay accessible in case of a leak or faucet replacement.
The same goes for radiator or towel rail pipes. If there are switches, vents or joints, we don't close them behind a permanent box. Even if today everything works, in the future it may need intervention. A beautiful cover that has to break in the first repair is not a good solution.
You should also not trap pipes that show condensation or “sweat”. If a cold water pipe sweats and you close it without venting, moisture can build up inside the structure. First it needs checking, possibly pipe insulation, then covering.
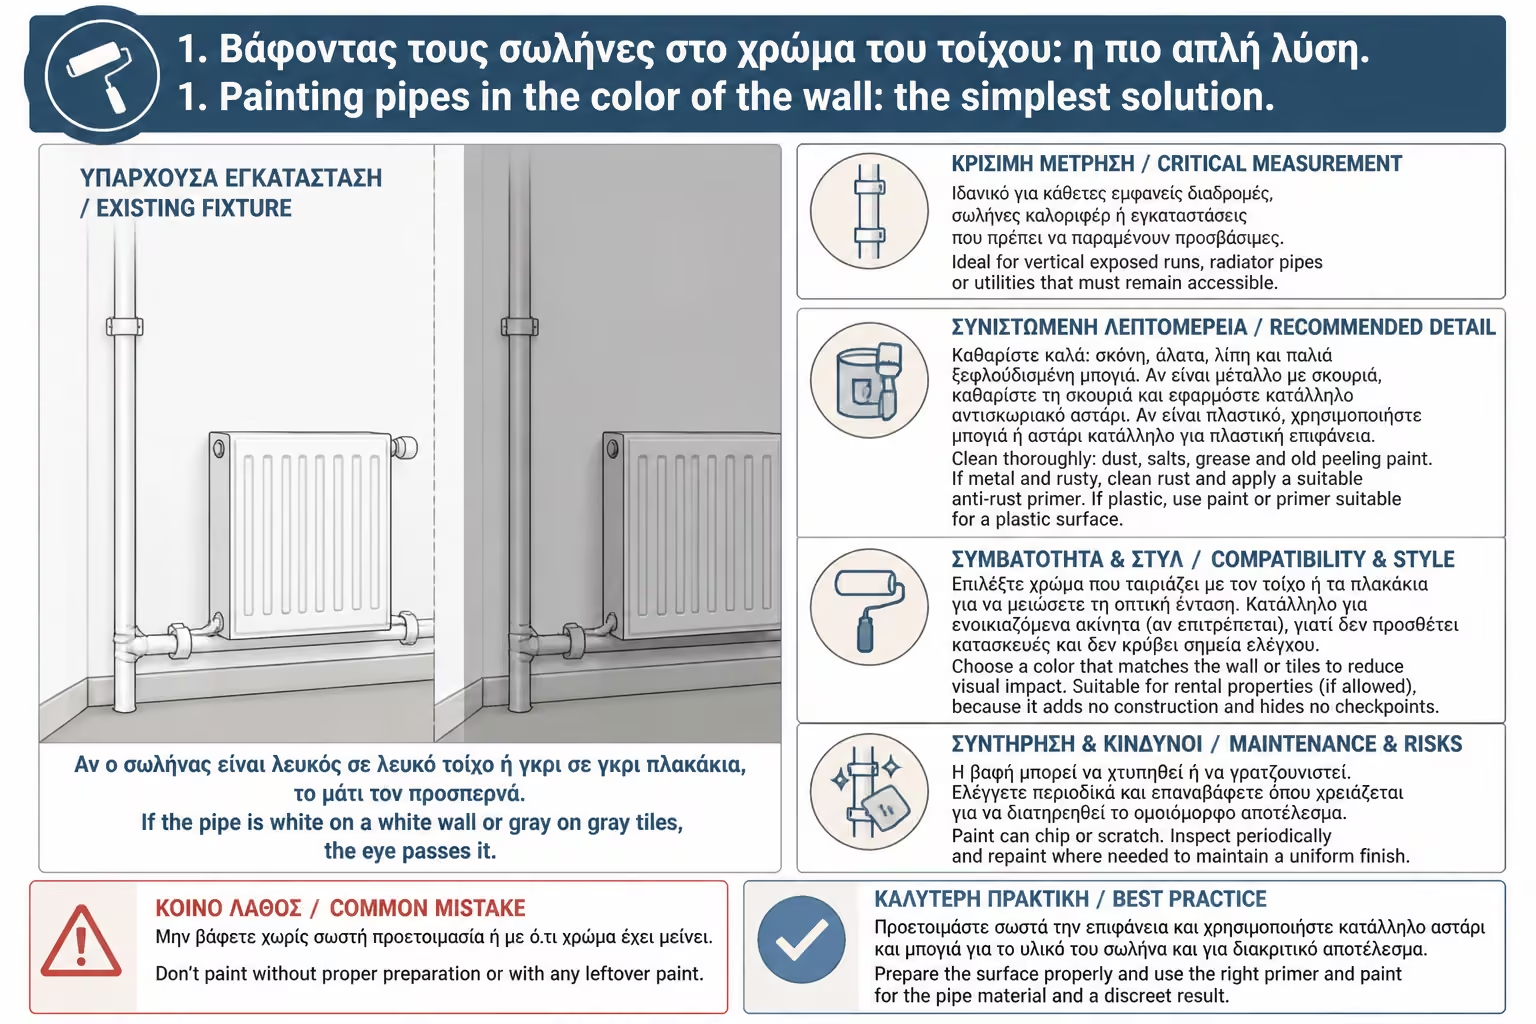
The most economical and reversible solution is to paint the pipes in the color of the wall. It doesn't completely eliminate them, but it greatly reduces their visual intensity. If the pipe is white on a white wall or gray on gray tiles, the eye passes it. If it is old metallic, dark or yellowed, it immediately attracts attention.
Painting is ideal for pipes that cannot or should not be hidden, such as vertical exposed runs, radiator pipes or utilities that you want to remain accessible. It can also be a good solution in a rental house, if allowed, because it does not add construction and does not hide checkpoints.
The process requires proper preparation. Pipes must be cleaned of dust, salts, grease and old peeling paint. If they are metal and have rust, the rust must be cleaned and a suitable anti-rust primer applied. If they are plastic, a paint or primer suitable for a plastic surface is needed. We don't just paint with whatever color is left over.
The paint must withstand moisture and cleaning. In a bathroom, a simple plastic wall paint may not work well on a pipe. Prefer primer and water ripolin or suitable color for the material. If the tube is heated, as in heating, the paint must be temperature compatible.
It is not necessary for the tube to disappear. It can become a conscious design element. In industrial or vintage bathrooms, exposed pipes can be painted black, charcoal, copper or in the same finish as the rest of the accessories. So they don't seem like an imperfection, but like a choice.
This works mostly when the pipes have a clear path. A straight vertical tube can look nice if painted black and combined with black knobs, black faucet or black mirror frame. A complex pipe with many joints, crooked paths and old repairs is more difficult to make a design element.
The bronze look can give a nice vintage or steampunk feel, but needs care so it doesn't look fake. If the pipes are real copper pipes in good condition, they can be cleaned and protected. If they are plastic and just painted copper, the result can look sketchy if not done right.
The choice to "emphasize rather than hide" is smart when the bathroom already has some style to support it. In a very classic or minimal white bathroom, painted black pipes can look foreign if there are no other black elements. Re-finishing is essential.
One of the most practical solutions to hide pipes under a sink is a wooden or MDF cover. It can be like a small box, like a removable front, like a false drawer or like an open structure that hides the siphon from the first glance. Done right, it gives a clearer image without requiring build-up.
The main thing is that it is removable. The siphon and corner switches must remain accessible. It can be attached with small magnets, hidden clips, easy-release screws, or simply clicked into place without permanent gluing. Do not seal it with silicone around as a permanent structure.
The material must withstand moisture. If you use MDF, it should be well painted or varnished on all sides, especially on the edges. Simple MDF without protection can swell quickly. Marine plywood, well-preserved wood or closed-edged melamine are more practical options.
The cover should also have some ventilation. If you completely close the siphon in a box, any moisture or small leakage can be hidden. Small gaps at the bottom or back help to ventilate and let you know if there is a problem. Aesthetics should not override inspection.
Drywall can be used to create a clear box around vertical or horizontal piping. It is a more "constructive" solution, gives a very clean result and can be painted in the color of the wall or covered with tiles/covering. It is ideal when the pipes run at an angle or in an obvious vertical path that you want to disappear.
In the bathroom, however, waterproof plasterboard and proper protection must be used. We do not put simple plasterboard in a damp place. The structure must have a metal frame, proper screwing, jointing, primer and paint suitable for a bathroom. If it is located near a bathtub or shower, the solution should be considered even more carefully.
The most important thing is access. If there are joints, valves, siphons or points in the construction that may need repair, a hatch must be provided. A small discreet porthole painted in the color of the wall is much better than having to break the whole structure in a future leak.
Drywall is a good solution when you want a clean, permanent aesthetic result, but it is not always the "lightest" DIY solution. If you don't have experience, you may need a handyman. The wrong drywall box can look crooked, crack at the joints, or trap moisture.
If a vertical pipe runs into the corner of the bathroom, you can hide it with a wooden pillar or removable box. This solution is often simpler than plasterboard because it can be built off-site and installed as a cover. It can be painted in the color of the wall or become a wooden decorative element.
The box can be U-shaped or C-shaped, depending on the position of the pipe. If it rests at an angle, two sides are needed. If the pipe is on a flat wall, three sides are needed. The construction must be deep enough not to touch the pipe, especially if the pipe gets hot or has condensation.
And here the removability is important. It can be screwed on with a few visible or hidden screws, snap on with magnets or fixed to a small frame. If pipe inspection is required, it must be removed without destruction. Do not permanently glue a wooden box to pipes.
If the box is wooden, protect all sides with varnish or paint. The back side, which is not visible, is just as important. If left untreated and gets wet, it can swell or smell. The hidden side is often the one that breaks down first.
A smart solution is not to just hide the pipe, but to create useful surface around it. A small shelf, console or low cabinet can camouflage pipes and provide storage at the same time. For example, under a wall-mounted sink, a shelf with baskets can partially hide the faucet and fittings.
This works well when the pipes are not too bad but need a "visual break". If you place a beautiful wooden shelf under the sink, the eye goes to the shelf and the baskets, not the faucet. Complete concealment is not always necessary. Sometimes it is enough to reduce the visual intensity.
This solution must allow access. The baskets come out, the shelf can be open, and the siphon remains accessible. It is more practical than a closed box when there are frequent cleaning needs or when the siphon needs to be untied.
Pay attention to the depth and height. If the shelf is under a sink, it must not obstruct feet or cleaning. If it is near a toilet, it should not limit comfort. Storage should serve the space, not make it more cramped.
Plants can camouflage exposed piping in a very natural way. A tall potted plant can hide a vertical pipe in the corner. A hanging plant on a shelf can soften the plumbing image next to the sink. A small plant on a cistern or shelf can draw the eye away from technical elements.
This solution is ideal when you do not want construction or when you are in a rented house. No drilling required, does not block access and can be changed easily. It also adds vibrancy to bathrooms that are too cold or full of tile.
But there must be light and the right choice of plant. Many bathrooms have no natural light, so a real plant may not live. In such a case, a good quality artificial plant may be more practical. If there is a window and moisture, plants such as pothos, zamia or sansevieria can work, depending on the conditions.
Do not place pots that touch or drip on pipes, wooden furniture or floors. The camouflage must not create new moisture. Use a saucer, inner case and check that there is no pooling of water.
In some cases, baskets or fabric elements can hide piping without a permanent structure. For example, a basket of towels under the sink can visually hide part of the siphon. A decorative basket next to the basin can draw the eye from a vertical pipe. A small fabric "apron" under the sink can work in a more cottage or vintage style.
The fabric solution needs attention in the bathroom. Fabrics hold moisture, collect dust and can smell. If the bathroom is not well ventilated, avoid heavy fabrics. If you use a curtain under the sink, it must be easy to wash and not touch the wet floor.
Baskets are more practical, but must be made of durable material. Matting, bamboo and natural fibers look beautiful, but if they touch a wet floor they may turn black. Plastic or metal baskets are more durable, but must be aesthetically pleasing.
Basket camo works best when there is already a storage logic in place. If you just put a lot of baskets to hide pipes, it can create a mess. A few, properly placed items are better.
Decorative panels, PVC or thin linings can be used to cover pipes in a wall or corner. They are light, relatively easy to cut and come in a variety of finishes: white, wood, stone, marble, cement. They can give a sheer effect without building, as long as they are placed correctly.
Their advantage is that they withstand moisture better than many wooden materials. The downside is that they can look plastic if they are of low quality. Also, if they are permanently stuck over pipes without access, they create the same problem as any closed structure.
A good use is a removable panel in front of pipes, fixed with screws or magnets. So it looks clean, but can be removed for inspection. It can also be used as a backsplash behind an open shelf to hide the pipes in a more organized arrangement.
Be careful around the edges. If the panel is cut roughly, the edges show and spoil the effect. They need clean cuts, finishes and proper alignment. Economic material should not be placed casually, because then it looks cheap.
Heating or electric/hydraulic towel rail pipes need special attention. If it is a hydraulic body, the pipes may get hot. They must not be covered with materials that are affected by heat or that prevent access to switches and vents. The ventilation around the heating element should also not be restricted.
The simplest camouflage is painting in the color of the wall or in the same finish as the body. If the pipes are white and the wall is white, they almost disappear. If you want a more design effect, they can be painted black or in the color of the towel rail, with a suitable color for metal and temperature.
If you want a cover, it must be open or removable. Do not permanently close body switches. In case of leakage, body change or venting, there must be access. A wooden or metal cover may look nice, but it must withstand heat and moisture.
In electric towel rails, we do not interfere with cables or connections. Anything electrical in the bathroom needs a specialist. Cable and piping camouflage must not create a risk of overheating or moisture.
An exposed drain is more difficult than a water pipe because it is usually larger in diameter and may need to be sloped, cleaned or accessed. If there is an external drainage pipe in the wall, it should not be hidden without maintaining controllability. If there is a cleaning plug, it must remain accessible.
A drywall or box solution can work, but it must have a window. There should also be some space around the pipe so that no vibrations or noises are transferred to the structure. If the pipe makes noise when water is passing through, the cover can reduce it a bit, but it is not complete soundproofing.
In a vertical corner drain, a wooden or PVC box can discreetly hide it. If you paint it the color of the wall, it almost disappears. If you make it wooden, it can look like a decorative pillar or part of a shelf. But be careful: the drain must not be pressed or punctured.
If there is a bad smell from the drain, we don't hide it. First the odor trap, siphon, connections and drain vent are checked. Camouflage does not solve odors. On the contrary, it can trap them.
The best solution is often dual-purpose: hide and store. For example, a narrow seam can be created around a vertical pipe. An open console with baskets can be placed under the sink. A small surface can be created above piping for toilet paper or towels. So the coverage doesn't look like a "patch", but a designed function.
But be careful not to load the structure. If the cover is removable, it should not have heavy objects permanently on it that will make access difficult. If you need to check a pipe, you need to be able to quickly remove the cover.
Storage should be neat. If you put an open shelf full of bottles in front of the pipes, you just change the problem. The pipes may not be visible, but the space will look cluttered. Baskets, boxes and few items are a better solution.
Think of coverage as part of a small refresh. If combined with new knobs, a clean mirror, a shelf or accessories in a common finish, the result looks thought out. If done in isolation, it can look like a clipboard on the wall.
In a rental home, exposed piping is a common problem. However, it is not worth making permanent constructions without a permit. Avoid holes, high-adhesion adhesives, sealed plasterboard or structures that will remain in place unless there is an agreement with the owner.
The best solutions are reversible: painting if allowed, removable wooden cover, baskets, plants, free shelves, boxes that are not permanently screwed, self-supporting structures or a curtain under the sink. If a puncture is needed, ask for permission in writing.
If the pipes are in poor condition, inform the owner. Do not hide them so that they are not "seen", because in the event of a leak, more damage and liability can be created. Aesthetics should not cover a technical problem that belongs to the maintenance of the property.
In a rented bathroom, often the smartest strategy is visual camouflage rather than complete concealment. That is, we reduce the intensity of pipes with paint, plants, baskets or shelves, but do not permanently interfere with the installation.
For DIY bathroom covers, the materials must withstand moisture. Marine plywood, properly varnished, is a better choice than plain MDF. Melamine can work if the edges are closed and it doesn't get wet. PVC and synthetic panels withstand moisture well, but need careful aesthetics. Drywall is better than plain drywall in fixed structures.
The metal elements must be stainless or protected. Screws, corners, brackets and hinges can rust in a bathroom. If they rust, they will leave brown stains on walls, tiles or wood. Do not use random indoor screws in a wet environment.
If you use paints, choose products suitable for the bathroom and for the material you are painting. Another color needs metal, another plastic, another wood, another plasterboard. The right primer is often more important than the final color.
The cheapest material is not always the most economical. If an MDF cover swells in six months, you will redo it. Better a bit more expensive material and proper protection from the start.
The cost depends on the type of cover, the length of the pipes, the material and whether it will be DIY or by a technician. The most economical solutions are painting and camouflage with baskets/plants. The more permanent constructions with plasterboard or custom wood cost more, but give a cleaner result.
The prices are indicative and depend on the area, the quality of materials, whether VAT is included, the difficulty of access and whether there are technical problems with the pipes. If there is a leak, the cost of repair comes before the cost of coverage. There is no point in investing in beautiful camouflage over a problematic installation.
| Solution / Material | Indicative cost picture 2026 |
|---|---|
| Painting pipes with primer and paint | around €10–35 |
| DIY Small Wooden Removable Cover | around €20–70 |
| Plywood / varnished wood | around €30–€120+, depending on size |
| PVC or decorative panel | around €15–80 |
| DIY Drywall Small Box | around 30–100€+ |
| Visitor box | around €10–40 |
| Baskets / plants for camouflage | around €10–60 |
| Professional micro construction | case by case, often €100–€300+ |
| Leak check/repair before covering | case by case |
Most mistakes are made because the target is only the image. But the pipes are functional. If you hide them incorrectly, you can lose access, trap moisture or delay leak detection.
A typical example is the MDF box under the sink that is glued with silicone so that the siphon is not visible. After a few months, the siphon loses some water. The leak is not visible, the MDF swells and the furniture smells. The correct solution would be a removable cover with access and tightness test before covering.
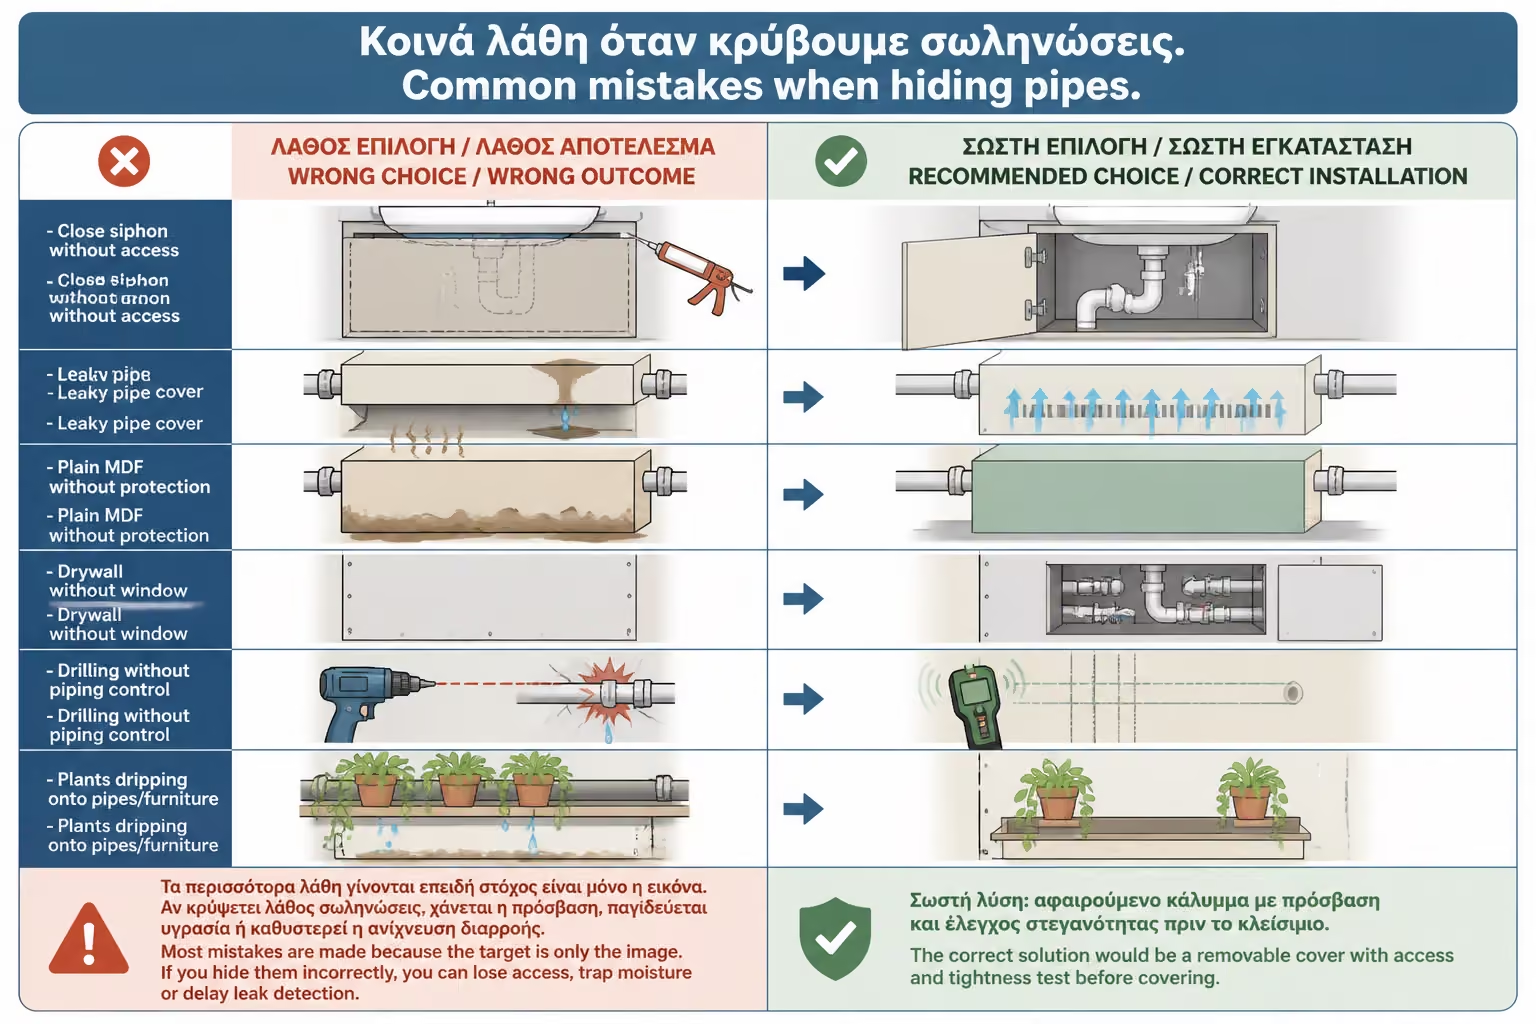
| Error | What does it cause? | Correct practice |
|---|---|---|
| Close siphon without access | Difficulty cleaning or repairing | Removable cover |
| Leaky pipe cover | Hidden moisture and more damage | Repair first |
| Plain MDF without protection | Swelling from moisture | Varnish on all sides or better material |
| Drywall without window | Break in future damage | Visitor box |
| Drilling without piping control | Risk of pipe puncture | Technical control |
| Plants dripping onto pipes/furniture | New moisture | Caspo and water control |
| Painting rusty pipe without primer | Return of rust | Cleaning and anti-rust |
| Permanent bonding of cover to rent | Difficulty removing | Reversible solutions |
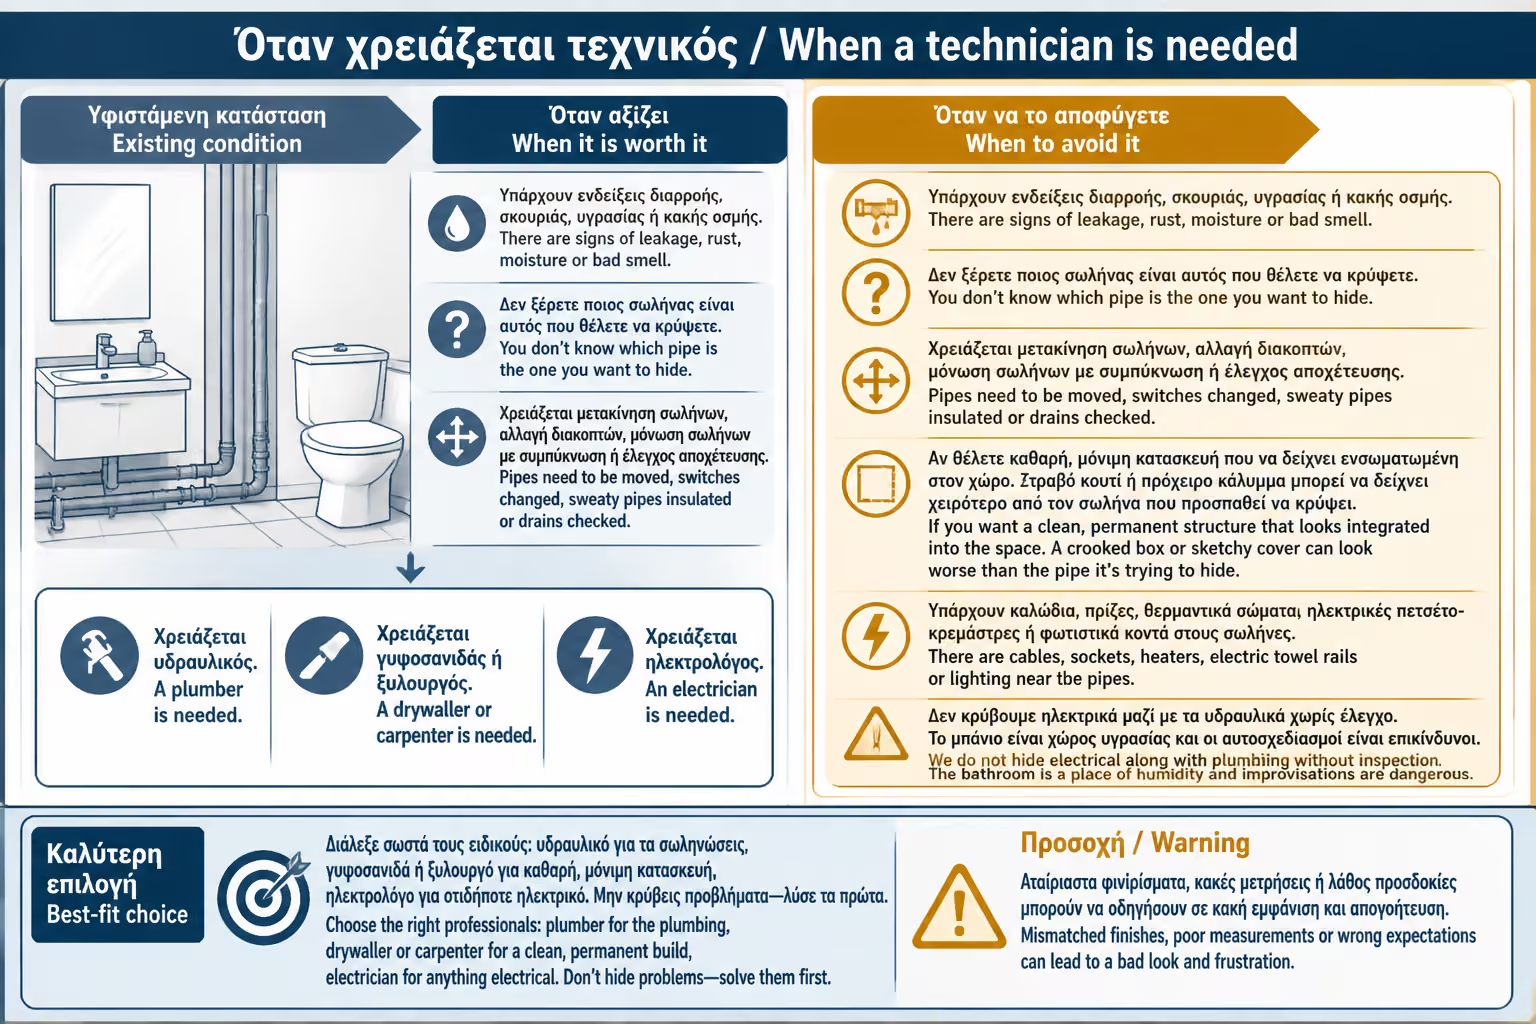
A plumber is needed when there are signs of leakage, rust, moisture, bad smell or when you don't know which pipe is the one you want to hide. It is also needed if pipes need to be moved, switches changed, sweaty pipes insulated or drains checked.
A drywaller or carpenter is needed when you want a clean, permanent structure that looks integrated into the space. A crooked box or sketchy cover can look worse than the pipe it's trying to hide. If the construction is in a prominent place, precision counts.
An electrician is needed if there are cables, sockets, heaters, electric towel rails or lighting near the pipes. We do not hide electrical along with plumbing without inspection. The bathroom is a place of humidity and improvisations are dangerous.
If the house is old and the pipes are exposed because of external repairs, it may be worth having the whole installation assessed before investing in coverage. Sometimes external tubing is a quick fix for an old problem. If you're going to renovate soon, it might not be worth a big build now.
| Inquiry | Yes / No |
|---|---|
| Have the pipes been checked for leaks? | Yes / No |
| Will the connections, valves, switches and siphons remain accessible? | Yes / No |
| Does the cover material withstand the humidity of the bathroom? | Yes / No |
| If wood or MDF is used, are all edges protected? | Yes / No |
| If it's plasterboard, will it be waterproof and gated where needed? | Yes / No |
| Is ventilation provided inside the cover? | Yes / No |
| Are pipes that sweat without insulation or control covered? | Yes / No |
| Can the solution be removed if repair is needed? | Yes / No |
| Has it been checked that no pipes or cables will be punctured? | Yes / No |
| Does the cover not obstruct the sink, basin, door or cleaning? | Yes / No |
| If it is a rental house, is there permission for permanent interventions? | Yes / No |
| Does the camouflage match the style of the bathroom and not look sketchy? | Yes / No |
If the answer is “No” to the points regarding leaks, access or moisture, do not proceed yet. Pipes are only hidden when they are healthy and when the covering does not hinder future maintenance.
The proper way to hide piping is not to eliminate it at all costs. It's about making them less visible while keeping them accessible. Before each cover, check for leaks, scale, rust and moisture. If you make a box, make it removable or put in a box. If you paint, use a proper primer for the material. If you camouflage with plants or baskets, do not create new moisture. The aesthetic solution must respect that the pipes may at some point need control.
Exposed plumbing can spoil the look of a bathroom, but it doesn't always take a builder or a complete renovation to improve it. With smart DIY solutions such as painting in the color of the wall, removable wooden covers, small boxes made of dry plasterboard, decorative panels, shelves, baskets or plants, you can greatly reduce the visual nuisance and make the space cleaner and more organized.
The main condition is not to sacrifice functionality. Piping must be dry, sound and accessible. We do not close valves, siphons and joints without a port. We do not cover leaks, rust or moisture. We do not use materials that will swell in a few months. And we don't drill into walls or tiles without knowing what's behind it.
The best solution is one that looks like part of the design: a well-painted pipe that disappears into the wall, a wooden cover that is removed, a shelf that adds storage, a plant that softens an ugly corner. When camouflage is done with moderation and technical sense, the pipes cease to be the first thing you see when entering the bathroom.
Return to category.
Go to categoryReturn to the central guide.
Go to guide