
Bathroom DIY, Maintenance & Styling
Return to category.
Go to categoryThe bathroom furniture is one of the points that visually ages very quickly. The tiles may still be acceptable, the sink is working and the faucet is fine, but an old piece of furniture with faded melamine, yellowed doors, worn knobs or small bumps on the edges makes the whole bathroom look tired. Especially if it is under the sink, it immediately catches the eye.
Replacing furniture is the clear solution when the furniture is seriously damaged. But it is not always necessary. If the frame is solid, the doors haven't fallen apart, the drawers work and the bulges are limited, painting can give a dramatic makeover for less. With proper preparation, chalk paint or other suitable furniture paint, adhesion primer and durable protective varnish, an old piece of furniture can be completely transformed.
Chalk paints, known as chalk paints, became popular because they promise easy application, good coverage and less need for heavy sanding. This is attractive for DIY jobs, especially on melamine or MDF where no one wants to spend hours with sandpapers. But in the bathroom things are more demanding. The furniture is not in a living room. Accepts moisture, drops, soaps, cleaners, vapors and frequent contact with hands.
That is why painting bathroom furniture should not be treated as a simple decorative craft. Color alone is not enough. It needs a clean surface, proper adhesion, damage repair, edge protection and a final varnish that better withstands moisture. Even so, we have to be realistic: no amount of varnish turns a swollen MDF into a new waterproof piece of furniture. If the material is waterlogged, the damage can continue from the inside.
In this guide we will see when it is worth painting an old piece of bathroom furniture, when it is not worth it, how to prepare melamine or MDF, what role the primer plays, how to apply chalk paint, why you need waterproof or high protection varnish, what mistakes lead to peeling and how to protect the result in everyday use.
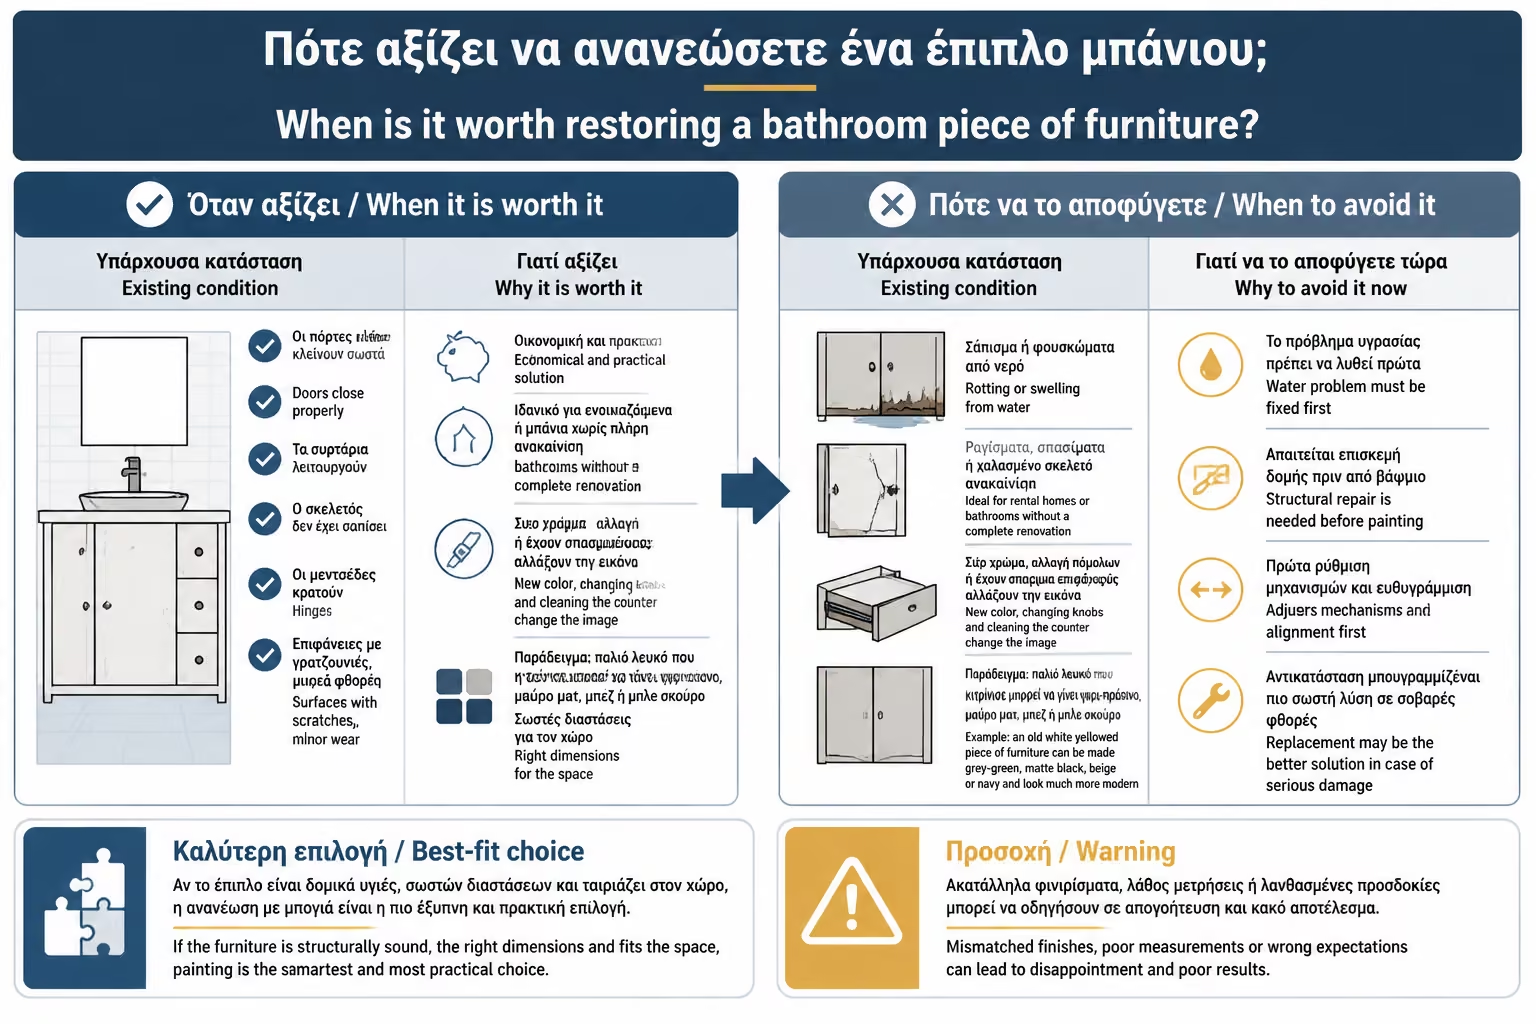
Painting is worthwhile when the furniture is aesthetically old but structurally sound. If the doors close properly, the drawers work, the frame is not rotted, the hinges hold and the surfaces only have scratches, dullness or minor wear, then restoration can give a very good result.
It is also worth it when the furniture has the right dimensions and fits the space. In many old bathrooms, the cabinet is cut right for the sink, the pipes or the corner of the wall. Replacement may involve additional work, new holes, changes to siphons or adjustments. If the existing furniture works, painting is an economical and practical solution.
It's especially worth it in rental homes or in bathrooms that you don't want to completely renovate. A new color, changing knobs and cleaning the counter can change the image without much intervention. For example, an old white yellowed piece of furniture can be made grey-green, matte black, beige or navy and look much more modern.
But it is not worth it when the furniture is seriously damp. If the MDF is very swollen, if the melamine has peeled off in large areas, if it smells musty, if the bottom has softened, or if the screws no longer hold, painting is just a cover-up. It might look better for a while, but it doesn't solve the problem.
MDF and chipboard swell when they get water. This usually happens at the edges, around the sink, near the floor or under places where there was a leak. When the material swells, it does not really return to its original density. It can be sanded, plastered and painted, but the internal wear remains.
If the swelling is small and superficial, you can improve it cosmetically. Lightly sand the raised area, remove loose material, stabilize the surface as much as possible, putty, sand again and paint. The result may look good, especially if the spot does not receive continuous water. But it must be protected very well with varnish and not re-wet.
If the swelling is large, if the door is warped, if the material rubs like dust, or if the edge has opened deeply, the repair is temporary. The paint will cover the image, but will not restore mechanical strength. If the spot is low on the furniture and receives water from mopping, the wear and tear will continue.
A practical criterion is finger pressure. If the swollen spot is hard, it can be repaired cosmetically. If it is soft, crumbles or sinks, the material has deteriorated deeper. There, replacing a door, side or entire piece of furniture is a more appropriate solution.
Before you paint, you need to understand what surface you have. Melamine is usually a smooth, laminated surface over chipboard or MDF. It is difficult to adhere to, because the color does not "grab" easily on it if proper preparation is not done. MDF can be painted, coated or bare on the edges. Wood behaves differently, because it absorbs more and rubs more easily.
Lacquer or old painted surfaces may have a glossy varnish. The problem there is the gloss. If you don't lightly dull the surface and apply a proper primer, the new paint can peel off. It doesn't need endless sanding until all the old finish is gone, but it does need to "break" the gloss.
Edges are the most critical point in bathroom furniture. That's where water is absorbed, that's where the PVC or melamine tape peels off, that's where the swelling starts. Before painting, check all edges, not just the front. If the edge banding has lifted, it must be repaired or sealed.
The same applies to the interior of the furniture. If there is moisture, mold or a swollen bottom shelf inside, painting the outside will not solve the cause. A siphon, sink valve, or pipes may need to be checked before restoration begins.
Chalk paints are often promoted as paints that stick to many surfaces without heavy rubbing. This is true to a point, but it does not mean "paint over dirt, gloss and soaps". In the bathroom, preparation is essential. You just don't need to sand until you strip the material.
Minimal rubbing has two goals. First, to dull the glossy surface to increase adhesion. Second, to smooth out minor damages, bulges, edges and stuccoed areas. We use fine sandpaper or a sanding sponge, not coarse sandpaper which will deeply etch the melamine.
Cleaning is just as important as scrubbing. Bathroom surfaces have soaps, salts, grease from hands and cleaners. If these are not removed, the paint will stick to the film and not the surface. Then it can peel off even if the color is good.
So "no endless sanding" means: I clean very well, sand lightly and purposefully, use adhesion primer where necessary and paint in thin layers. It doesn't mean I skip the preparation.
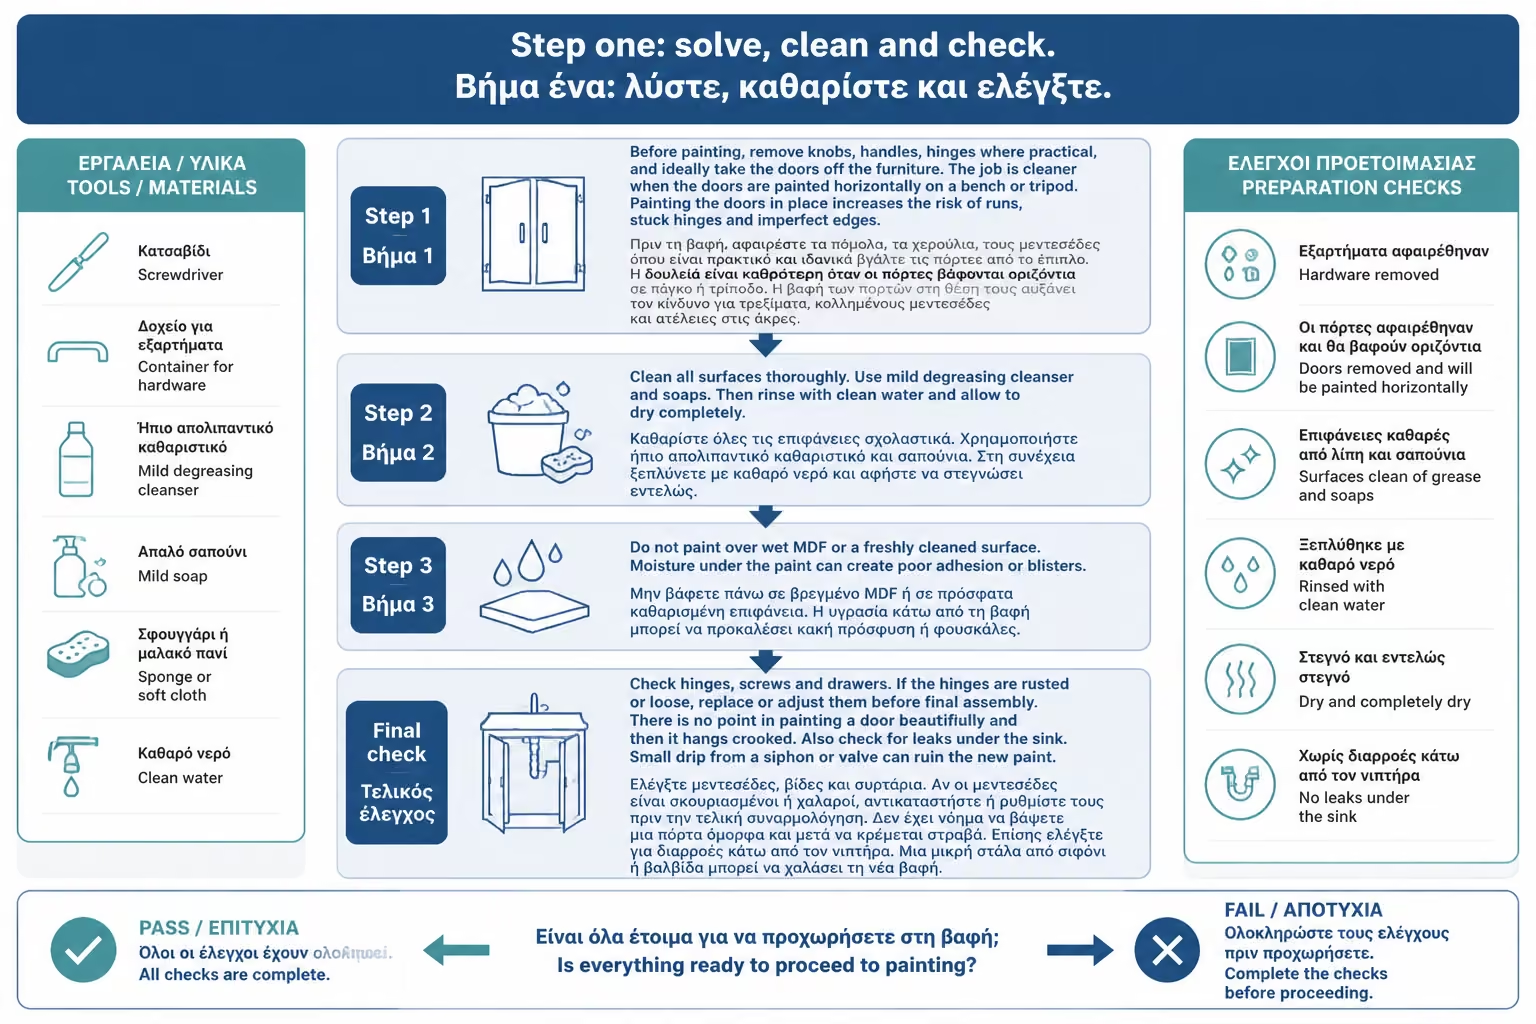
Before painting, remove knobs, handles, hinges where practical, and ideally take the doors off the furniture. The job is cleaner when the doors are painted horizontally on a work surface or trestles. Painting the doors in place increases the risk of runs, stuck hinges and imperfect edges.
Clean all surfaces thoroughly. Use mild degreasing cleanser and soaps. Then rinse with clean water and allow to dry completely. Do not paint over wet MDF or a freshly cleaned surface. Moisture under the paint can create poor adhesion or blisters.
Check hinges, screws and drawers. If the hinges are rusted or loose, replace or adjust them before final assembly. There is no point in painting a door beautifully and then it hangs crooked. Also check for leaks under the sink. Small drip from a siphon or valve can ruin the new paint.
If there is any old silicone residue, adhesives or dried cleaners on the edges, remove them. The paint does not adhere properly to silicone. If an edge next to the wall has been sloppily sealed with silicone, it may need to be cleaned and resealed after painting.
Small dings, scratches and holes from old knobs should be patched before painting. Use putty suitable for wood/MDF or repair material that can be painted. Apply in thin layers, allow to dry and rub lightly until smooth. Do not rush to cover deep wear with a thick layer.
In swollen areas, remove anything loose. If the melamine has lifted, it must be trimmed or firmly glued as appropriate. If you leave a loose surface underneath, the new paint will follow the wear and may peel off. Paint is not repair glue.
The edges can be sealed with a suitable primer or sealer before painting, especially if it is bare MDF. The MDF at the edges absorbs a lot. If not sealed, it will attract paint and moisture. This is critical in bathroom furniture.
If you want to change knobs and the new knobs have different screw spacings, putty the old holes before painting. After painting, the new holes must be made carefully, without breaking the paint around them. Measure twice before drilling.
On melamine and glossy surfaces, adhesion primer is almost always necessary. Even if the chalk paint promises good adhesion, the bathroom is a wet place and the furniture is used. The primer acts as a bridge between the smooth old surface and the new color. Reduces the risk of peeling.
Choose a primer suitable for glossy surfaces, melamine, laminate or laminated materials. Follow instructions for drying time and repainting. Do not paint over primer that has not completely dried. Rushing at this stage can ruin all the work.
The primer should be applied in a thin, even layer. It does not need to cover perfectly as a final color. Its purpose is adhesion. If you apply it too thick, it may streak or take a long time to dry. In corners and edges, be careful not to drip.
On bare MDF or in stuccoed areas, the primer also helps smooth out absorbency. If you paint directly, the color may look different on stucco and different on melamine. The primer makes the base more uniform.
The chalk paint has a matte, velvety look and covers well. It is popular in restorations because it quickly gives a new look, is easy to work with and does not require complex equipment. It can give a beautiful effect to bathroom furniture, especially if you want a more vintage, country, minimal or soft matte aesthetic.
Its main disadvantage is that by itself it does not have the durability that a bathroom needs. The matte surface can stain, absorb moisture or mark if not protected. That is why chalk paint on bathroom furniture must almost always be sealed with a suitable protective varnish. Wax, often used in living room furniture, is not the most practical solution for a damp environment.
Chalk paint also does not correct poor adhesion. If the melamine is shiny and dirty, the paint may appear to have set, but peel off with a bump or with moisture. That's why primer and preparation remain important.
If you want a more modern and durable effect, you can also consider special water furniture colors, water ripples or cabinet colors, depending on the surface. Chalk paint is an aesthetic choice, not the only technical solution.
The paint should be applied in thin layers. Don't try to cover perfectly with the first coat. A thick hand makes lines, runs and is slow to dry. Two or three thin coats give a better result, better durability and a more even surface.
Use a good brush for corners and a small roller for flat surfaces. The roll gives a more uniform look to melamine doors. The brush can leave visible lines, especially in matte colors. If you want a more handmade/rustic effect, lines may be acceptable. If you want modern clean image, work more carefully with roll.
Let each hand dry as the manufacturer says. Do not touch the surface constantly to see if it has dried. Surface drying does not mean complete curing. If you apply a second coat too quickly, you may pull the previous coat or create marks.
Between hands, if the surface has small imperfections, you can do very light sanding with fine sandpaper and wipe off the dust. This gives a smoother result. Do not rub hard, because color can be removed from edges.
Varnish is critical in bathroom furniture. Protects the paint from water, soaps, cleaners, fingers and friction. Without varnish, a chalk paint can look beautiful at first, but quickly become stained. With the right varnish, the surface becomes much more practical.
Choose water varnish or another product suitable for furniture and wet areas. Look for resistance to water, stains and cleaning. The finish can be matte, satin or glossy. For the bathroom, satin is often a good balance: easier to clean than very matte, but not overly shiny.
Apply the varnish in thin layers. As with paint, two thin hands are better than one thick one. Pay attention to the edges, undersides and points around the sink. That's where most of the water falls. If the varnish does not cover the edges well, moisture will find a way out.
Allow the varnish to cure before using the furniture normally. Many varnishes dry to the touch quickly, but take days to fully cure. If you immediately put objects, water or cleaners, it may be marked. Patience in the end protects all work.
Many chalk paint restorations use wax. It gives a nice texture and soft finish, but in the bathroom it's not always the most practical choice. The wax can be marked by water, need to be renewed and not protect enough in areas that receive moisture and frequent cleaning.
For bathroom furniture, varnish is usually a safer choice. Offers better resistance to water and cleaning. If you want a very matte effect, there are matte water varnishes that keep the aesthetics of chalk paint without leaving such a vulnerable surface. If you want more practicality, a satin varnish might be better.
The candle can have a place in decorative places that do not get wet, but not on a counter, door under a sink or a place that gets splashed every day. If you choose wax, be aware that it will require maintenance and careful cleaning.
A good rule of thumb: for living room furniture, wax can be enough. For bathroom furniture, especially MDF or melamine, prefer durable varnish.
The most dangerous spot is the counter around the sink. Water, soaps, toothpaste and cleaners fall there. If the counter is melamine or MDF and already has wear, painting is risky. The horizontal surface receives much more stress than a vertical door.
If the countertop is in good condition and you want to paint it, it needs even more careful preparation, primer, durable paint and strong varnish. Even so, no water should remain on it. If water pools around the sink, the paint will be tested too hard.
In many cases, it is better to paint the doors and sides, but leave or replace the counter with a more durable material. A new budget countertop, properly cut and sealed around the sink, may be a better investment than painting a worn MDF countertop.
The sink-counter joint must be properly sealed. If water goes under the sink, the paint and varnish will not save the MDF. Before painting, check if new silicone or valve repair is needed.
Changing knobs is one of the most economical and efficient moves. A painted piece of furniture with old, worn knobs looks unfinished. Instead, new knobs in matte black, brushed gold, inox or wood can make the result look more professional.
Before you buy, measure the existing holes. If the old handles have two screws, measure the center-to-center distance. If the new handles have a different dimension, you will have to putty the old holes and drill new ones. This should be done before painting, not after.
Knobs should match the style of the bathroom. Black knobs on light-colored furniture provide a modern contrast. Gold knobs on green, blue or beige furniture give a more boutique effect. Wooden knobs on white or gray furniture give a more natural spa image.
Attention to quality. Very cheap metal knobs in a wet bath can peel or rust. Since their cost is small compared to the paint job, it's worth choosing something decent.
The colors that look good on bathroom furniture depend on the tiles, the lighting and the size of the space. White is safe and bright, but if the bathroom is already too white it can look dull. Gray is neutral but needs the right shade to not become cold. Greige, i.e. grey-beige, is very practical for old bathrooms with beige tiles.
Sage green, the soft green of sage, goes well with white, beige, wood and gold elements. It gives a calm, modern image without being flashy. Navy or deep blue can give a strong character, especially with gold or inox knobs, but in a very small bathroom it can darken the space.
Black or charcoal can look very modern, but it needs good lighting and a clean background. In a small bathroom with few square meters, a black piece of furniture can look elegant if the walls are open. If the bathroom is already dark, maybe a lighter color is better.
For old bathrooms with bold tiles, choose a color that calms the space. Don't add one more hot piece of information. If the tiles are brown or beige, a warm greige or soft green can work well. If they are gray/white, a charcoal or blue can add character.
The professional result can be seen in the details: clean edges, no runs, no dust in the paint, uniform finish and correct mounting. To achieve this, work in a clean, well-ventilated area with good lighting. Do not paint in dust, moisture or vapors.
Rest the doors horizontally on supports. Paint the edges first and then the large surfaces. Don't let paint pool in the corners. If you are painting both sides, let the first side dry thoroughly before turning the door over. Do not touch fresh paint to newspaper which may stick.
Use masking tape where necessary, but remove it at the right time, before the paint fully hardens and tears at the edge. Protect the sink, floor and batteries. A drop of paint on porcelain can be cleaned, but on porous stone or grout it can become a problem.
Don't rush the final assembly. If the varnish has not hardened, hinges, knobs and rubbers can mark the surface. Allow as much time as needed. The most common mistake in DIY painting is that the user does a good job and ruins it by assembling too early.
A painted bathroom furniture needs gentle maintenance. Cleans with a fresh cloth, mild soap and immediate drying. Do not use strong anti-salts, bleach, hard sponges or abrasives. Varnish protects, but is not indestructible.
You wipe water around the sink. If you spill toothpaste, soap, hair dye or cleaner, remove it immediately. Do not leave bottles with wet bottoms on painted furniture. Use a tray or organizer, but lift it often so it dries underneath.
If a small bump appears, fix it early. Keep some of the paint and varnish for future spot-on corrections. A small abrasion in a spot that receives water may develop if left open.
Bathroom ventilation is also important. The less moisture that remains in the room, the better the painted furniture will last. If the bathroom is not ventilated and the mirror remains cloudy for a while, the paint will be tested more.
Not all furniture is a candidate for painting. If the bottom is swollen with water, if the back is moldy, if the interior smells damp, if the pipes are dripping or if the doors are out of shape, restoration is a temporary cover. It might look better for a few months, but it's not the right solution.
It is not a good idea to paint over active moisture. If there is a leak from a siphon, valve, supply or sink silicone, it is first repaired. Paint does not stop water. If water continues to seep through, the MDF will bubble under the new paint.
It is also not a good idea when the furniture is very cheaply made and its materials have already broken down. The cost of paints, primers, varnishes and time can approach the price of a new simple piece of furniture. In such a case, replacement may make more sense.
But if the furniture is sturdy, the damage is limited and you like its dimensions, restoration can be a very good investment. The key is proper assessment before you start.
Painting bathroom furniture is cheaper than replacing, but it is not zero cost. If done correctly, they require cleaners, sandpaper, putty, primer, paint, varnish, brushes or rollers, and possibly new knobs. If you buy all the materials from scratch, the cost can go up.
The prices are indicative and depend on the area, the quality of the products, the size of the furniture, whether VAT is included and whether there are already any tools in the house. If you have to buy everything, the difference from an affordable new piece of furniture can get smaller. But if you already have tools and the furniture is on a good foundation, restoration is worthwhile.

| Material / Labor | Indicative cost picture 2026 |
|---|---|
| Degreasing / conditioning cleaner | around €3–8 |
| Sandpapers / sanding sponges | around €3–10 |
| Wood putty or MDF | around €3–8 |
| Adhesion primer for melamine / glossy surfaces | around €8–20 |
| Chalk paint or special furniture paint | around €10–35 |
| High protection water varnish | around €10–30 |
| Rollers, brushes, paper tapes | around €8–20 |
| New knobs / handles | about €2–8 per piece |
| DIY restoration of small furniture | around 40–100€+, depending on materials |
| Professional painting / restoration | case by case |
| Replacement of simple bathroom furniture | often higher cost, depending on dimension and plumbing |
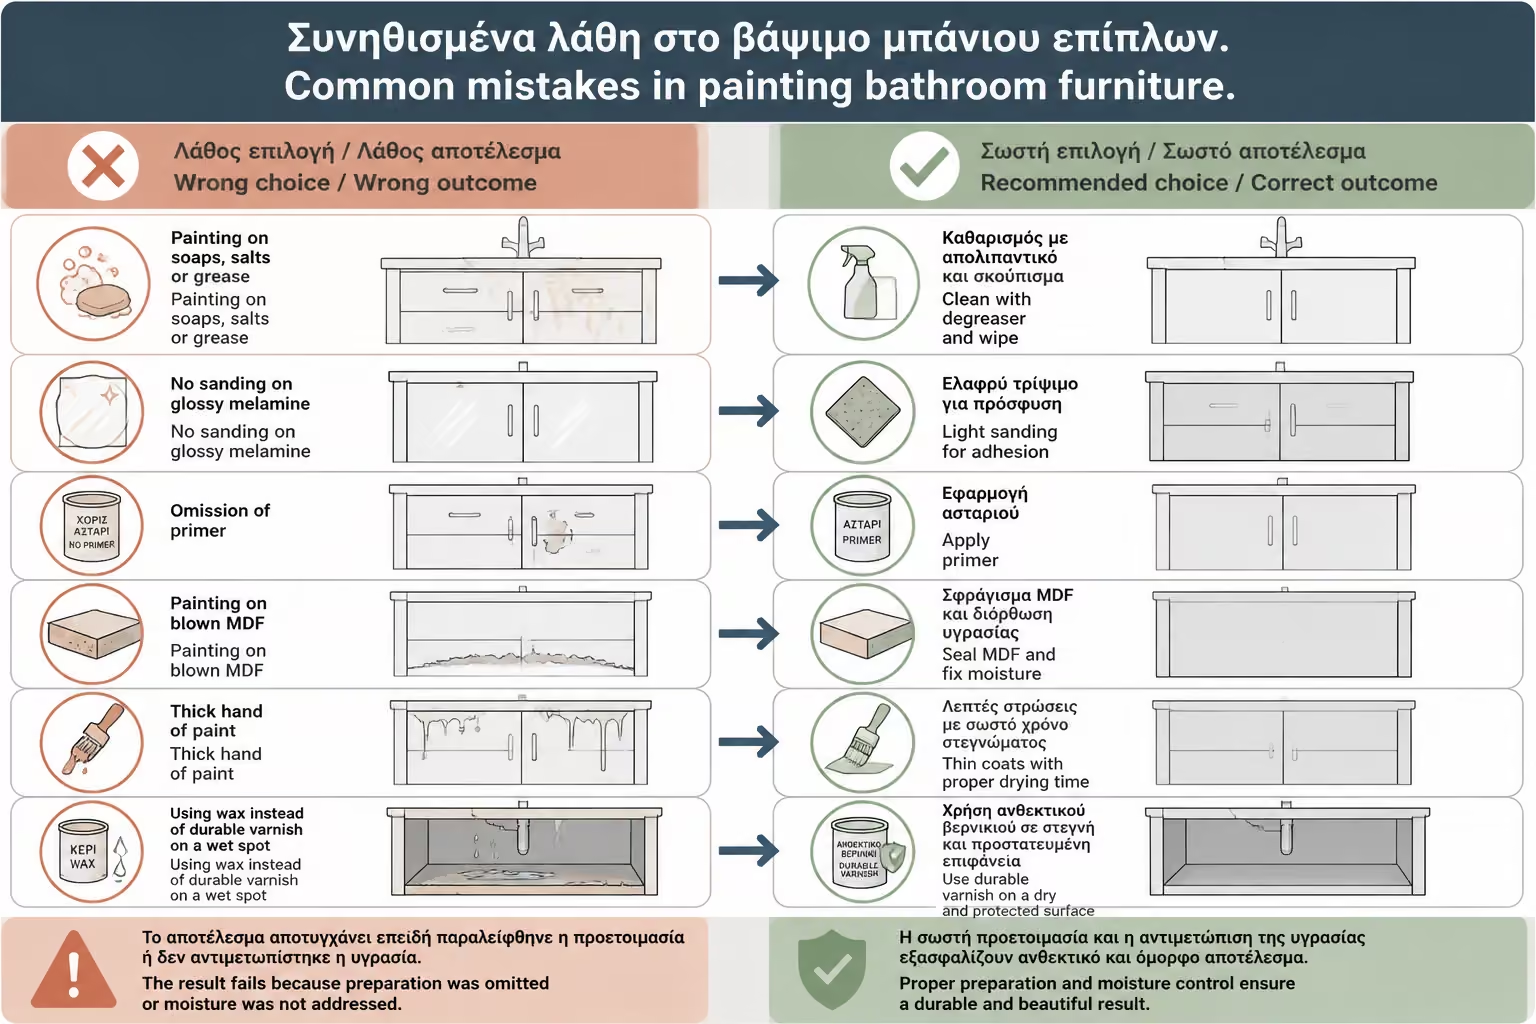
Most failed DIY paint jobs don't fail because the paint was bad. They break down because preparation was omitted or because the furniture had moisture that was not treated.
A typical example is the piece of furniture that is beautifully painted on the outside, but under the sink the faucet continues to drip. In a few weeks, the lower shelf swells again and the color opens at the edges. The problem wasn't the chalk paint. It was that the cause of moisture was not corrected.
| Error | What does it cause? | Correct practice |
|---|---|---|
| Painting on soaps, salts or grease | Poor adhesion and peeling | Good cleaning and degreasing |
| No sanding on glossy melamine | The color does not "take" properly | Light sanding to break up gloss |
| Omission of primer | Peeling on edges and doors | Adhesion primer |
| Painting on blown MDF | Temporary effect | Repair or replace a worn part |
| Thick hand of paint | Runs and poor hardening | Lots of thin hands |
| Using wax instead of durable varnish on a wet spot | Stains and low protection | Varnish suitable for humidity |
| Assembly before the varnish hardens | Marks and adhesions | Wait until fully ripe |
| Ignoring the leak under the sink | New inflation | Plumbing check before painting |
A professional is needed when the furniture has serious swelling, when an MDF part needs to be replaced, when there are leaks, when a sink or counter needs to be cleaned, when the hinges do not hold or when you want a very smooth and durable result like the factory. DIY can give a very beautiful image, but it has limits.
A plumber is needed if there is a drip from a supply, siphon, valve or sink joint. We do not start painting over an active leak. A carpenter may be needed if a door, side or bottom shelf needs to be replaced. An oil painter or painter can help if you want a more professional finish.
If the piece of furniture is expensive or specially made, it deserves an appraisal before messing with it. A wrong DIY application can make professional restoration more difficult. If it's cheap and old, DIY has less risk.
The right decision is not always "do it alone" or "change it". Sometimes the best solution is a combination: repair a leak from a plumber, replace a worn shelf from a carpenter, and DIY paint on the facades.
| Inquiry | Yes / No |
|---|---|
| Is the furniture frame stable and free of deep moisture? | Yes / No |
| Have the siphon, valve and fittings been checked for leaks? | Yes / No |
| Are the bumps small and hard, not soft or squishy? | Yes / No |
| Are knobs and fittings removed before painting? | Yes / No |
| Has the surface been cleaned of soaps, salts and grease? | Yes / No |
| Has it been lightly sanded for adhesion? | Yes / No |
| Will an adhesion primer be used for a melamine or glossy surface? | Yes / No |
| Will the paint be applied in thin layers? | Yes / No |
| Will protective varnish suitable for wet areas be included? | Yes / No |
| Will it be given enough curing time before use? | Yes / No |
| Are the new knobs measured correctly before they are drilled? | Yes / No |
| Is there a plan for daily protection from water after painting? | Yes / No |
If the answer is “No” to the points about moisture, leaks, primer or varnish, don't start yet. In the bathroom, painting is successful when the surface is dry, stable and properly protected.
Painting a piece of bathroom furniture can give a dramatic refresh, but it shouldn't be used to hide dampness. If the MDF is deeply swollen or there is a leak under the sink, first address the cause. Then we paint. On melamine and glossy surfaces, don't just rely on "chalk paint gets everywhere". Cleaning, light sanding, adhesion primer and a good varnish are what will keep the result. The bathroom does not forgive sloppy preparation, because moisture always finds the weakest edge.
Restoring bathroom furniture with chalk paint or special furniture paint can transform an old sink without a complete replacement. It is an economical, creative and impressive solution when the furniture is stable, damage is limited and there is no active moisture. With a new color, correct knobs and a clean line, an old piece of melamine or MDF furniture can look modern and much neater.
The secret is not to avoid preparation altogether. It's about doing proper, targeted preparation without endless grinding. Cleaning, degreasing, light sanding, damage repair, adhesion primer, thin coats of paint and durable protective varnish is the order of the day. If you skip the basics, the result can be flaky, dull or puffy.
But there must be realism. Painting does not make a blown MDF new. Does not stop leaks. It does not replace a proper seal around the sink. If the base of the furniture is waterlogged, if the material is loose, or if the interior smells damp, replacement is often more appropriate. But when the foundation is good, restoration can give the bathroom a new look at a much lower cost than a complete change.
Return to category.
Go to categoryReturn to the central guide.
Go to guide