
Bathroom DIY, Maintenance & Styling
Return to category.
Go to categorySelf-adhesive vinyl tiles, also known as peel & stick tiles, have become one of the most popular solutions for quick, hassle-free bathroom renewal. No tile adhesives, grouts, wheels, dust, workshop or owner permission required, at least when used properly and on limited surfaces. You peel off the protective paper, stick the tile onto the existing surface and within a few hours the space looks different.
This solution is particularly attractive for tenants. In many old apartments, the bathroom has tiles that are not necessarily damaged, but are aesthetically difficult: strong retro patterns, strange borders, old shades, tiles around the mirror that "scream" 80s or 90s. They're not worth getting ripped off, they're not always allowed to be changed, and you certainly don't want to invest large sums of money in a home you don't own. That's where peel & stick can work as a smart temporary facelift.
The important thing, though, is to know where we use them. It's one thing to cover a zone around the mirror or the sink, and another to put them inside the shower, on a wall that gets wet every day. Vinyl stickers can withstand moisture and splashes, depending on quality, but should not be considered equivalent to normal tiling in a permanently wet zone. It is a decorative and practical solution for specific areas, not a universal bathroom waterproofing.
Their great advantage is reversibility. If chosen correctly and applied to a suitable surface, they can be removed later with less damage than a permanent intervention. This does not mean that they never leave glue or that there is no risk. On old tiles, sensitive paint, loose joints or damp surfaces, removal can leave residue or reveal problems. That is why care is needed before application.
In this guide, we'll look at where to use self-adhesive vinyl tiles in the bathroom, how to apply them correctly around the mirror and sink, what surfaces are not suitable, how to achieve a clean result without blisters, how to remove them more gently when you leave the house and what mistakes make the "reversible" solution look sketchy.
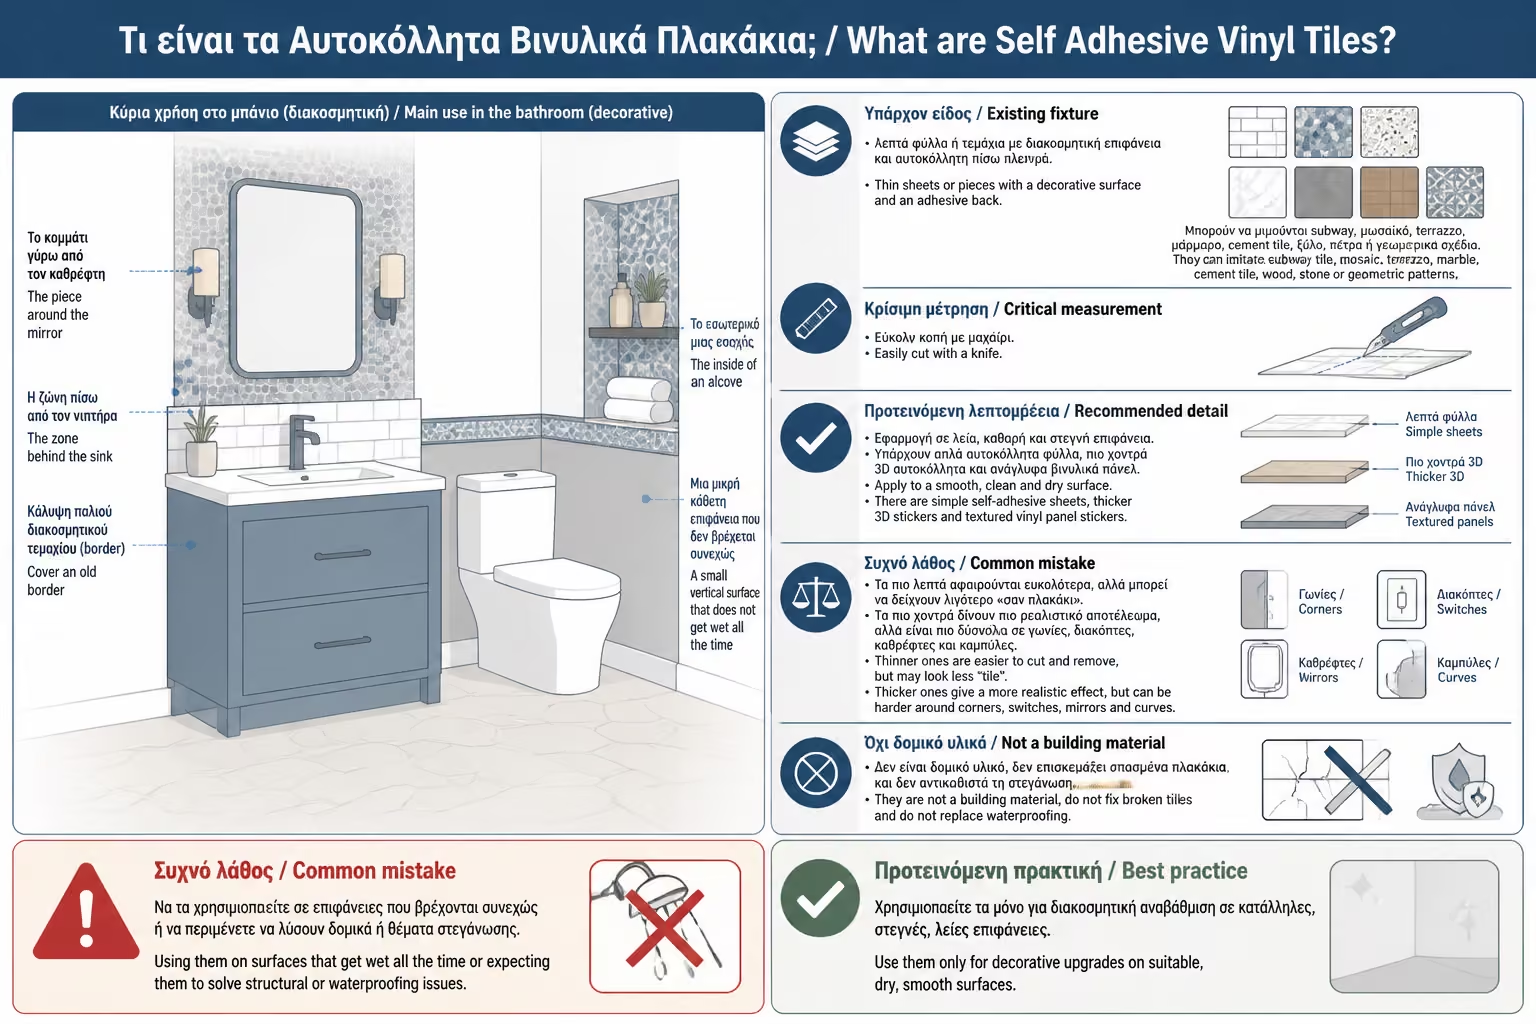
Self-adhesive vinyl tiles are thin sheets or pieces with a decorative surface and an adhesive back. They can imitate subway tile, mosaic, terrazzo, marble, cement tile, wood, stone or geometric patterns. They are usually easily cut with a knife and applied to a smooth, clean and dry surface.
There are simple self-adhesive sheets, thicker 3D stickers and textured vinyl panel stickers. Thinner ones are easier to cut and remove, but may look less "tile". Thicker ones give a more realistic effect, but can be harder around corners, switches, mirrors and curves.
Their main use in the bathroom is decorative. They can cover an old border, a zone behind the sink, the piece around the mirror, the inside of an alcove or a small vertical surface that does not get wet all the time. They are not a building material, they do not fix broken tiles and they do not replace waterproofing.
A good example is the wall behind the sink. If it has old beige tiles and you want a more modern look, you can create a vertical zone with white subway or terrazzo stickers. The mirror, faucet and new accessories will immediately look more modern, without changing the construction of the bathroom.
The tenant has restrictions. It cannot always drill, peel, change tiles or make permanent interventions. Even if the owner agrees, it doesn't always make sense to invest a lot of money in a space that he might leave in a few years. Self-adhesive tiles offer an intermediate solution: aesthetic improvement without heavy work.
It's also a quick fix. It can be applied in an afternoon, without emptying the entire bathroom and without leaving the space out of use for days. There is no debris, dust or wet materials that need curing. This is a big advantage in small apartments.
Reversibility is the key argument. On the right surface, decals can be removed with heat and patience, leaving behind mostly clean-up adhesive residue. This is very different from permanently gluing a new tile over an old one. Nevertheless, it is a good idea to keep photos before the application and, if the house is rented, to consult with the owner about any changes.
The important thing is to choose low-risk spots. A zone around the mirror is a much better option than inside the shower. If you want truly reversible intervention, you must avoid surfaces that will stress the adhesive with permanent water, steam and cleaners.
The best place for peel & stick tiles in the bathroom is around the mirror, behind the sink, in a small decorative zone above the furniture or on a wall that receives only splashes. There the humidity is there, but there is no continuous water pressure. If the surface is wiped and aired, the stickers can hold decently.
They can also be used to cover old decorative edging. Many bathrooms have a horizontal patterned strip that no longer matches the style of the space. If the border is smooth and clean, a sticker in a modern design can make it disappear visually.
They can fit on the side of a cupboard, on a small back behind a shelf or in a guest WC where there is no intense moisture. In such applications, they work almost like a decorative wall sticker, but with a more "material" effect.
It's not a good idea for them to get inside the shower, inside the bathtub, on a wet floor, in siphons, in moldy areas, on swollen walls or over exposed joints. If the substrate is damp, the sticker will seal the problem from above, but not solve it. It can even trap moisture and peel off.
The ideal surface is smooth, clean, dry and stable. Glossy ceramic tiles are usually a good base, as long as they are not heavily textured. Melamine, glass or smooth painted surfaces can also accept stickers if they are free of dust, grease or moisture.
Old tiles must be well glued. If they sound hollow, if they wobble, or if there are cracks, the sticker does not fix the base. Also, the joints should not be too deep or strongly embossed, because they can look like "hollows" on the sticker or reduce the contact of the glue.
If the tiles have a strong texture, like stone or embossed retro design, the adhesion may be poor. The sticker needs full contact with the surface. Where there are air gaps, it can come off. In such cases, another solution may be needed, such as a thin cladding panel or painting tiles with a special system, if permitted.
The surface must be completely dry. If the bathroom has just been used, wait for the water vapor to evaporate and the tiles to dry. Do not apply to a surface that has moisture in the joints or smells musty. The sticker needs a dry base to stick.
They should not be placed in places with permanent wetting. The inside of the shower, the wall where the water falls directly, the floor of the shower, the inside of the tub, and areas around faucets are poor choices. Even if some products claim to be water resistant, continuous use in a wet zone is a big strain.
They must not step on mold. If the joints are blackened, if there is moisture behind tiles or if the silicone is damaged, the problem is corrected first. The sticker will hide the mold, but it won't make it disappear. In poor ventilation, an even more unpleasant situation can be created.
They should not be placed on peeling paint or loose plaster. If the substrate comes off, it will come off with the sticker. The glue sticks as well as the base. In a rental home with old paint, a small spot test is essential.
Also avoid places with high heat, such as too close to a radiator or electric towel rail, if the product does not allow it. Heat can soften the glue and create separation at the edges.
Self-adhesive tiles can easily look either too beautiful or too fake. The choice of design plays a big role. The most timeless designs usually look best: white subway tile, small terrazzo, soft marble, monochromatic matte tiles, subtle geometric pattern or soft concrete texture.
Too intense 3D designs, too shiny "marble" prints or too cheap geometric patterns can get tiring quickly. In a small bathroom, a bold design around the mirror can become visually heavy. If the old tiles are already bold, it's better to choose something calm that neutralizes them, not something that competes with them.
For a rental bathroom, the goal is usually to look clean, fresh and neutral. A white or light gray design matches more easily with existing batteries, mirrors and accessories. If you want character, you can give it with black or gold accessories, not necessarily with a very bold sticker.
Consider photography too. If the bathroom is for an Airbnb or rental that you want to look better in the listings, simple clean designs photograph better. The very "fake" print looks even more intense in a photo with flash or cold lighting.
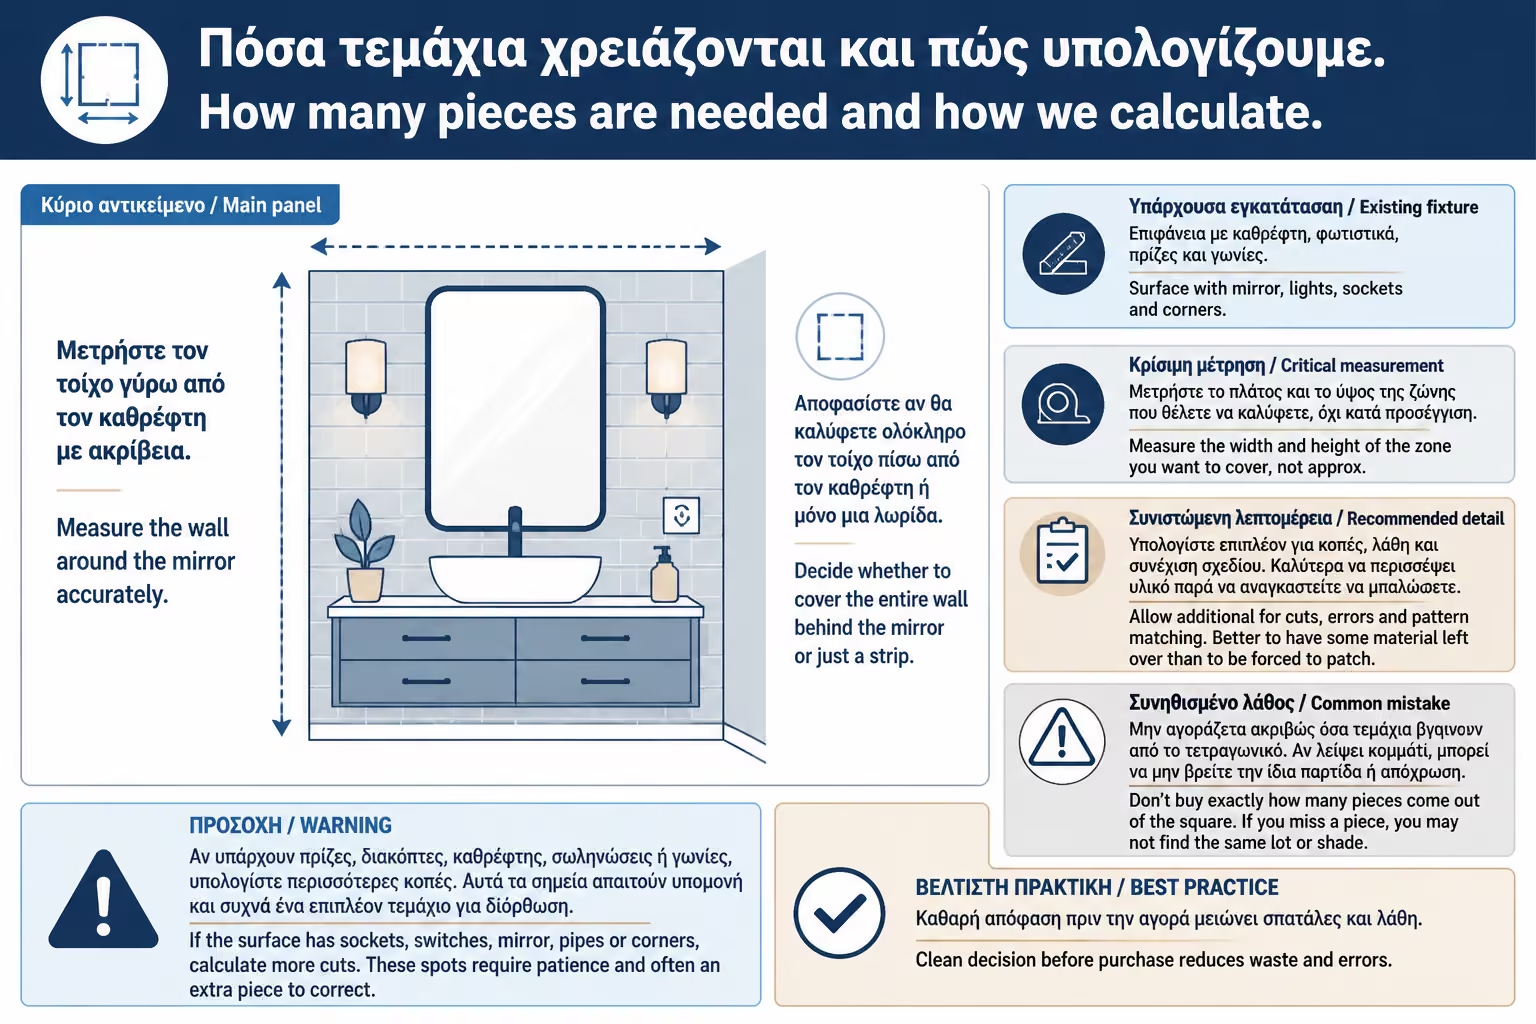
Before you buy, measure the area accurately. Measure the width and height of the zone you want to cover, not approx. If the area is around a mirror, decide whether to cover the entire wall behind the mirror or just a strip. Clean decision before purchase reduces waste and errors.
Allow an additional 10–15% for cuts, errors and pattern matching. If the design has a pattern that needs to be continued, it may take a little more. Don't buy exactly how many pieces come out of the square. If you miss a piece, you may not find the same lot or shade.
If the surface has sockets, switches, mirror, pipes or corners, calculate more cuts. These spots require patience and often an extra piece to correct. Better to have some material left over than to be forced to patch.
Keep some small pieces after application. They may be needed for local repair or to replace a part that is wearing out. Especially in a rented house, it is useful to have the same material available.
Preparation is more important than the application itself. The tiles must be cleaned of salts, soaps, grease and dust. Around the sink there are often toothpaste, soap, cleaning residue and water drops. If the glue gets on them, it won't stick properly.
Use a mild degreasing cleanser and then rinse with clean water. Allow to dry completely. On glossy tiles, you can finish with a microfiber cloth to remove lint. Do not apply immediately after a hot shower, because the water vapor will have settled on the surface.
If there is scale around the faucet or sink, remove it first. Do not put a sticker over white crusts. If there are silicones on the edges, check that they are clean and firm. The sticker does not stick properly on silicone. It usually needs to stop before the silicone or cut cleanly around it.
If the joints are dirty or blackened, clean them first. Even if they will be covered, you don't want to trap moisture and dirt underneath. The reversible solution must start from a clean base.
The application does not require specialized tools, but it does require precision. A scraper with a new blade, metal ruler, tape measure, pencil, spirit level, soft applicator spatula or plastic card, microfiber cloth and tape are usually enough. If there are sockets or difficult cuts, a piece of pattern paper can help.
The new llama is important. An old blade rips the vinyl and leaves jagged edges. If the design has fine lines, poor cutting is immediately visible. Always cut on a cutting surface or cardboard, not on the bathroom counter.
The spirit level helps you start straight. If the first piece goes wrong, all the rest will follow. Don't always rely on the joints of old tiles, as they may not be perfectly horizontal. Especially in old bathrooms, the lines can have deviations.
Spatula or card helps to get air bubbles out. Press from the center to the edges. Do not press so hard that you distort the material, especially if it is thin or textured.
Start by deciding on the zone. If the mirror is easily removed, it is better to take it out, apply the stickers and put it back. If it is not removed, carefully work around it, leaving clean cuts at the edges. Do not try to push the sticker behind a mirror attached to the wall.
Mark a straight starting line with a spirit level. We usually start from the most visible point, not necessarily from a corner. If the design has seams or a pattern, think about where the cuts will appear. It is better for small cuts to go on the edges or under the mirror, not in the center of the look.
Peel off some of the backing paper, not all at once. Place the top, align and press gradually, pulling the paper little by little. This reduces bubbles and warping. If you glue the whole sheet sharply, the correction is more difficult.
Press from the center to the edges. Pay attention to the joints of the old tiles. If the material is thin, it can make a small belly over deep joints. In such a case, we do not press too much into the joint, because it will emphasize the relief. Material quality and preparation play a big role.
The cuts are where it shows if the job was done carefully. For straight cuts, use a metal ruler and chisel. Cut from the back side where possible if the pattern helps, but be careful not to mix up the left and right sides. For difficult shapes, make paper patterns first.
Around outlets and switches, the safe bet is to remove the bezel and cut the sticker around the box so the bezel covers the edge. If you are inexperienced or have an electrical issue, don't bother with outlets. The bathroom is a wet place and safety comes first. When in doubt, ask an electrician.
Around sink taps or a mirror with brackets, cut carefully and avoid creating many small joints. The more joints, the more likely they will come off. If the faucet is wall-mounted and the area gets wet often, stickers may not be the best solution near the base of the faucet.
In the corners, if the material is thin, it can turn. If it is thicker, it is better to cut it cleanly in the corner and start a new sheet on the other side. The fold of thick self-adhesive corner lining often lifts over time.
Blisters are created by air, dust, moisture or rapid application. The best prevention is a clean and dry surface, slow application and pressure from the center outwards. If a small blister appears, carefully lift the sticker while it is still fresh on the application and press again. Do not pull it too many times, because the glue loses strength.
Peels usually start from edges, corners and wet spots. That is why the edges must be well pressed, clean and not on silicone or dust. If the product allows it, you can use slight heat from a hair dryer to help the glue "set", but not too much heat that warps the vinyl.
Do not apply in a very cold bath. Adhesives work best at normal room temperature. If the surface is too cold or wet, adhesion is reduced. Ideally, the bathroom should be dry and relatively warm, without water vapor.
After application, avoid wetting or vigorously cleaning the surface for the first few hours or the first day, depending on the product instructions. The glue needs time to set.
Many self-adhesive tiles have printed or embossed "joints". This can give a more realistic image, but needs proper alignment. If the lines do not match from sheet to sheet, the result looks fake. In a small area around a mirror, failures are easily seen.
If the old tiles have deep joints, they may show under the sticker, especially if the material is thin. This isn't always a bad thing, but it can create weird double lines: old joint below and new printed joint above. In such cases, a thicker or more uniform design may work better.
If you want to cover old retro tiles with a bold pattern, choose a sticker that has enough opacity. Very thin light-colored decals may show the old design underneath, especially in bright light. Before you buy a large quantity, try a piece.
The goal is not to fool from a distance of 10 centimeters. It is to give a clear overall picture to the space. If the design is calm, small imperfections are less visible.
Self-adhesive tiles should be cleaned gently. Use a fresh cloth, mild soap and dry immediately. Avoid hard sponges, wires, abrasive powders, very strong anti-salts and bleach. Aggressive cleaners can dull the surface, affect the adhesive or lift the edges.
If the surface is behind the sink, wipe off the water after use. Do not allow drops to pool in the joints. If water constantly gets behind the edge, it will come off. Stickers last better when moisture doesn't stay on them.
Do not rub the joints. They are most vulnerable there. If dirt collects on the edges, clean gently with a soft cloth or cotton swab, not a stiff brush. If an edge starts to lift, press it early. If it has collected dust or soap underneath, it may not stick well again.
Avoid attaching heavy accessories, hooks or mirrors to them. Peel & stick tiles are a surface covering, not a support base. If you need to hang something, it must be supported on the actual wall or the tiles below, in a proper way.
To remove them more gently, use heat from a hair dryer. Warm up one corner, raise it slowly and pull gradually, keeping a low angle. Do not pull out sharply, as more glue may remain or weak paint may lift from underneath.
On glossy tiles, removal is usually easier. On painted walls or porous surfaces, there is a greater risk. If the sticker has been left for years, the adhesive may have hardened or left residue. These are cleaned with a suitable adhesive remover, but you need to be careful of the surface underneath.
Do not use very aggressive solvents without testing. They may clean the glue but dull tiles, affect joints or damage paintwork. In a rental home, start with the gentlest method: heat, slow removal, mild residue cleaner.
If you plan to remove the stickers when you leave, do not place them on an already fragile surface. Reversibility depends on the base. If the base is bad, it will come off with the sticker.
Duration depends on product quality, surface, preparation, humidity and use. In a dry zone around a mirror, they can last several years with proper application. To the point where it is splashed often but wiped, durability can be good but needs maintenance. In a permanently wet zone, the duration is significantly reduced.
Edges are the first point of wear. If they start to rise, moisture and dust get in from underneath and the problem grows. That's why good cuts and the right application pressure are critical. If the edge is at a point where it rubs or gets wet all the time, it will be tested more.
Cheap stickers may yellow, fade or lose adhesive faster. The best quality ones have a more stable surface and better grip. You don't always have to buy the most expensive, but avoid products that are too thin, smell strong, have weak adhesive or bad reviews for moisture.
In any case, we are talking about a temporary or medium-term renewal, not a decades-long solution like regular tiles. This is not a disadvantage if you know what you are buying. For a tenant, temporary is often just the thing.
Self-adhesive tiles look best when combined with small changes around them. If you change only the wall but leave old plastic dispenser, rusty pigal and different towels, the result will be half. With a few matching accessories, the change looks much more thought out.
If you choose a white subway sticker, you can combine it with a black matte dispenser, a black hook and white towels. If you choose terrazzo, wooden or white accessories are suitable. If you choose marble print, be careful not to look too fake and combine it with subtle inox or brushed gold.
The mirror also plays a role. If the mirror is old but can be removed, a new plain frame or mirror with a thin black/gold frame can make the trim look more real. If it doesn't change, give it a good clean and make sure the edges aren't blackened by moisture.
The overall image wins when there is a clean palette. Pick 2–3 colors and stick to them. Stickers are already a visual change. Do not overload the space with many different patterns.
The cost depends on the quality, thickness, design and quantity. For a small zone around a mirror or behind a sink, the budget can be quite low. If you want to cover a large wall, the cost goes up and it might be worth comparing with other solutions.
The prices are indicative and depend on the area, the store, the quality, the design, whether VAT is included and the surface to be covered. For a rental home, it's usually worth sticking to a small, targeted application with a big visual impact, not covering the entire bathroom.

| Material / Labor | Indicative cost picture 2026 |
|---|---|
| Simple self-adhesive tiles / sheets | about €10–25 per small package |
| Thicker 3D peel & stick tiles | about 20–50€+ per package |
| Sharpener, blades, ruler, spatula | around €5–20 if they don't already exist |
| Preparation cleaners | around €3–8 |
| Small application around mirror | around €25–80, depending on the product |
| Belt behind sink | around 30–100€+ |
| Large bathroom wall | it can easily exceed €100–200 |
| Professional application | case by case, usually not suitable for very small DIY solution |
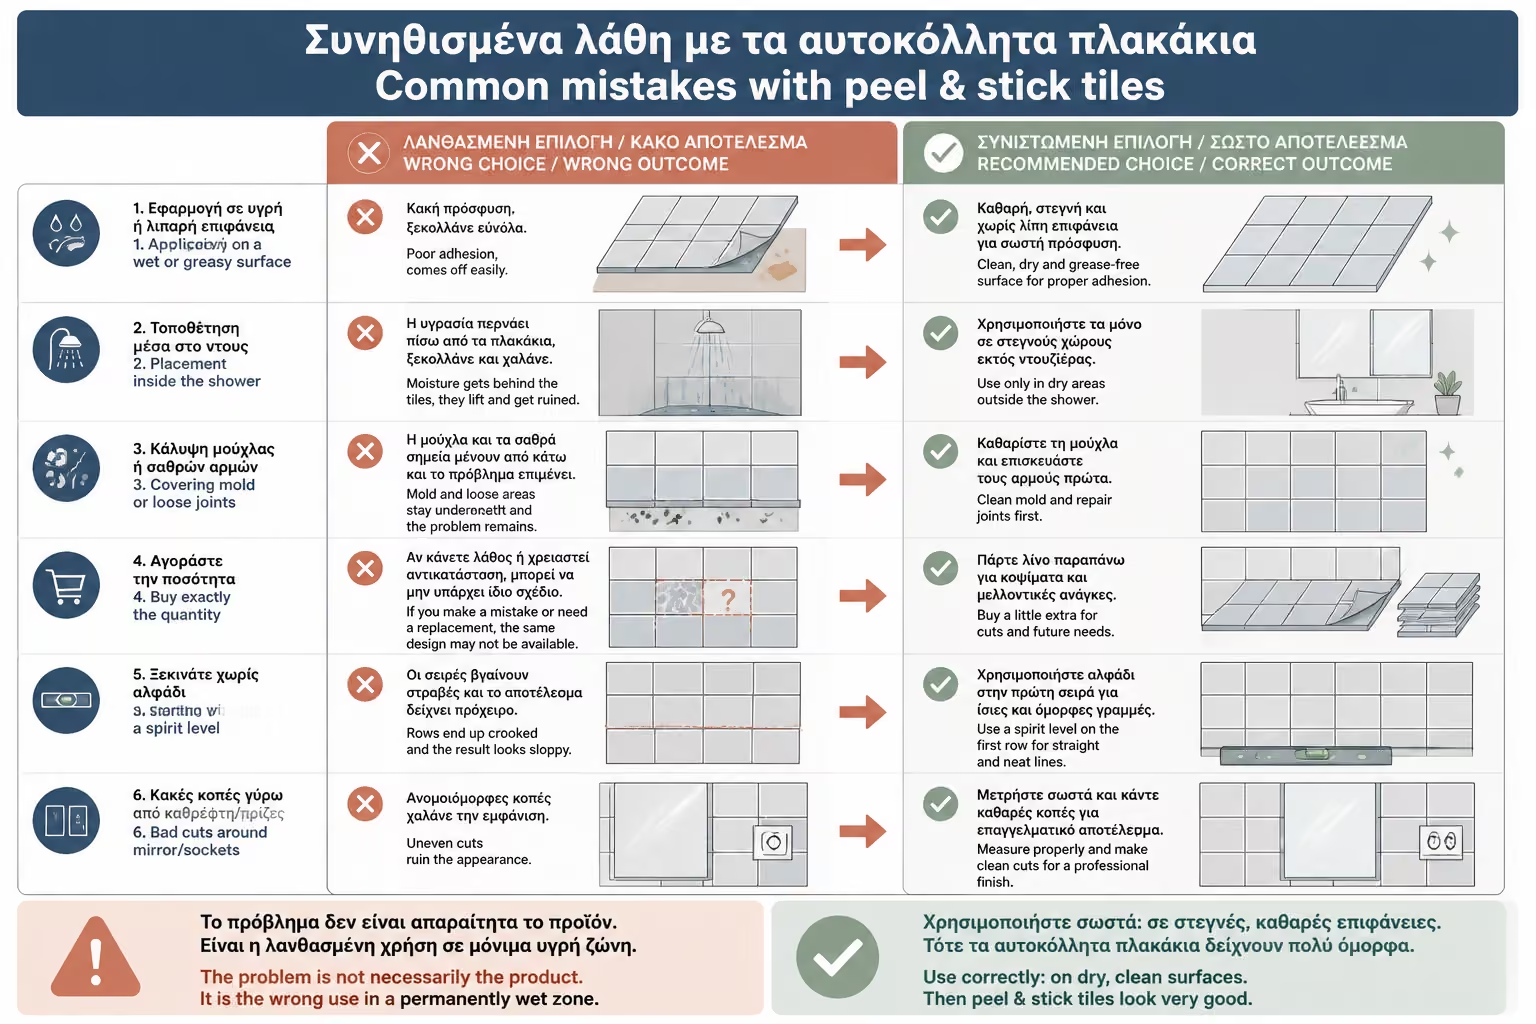
The most common mistakes do not have to do with the product itself, but with too much expectation. Self-adhesive tiles are not regular tiles, they do not waterproof and do not fix a bad base. If used correctly, they look very good. If used in the wrong place, they come off and look sloppy.
A typical example is the tenant covering the entire shower wall with peel & stick “to hide the old tiles”. For the first few days it seems nice. After a few weeks, the edges lift, water seeps in from behind, and the image is ruined. The problem is not necessarily the product. It is the wrong use in a permanently wet zone.
| Error | What does it cause? | Correct practice |
|---|---|---|
| Application on a wet or greasy surface | Poor adhesion | Clean and dry completely |
| Placement inside the shower | Detachment from permanent moisture | Use only in splash zones |
| Covering mold or loose joints | Problem trapping | Cleaning/repair first |
| Buy exactly the quantity | Lack of material in cuts | 10–15% more |
| Starting without a spirit level | Crooked lines | Starting line |
| Bad cuts around mirror/sockets | Preliminary result | Patron and new llama |
| Lots of bold designs in a small bathroom | Visual overload | Calm design and clean palette |
| Abrupt removal | Debris or damage to the base | Heat and slow draw |
If the old tiles are cracked, hollow, with open joints or moisture, stickers are not the right solution. Needs technical inspection or repair. If the problem is cosmetic, peel & stick helps. If it's technical, they just hide it.
If you want to renew the entire bathroom for many years, it may be worth considering other solutions: painting tiles with a special system, new lining, PVC panels or normal renovation. Stickers are best for small, targeted, temporary or reversible changes.
If the surface is too textured or the old joints too deep, the result may not be satisfactory. In such case, it is better to test with a single piece before buying quantity. If the old lines are visible or it doesn't stick well, don't insist.
If the owner of the house does not allow any sticking, prefer non-stick solutions: mirror with frame, shelf, accessories, lighting, towels, mat and decorative organization. Sometimes you can change the image a lot without touching the tiles at all.
| Inquiry | Yes / No |
|---|---|
| Is the surface smooth, stable and free of moisture? | Yes / No |
| Are the old tiles well bonded and free of cracks? | Yes / No |
| Are the joints cleaned and mold free? | Yes / No |
| Is the area not directly wetted by showers every day? | Yes / No |
| Has a piece been tested before the entire surface is covered? | Yes / No |
| Has 10–15% extra material been calculated for cuts? | Yes / No |
| Are there a ruler, spirit level, ruler and application spatula? | Yes / No |
| Does the design match the mirror, faucet and accessories? | Yes / No |
| Will the outlets or switches be handled safely? | Yes / No |
| Is the solution acceptable to the landlord if it is a rental? | Yes / No |
| Is there a plan for heat removal when needed? | Yes / No |
If the answer is “No” to the items regarding moisture, mold, direct wetting or owner's permission, do not proceed yet. Peel & stick are a smart solution only when they are put into the right base.
Self-adhesive vinyl tiles are an excellent solution for aesthetic renewal, not technical repair. Put them around a mirror, behind a sink or in a splash-only zone, not in the shower and not on mold. The result is judged by the preparation: clean, dry, smooth surface and straight first line. If you want a truly reversible intervention in a rental house, work on a small surface with a large visual effect and keep the application as clean as possible at the edges.
Self-adhesive peel & stick vinyl tiles can quickly transform an old bathroom, especially when the problem is aesthetic rather than technical. They are perfect for renters who want to cover old or 'faux retro' tiles around a mirror, wash basin or small areas without going into permanent work. With the right choice of design, the bathroom can look cleaner, more modern and more well-kept in a few hours.
Their success depends on three things: right point, right surface and right fit. They don't go into permanently wet zones, they don't cover mold, they don't fix loose tiles and they don't replace waterproofing. They enter on a clean, dry, smooth and stable surface. They are started with a spirit level, cut with a clean blade and pressed carefully so that there are no blisters.
Used with realistic expectations, they are among the smartest financial renewal solutions. If they are used to hide technical problems, they will disappoint. For a renter, the best fit is small, targeted and reversible: a beautiful zone around the mirror, a few new accessories, clear lighting and the space changes without disturbing the structure.
Return to category.
Go to categoryReturn to the central guide.
Go to guide