
Indoor Fiber Optic Cabling: What "waits" (pipes) and boxes to leave when retrofitting for the provider

In the previous article, we saw how optical fiber reaches from the street to the doorstep of your apartment building (BEP) and how it goes up the floors. But what happens once the cable passes the front door of your apartment?

The most common (and unpleasant) surprise for owners who have just completed a luxury renovation is when the Cosmote, Nova or Vodafone technician arrives. If proper electrical provision has not been made, the technician will be forced to stick unsightly, exterior plastic conduits over your freshly painted baseboards, drilling through walls to get to the TV.

As engineers, we see fiber as a permanent, architectural infrastructure. Let's see step by step what "stands" (piping and boxes) you should ask your electrician to bury in the walls, so that the installation of the provider becomes completely invisible.

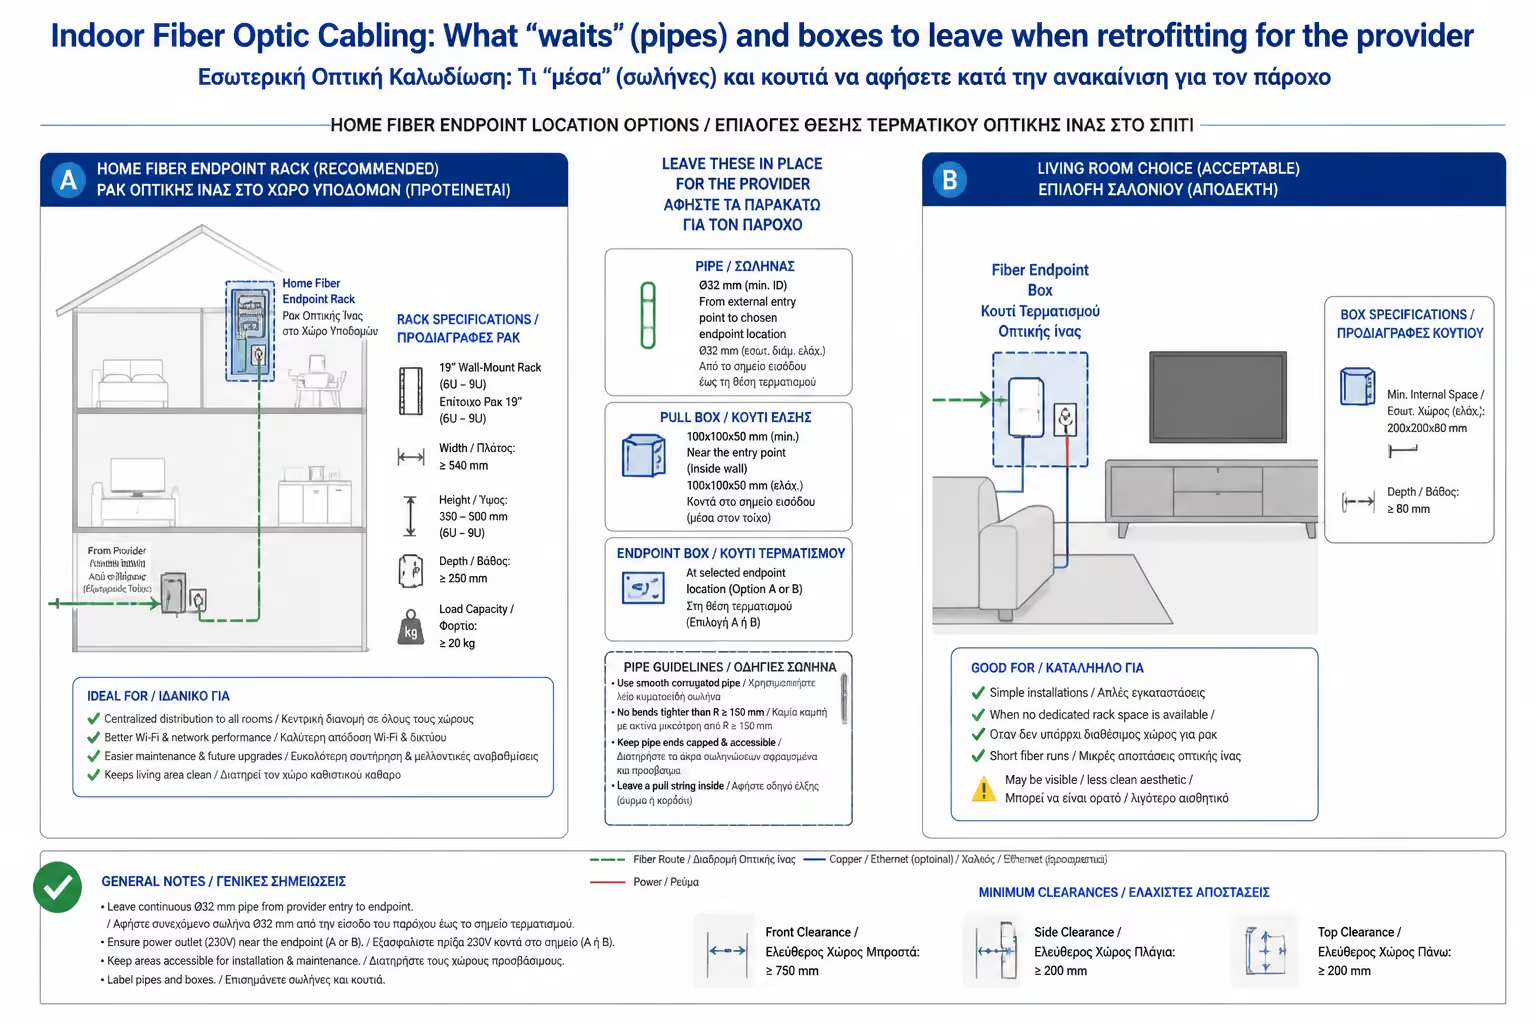
1. The Crucial Question: Where should Ina end up?

The first mistake is the choice of position. Most people ask the electrician to run the fiber pipe behind the TV stand in the living room. This is a holdover from the old days.

In modern Structured Cabling, the optical fiber (and by extension the Router) does not enter the living room, but the Central Convergence Point.

  • If you have built a Central Rack (for cameras, alarm and network) in a warehouse, loft or closet, the fiber pipe should end there.
  • The reason is simple: From this central point, the Router will send the Internet (through the Cat6a copper cables you have already laid) to all the network sockets in the house and to the Wi-Fi antennas (Access Points) on the ceilings. If you put the Router in the living room, you will not be able to "share" the internet in the other rooms wired.
Illustration for 1. The Crucial Question: Where should Ina end up?

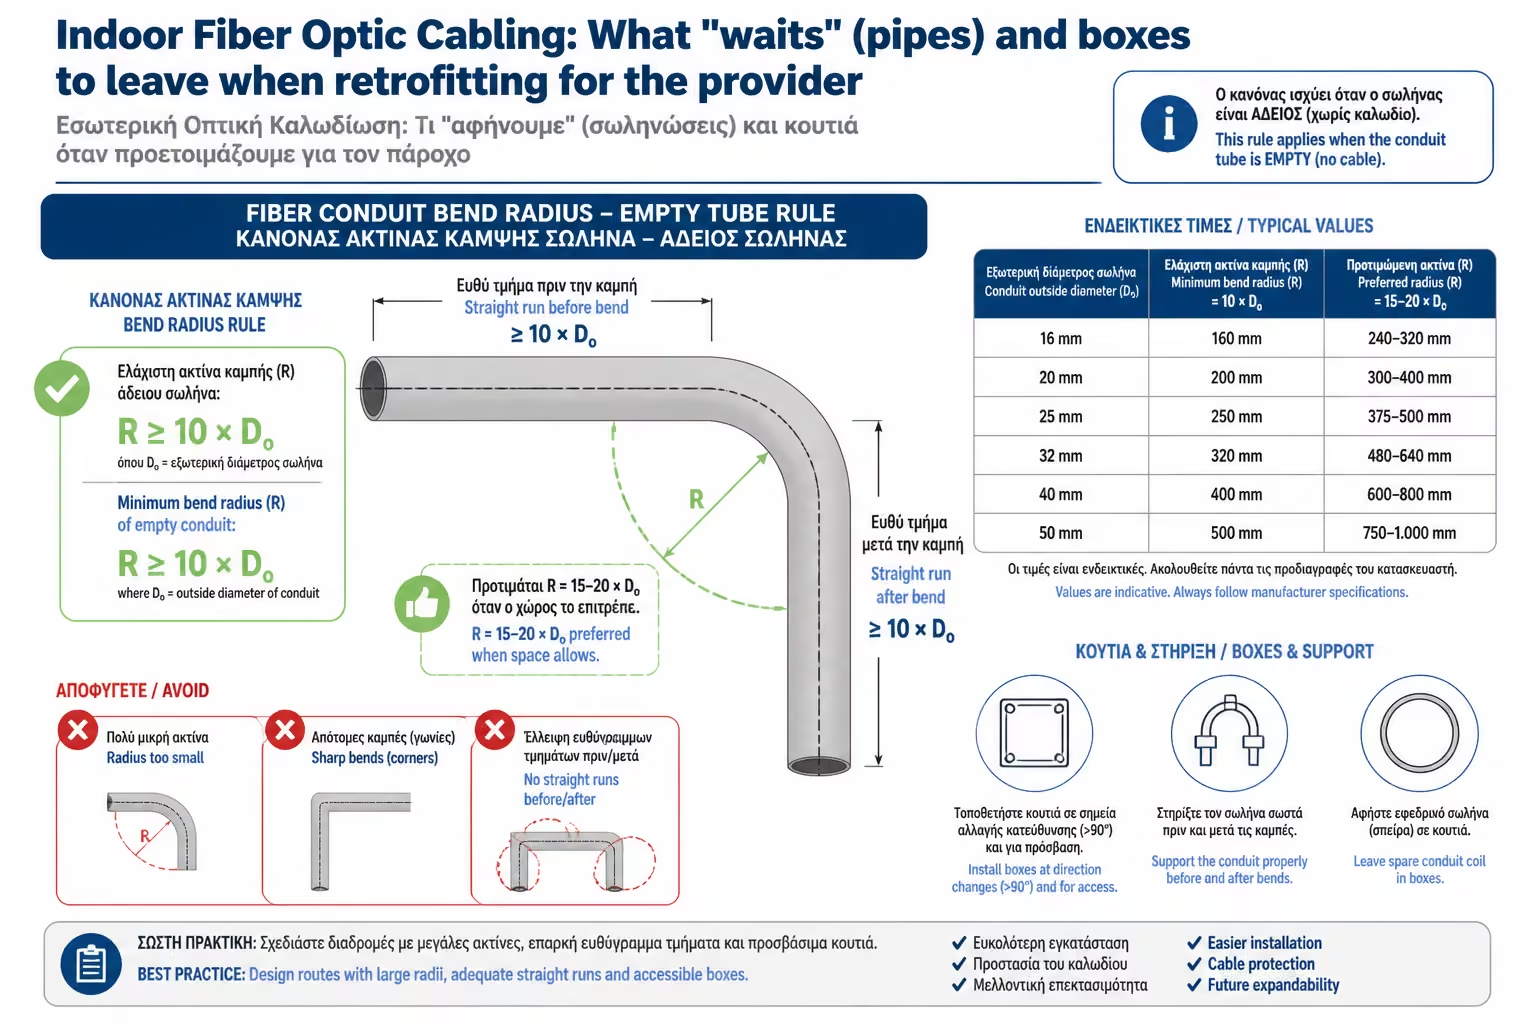
2. Piping Specifications (The Curve Rule)

Illustration for 2. Piping Specifications (The Curve Rule)

The TV cable and copper forgive the "kinks". Fiber optic NO. It is made of silica glass and if it is bent sharply, the glass breaks (or the light refracts and the signal is lost).

Instructions to the Electrician:

  1. Pipe Diameter: The empty pipe that will start from the outside of the house (staircase) and end up in your central Rack, must be spacious. We use plastic pipe at least Φ20 or Φ25.
  2. Smooth Inside: Avoid classic "spirals" with strong ridges. Prefer tubes with a smooth inner surface (eg Courbi/Kouvidis type for optics) so that the fiber slides easily.
  3. Bending Radius: This is where the game is decided. The use of 90 degree corner fittings (fittings) is strictly prohibited! The curves of the pipe (where it meets wall to floor or wall to ceiling) must be absolutely "sweet" and open. The minimum allowable radius of curvature must be greater than 5 cm.
  4. Guide (Steel): Ask for a thin string or wire (guide) to be left inside the empty pipe from now on. When the technician arrives, he will simply tie the fiber to the end and pull it out in seconds.

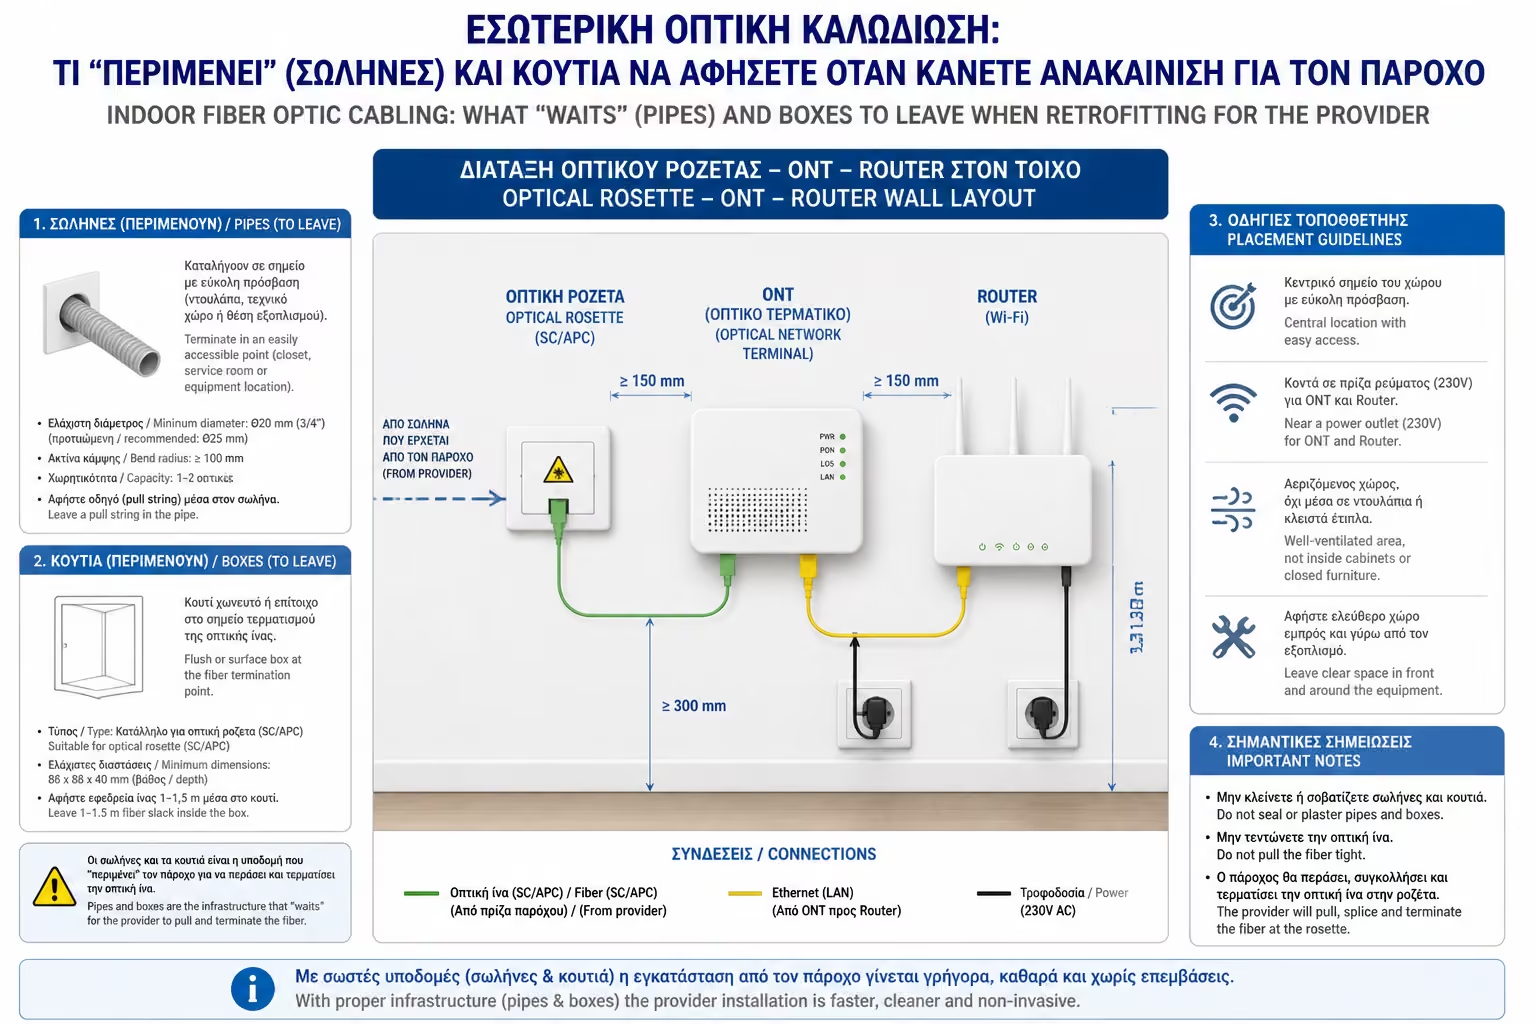
3. The Optical Outlet (Rosette) & The Equipment (What will go into the wall?)

When the technician runs the fiber through your pipe, they have to terminate it somewhere. He won't let her hang.

At the point where the pipe ends (in the Rack or on the wall), the technician will screw a small, square plastic Optical Socket (Rosette). From this socket, a ready, thin cable (Patch cord) will start which will end up at the ONT (Optical Network Terminal), the small "box" of the provider that converts the light into an Ethernet signal for your Router.

What you should anticipate:

Illustration for 3. The Optical Outlet (Rosette) & The Equipment (What will go into the wall?)

Power Sockets (230V)

The ONT needs power. The Router needs power. At the termination point of the fiber, your electrician should have installed at least 2 or 3 power outlets (Schuko), ideally connected to a separate line protected by a UPS (so that the Internet does not fall into blackouts).
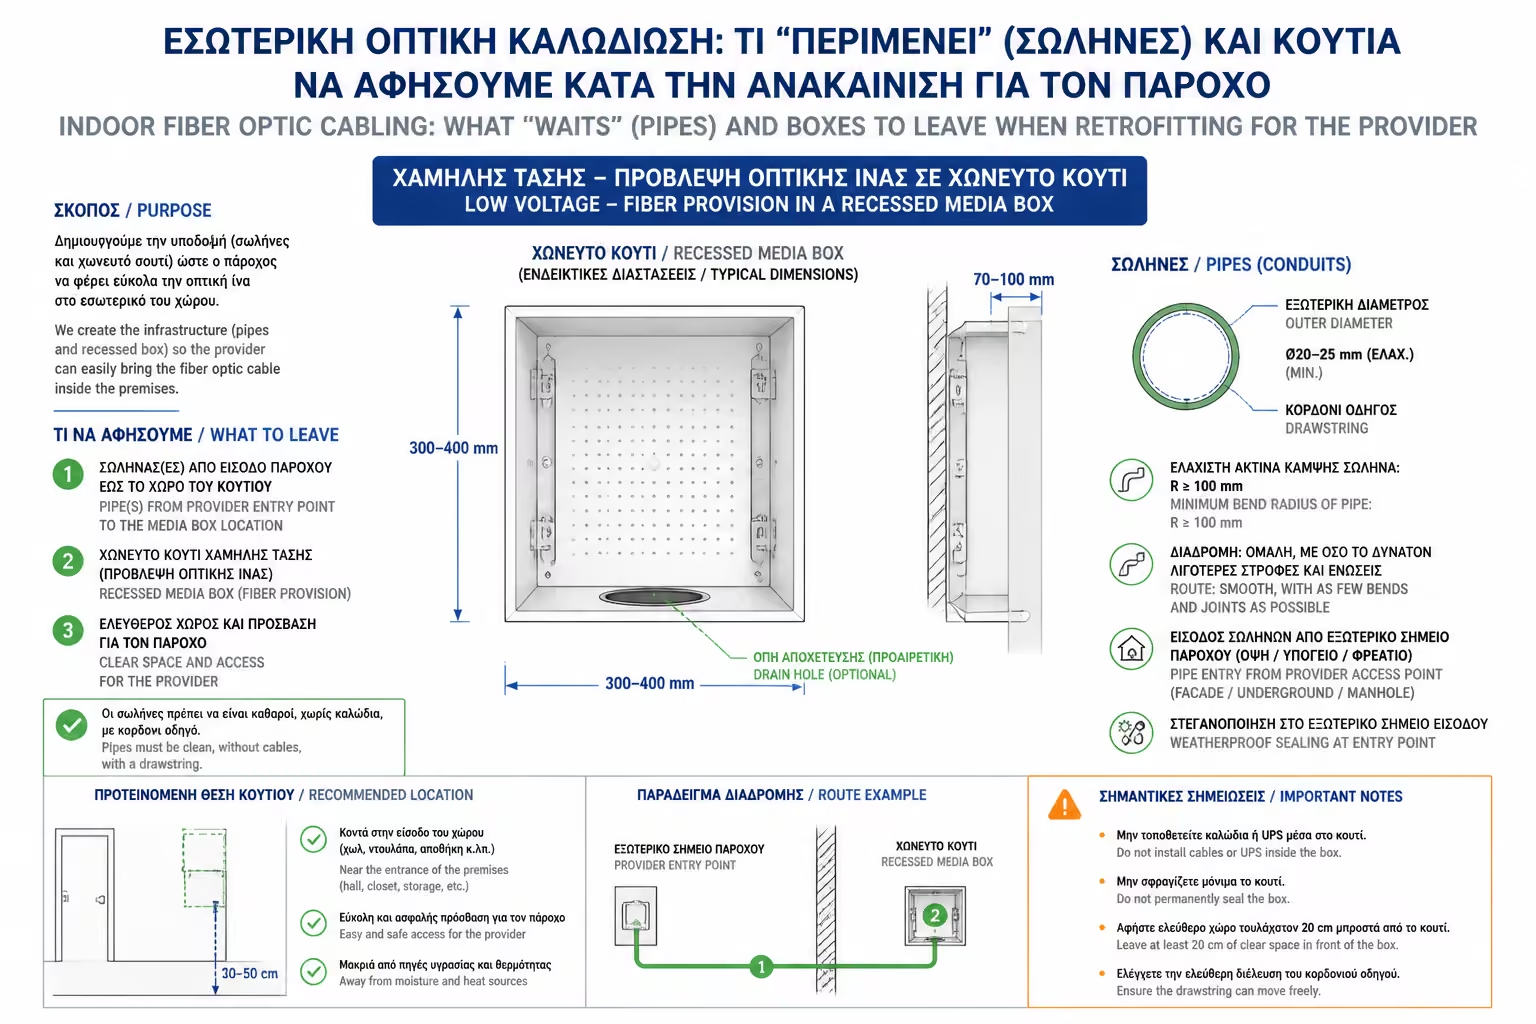
4. The "Invisible" Solution: Media Boxes

Illustration for 4. The "Invisible" Solution: Media Boxes

If for some reason you do not have space for a separate Rack and the fiber must necessarily end up on a visible wall (e.g. in a corridor), the presence of 2-3 devices, power supplies and cables will destroy the aesthetics of the space.

The professional solution is to install a Recessed Multimedia Box (Media Box):

  • It is a large plastic (or metal) panel, similar to your electrical panel, that is built and "buried" into the wall.
  • It has a perforated door to ventilate the equipment and not cut off the Wi-Fi signal.
  • Inside this box are hidden the optical socket, the ONT, the Router, and even the central Switch of the house.
  • The result? From the outside you see only an elegant, white door (which can even be covered by a painting), while all the "chaos" of telecommunications is neatly placed inside the wall.

Summarizing

The advent of FTTH is the reason to radically modernize your home infrastructure. An empty, spacious, open-curve pipe leading from the stairwell directly to the Patient Current Center (or Media Box), combined with adequate power supplies, ensures that the fiber will be installed in 10 minutes, without any visible cables and without any damage to your home's decor.

Next Step: Until now, we thought that the optical fiber terminates at a central point in the house and then the copper (Cat6a) takes over to distribute the network to the rooms. But technology is moving at breakneck speed. What happens when copper is no longer enough?

We continue with the most innovative market trend: FTTR (Fiber to the Room): The new trend of 2026 for optical fiber that ends up in each individual room.

Related Articles

Preview