Electrical Provisions for a Home Server / NAS (Home Lab): Which room
should the rack go in (cooling, noise and dedicated power line
requirements)
We have reached the final and perhaps most decisive chapter of our
guide. You have bought the perfect rack, installed a patch panel, a PoE+
switch, a UPS and perhaps a home server or NAS to store your films and
files. The system is a technological masterpiece.
Now you have to place that metal cabinet somewhere inside the building.
Many owners decide, or are forced by poor planning, to put the rack
inside their office, the living room or a sealed wardrobe. A few days
after powering it on, they regret it bitterly. A rack is not a silent
piece of furniture. It is a living, warm and noisy organism.
Let us look at the three golden principles engineers use to choose the
right room or IT closet during renovation, so living with your network
remains completely workable.
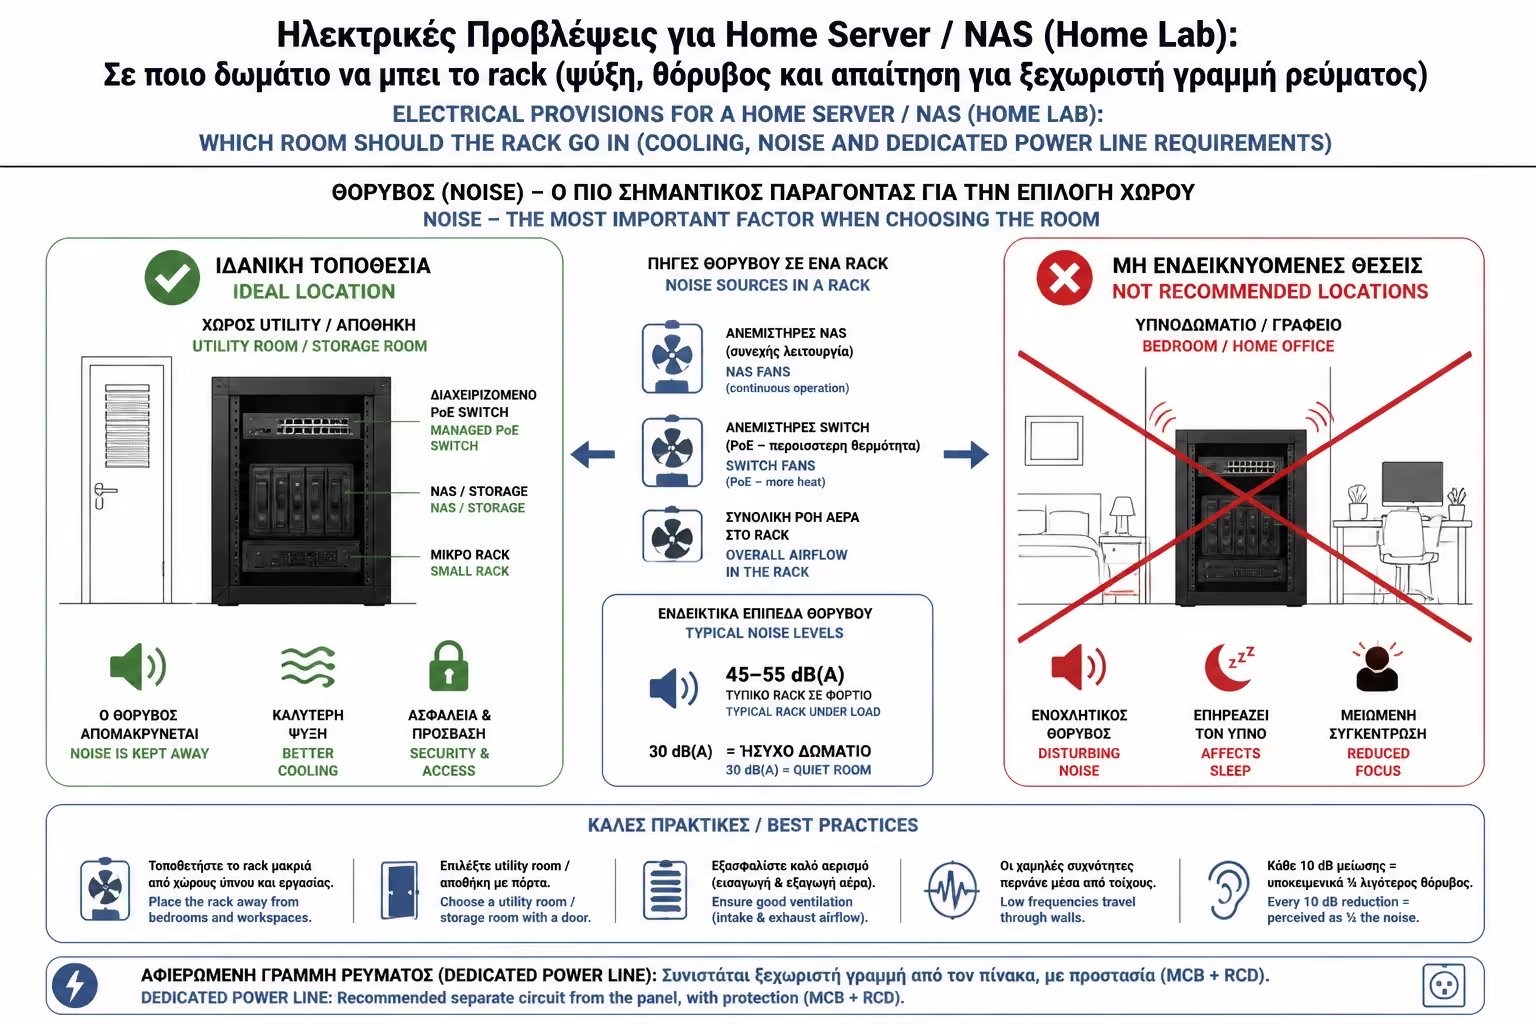
1. The Noise Factor (The WAF & Jet Engines)
If you are used to the silent little router from your provider,
prepare for a surprise. Professional equipment is designed to work in
data centres, not bedrooms.
🌪️ The Fans
A managed PoE switch uses small 40mm fans spinning at 8,000 or
10,000 RPM to remove heat. Their sound is a penetrating high-pitched
whine that goes through thin walls. If you add a 1U rackmount
server, the startup noise can literally sound like an aircraft
engine.
❌ The Placement Rule
Do not place the rack in bedrooms, study or work-from-home spaces,
or the main living room. If you ignore this, you will regret it as
soon as the system starts running 24/7.
✅ The Ideal Spaces
The rack belongs in dead or auxiliary spaces: an internal utility
room, the laundry room, the stairwell, the basement or a spacious
loft, provided ventilation is planned properly.
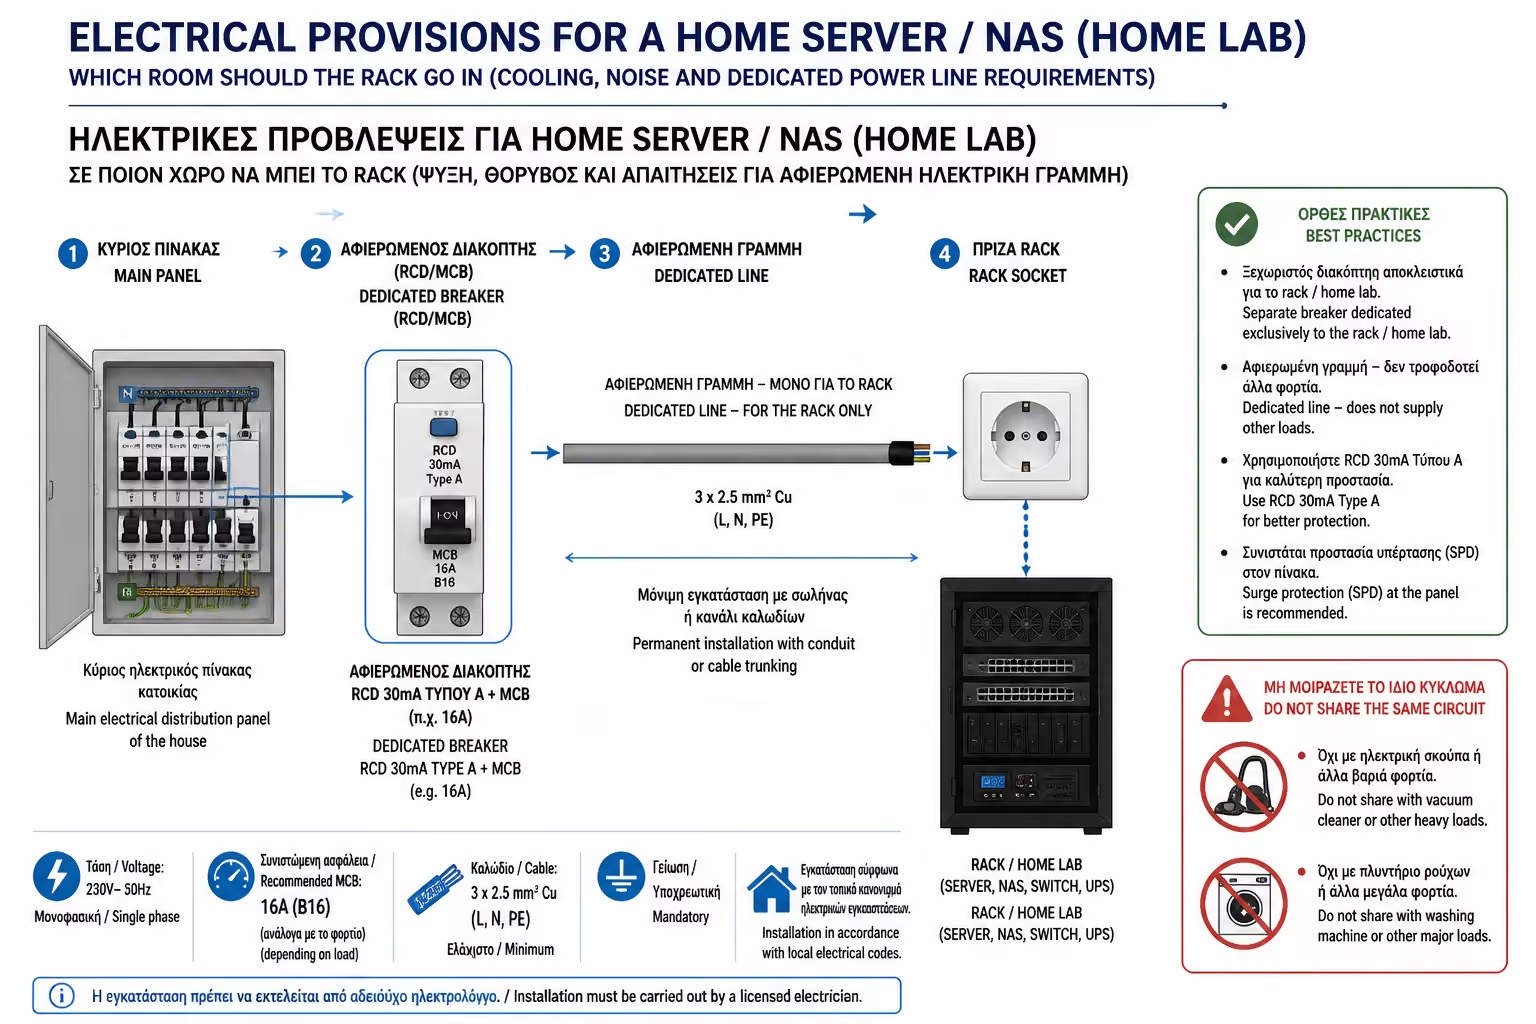
2. Electrical Planning: The Dedicated Power Line
This is the most common installation mistake we see. The electrician
brings all the UTP cables into the utility room but forgets the power
feed, so the rack ends up borrowing electricity from the nearest
socket, such as the one used by a vacuum cleaner or washing machine.
If your rack shares the same breaker with other household appliances,
you are playing Russian roulette with your equipment.
⚠️ Noise and Voltage Dips
When a vacuum motor starts, it creates a brief voltage dip and
electrical noise. If an old toaster shorts out, it may trip the room
breaker and kill your entire network, your cameras and your Wi-Fi
together.
🔌 The Dedicated Circuit Rule
During renovation, require a separate 3x2.5mm² or 3x1.5mm² power
cable to run directly from the main electrical panel to the rack
socket only. That line should have its own dedicated 10A or 16A
breaker.
🛡️ Advanced Tip
The power supplies in switches, UPS units and NAS systems can create
leakage currents that trip a standard residual-current device for no
good reason. Ideally, the rack line should use its own type A or
type F RCD designed for sensitive electronics.
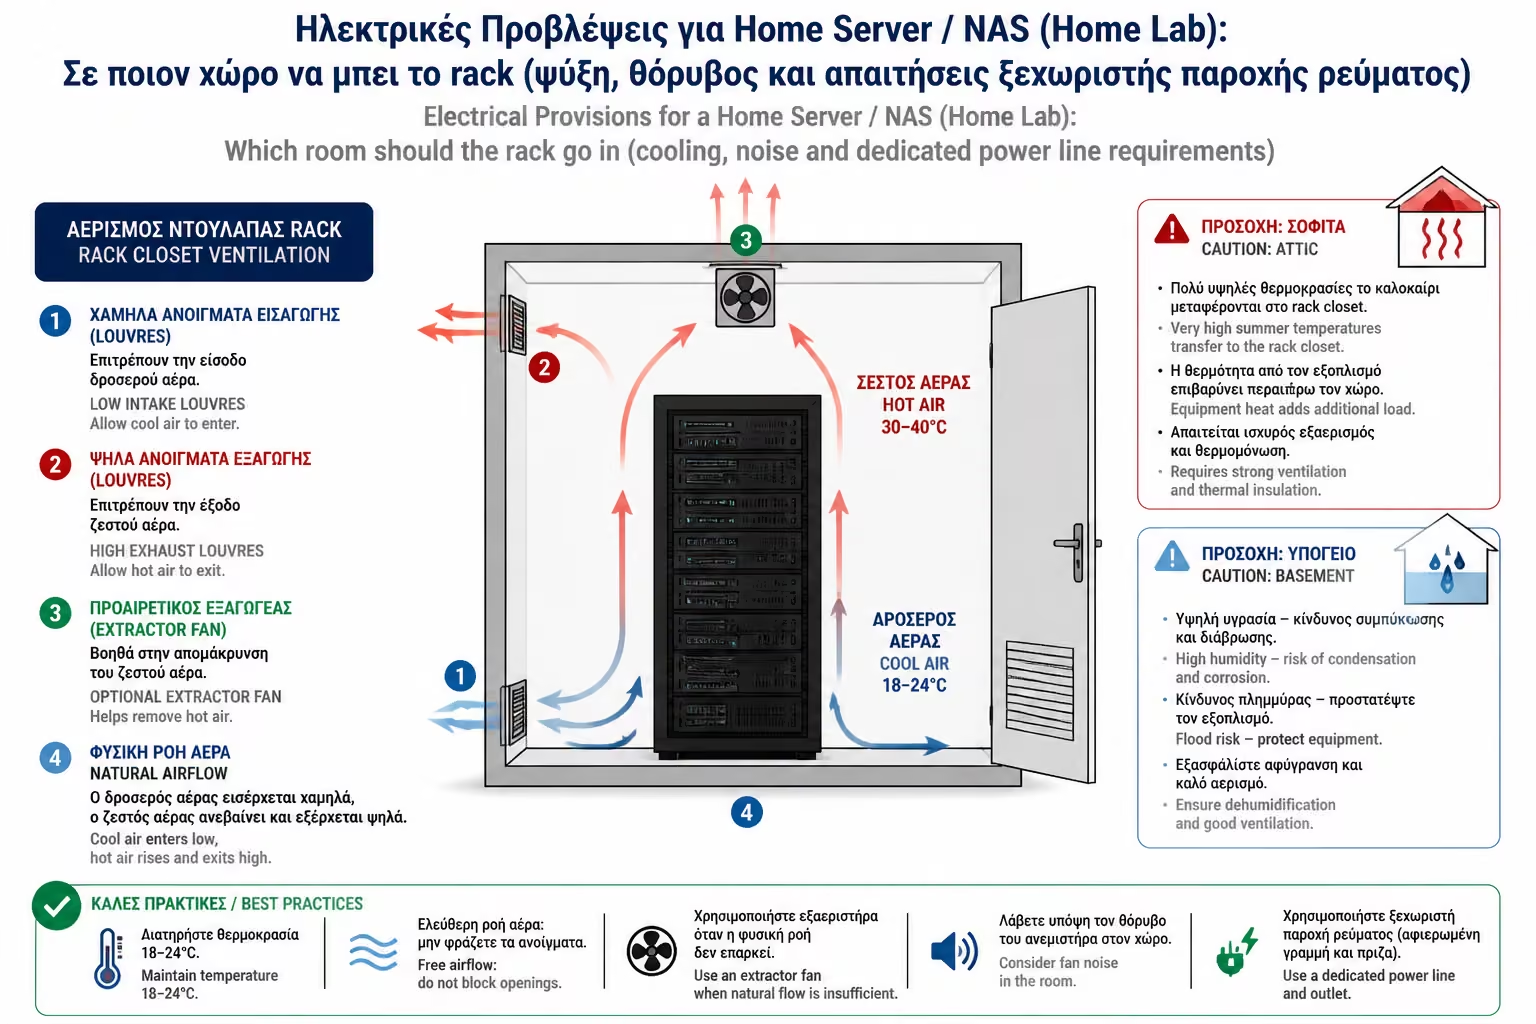
3. Ventilation: Do Not Turn the Closet into an Oven
If you find the perfect isolated spot, for example a closed cupboard
under the stairs, you may solve the noise problem but immediately
create an overheating problem. The rack throws heat out through its
roof. If the cupboard is sealed, the space becomes a sauna.
Ventilation solutions must be planned before the equipment is
installed.
Passive ventilation with large louvres low on the door to let cool air
in from the house and high up to let hot air escape.
Active ventilation with a small extractor fan, like a bathroom fan,
mounted high on the wall if the space is a fully enclosed small
utility room.
Avoid extreme spaces: lofts in Greece can exceed 50°C in summer, while
basements are cooler but bring moisture and flood risk.
🏚️ Beware of the Loft
In a loft or attic the equipment will be baked. High summer
temperatures cancel every other good decision you made about
placement.
💧 Beware of the Basement
If the rack goes in the basement, use a floor-standing cabinet that
does not sit directly on the floor or mount a wall rack high on the
wall to reduce humidity and water risk.
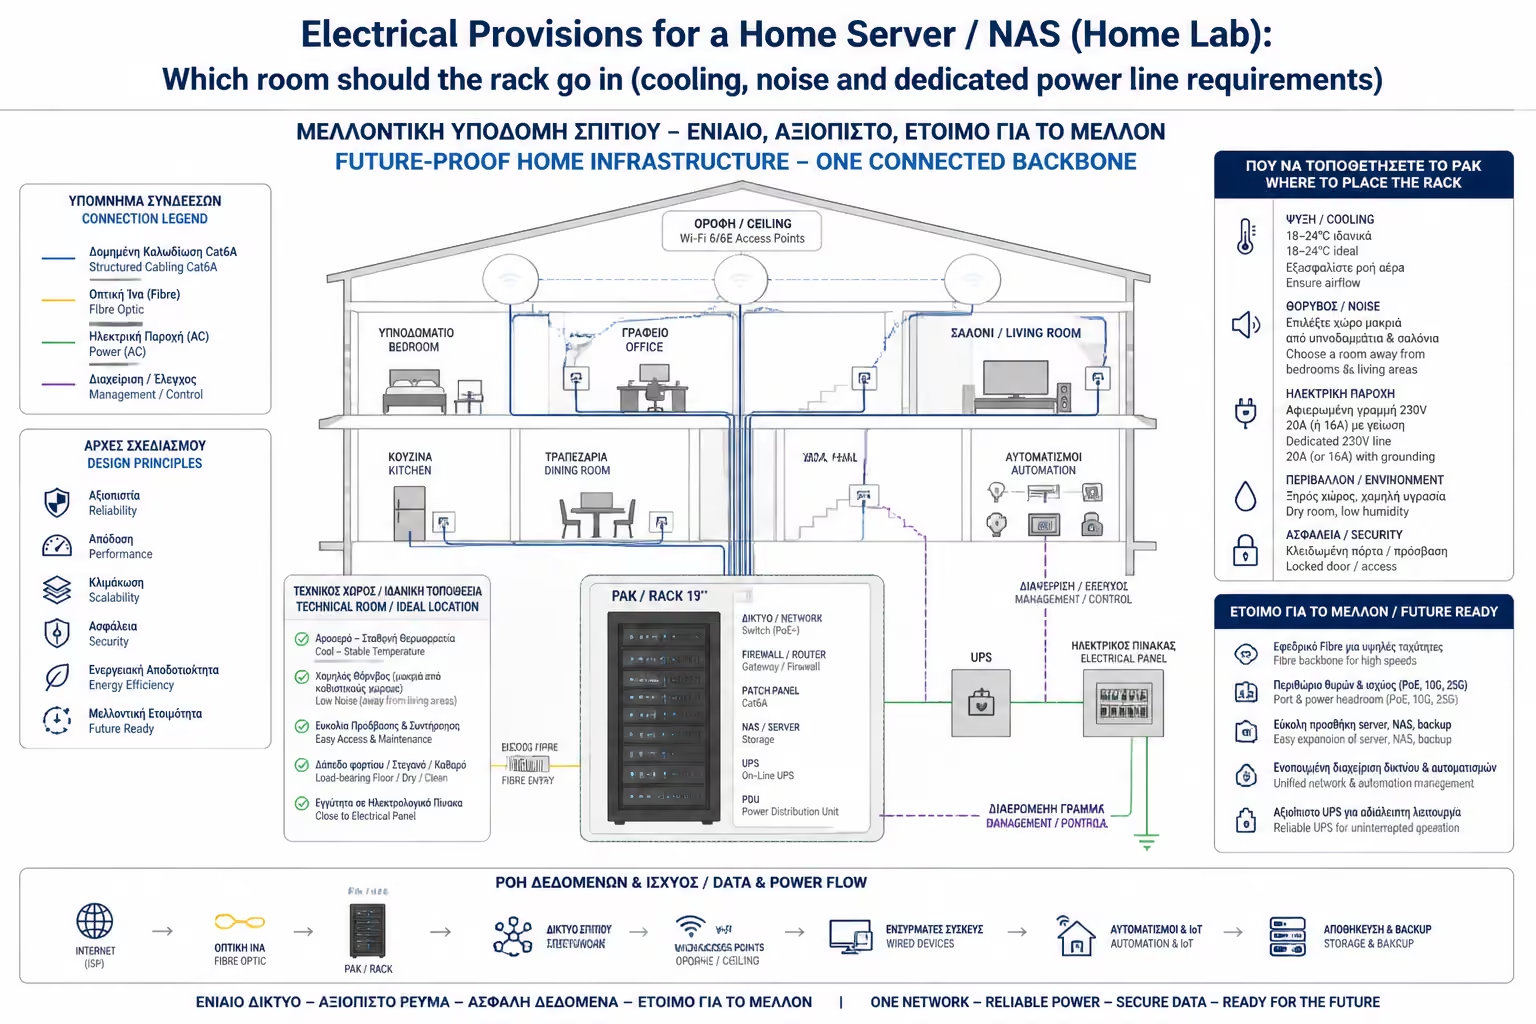
4. Conclusion: The House of the Future Is Already Here
This is where our journey through structured cabling and networks
comes to an end.
We started from the foundations, learning why Cat6a made from 100%
pure copper is the only sensible wall-cable choice. We moved into the
age of light, examining fibre optics, FTTH and the precision of glass
splicing. Then we went wireless, designing seamless Wi-Fi with
ceiling-mounted access points. Finally, we reached the brain of the
system, organising the cabinet that hosts all this equipment with
safety and clarity.
Renovating or constructing a building is a major investment. Furniture
changes and walls get repainted, but cables remain buried for decades.
By applying the principles in this guide, you are not just creating a
home with good internet today. You are building a solid future-proof
infrastructure, ready to absorb every new technology, from Wi-Fi 7 and
artificial intelligence to 8K streaming and full home automation, for
the next 20 years.