Bonding
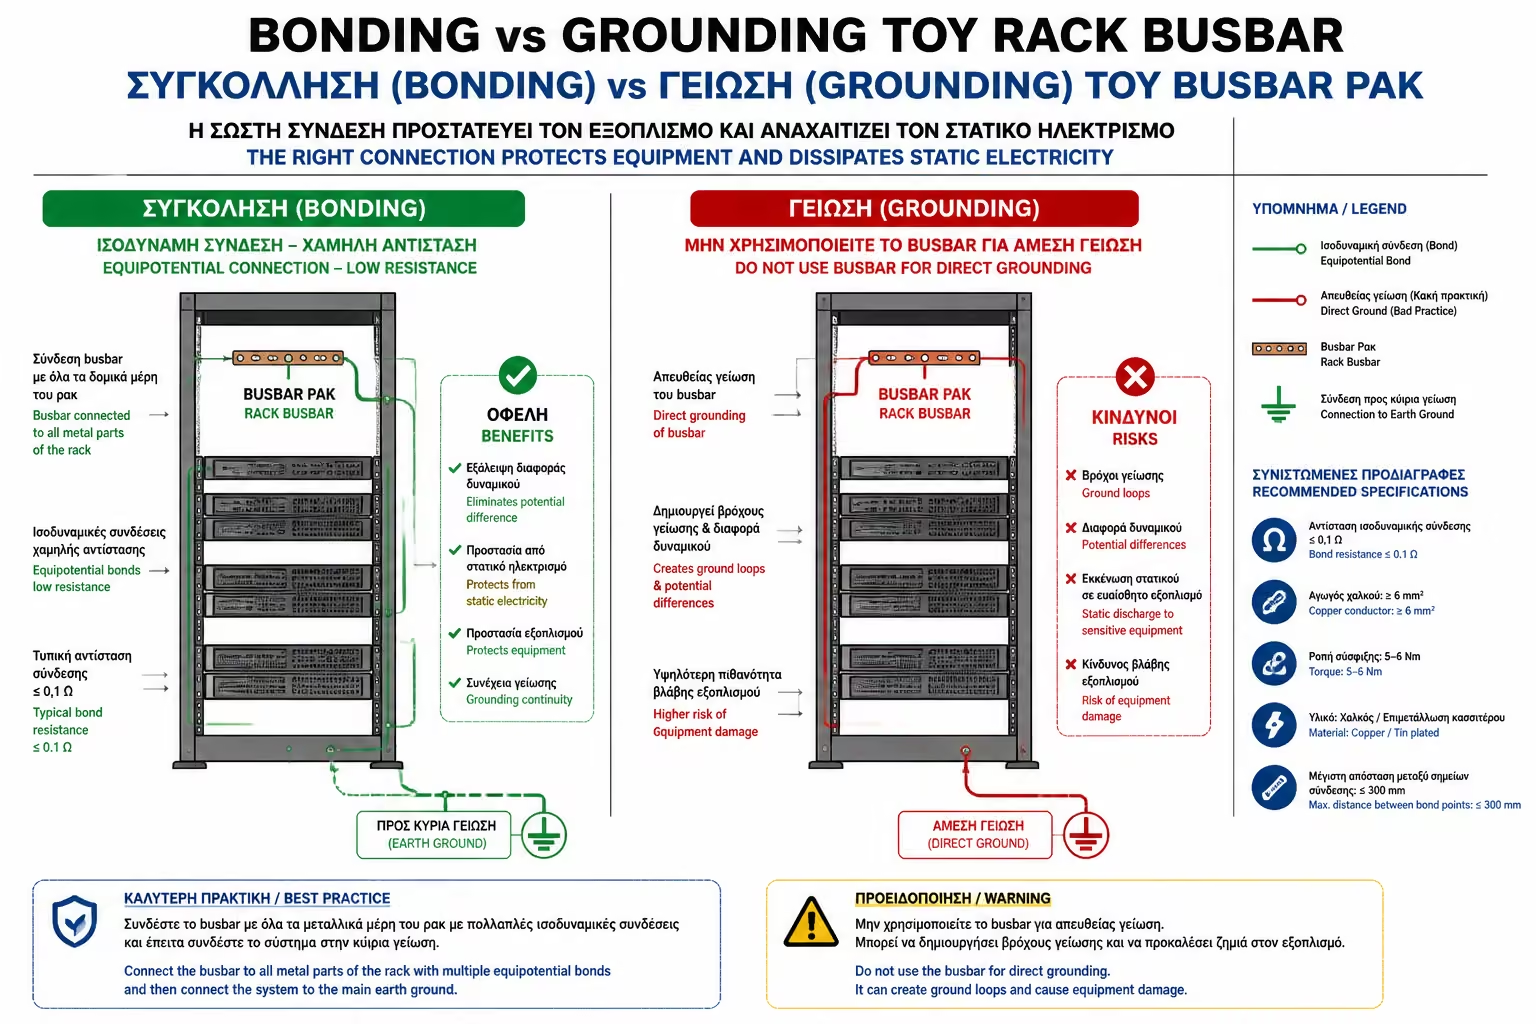
It is the connection of all the metal parts of the Rack to each other (the door, the side covers, the frame). The purpose is to make sure that no piece of metal has a different electrical voltage than the others.
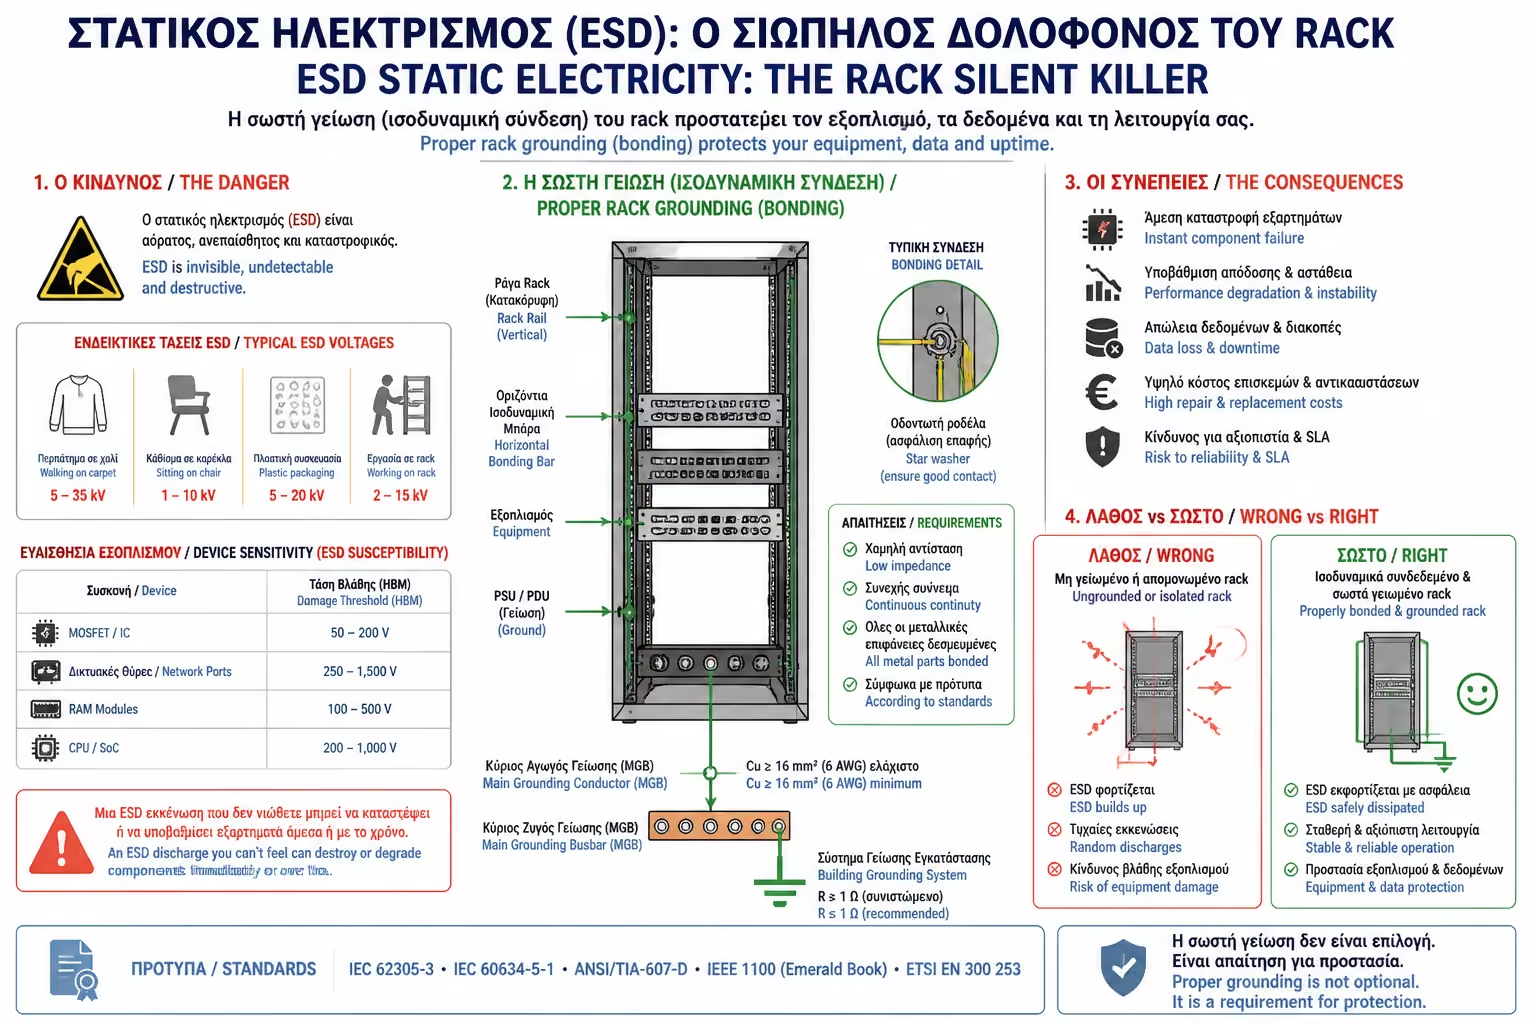
You've set up the Rack, the cables are perfectly organized and the fans are running quietly, keeping the system cool. Seemingly, everything is ready. But there is an invisible, "silent killer" in the cabin that accounts for 50% of unexplained network failures: static electricity and current leaks.
A Rack is, essentially, a huge metal box filled with high-frequency electronic circuits, power supplies, and fans that swirl the air. If this metal box is not properly grounded, it becomes a dangerous trap for both the machinery and you.
As engineers, we consider cab grounding to be perhaps the most critical - and most often overlooked - safety step. Let's see why your machines are at risk and how to apply the correct electrical protection (Bonding).
Think about what's going on inside your Rack:
If the Rack is not grounded, this current is trapped on the cabinet metals. Trying to find a way out, it often "hits" the most sensitive spots: Switch ports or motherboards, burning integrated circuits instantly, without dropping any fuses on the house panel!
In networking terminology, we use two different (but related) terms:
It is the connection of all the metal parts of the Rack to each other (the door, the side covers, the frame). The purpose is to make sure that no piece of metal has a different electrical voltage than the others.
It is the connection of all this "unified" metal Rack to the central ground of the building (the foundation ground or ground triangle to the ground), so that all the unnecessary current is safely absorbed by the earth.
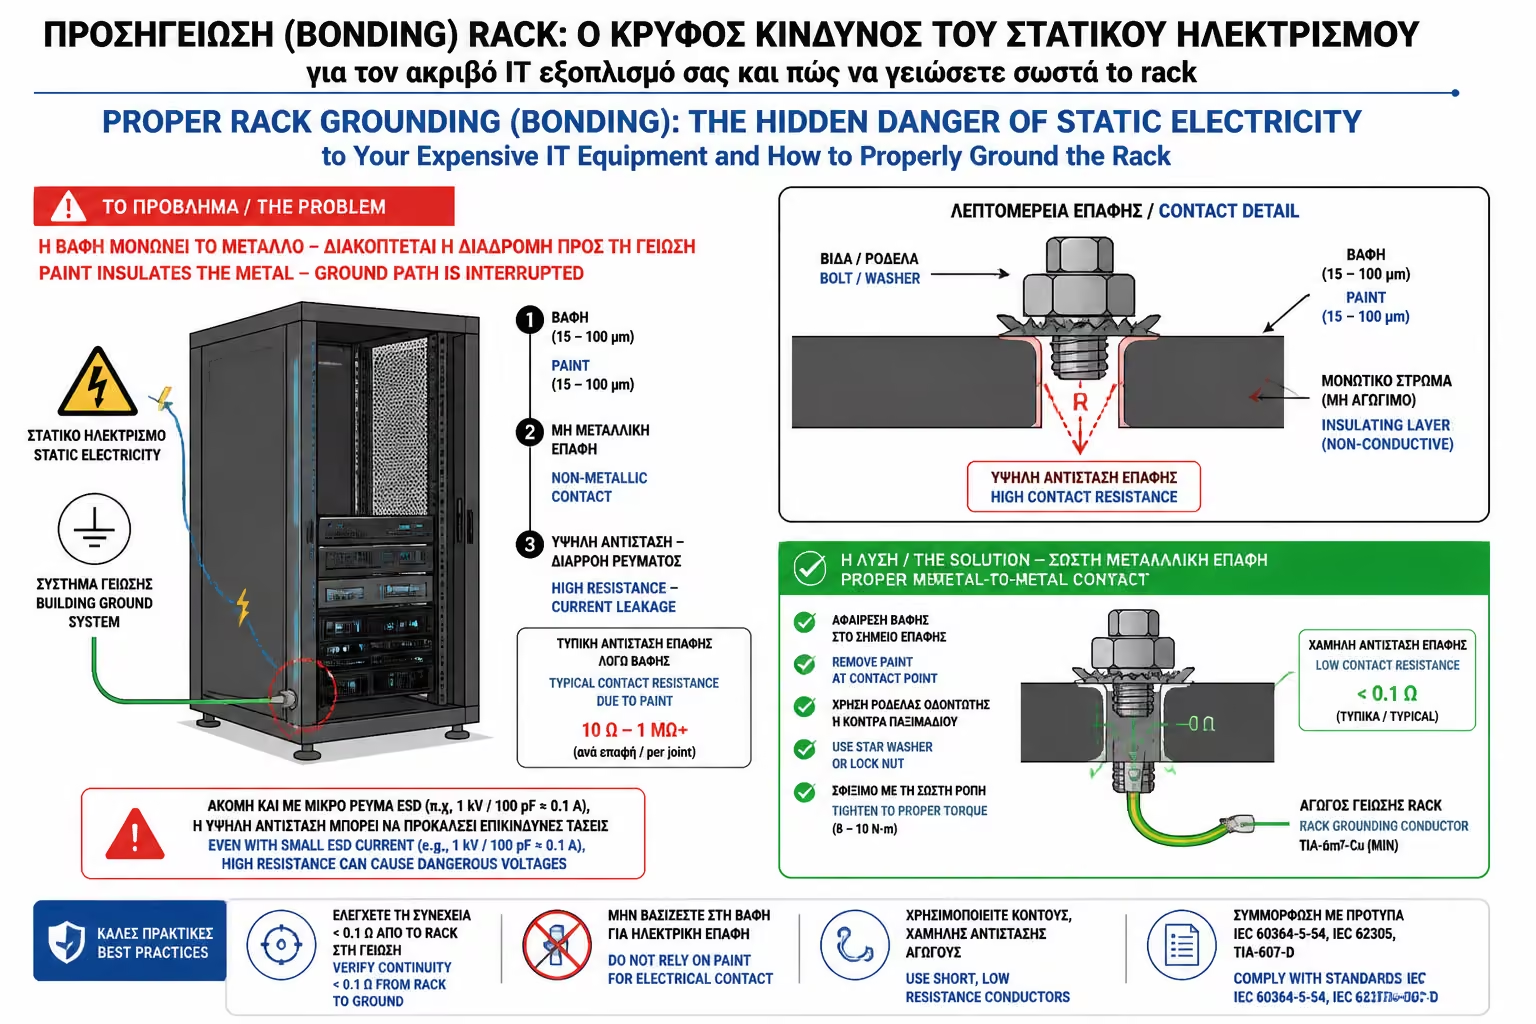
Many people think that because the Switch rests on the metal rails of the Rack (when we screw it), it is already grounded. Error!
Racks and machines are painted in the factory with electrostatic paint (Powder Coating). This black or gray paint is an excellent insulator. Even if you bolt a machine tightly to the Rack, the metal of the machine does not touch the metal of the Rack, because the paint gets in the way. The current cannot pass.
To make your system 100% safe, follow the professional procedure below:
On the back of the Rack (usually vertically or horizontally on the bottom shelf), we screw a bare, copper bar (Grounding Busbar). This bar is the "collecting center" of all currents.
If you've noticed, the good cabs come with some short, yellow-green wires that have ring terminals on the ends. You need to connect these cables to join the glass front door and the removable side covers to the main frame of the Rack. Where these wires screw in, factories have left the metal unpainted (or have special screws with "teeth" that scrape the paint) to ensure contact with clean metal.
Every professional Switch and Patch Panel has a small screw on the back with the ground mark (a symbol that looks like an upside down "T" with dashes). Pull a yellow-green wire from the Switch screw and screw it onto the copper Busbar you put in in Step 1.
Finally, the copper Ground Bar must be connected to your home's electrical panel. The electrician will run a thick earth wire (eg 6mm² or 10mm² cross section) from the Rack directly to the electrical panel earth bar. This is the "highway" that will drive static electricity out of the house.
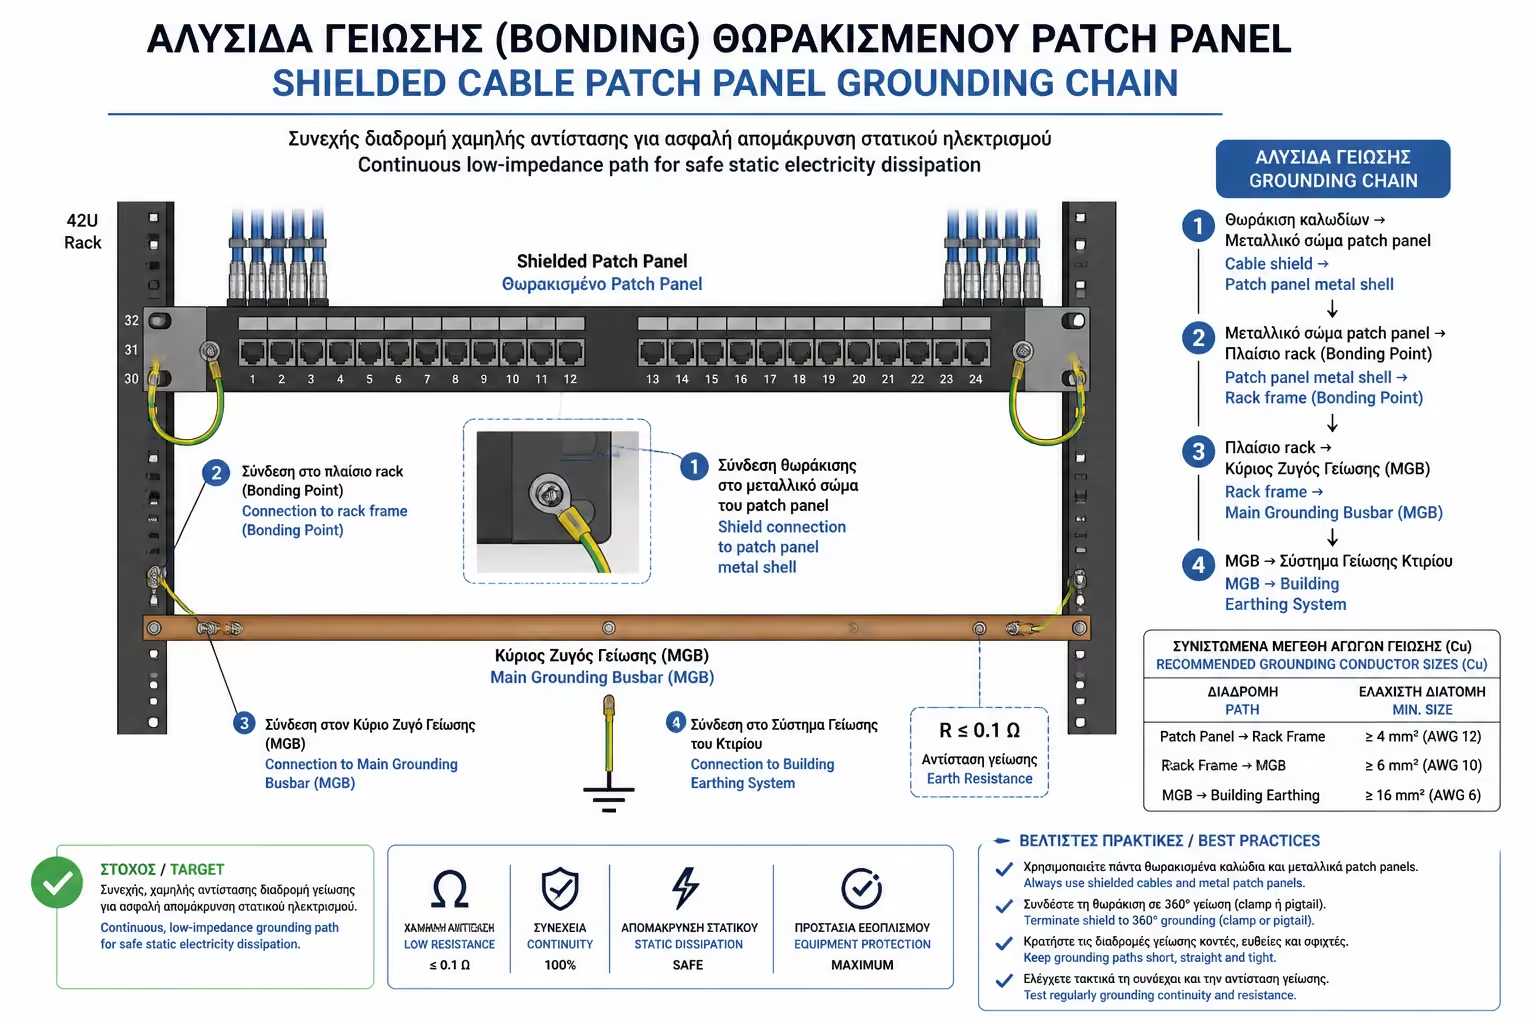
If you remember from the outdoor Wi-Fi article, the cables that go out into gardens are shielded (they have metal foil and a metal plug) to ward off lightning.
When these metal plugs snap into your Patch Panel, their metal housing rests against the metal of the Patch Panel. If the Patch Panel is not strictly grounded (with the yellow-green wire on the bar), the shielding of the external wires acts like a giant radio antenna! Instead of rejecting interference (EMI), it picks it all up from the environment and "drops" it straight into your Switch, breaking up the network.
Rack grounding is not an optional accessory, it is a basic physics requirement. By connecting all metal parts (doors, sides, switches, patch panels) to a common ground bar and grounding it to earth, you create a "bulletproof" cage (Faraday Cage) that protects your electronics from the vagaries of current, the interference of shielded cables and the invisible danger of static electricity.
Next Step: We've solved the problem of leaks and static electricity, but what happens when the PPC power goes out completely or, even worse, surges? If the "heart" of the network goes down, you lose cameras, Wi-Fi and communication.
We continue with the guardian angel of your equipment: UPS Installation Inside the Rack: Rackmount UPS vs. Tower – How to protect your network core from power outages.
Return to category.
Go to categoryReturn to the central guide.
Go to guide