Up-lighting
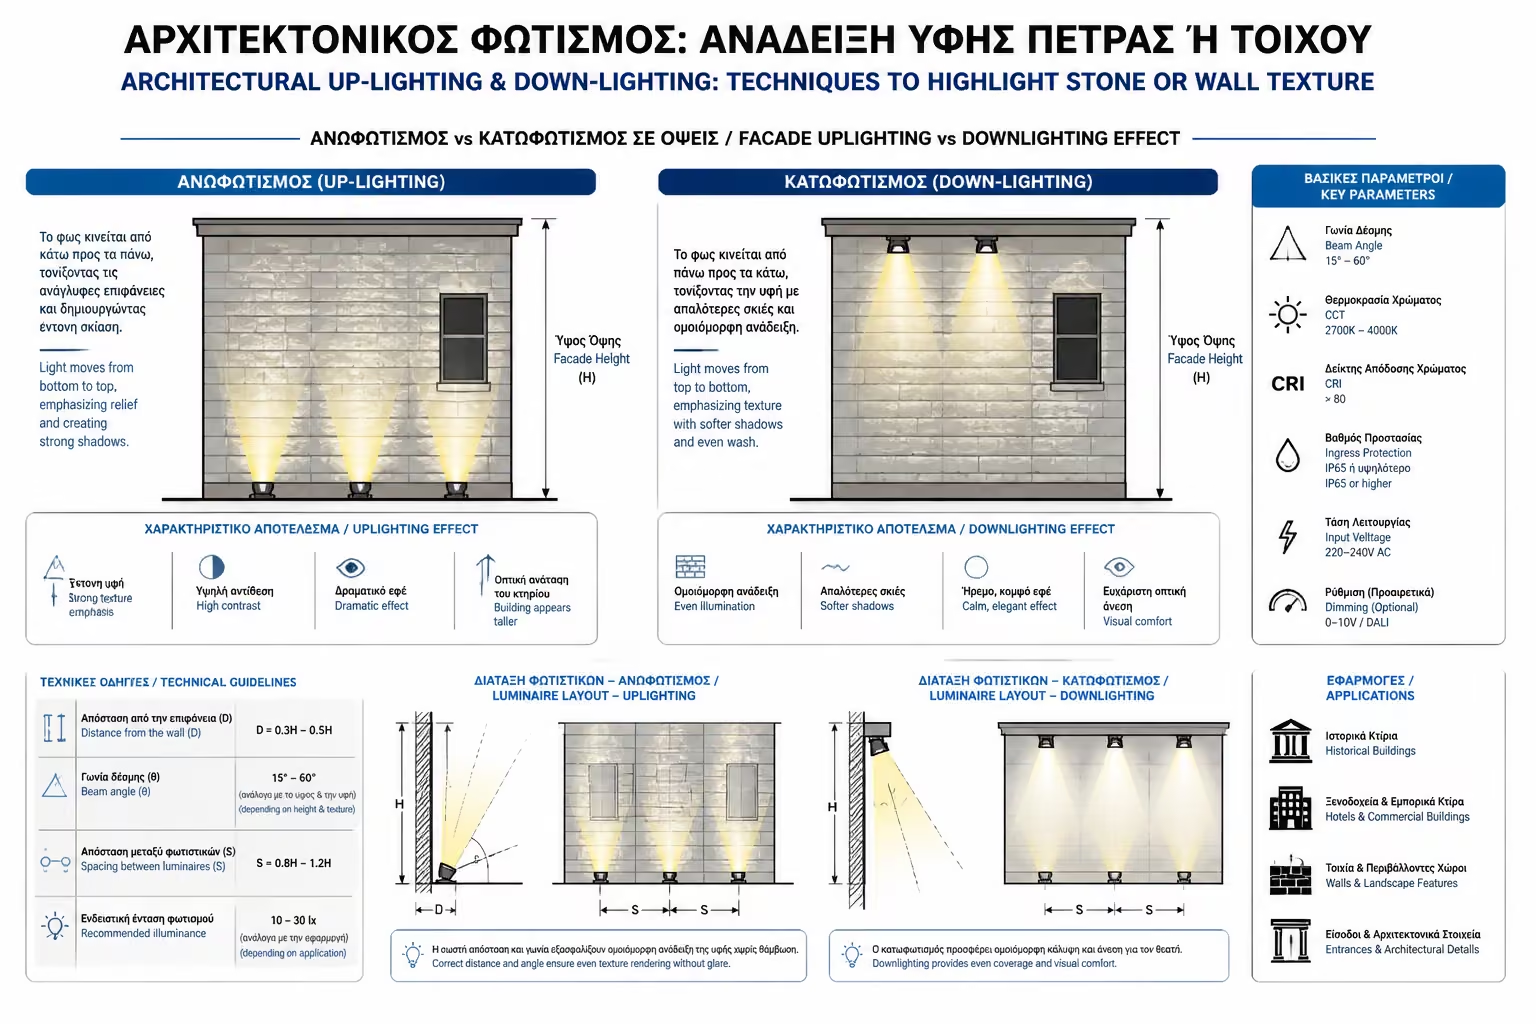
This technique uses luminaires (usually IP67 recessed ground spots or small floodlights in the soil) that point upwards.
The facade of your house is its "face". During the day, the sun takes over to highlight its architecture. At night, however, control is in your hands. A magnificent stone house or a modern villa with architectural overhangs can "disappear" in the dark or, if lit incorrectly (with a strong, flat spotlight hitting it head on), look like... a maximum security prison.
Proper architectural outdoor lighting is an art. It is not intended to make night-day, but to create drama, depth and shadows. As engineers, we often see owners spending fortunes on stone cladding, which at night they do justice to with their lighting.
Let's look at the basic directional techniques (Up-lighting and Down-lighting) and the secret of "scratch" lighting to make your home look three-dimensional and imposing.
The way light travels completely changes the psychology of the building.
This technique uses luminaires (usually IP67 recessed ground spots or small floodlights in the soil) that point upwards.
Because in nature light always comes from above (the sun or the moon), Up-lighting creates an "unnatural", highly dramatic and theatrical effect.
It is the perfect choice to show off tall columns, trees with interesting trunks (e.g. olives) or narrow architectural elements between windows.
Don't overdo it. If you put strong Up-lighting directly under the windows of the bedrooms, the light will enter the rooms and disturb sleep (the so-called light pollution).
Here, the luminaires are placed high (e.g. under the roof eaves or high on the wall) and shine downwards.
It's a much more "natural" approach. It imitates the light of the moon (Moonlighting). It offers architectural prominence and functionality at the same time, since it also illuminates the ground/corridor under the wall.
The most popular solution in contemporary homes are wall sconces that cast light both up and down at the same time (creating a luminous hourglass shape on the wall). They combine the drama of Up-lighting with the naturalness of Down-lighting, without having to dig the ground.
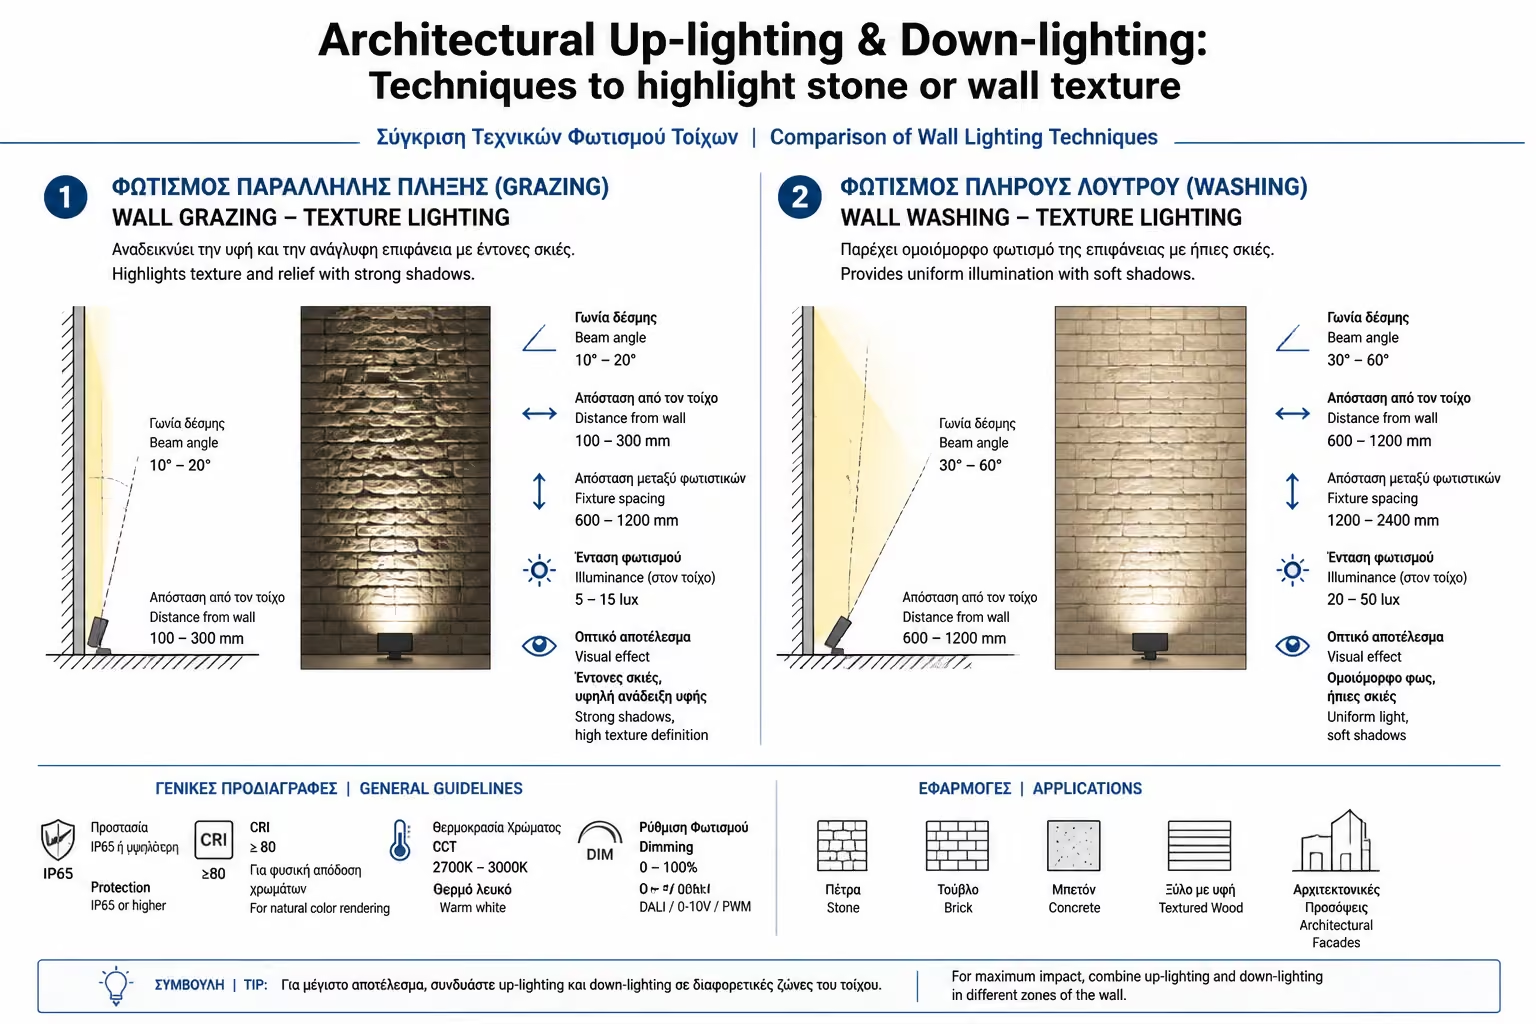
Here lies the biggest secret of lighting design. _where_ you place the fixture in relation to the wall determines what you see.
If your wall has texture - such as natural stone, decorative brick (brick), rough plaster or wood paneling - your goal is to highlight the irregularities of the material.
Place the lamp (wall, spot or linear LED) extremely close to the wall, at a distance of only 10 to 20 cm.
The light "licks" the wall. This causes each small protrusion of the stone to cast a small, sharp shadow directly below it. This play of light and shadow gives amazing three-dimensional depth (3D) to the material. The wall comes alive.
If you have a perfectly smooth, flat wall (eg smooth plaster or cement board), Grazing will make it look... ugly, because it will highlight every little imperfection of the painter!
This is where you want Wall Washing. Place the fixtures further away from the wall (usually 60cm to 1 meter away) and point them towards it.
The light "washes" the wall evenly, eliminating shadows and creating a clean, bright and modern surface.
Not all spots are the same. How much the light "opens" determines the architectural line.
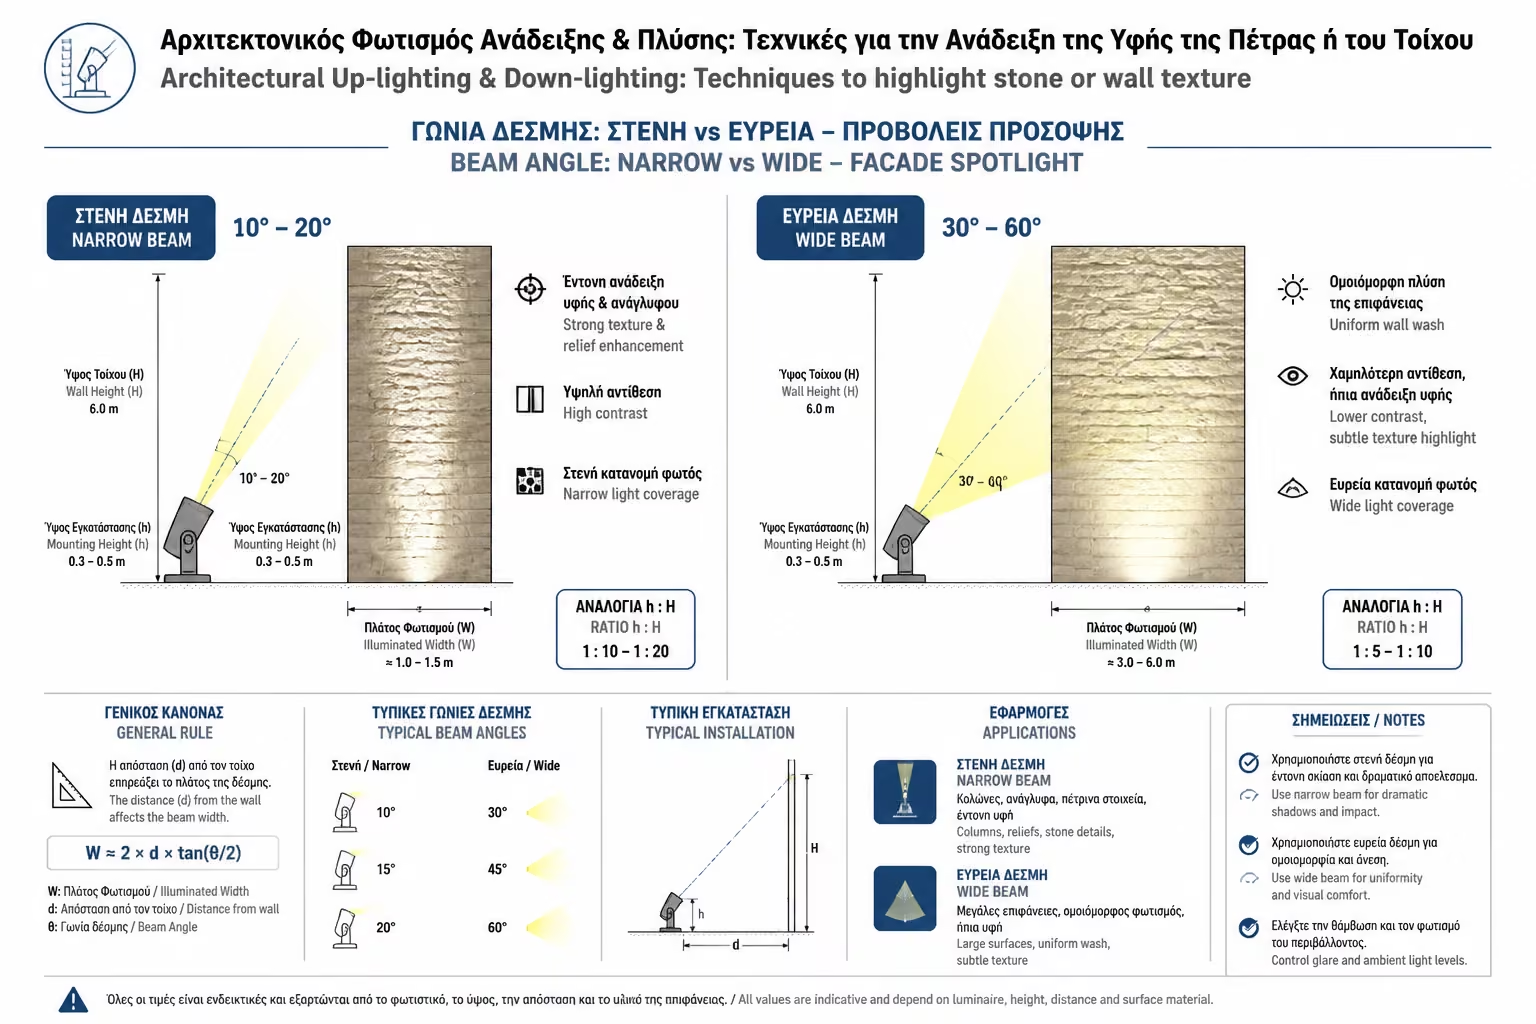
Produces a stern, "sharp" beam of light (like a spear). It is used to "cut" the wall vertically, between two balcony doors or to illuminate the columns of a pergola.
Spreads the light like a "fan". It is ideal for low, wide walls, where you want a few lamps to cover a large area.
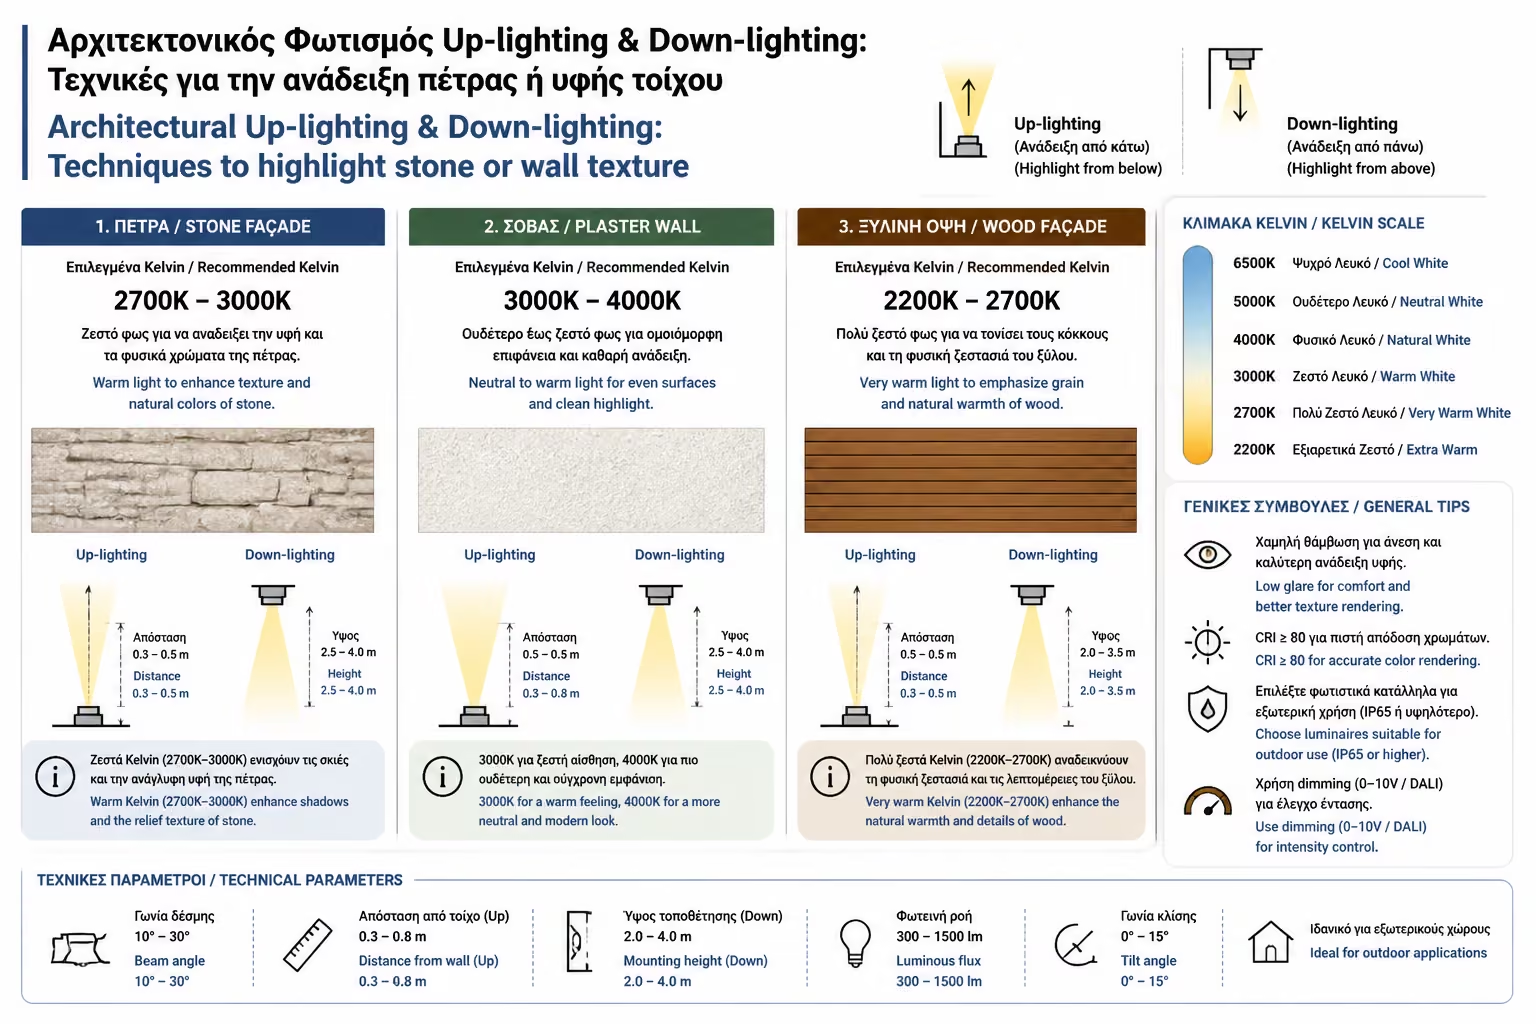
In the chapter on the interior of the house, we said that the choice of color temperature depends on the room. Outdoors, it depends on the material of the facade:
They strictly require Warm White (2700K - 3000K). The warm light brings out the red and brown shades of the natural materials and creates the feeling of a traditional, welcoming home.
If you light the gray concrete with yellow light, it will look "dirty" and muddy. Modern architecture is perfectly highlighted with Natural White (4000K), which makes clean, "cool" surfaces look sharp and imposing.
To properly illuminate the facade of your building, never think "how will I shine abundant light everywhere". Think directorially. Use Wall Grazing to reveal the beauty of the stone, play with narrow and wide beams to give rhythm to the building, and carefully choose the color of the light to flatter the materials of your build.
Next Step: After lighting the garden and the walls, the most impressive - and most dangerous - element of the outdoor space remained. If you have a pool, choosing and maintaining its lighting is a matter of life and death. Continue to our technical guide: Pool Lighting & Underwater Lights: Safety rules, 12V vs 24V and maintenance.
Return to category.
Go to categoryReturn to the central guide.
Go to guide