12V tapes
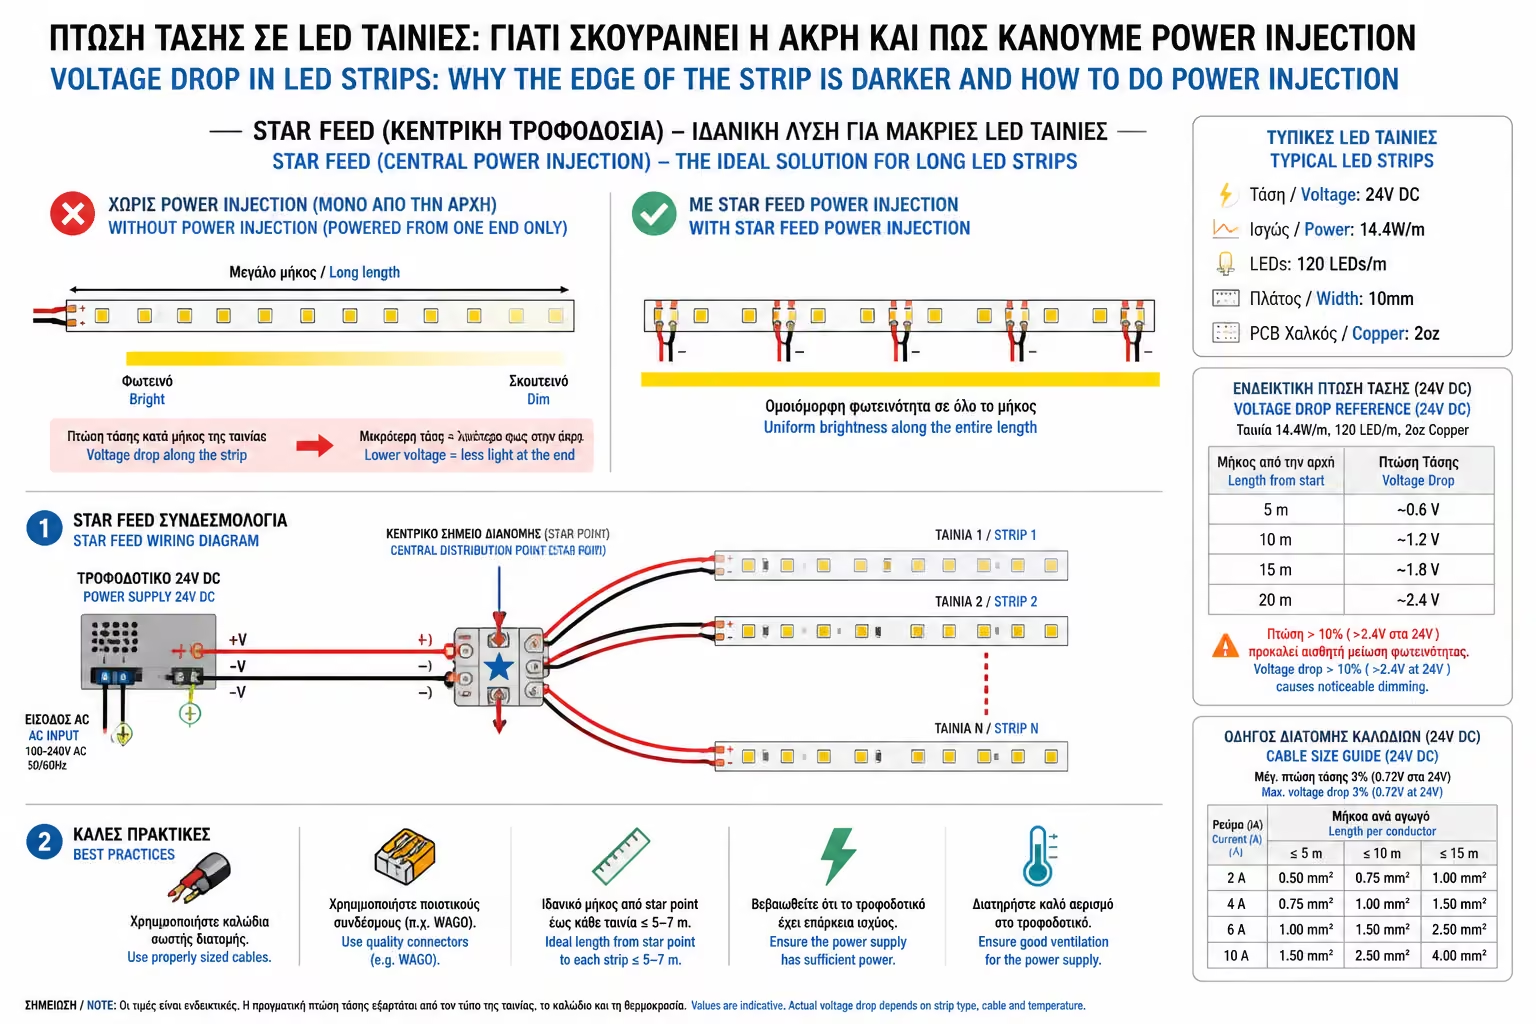
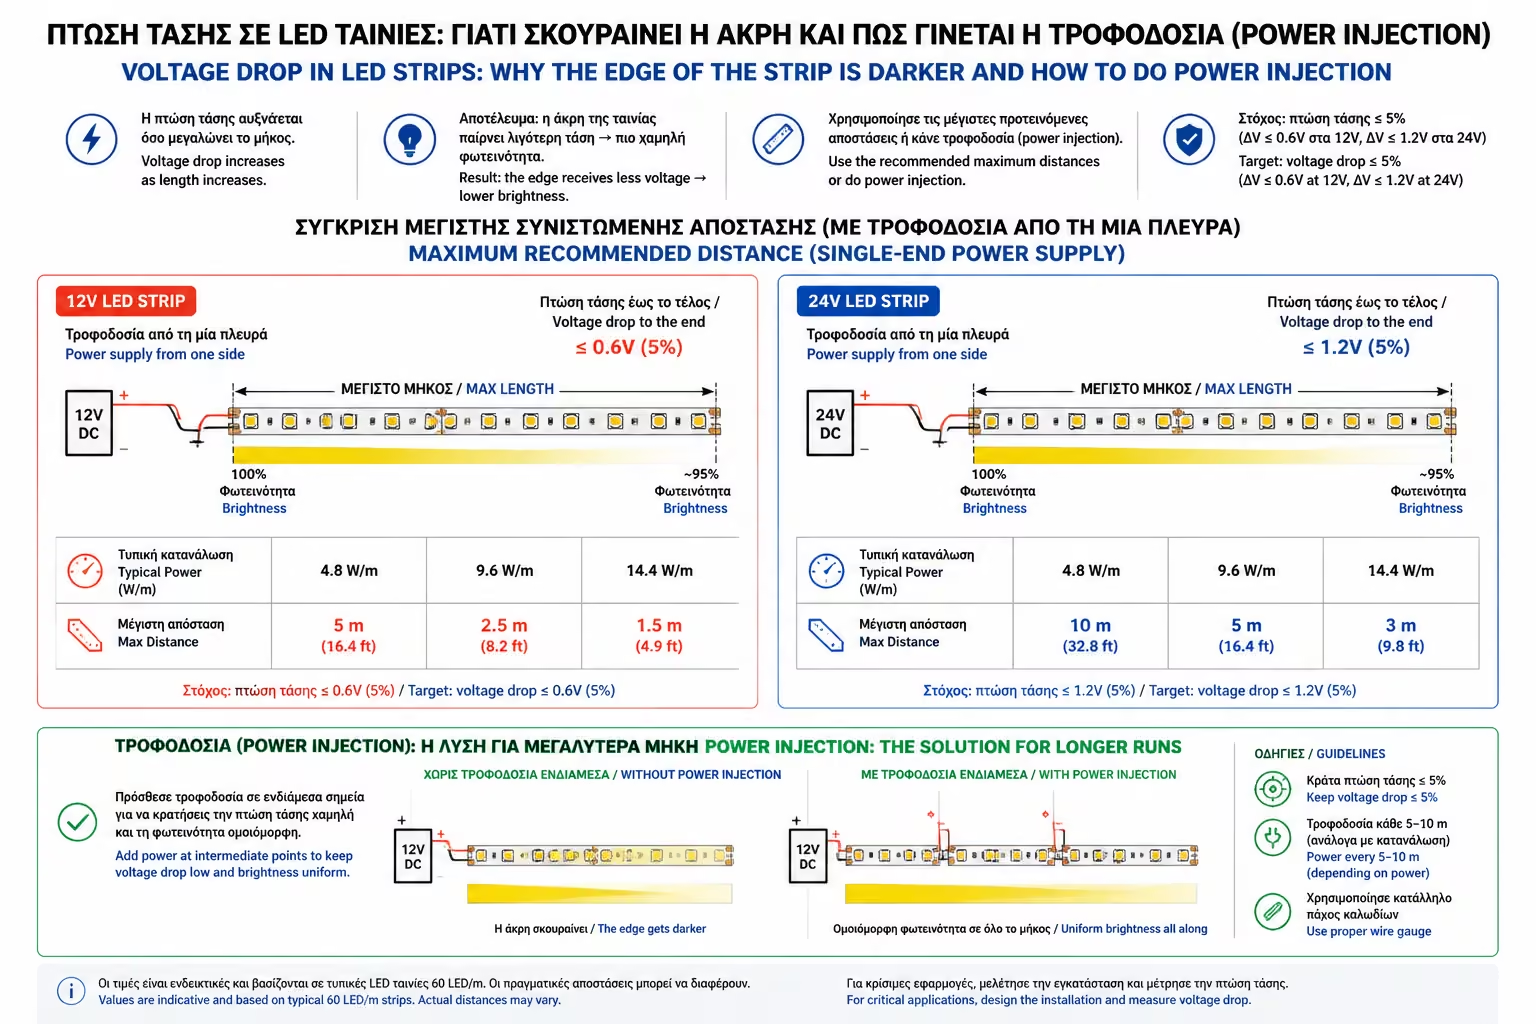
They suffer greatly from the phenomenon. On an average 12V tape, the voltage drop becomes visible as early as 3 to 4 meters. They are only ideal for small structures (eg behind a TV or on a small shelf).
You've made a beautiful, long "coutelo" out of plasterboard in the living room. You bought 10 meters of the best LED strip on the market, connected the right power supply to the beginning of it and hit the switch.
You go to admire your work and notice something disappointing: At the point where the power cord is connected (at the beginning), the tape glows blindingly. But as you move towards the other end of the room, the light visibly fades. In fact, if the film is "Cool White", you notice that towards the end its color changes and starts to "yellow" or turn red.
It's not the tape you bought, nor your power supply (even if you got a huge 200W one). You are just the new victim of the laws of Physics and the phenomenon called Voltage Drop. As engineers, let's see why this is happening and how to fix it once and for all.
LED strip is not a simple wire. It is a flexible printed circuit board (PCB) that has an extremely thin and narrow copper pathway on it to carry current.
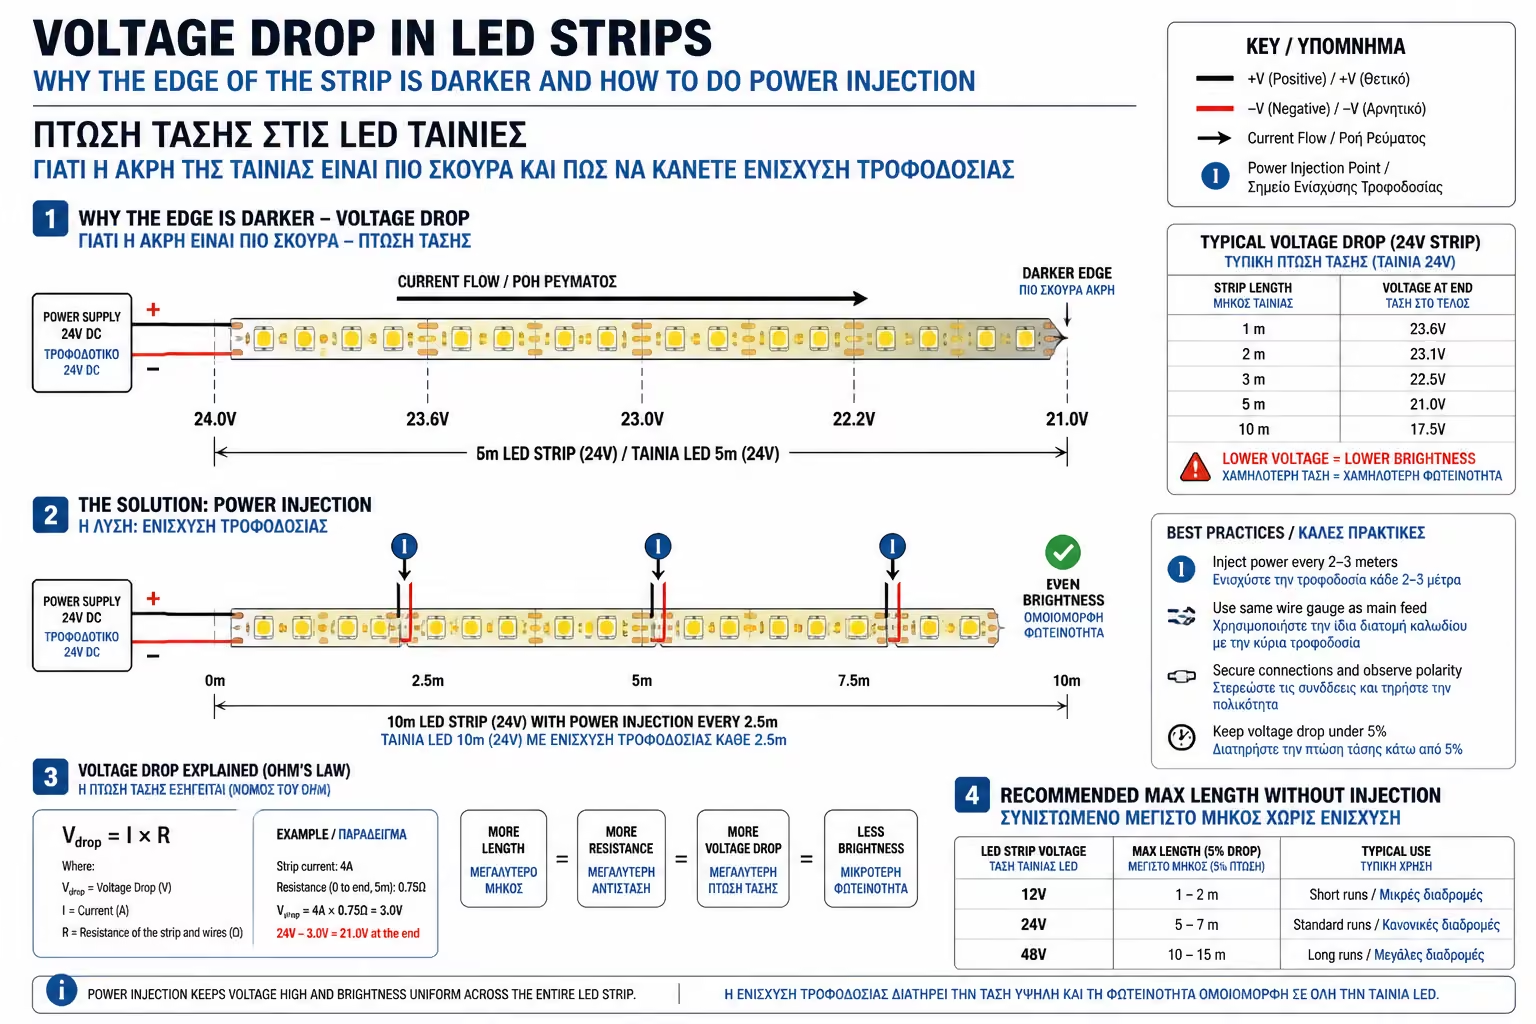
Think of this hallway as a water pipe. Your power supply (the "pump") pushes 24 Volts (the "pressure") to the beginning of the tape. As the current travels through this narrow, copper passageway, it encounters Resistance. This resistance gradually "eats" the voltage.
Because LEDs are extremely sensitive to voltage changes, this difference is immediately apparent to the eye. The last LEDs are underperforming, which is why you see the edge dark.
(Note: In cool white or RGB strips, the end of the strip turns yellow/reddish because the blue chips inside the LED need more voltage to light up than the red ones. When the voltage drops, the blue turns off first, letting the red/yellow take over!)
The simplest way to combat voltage drop before you even start the installation is to choose the right tape.
But what if you want to go around the living room and have 15 or 20 meters of single tape?
They suffer greatly from the phenomenon. On an average 12V tape, the voltage drop becomes visible as early as 3 to 4 meters. They are only ideal for small structures (eg behind a TV or on a small shelf).
It is the industry standard. Because they work at twice the voltage, the current (Amperes) flowing through the copper is half. Less current means less resistance. A 24V tape can reach 7 to 10 meters (depending on its power) without any visible loss of brightness.
Herein lies the great secret of professional installers. When the distance is long, we don't rely on the thin copper of the strip itself to carry the current all the way. We use external, thick cables (e.g. 1.5mm² or 2.5mm²) to carry "fresh" current directly from the power supply to various points on the tape. This is called Power Injection.
Let's look at the 3 basic wiring topologies:
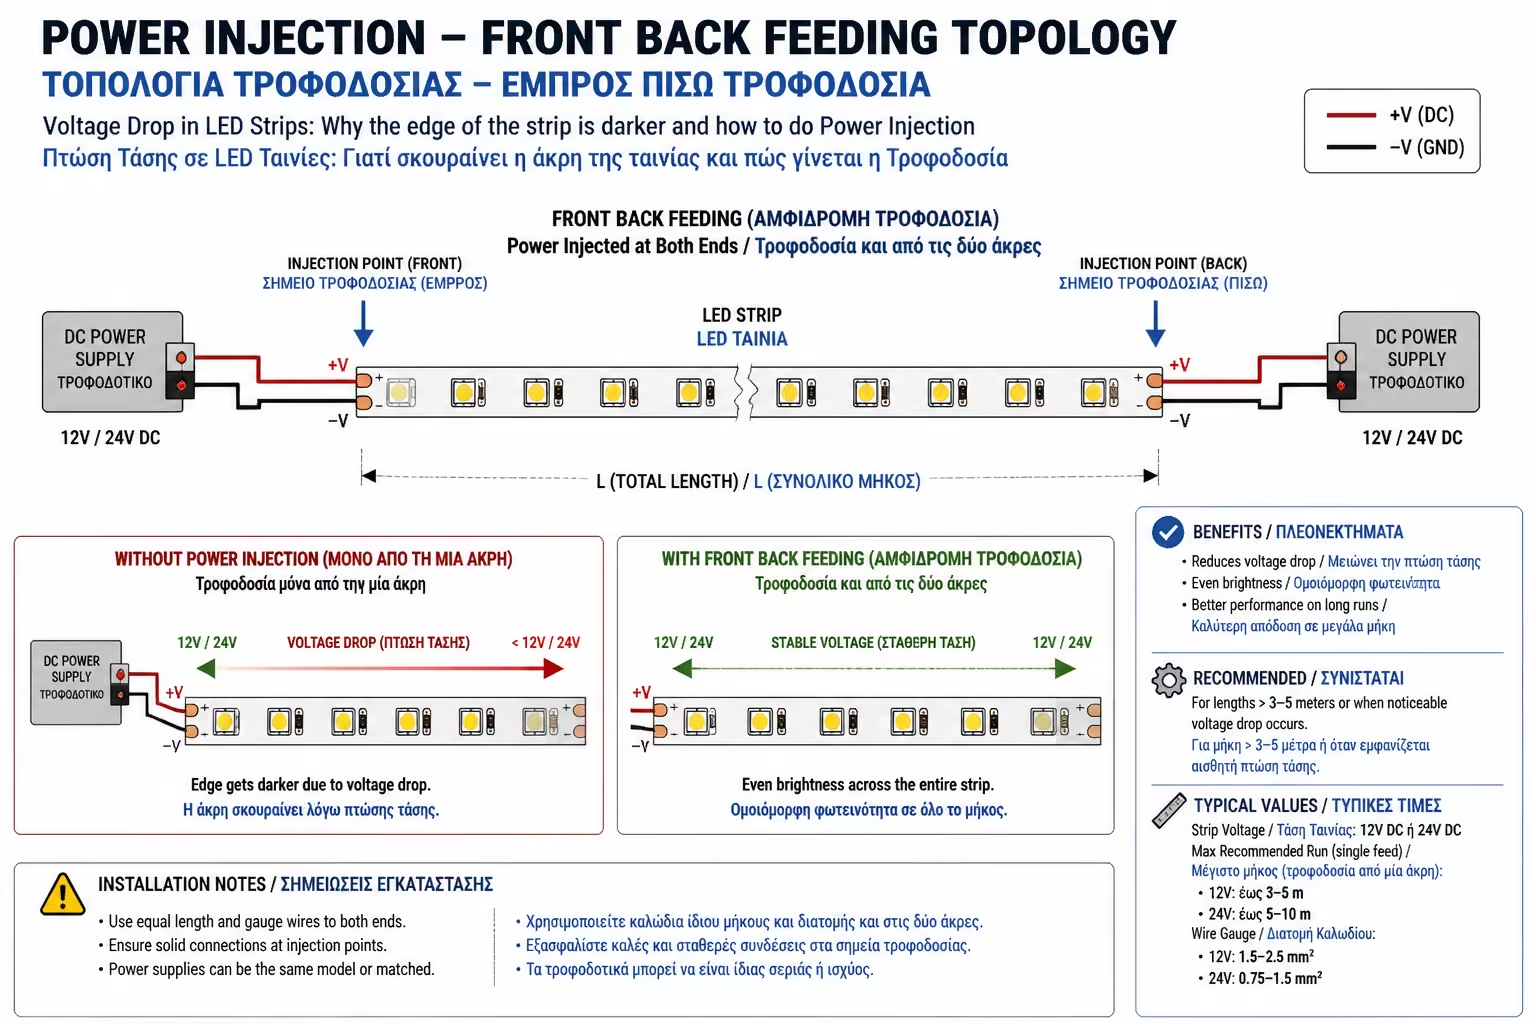
If you have a 10 meter roll, your power supply sends power to the beginning of the film. You, take a second wire, connect it to the exact same outputs of the power supply (+ and -), run it parallel to the tape (eg hidden behind it) and solder it to the end of the 10m tape. Result:* Now the current "pushes" from both sides. The beginning and end are at 100%, and the minimum drop in the middle (at 5 meters) is invisible to the human eye.
Instead of putting the power at the edge of a 10m room, place the power supply right in the middle of the wall (at 5m). Connect the tape so that the current leaves right and left. Result:* The current only has to travel 5 meters in each direction, automatically solving the problem.
If you have 20 meters of recessed lighting around a large room, you will cut the tape into 4 5 meter pieces. From the main power supply, you will run 4 separate "thick" wires (home runs). Each cable will go to separately feed the beginning of each pentameter. Result:* Each piece of tape behaves as if it were alone, taking 24V "pins" directly from the source. The lighting is completely uniform.
When the LED strip exceeds 5-7 meters, voltage drop is inevitable. Don't try to "fight" it by putting in a bigger power supply, because you'll just burn out the first LEDs! Buy 24V tapes (rather than 12V) and ask your electrician to "throw" parallel wires (Power Injection) to feed your tape from the other side as well. The light will remain perfect from the first to the last centimeter.
Next Step: We have seen how to transfer current to simple (white) ribbons. But what if you have a multi-color film (RGB or RGBW) and want to control it all (all 20 meters) with a single remote control? There, Power Injection alone is not enough, because the controller cannot withstand such a load.
Moving on to our technical guide: Signal Amplifiers (RGB/RGBW Amplifiers): How to join over 10 meters of colorful LED strip without burning the Controller.
Return to category.
Go to categoryReturn to the central guide.
Go to guide