
Lighting & Control
Return to category.
Go to categoryIn the previous chapter we saw how Power Injection saves simple, monochrome (white) tapes from voltage drop. Things, however, get dramatically complicated when we talk about multi-color films (RGB, RGBW or CCT).
In white tapes, power goes directly from the power supply to the tape. In colorful films there is a "mediator": The Controller. It's the "box" (WiFi, Bluetooth or by remote control) that decides how much current to send to the red, green and blue colors to make the shade you asked for.
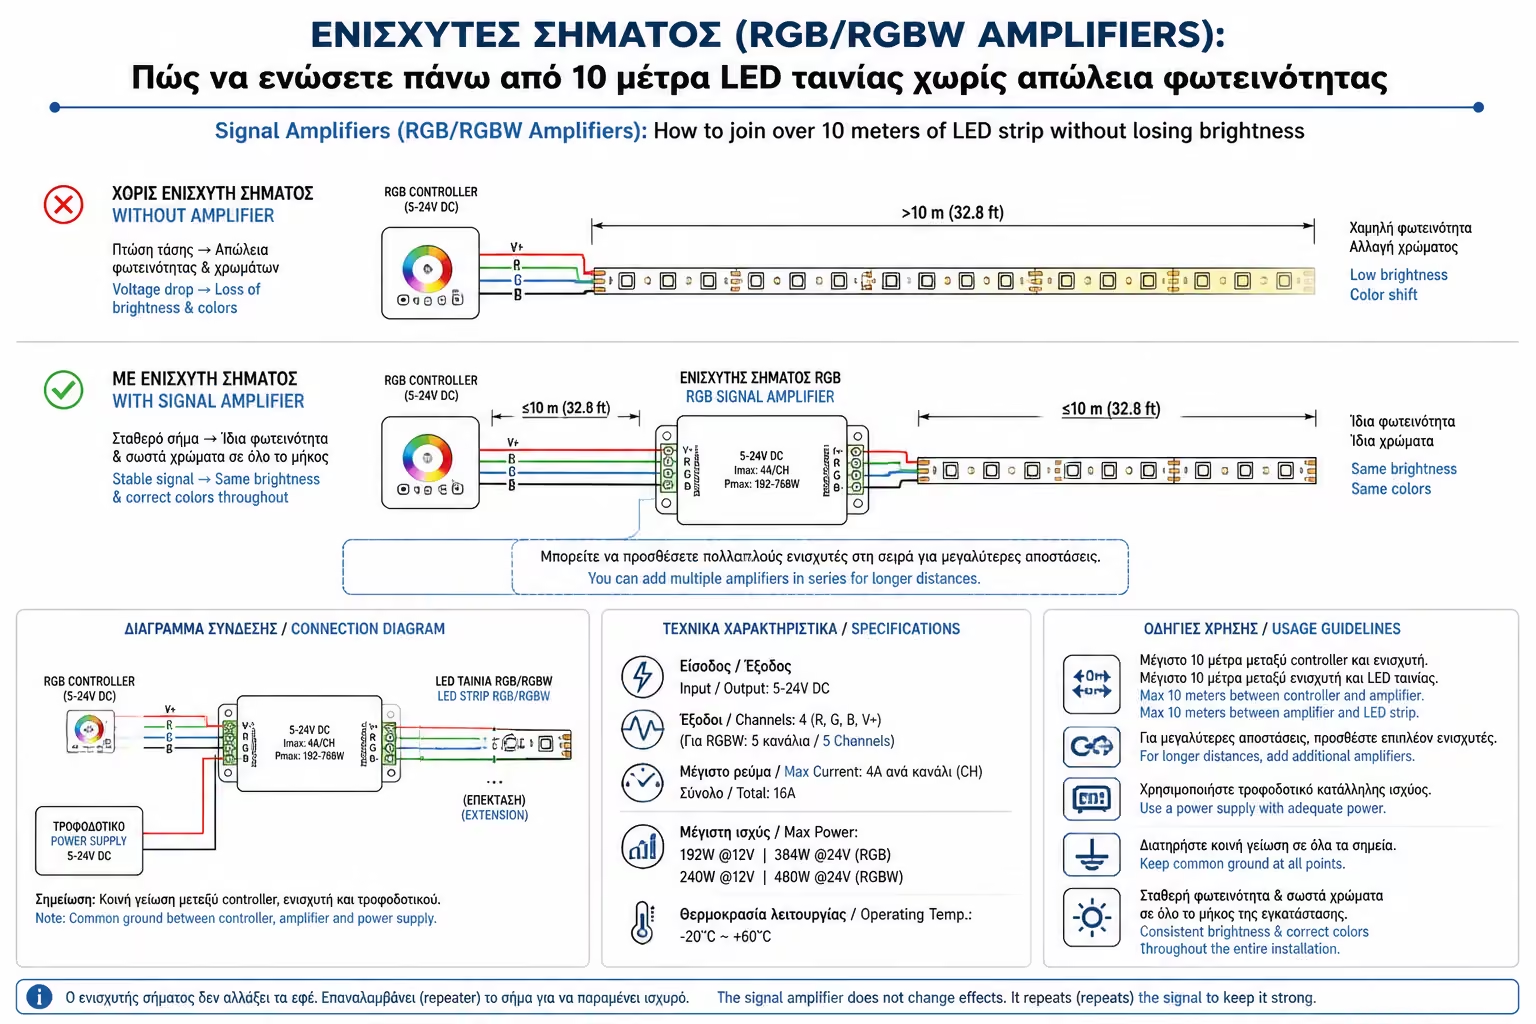
If you try to join 20 meters of RGB tape in series and connect them to a simple controller... you will most likely see smoke. As engineers, we go to see why Controllers "burn" and how the Signal Amplifier (Amplifier) is the only, safe solution for huge installations.
Every RGB controller has a strict limit on the current that can pass through it. If you turn your controller upside down, you will see a label that reads for example: Max Output: 3x4A (Total 12 Amperes).
Let's do the math:
Your controller can withstand up to 12A. So, it comfortably withstands 10 meters. But what if your living room needs 25 meters of RGB tape? This requires 15 Amperes. If you put 15 Amperes through a controller that can only handle 12A, its internal circuit board will melt.
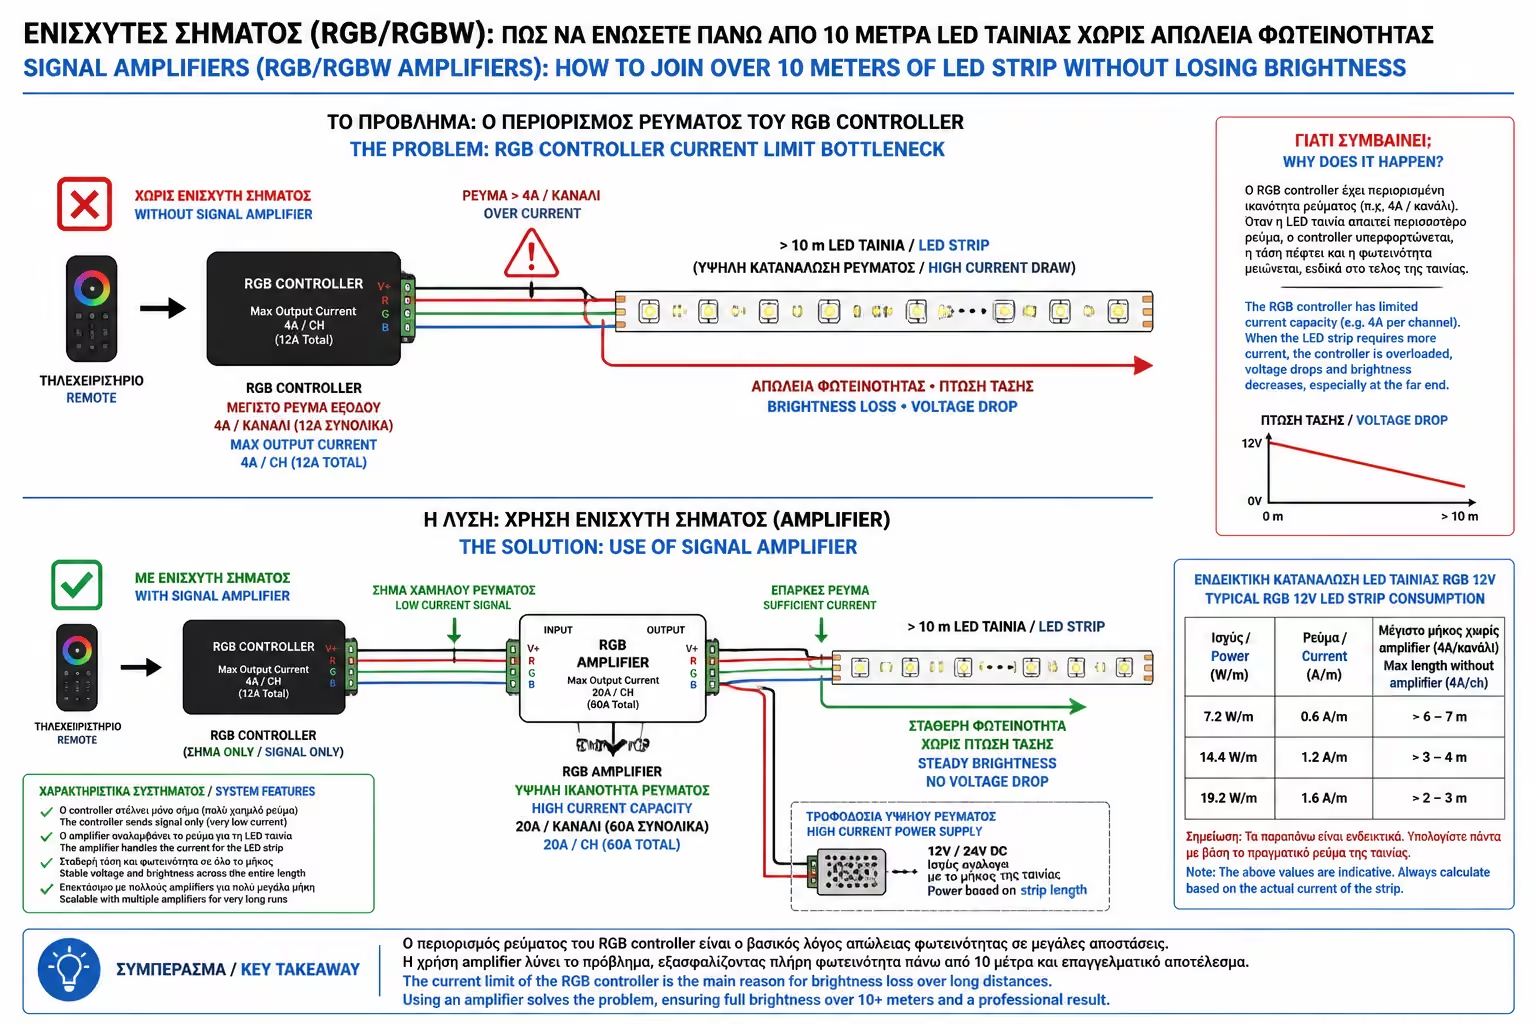
This is exactly where the Signal Amplifier (RGB/RGBW Amplifier) comes to our rescue. It is a small, cheap component (usually costs around €10 - €15) that works as a "Repeater".
The amplifier has two jobs:
This way, the heavy current of the second ribbon NEVER passes through the main Controller. The Controller controls only the first few measures, and the amplifiers take on the "heavy lifting" for all the rest, duplicating the command at the same time.
Wiring might sound scary, but it actually makes a lot of sense.
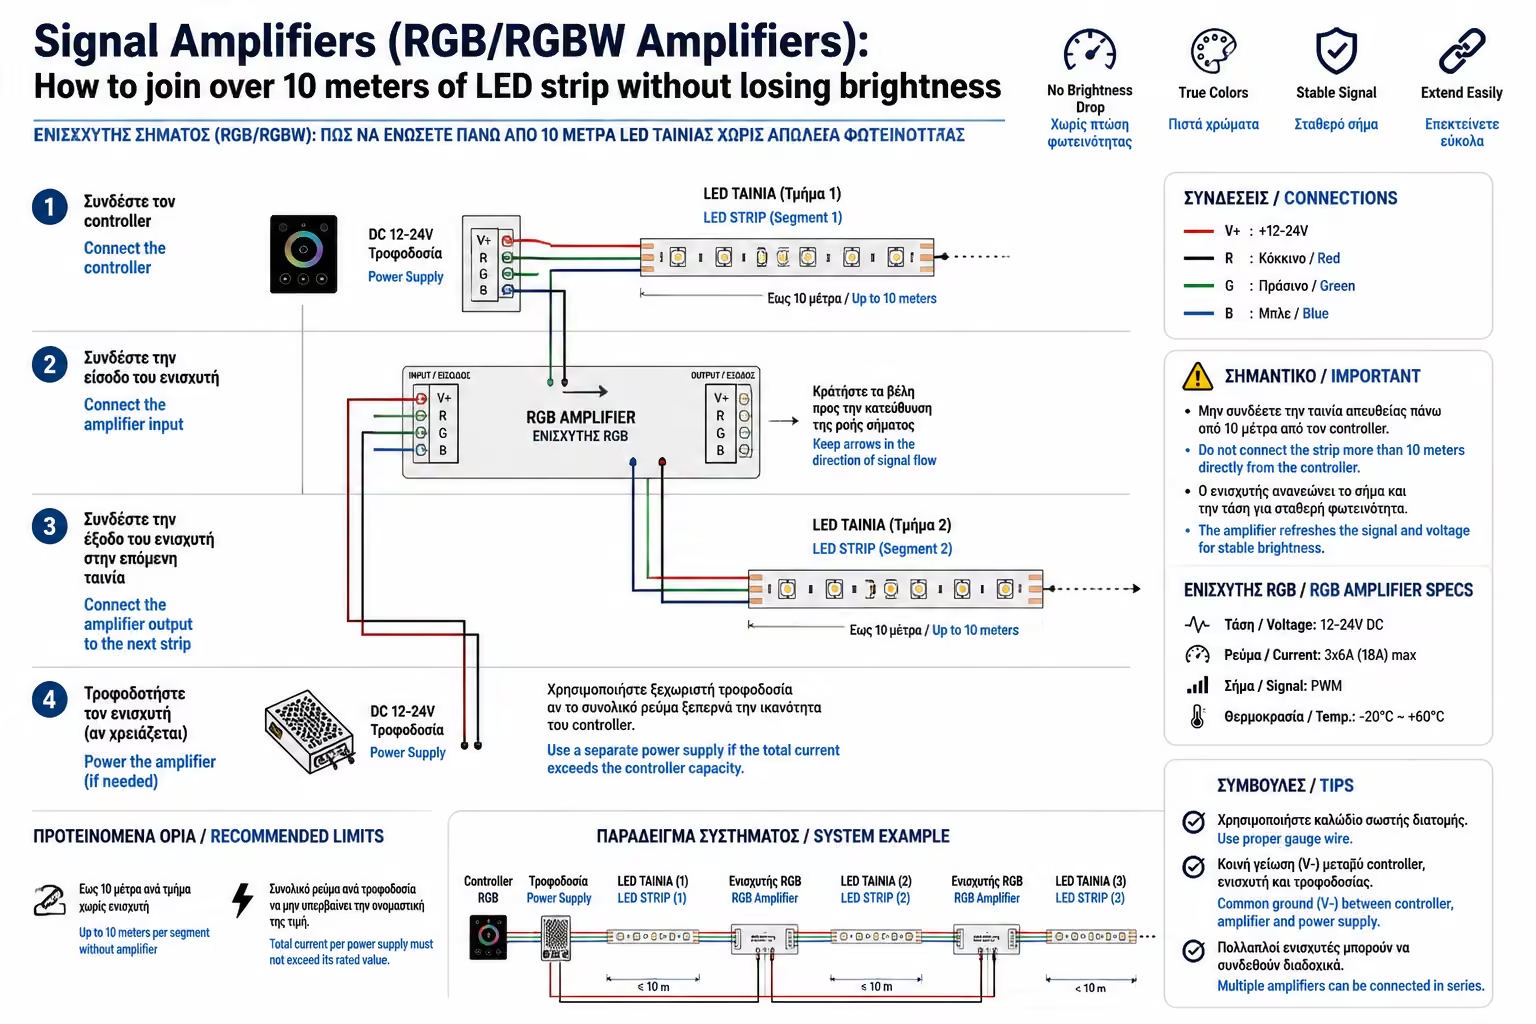
Let's say we have 20 meters of RGB tape (split into two 10 meters to avoid voltage drop). The wiring is as follows:
1. The Central Power Supply: Connects to the 230V socket. Its output (24V) goes to the RGB Controller. 2. The First Tape (0-10m): Its beginning is normally connected on the RGB Controller (on the 4 cables: V+, R, G, B). 3. The Booster (In the Middle): At the end of the first strip (at 10 meters), instead of joining the second strip directly, you put the Booster. The end of the first tape goes into the "INPUT" of the amplifier. The beginning of the second tape (10-20m) goes into the "OUTPUT" of the amplifier. 4. Powering the Amplifier (The most critical step!): The amplifier also has two additional contacts (+ and -) that say "Power". Here you need to bring a cable directly from your power supply. This is the "fresh" current that will feed the second film.
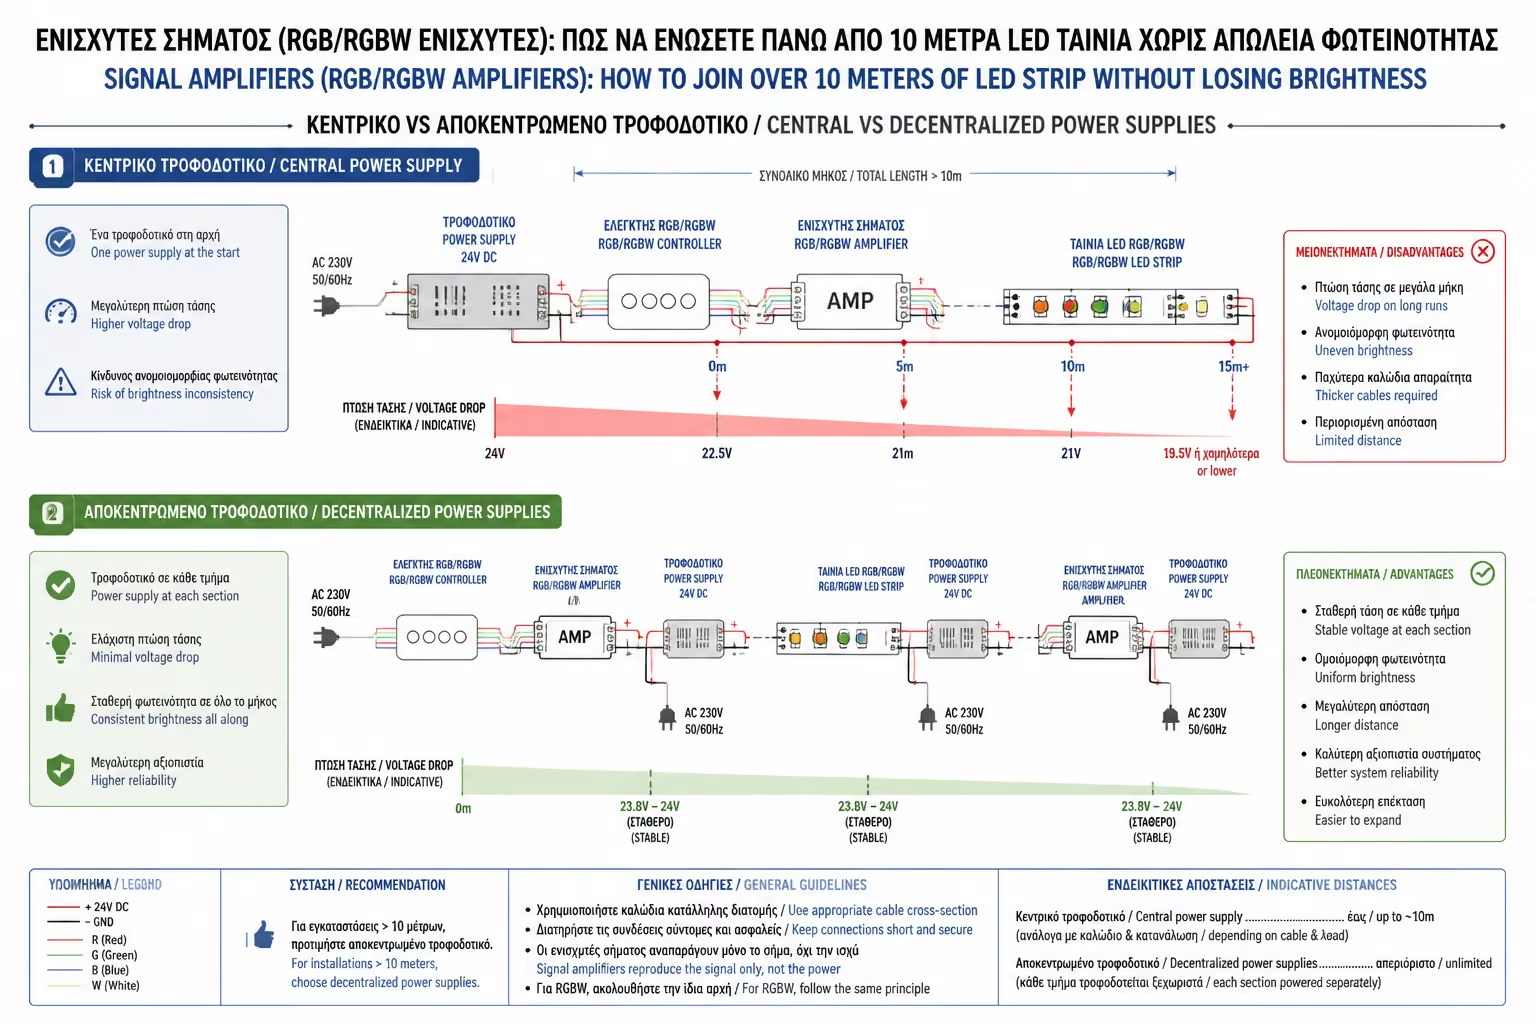
In the wiring above (Star Method), you need to run thick power cables from the main power supply to each amplifier. If the room is huge, this means a lot of cables inside the drywall.
The Installer's Secret (Decentralized System): Instead of buying a giant power supply (eg 500W) that makes noise (with a fan) and takes up space, you can use several small power supplies.
So the only wire that needs to "travel" around the room is the LED strip itself, making the installation incredibly clean. With this method (by adding amplifiers and small power supplies), you can control with ONE remote control even... kilometers of LED strip, in absolute synchronization.
All of the above applies to "Analog" RGB strips (where the entire strip is necessarily lit the same color). If you have bought "Digital" or "Addressable" tape (eg WS2811, WS2812B), where each meter can be a different color (the so-called rainbow / running water effects), classic amplifiers do NOT. There the signal (Data) travels digitally from chip to chip, and all you need to do to extend the film is simple Power Injection (as we saw in the previous chapter), making sure your Controller supports the total number of Pixels.
Do not play with the limits (Amperes) of your RGB Controller. If your tape exceeds the endurance limits of the controller, the installation of a Signal Booster is absolutely mandatory. With the right amplifier, the light stays 100% bright, the hue stays constant without "yellowing", and most importantly, your electronics stay cool and safe.
Next Step: We complete Category D with the most modern consumer dilemma. You have decided to make your home "smart" (Smart Home). Where do you start?
We continue with the last guide in this series: Smart Bulbs vs. Smart Switches: What is the most correct and permanent solution for your home.
Return to category.
Go to categoryReturn to the central guide.
Go to guide