Safer DIY territory
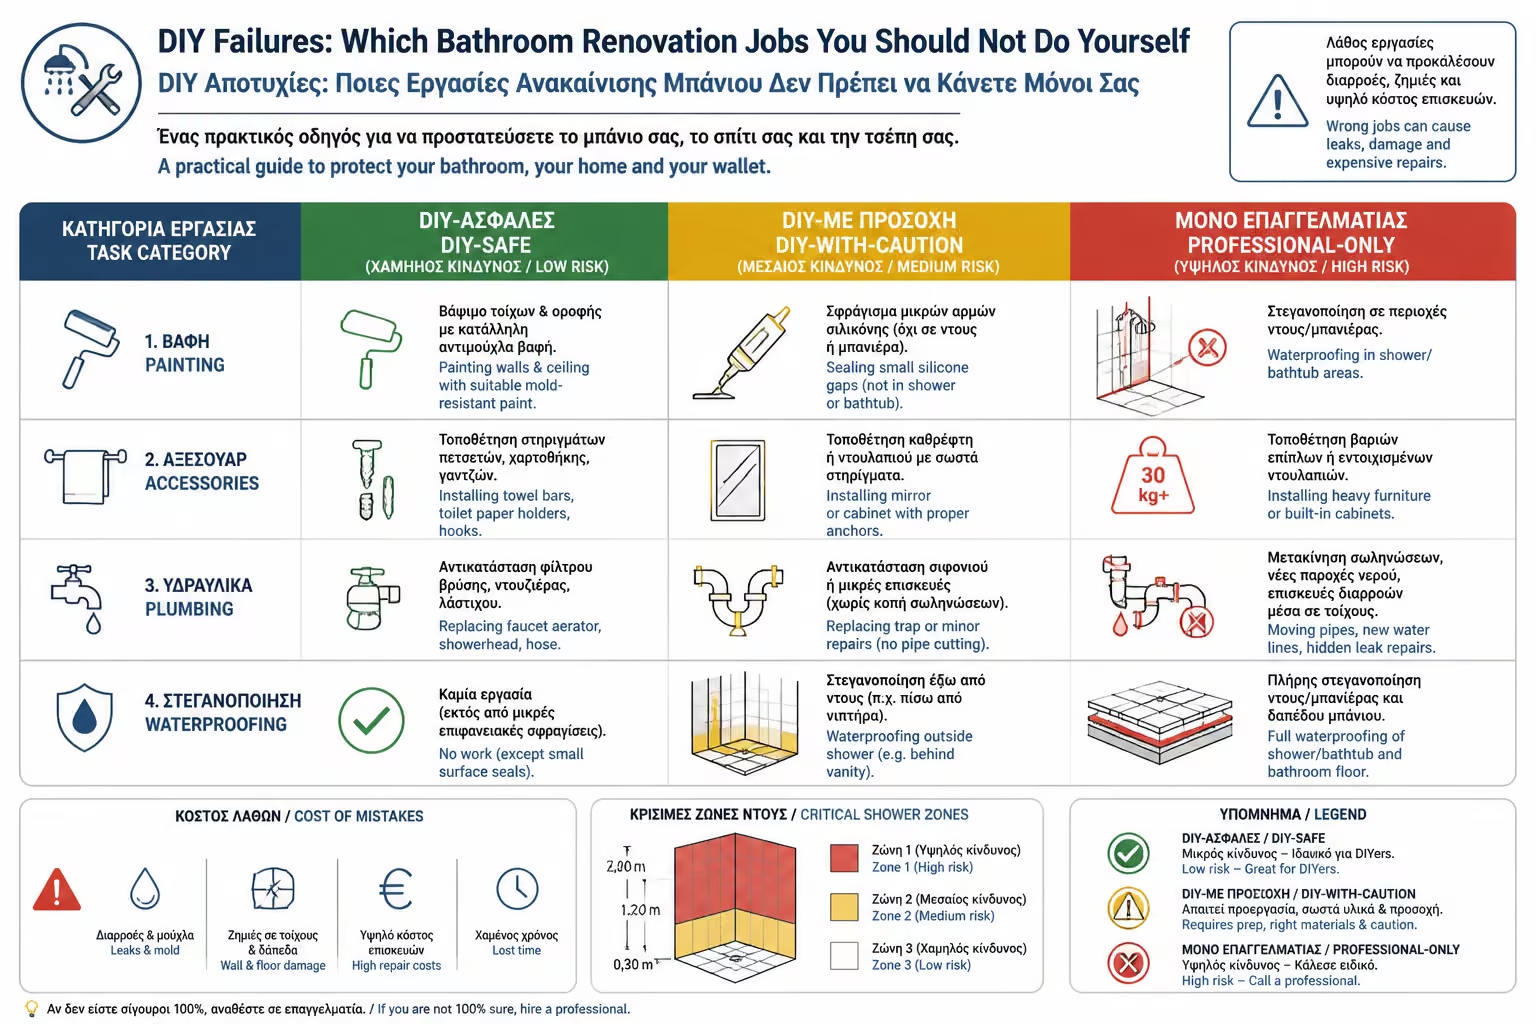
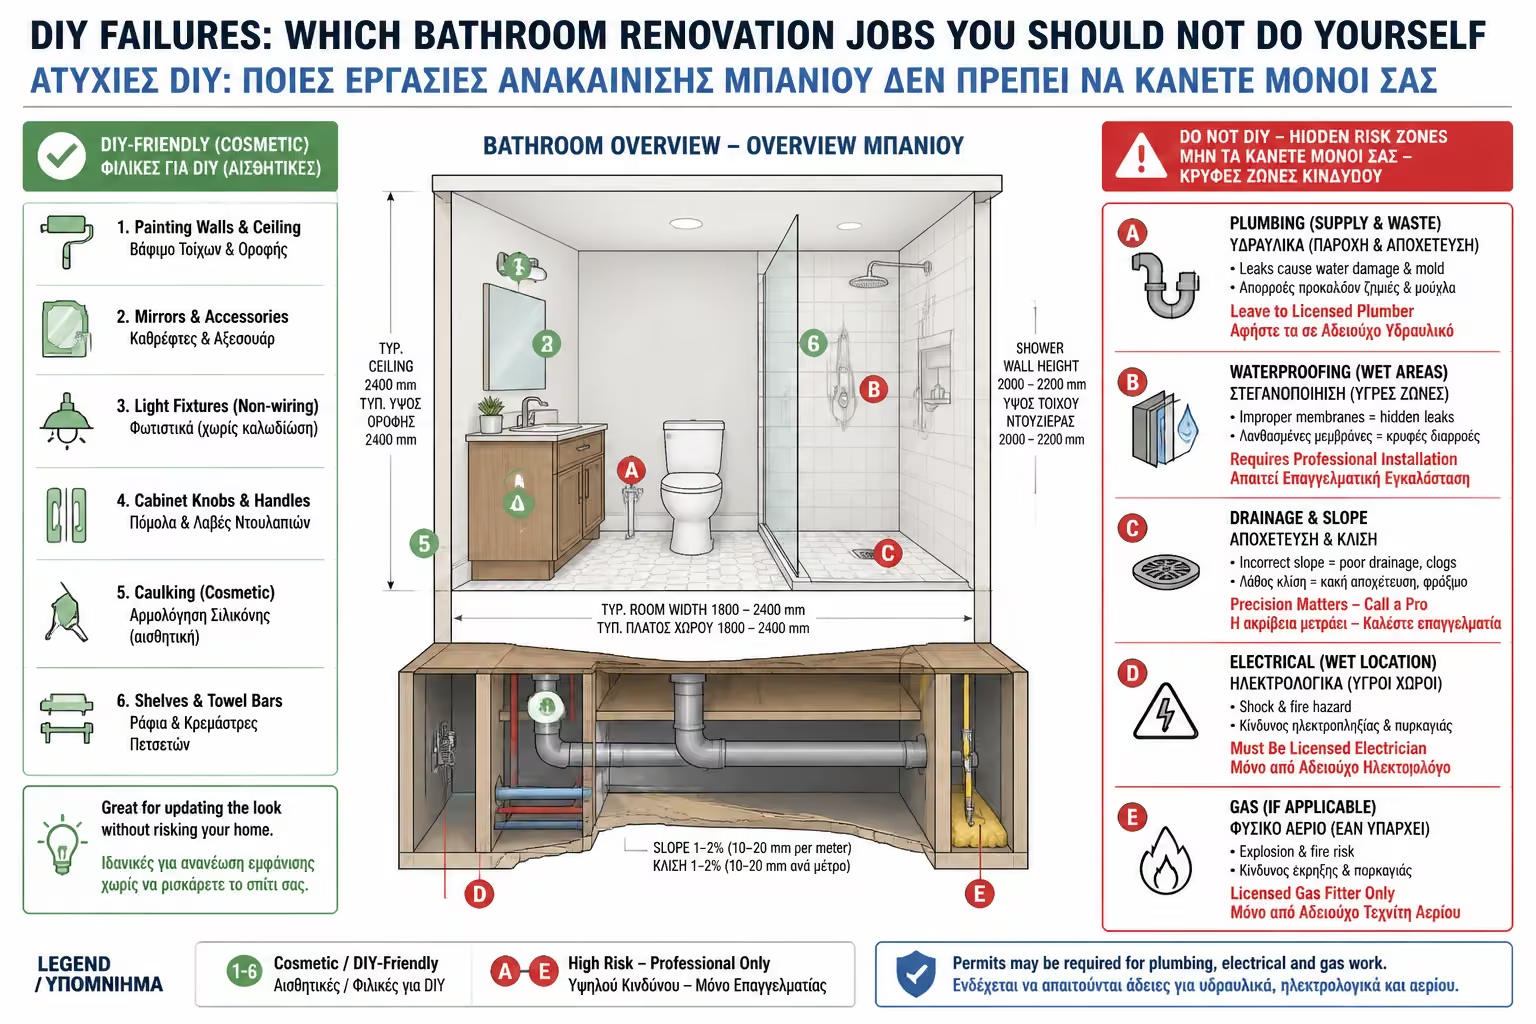
Accessories, simple shelves outside critical zones, a mirror with no electrical connection, minor painting and storage organization.
DIY can genuinely help reduce renovation costs, but only when it stays within the right boundaries. Some bathroom tasks are low risk and perfectly reasonable for a homeowner to handle. Others carry failure costs that are far beyond aesthetics.
A bathroom combines water, electricity, drainage, humidity, waterproofing, concealed connections and, in many apartment buildings, shared infrastructure. That is why the real question is not "what can I try myself?" but "what can I do without creating a hidden, dangerous or expensive problem later?"
Every bathroom renovation starts with a simple distinction: low-risk aesthetic tasks on one side, critical technical infrastructure on the other. Limited DIY can make sense in the first category. It does not belong in the second.
If a task touches electricity, pressurized water, drainage, waterproofing, structural elements or anything that will be hidden behind finished surfaces, you should treat it as technical work with a real failure cost.
Accessories, simple shelves outside critical zones, a mirror with no electrical connection, minor painting and storage organization.
Electrical work, plumbing, drainage, siphons, floor falls, waterproofing, shared pipes, permits and structural elements.
Infrastructure mistakes often stay hidden at first and show up later as leaks, demolition, mold, repairs or compensation claims.
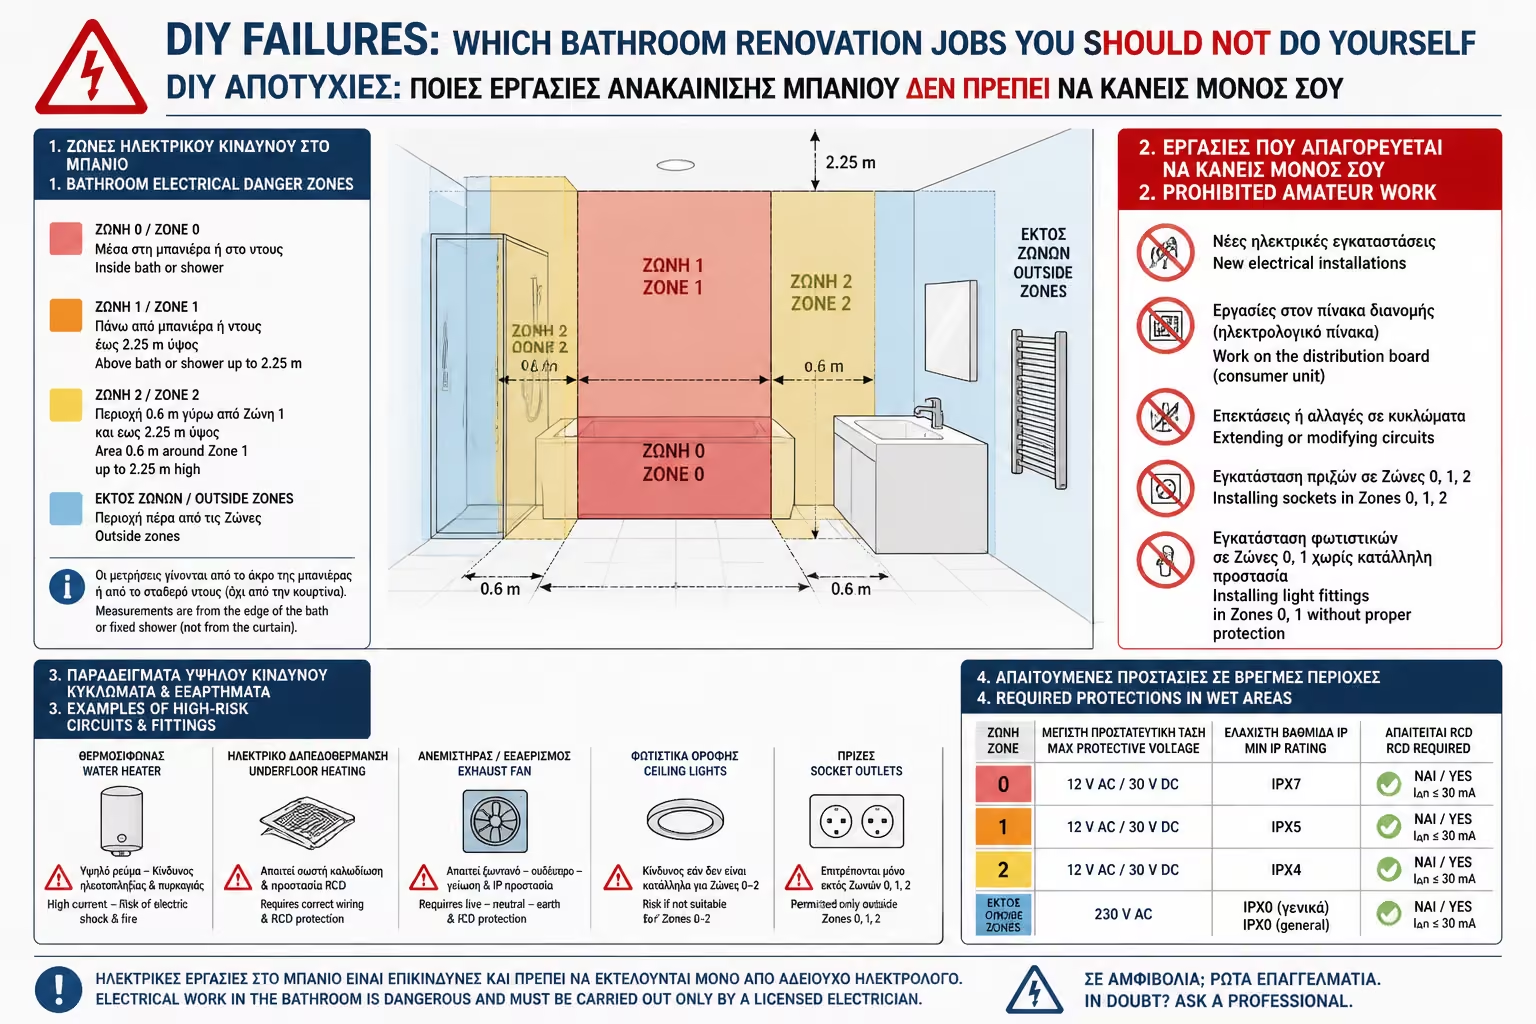
The bathroom is the most dangerous room in the house for casual electrical work because it combines power, moisture and very short user distances. Here, "it works" is not enough. It has to be safe, compliant and correctly protected.
A homeowner can decide where lighting, sockets, a mirror or ventilation should go. The execution itself should be carried out by a licensed electrician.
New circuits, new sockets, moving switches, power for a washing machine or water heater, LED mirror wiring and any intervention inside the panel.
Electric shock, short circuit, cable overheating, fire, appliance damage or problems during a future inspection of the installation.
Moving or fully replacing an electrical panel is not a cosmetic box swap. It affects supply lines, breakers, residual-current protection, grounding, cable sizing, load distribution and the verification of the whole installation.
Protection devices, cabling, grounding, measurements and potentially the need for updated compliance documentation.
If the panel needs to be moved or replaced, the work belongs only to a licensed electrician with the required checks.
An electric water heater, and any high-load supply in a humid room, requires proper design and installation. Improvising with cables, breakers or feed lines is not acceptable.
New water-heater feeds, rewiring, breaker changes, panel connections or new dedicated lines for heavy appliances.
Current leakage, overloaded circuits, short circuits, fire, device damage and serious risk in a wet environment.
Bathroom drainage often does not belong only to your apartment. In apartment buildings, main stacks, shared inspection points and communal pipe routes serve multiple floors and units.
That is why you should not touch the main stack, a toilet connection, a shared drain point or a changed waste route without technical review.
Blockages, sewage backup, odor, noise, leaks to neighbors and failures that affect the entire vertical stack.
Drainage depends on correct pipe size, slope, route planning and knowledge of the existing installation.
A toilet is the hardest sanitary fixture to relocate because it depends on large-diameter waste piping, correct slope, floor buildup and the relationship to the main stack.
Slopes, finished floor heights, trap position, drainage path, bathroom layout and possibly shared vertical drainage.
In older buildings or long relocation runs, a rough solution often turns into a permanent drainage problem.
Replacing an exposed fitting is one thing. Building or altering concealed water supplies is another. New pipe runs, hidden joints and connections inside the wall are not DIY territory.
New pipework, hot and cold water line changes, concealed mixers, manifolds and pressure-testing of the installation.
A small leak inside the wall may take time to appear, by which point the damage may already extend into an adjacent room or downstairs.
Concealed systems look cleaner, but they are unforgiving. Anything that disappears behind tile must be correct the first time.
Concealed shower mixers, in-wall cisterns, hidden supplies and mechanisms that will be sealed behind finished surfaces.
These systems require exact spacing, service access, testing before closure and strict compliance with the manufacturer's instructions.
Waterproofing is not simply "apply a product and finish." It is a system that depends on the right substrate, overlaps, material compatibility, corner treatment and correct integration with the floor drain.
Corners, floor drains, niches, pipe penetrations, hidden voids and incompatible materials.
Water travels behind the tile and eventually shows up as mold, blistering or moisture damage in the next room.
Floor falls toward the drain must be accurate. If water does not run correctly, it will sit on the floor after every shower, and repair after tiling is both disruptive and expensive.
Sloped screed, drain height and position, preparation for a walk-in shower and changes in floor level.
This mistake rarely reveals itself on installation day. It shows up later, when the bathroom keeps holding water.
Anything involving columns, beams, slabs, load-bearing walls or the structural behavior of the building sits entirely outside the DIY zone.
Openings in a load-bearing wall, cutting a beam, chasing a slab without review or removing a wall without knowing whether it is structural.
This is not about rough workmanship. It is about structural safety, permits, engineering responsibility and potentially severe consequences.
Even an internal wall may hide services or relate to how the building functions. "It is just a partition" is not a technical diagnosis.
Whether the wall is structural, whether electrical, plumbing or drainage runs through it and whether neighboring or shared areas are affected.
Inspect first, demolish later. Never the reverse.
Not every internal alteration is automatically "free". Many cases require at least a technical review and, depending on the intervention, may trigger permit or small-scale works procedures.
Layout changes, a new toilet, moving the bathroom, work in a lightwell, façade changes, shared systems or anything affecting structural elements.
Do not decide on your own that "nothing is needed". Get the right technical check first.
If the project touches natural gas, a boiler, a burner, a flue or any combustion-related system, there is no legitimate DIY space at all.
Gas piping, appliance connection, flues, combustion air routes or any closure of ventilation openings.
This work belongs to a licensed specialist, without exception.
Older properties may contain materials that should never be stripped casually. When the origin of an older product is uncertain, do not start removing it "just to see what it is."
Old pipes, insulation, unidentified boards, older floor layers, unknown wall linings or any material with unclear provenance.
If there is any suspicion of hazardous material, stop the DIY work and ask for specialist assessment and handling.
The conclusion is not that a homeowner should do nothing. It is that homeowner work should stay inside genuinely low-risk activities that do not interfere with critical systems.
Choosing materials and accessories, simple shelves, a shower curtain, painting dry surfaces and storage organization.
A mirror with no electrical wiring, grout cleaning and replacing simple fittings without touching the underlying installation.
Never drill where pipes or cables may be running, especially near the sink, shower, toilet or power points.
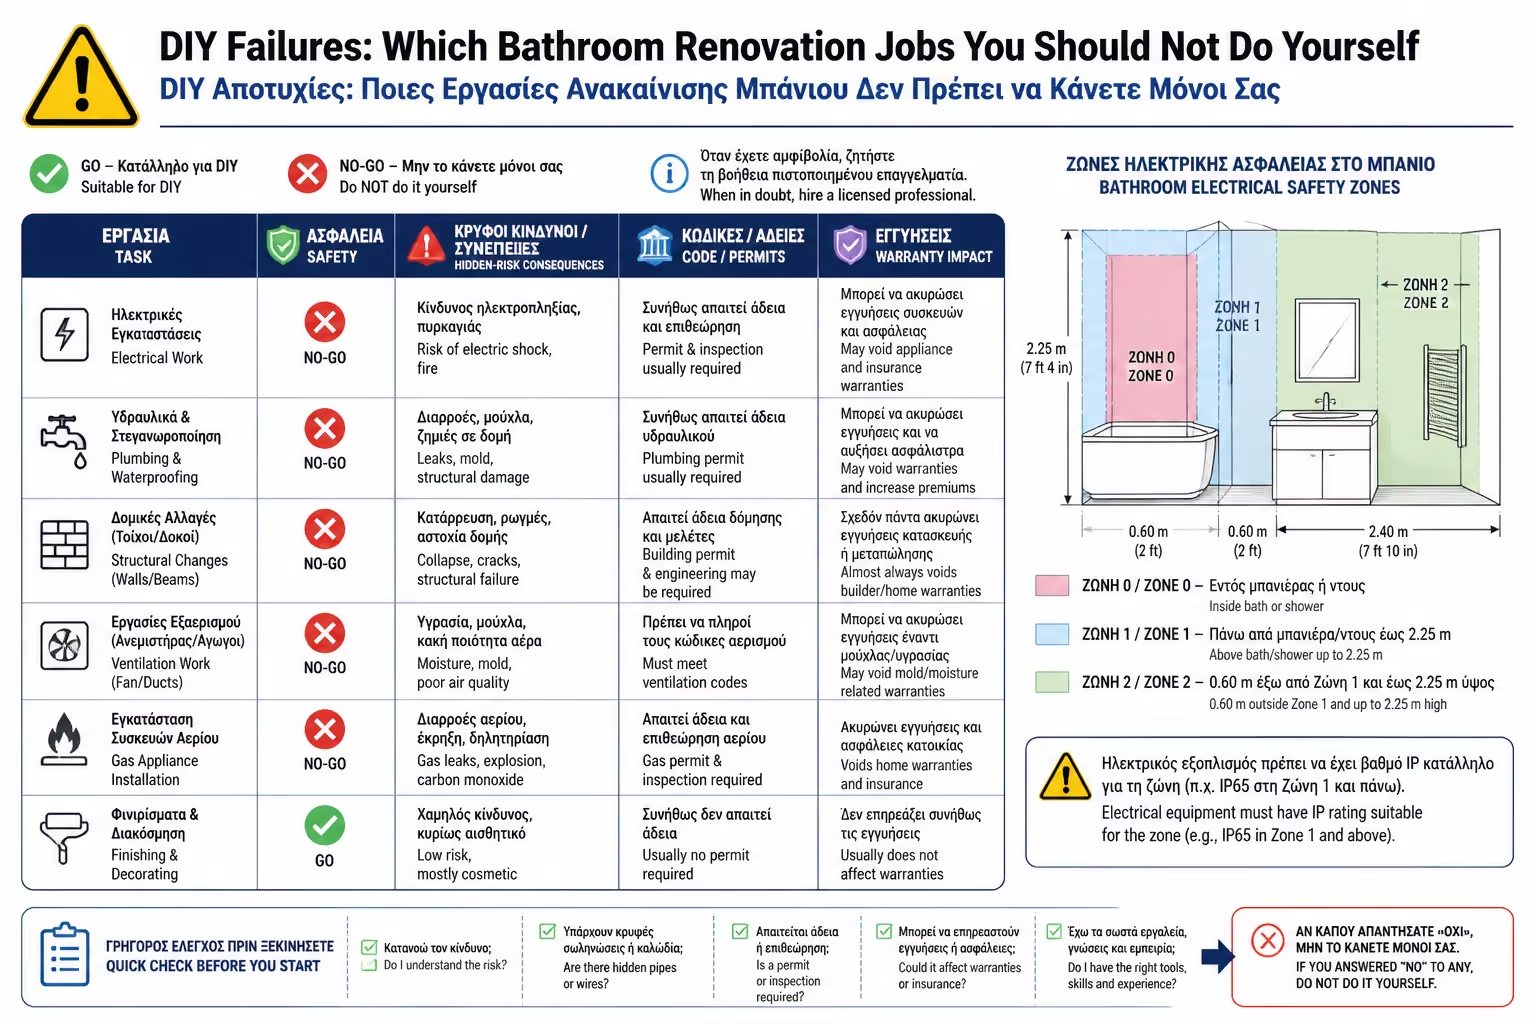
Before you start any DIY work, ask three simple questions. If even one of them points to a technical, legal or concealed risk, the task should move to a professional.
If yes, it is not safe DIY.
If yes, the risk is already too high for a homeowner experiment.
If yes, bring in the right specialist from the start.
Use the table below as a quick filter. If the job belongs to technical infrastructure or will be concealed behind finished surfaces, the correct path is almost always a qualified professional.
| Task | DIY? | Who should handle it |
|---|---|---|
| Relocating the electrical panel | No | Licensed electrician |
| New bathroom socket | No | Licensed electrician |
| Water heater feed | No | Licensed electrician |
| Work on the main drainage line | No | Plumber or engineer where required |
| Moving a toilet | No | Plumber, and possibly an engineer |
| In-wall cistern | No | Plumber or technical installation crew |
| Built shower and floor falls | No | Specialized crew |
| Waterproofing a shower zone | Not for a beginner | Professional installer |
| Demolishing a wall | Not without review | Engineer and crew |
| Intervening in a structural element | Never DIY | Engineer and licensed contractor |
| Installing a simple shelf | Yes, with care | Homeowner, if no hidden pipes or cables run there |
| Painting the ceiling | Yes, with conditions | Homeowner or painter |
| Organizing storage cabinets | Yes | Homeowner |
The most deceptive failure is not the one you see immediately. It is the one that gets sealed behind tile, microcement or drywall and only reveals itself after damage has already spread.
Pipe joints inside a wall, shower waterproofing, a floor drain change, electrical supply behind a mirror or any concealed fixture system.
If it fails, the repair is not just replacing one part. It usually means opening finished surfaces and rebuilding the area.
Another issue people often forget is product and system warranty. Many manufacturers make correct professional installation a condition of coverage.
Cisterns, mixers, electrical mirrors, water heaters, ventilation units, shower enclosures and waterproofing systems.
If a defect appears, the manufacturer may ask for proof of correct installation or professional fitting.
Before starting any DIY task, run it through the checklist below. If the answer is "yes" to any critical question, the job should leave the DIY category and move to a professional.
| Question | Yes / No |
|---|---|
| Does it involve electricity? | Yes / No |
| Does it involve pressurized water? | Yes / No |
| Does it involve drainage? | Yes / No |
| Does it affect shared building infrastructure? | Yes / No |
| Will it be hidden behind tile? | Yes / No |
| If it goes wrong, can it flood the space? | Yes / No |
| If it goes wrong, can it cause electric shock? | Yes / No |
| Can it affect a neighbor? | Yes / No |
| Might it require a permit or an engineer? | Yes / No |
| Can it void a product warranty? | Yes / No |
If one or more of these answers is yes, stop and get technical guidance before touching the installation.
DIY has a valid place in a renovation, but not in the critical infrastructure of a bathroom. You can take responsibility for material choices, accessories, storage and small low-risk finishing touches. You should not take responsibility for electrical work, shared drainage, concealed water feeds, structural elements, in-wall systems or shower waterproofing.
The rule is simple: if the task can cause a leak, electric shock, damage to a neighbor or tile removal later, it is not a DIY job. Paying a qualified professional is usually far cheaper than repairing a concealed failure after the room is finished.
Good DIY in a bathroom renovation is not about courage. It is about limits. The closer a job gets to hidden systems, moisture, drainage, electricity and shared infrastructure, the less room there is for homeowner improvisation.
Real savings do not come from gambling on a critical task. They come from handling only what is genuinely safe and assigning the technical work to the right licensed professional early.
Return to category.
Go to categoryReturn to the central guide.
Go to guide