The Ultimate Bathroom Renovation Guide: The Correct Work Sequence from
Start to Finish
A bathroom renovation is one of the most complex projects inside a home.
The room may be small, but it requires multiple trades to work in a
tight space with very little margin for error.
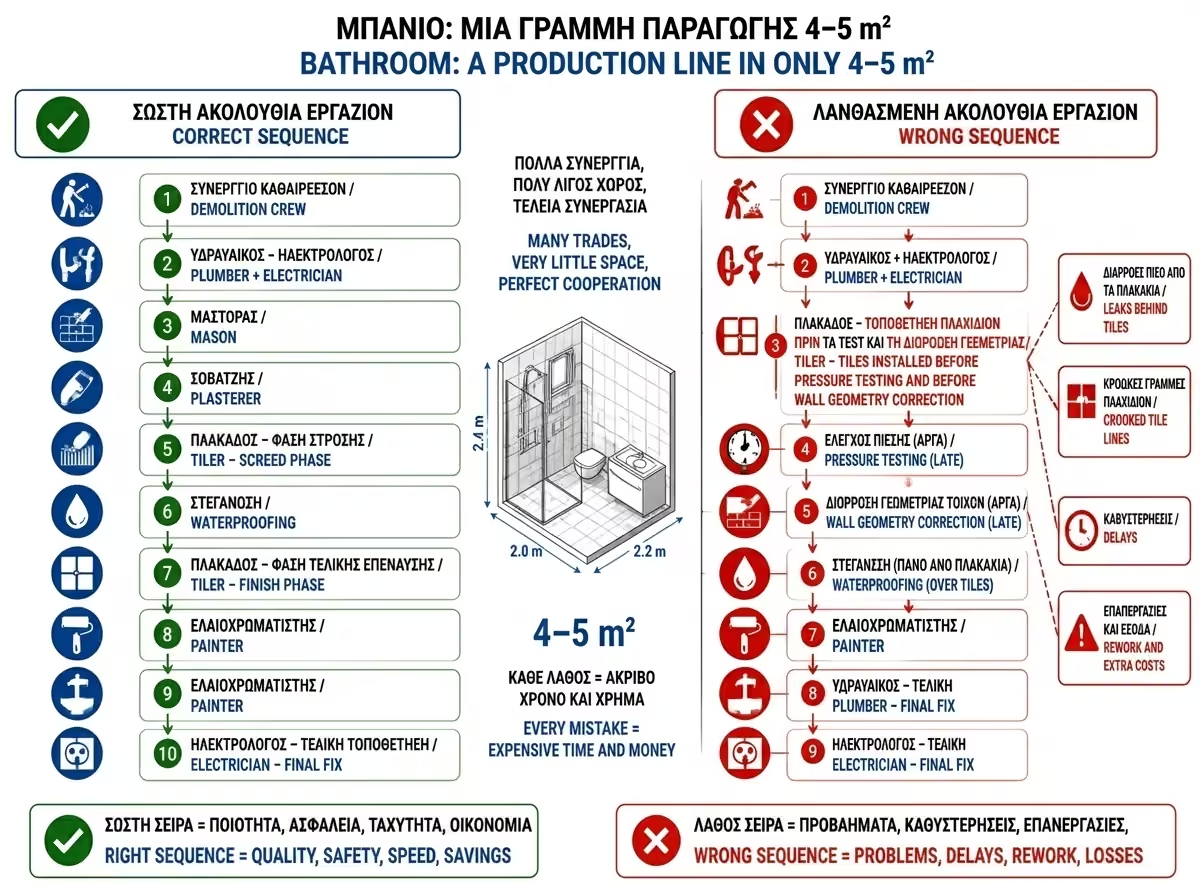
The biggest problem usually does not begin with the choice of tiles or
sanitary ware. It begins with the wrong work sequence. If one trade
enters before the previous one has finished correctly, the result
becomes a chain of delays, defects, and extra cost.
As engineers, we treat bathroom renovation as a tightly organized
production line. When the sequence is respected, the project moves
forward cleanly. When that sequence is broken, problems almost always
multiply.
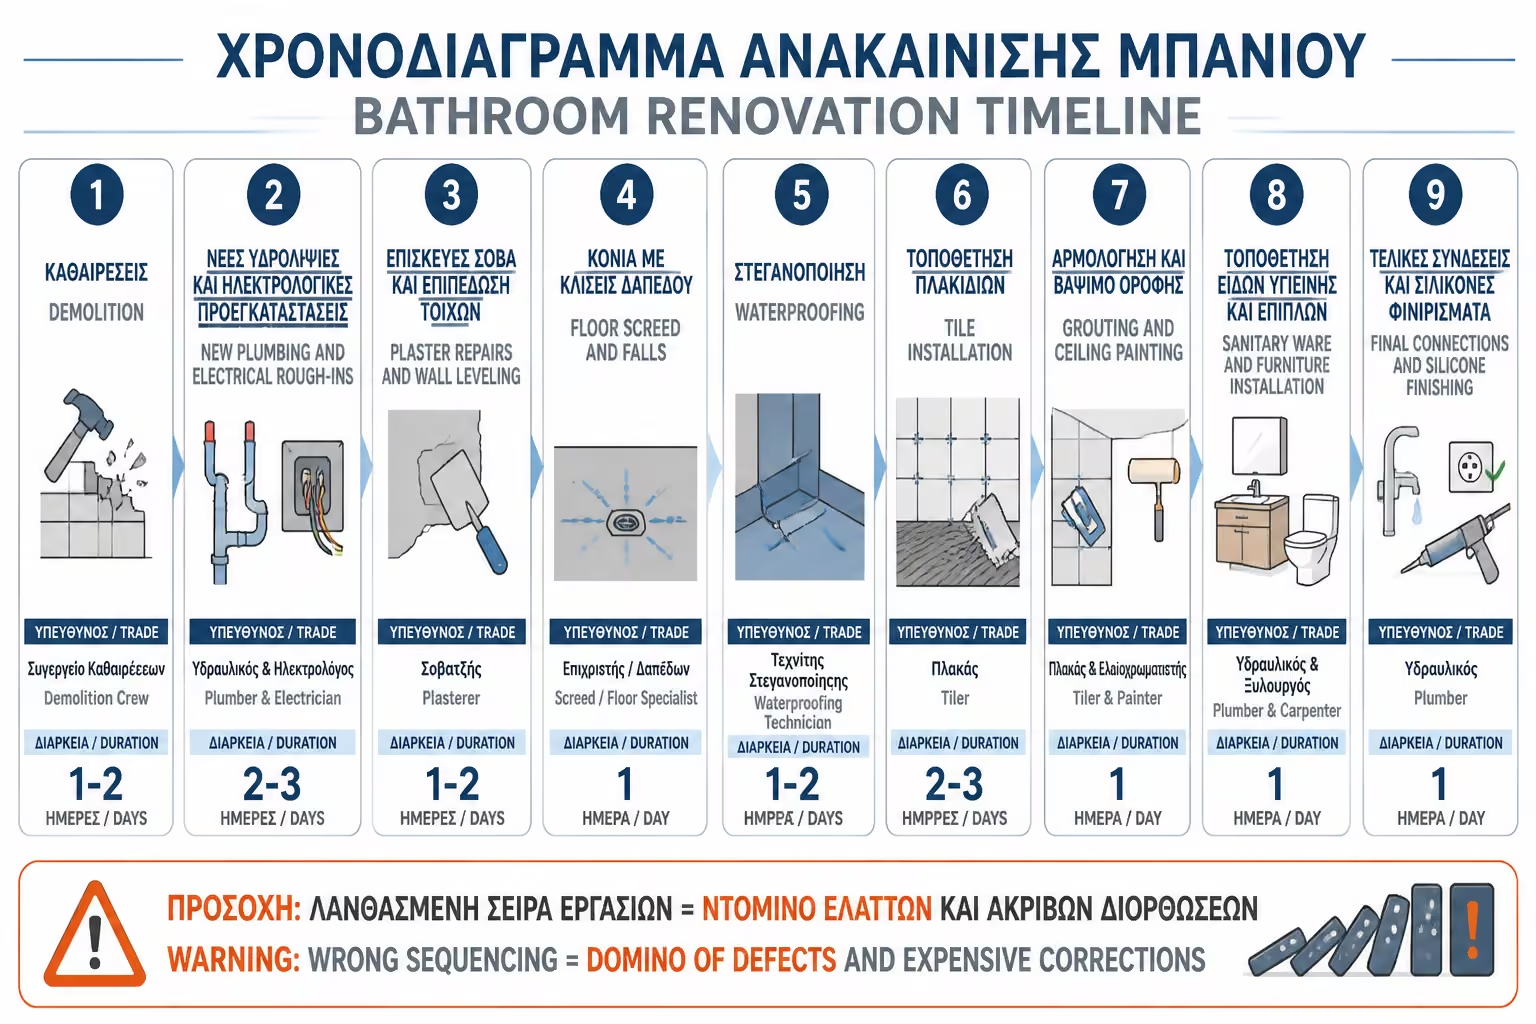
Below is the full guide to the 9 core stages, so you can see exactly
what must happen, when it should happen, and what must be fully complete
before the next step begins.
The Work Sequence at a Glance
Before looking at the detail, it helps to see the project as one
complete sequence. Each phase has its own trade and its own critical
control point.
This table works as a quick project map and helps you understand which
step must come first and which step should never begin too early.
Work Phase
Trade Involved
Critical Control Point
1. Strip-out and demolition
Demolition crew / laborers
Protecting the structure and main drainage lines
2. New plumbing and electrical routing
Plumber and electrician
Pressure-testing the new pipework
3. Wall repairs and plastering
Mason / plasterer
Perfect leveling and accurate corners
4. Floor screed
Tiler / floor technician
Correct slopes toward the drain
5. Waterproofing
Specialist technician / engineer oversight
Sealing before tiling begins
6. Tile installation
Tiler
Correct direction, joints, and leveling
7. Grouting and ceiling painting
Tiler and painter
Anti-mold materials and clean finishing
8. Installation of sanitary ware and furniture
Plumber and joiner / stone installer
Accurate fitting of equipment
9. Final connections and finishing
Electrician and plumber
Accessories, sealants, and final checks
The 9 Renovation Stages in Detail
Each stage has a specific role and should never be treated like a
formality. In practice, the success of the next step depends directly
on how well the previous one was completed.
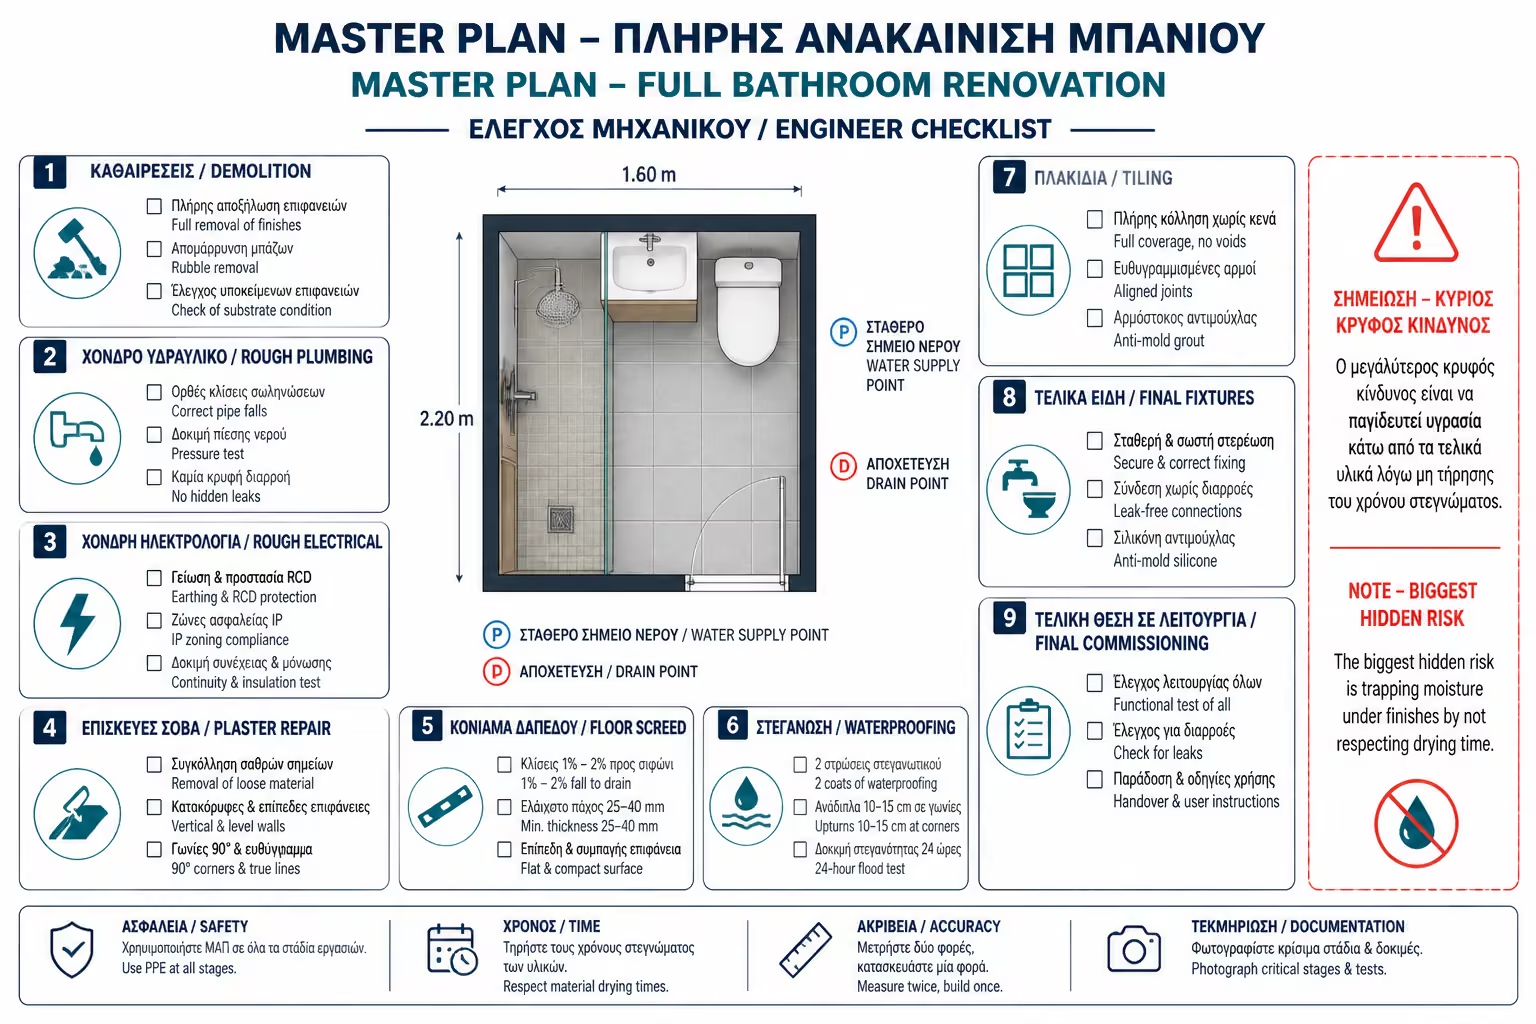
Two reminders are especially important throughout the process: debris
must be removed quickly so the room stays safe for the next team, and
the new plumbing must be pressure-tested before any wall is closed.
Phase 1: Strip-out and demolition
The renovation begins with a full strip-back of the room. Sanitary
fixtures, old tiles, plaster, and substrate layers are removed so
the real condition of the walls and floor becomes visible.
This stage needs careful control so that main drainage lines or
elements that must stay untouched are not damaged.
Phase 2: New plumbing and electrical installations
With the room opened up, the plumber and electrician mark the new
routes. Old pipework is replaced, and new lines are run for
lighting, protected sockets, and ventilation.
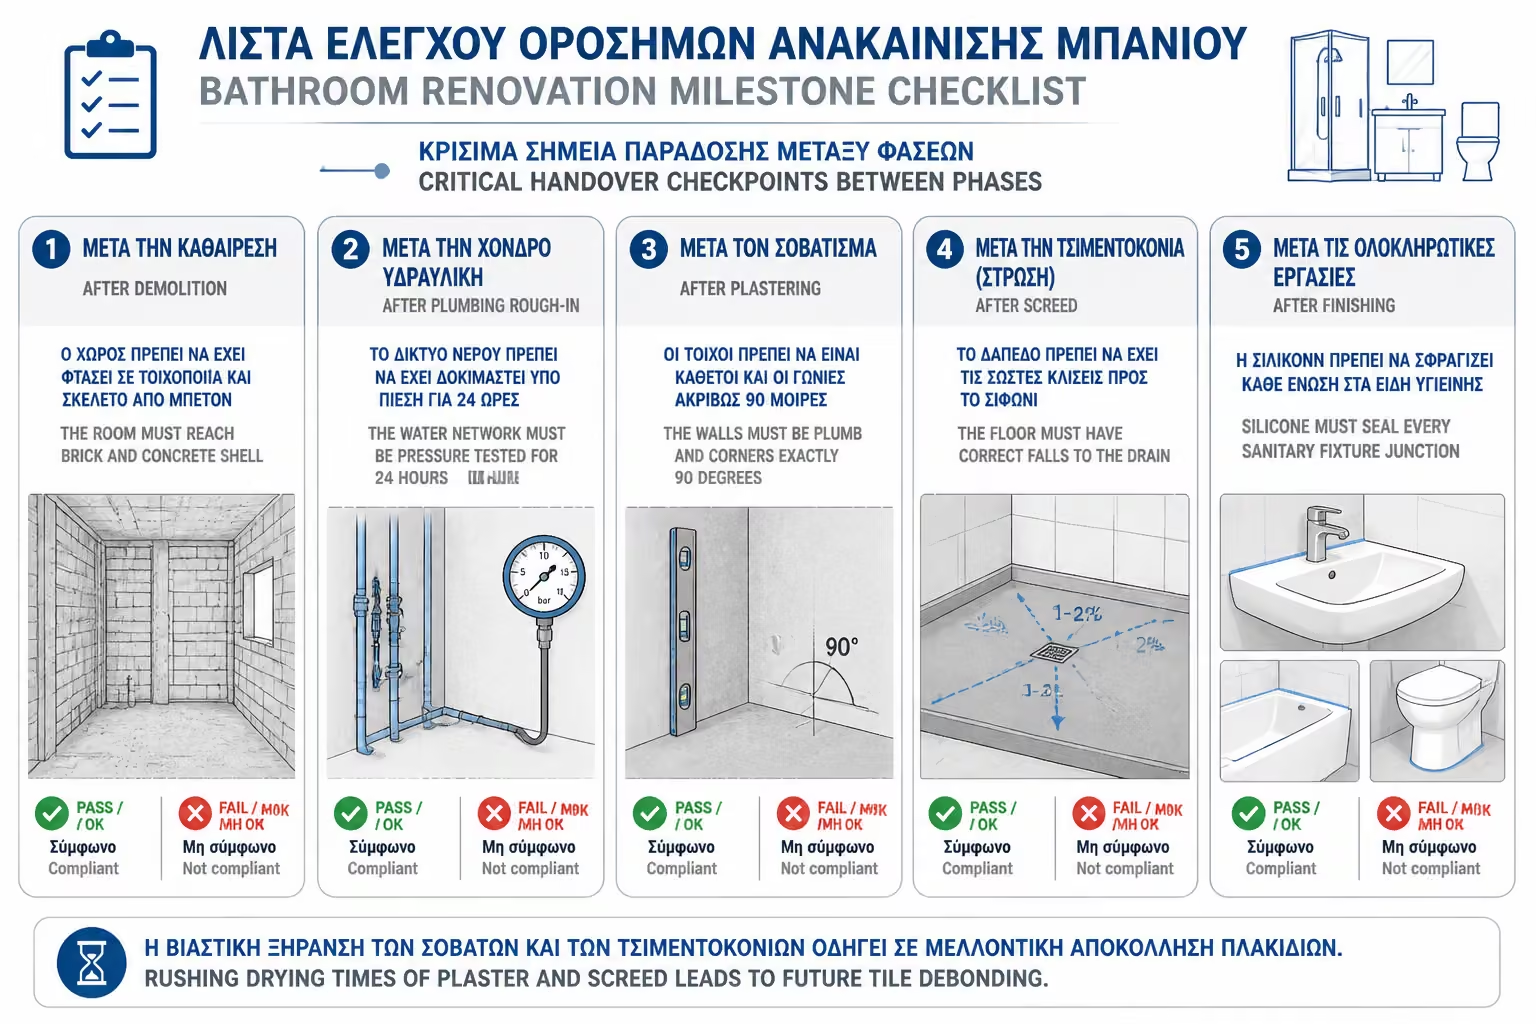
Before anything is closed, the new water network must stay under
pressure so even the smallest leak is caught early.
Phase 3: Wall repairs and plastering
The service chases are closed and the walls are replastered. This is
not a cosmetic patch-up. It is a technical prerequisite for
everything that follows.
If the walls are not properly leveled and the corners are not
accurate, the new tiles will never sit correctly, regardless of how
skilled the tiler is.
Phase 4: Floor screed and drainage slopes
The new base layer is formed on the floor. This is where the
required falls toward the central drain or linear shower channel are
created.
If those slopes are wrong, water will continue to pool permanently,
no matter how beautiful the finished bathroom looks.
Phase 5: Waterproofing
Before any tile goes in, a proper waterproofing system is applied on
the floor and especially in the shower or bath zone.
This is the invisible defensive layer that protects the bathroom
from future moisture and hidden leakage behind the finished
surfaces.
Phase 6: Tile installation
The tiler usually works on the walls first and then the floor, using
appropriate adhesives and leveling systems.
At this stage, the geometry, the grout lines, the pattern direction,
and the overall cleanliness of the finish are all decided.
Phase 7: Grouting and ceiling painting
Once the adhesive has cured, the joints are filled and the ceiling
is prepared and painted.
Anti-mold materials here are not excessive caution. They are a
sensible response to the humidity levels a bathroom has to live
with.
Phase 8: Installation of sanitary ware and furniture
The bathroom begins to take its final form. The toilet, basin,
vanity, shower enclosure, and any storage elements are fitted in
place.
Proper alignment and accurate installation here matter both for
daily function and for the final visual quality of the room.
Phase 9: Final connections and finishing
The plumber completes the final water connections, the electrician
installs switches, sockets, and lighting, and the final sealants are
applied.
This is the stage where it becomes clear whether the whole project
truly comes together, both technically and visually.
💡 The Engineer's Advice
One of the most expensive mistakes in a bathroom renovation is rushing
the drying time between stages. Plaster, screed, and waterproofing
materials all need their proper curing time before the next system is
applied over them.
If moisture gets trapped beneath adhesives, tiles, or finishes because
the project was pushed to finish a few days earlier, the problems will
show up later as detachment, swelling, or general system failure.
Never allow the drying time of the core materials to be artificially
shortened just to finish the project faster. A bathroom is a room
exposed to water, pressure, and humidity. If you rush the invisible
stages, you will pay for it later in very visible failures. A correct
renovation is not only about using the right trades in the right order.
It is also about giving each phase the right amount of time between
steps.
In the next article of this section, the dilemma becomes both more
financial and more technical: partial or full renovation? When is it
truly worth keeping older pipework to save money, and when is full
replacement the only safe path?
Final handover checklist before delivery
Before the renovation is considered complete, it needs a calm final
review. Check the floor falls, the operation of every tap and fixture,
watertightness around drains, the quality of the silicone lines, the
ventilation performance, and the cleanliness of the final finishes.
This final review is what separates a bathroom that merely “looks
finished” from one that is genuinely ready to perform without problems
from day one.