
Phase 5 - Waterproofing (Waterproofing): The Invisible Shield Under the Tiles

If you ask ten homeowners who renovated their bathroom a few years ago what the biggest mistake they made, most will tell you the same thing: they underestimated the waterproofing.

Phase 5 is the most "unpleasant" but also the most critical phase of the renovation. It is unfortunate because the applied material will be completely covered by the tiles and you will never see it again. It is critical because it is the only safety valve that prevents water from entering the structural elements of the house.

Let's dispel some myths and see how an impenetrable sealing shield is created.

1. The Big Myth: "Well, I'm going to tile, why do I want insulation?"

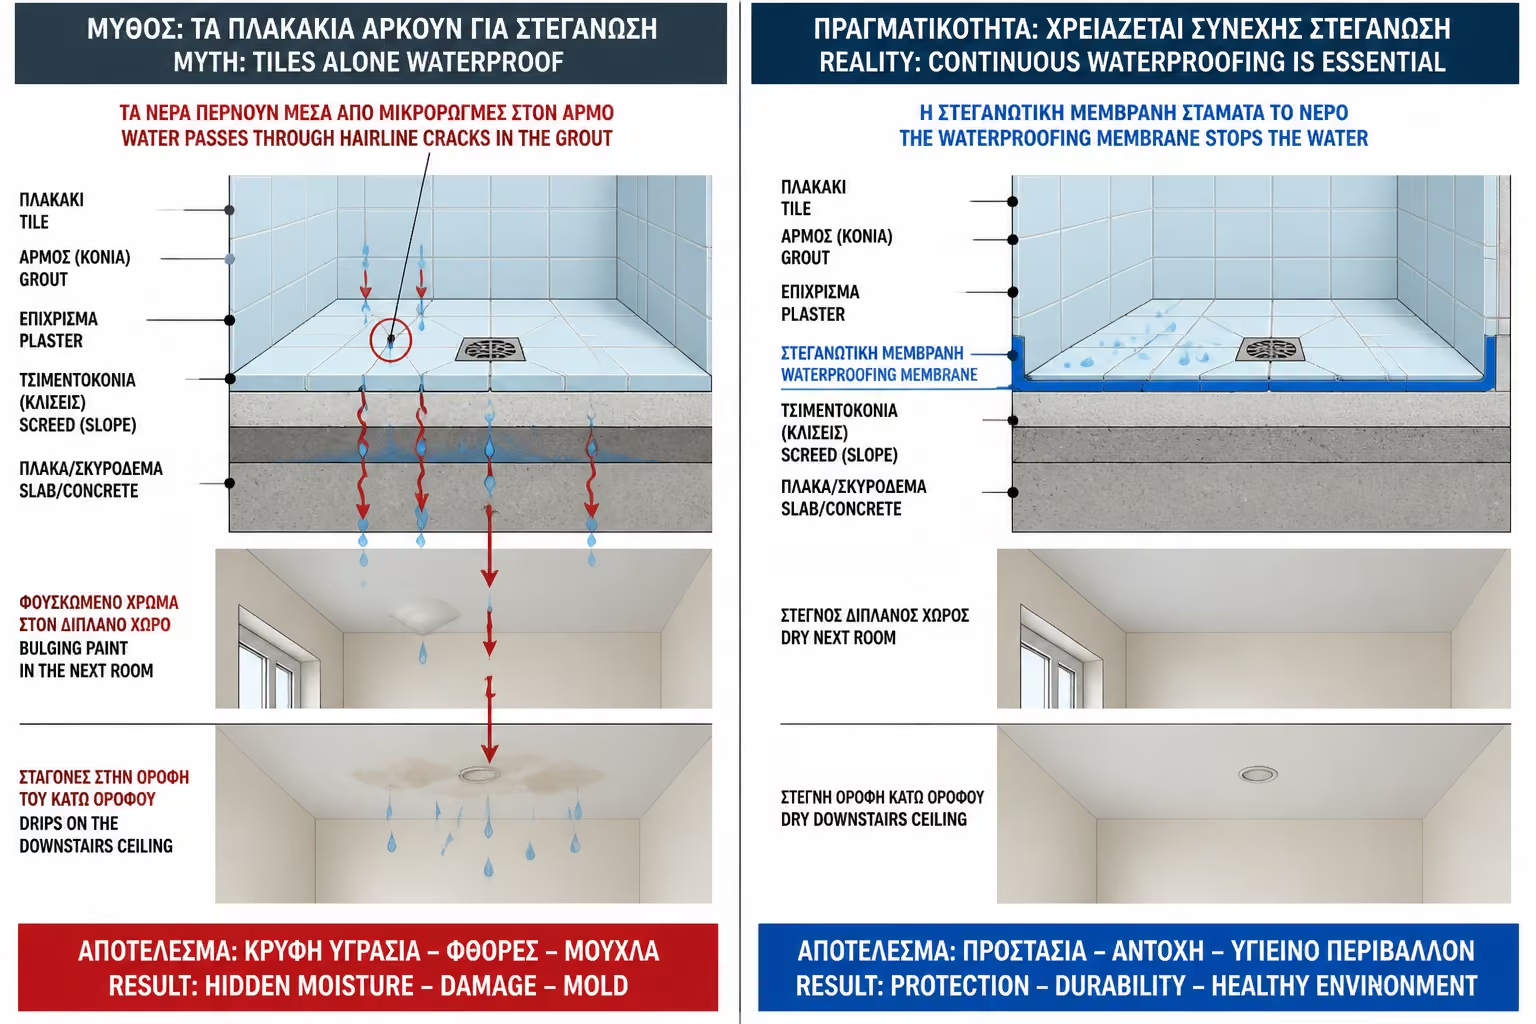
This is the classic line of the unskilled handyman or the unsuspecting homeowner. The truth is harsh: Tiles and grouts are NOT 100% waterproof materials.

Grout (even the branded one) is a porous material based on cement. Over time, the use of cleaners and contractions-expansions, the joint acquires microscopic cracks (capillaries). The shower water passes through these cracks, wets the plaster and cement mortar, and begins to travel.

The result? Bulging walls in the next room, mold behind the wardrobes and, worst case scenario, drips on the downstairs ceiling.

Illustration for 1. The Big Myth: "Well, I'm going to tile, why do I want insulation?"

2. The Sealing Materials

Illustration for 2. The Sealing Materials

Modern material technology has replaced the old tar papers with sophisticated, elastic systems:

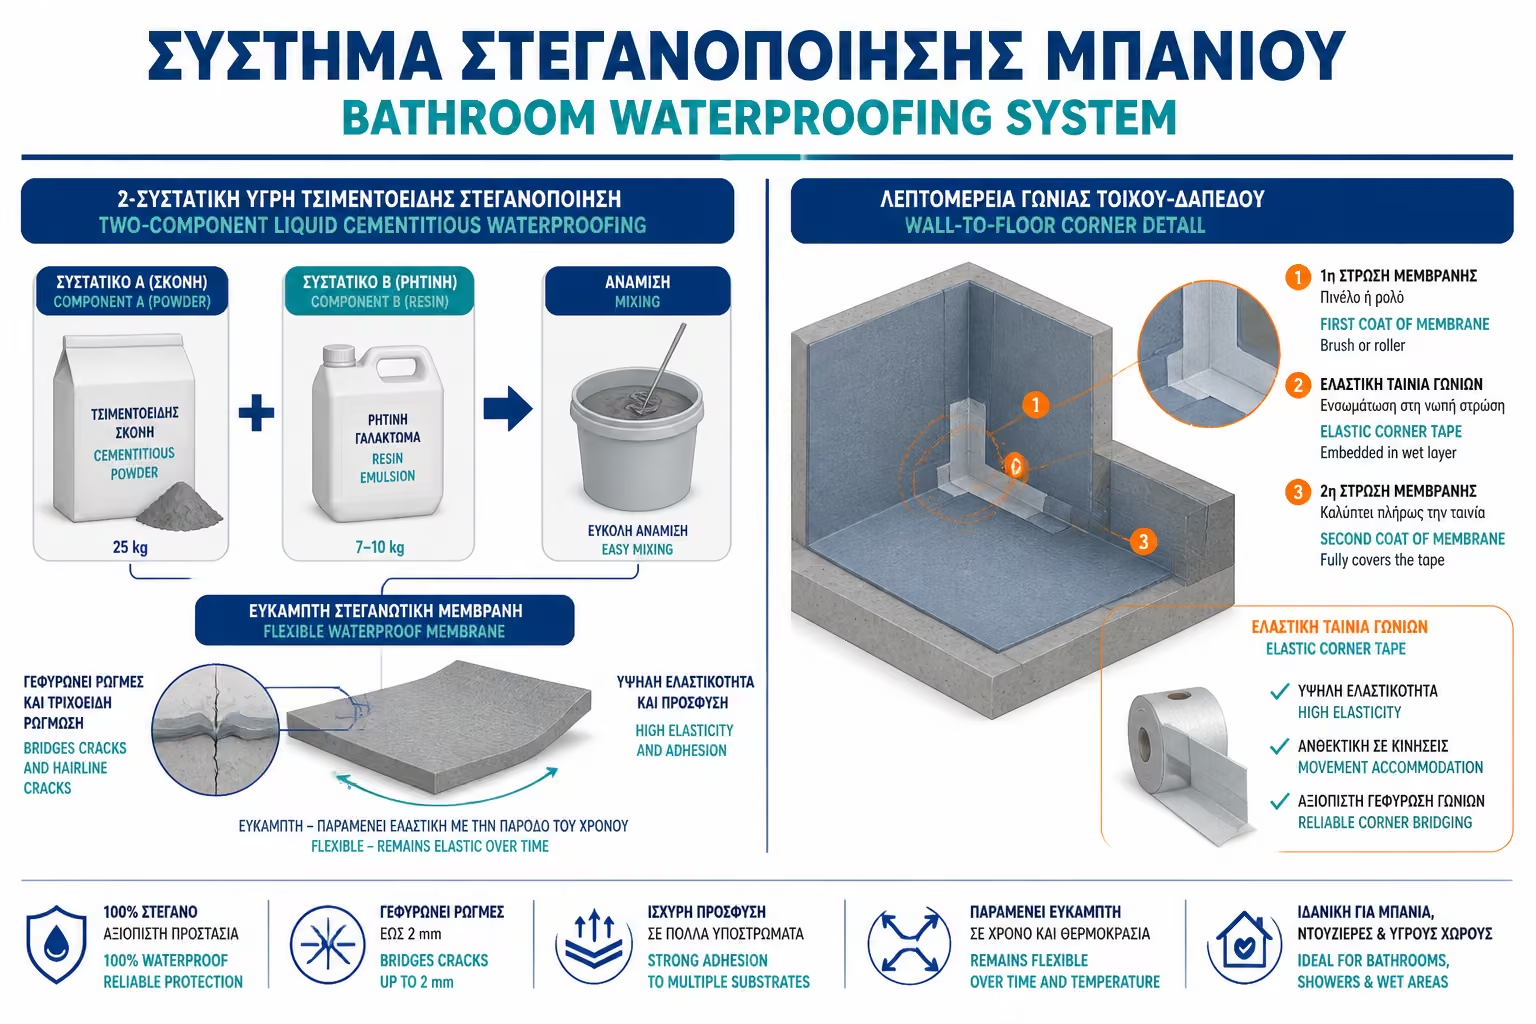
Spreadable Cementitious Mortars (2 Components)

It is the market standard. It is a mixture of cementitious powder and elastic resinous emulsion. When dry, it turns into a single, flexible membrane like rubber, which does not allow water to pass through but allows the wall to "breathe".
Elastic Waterproofing Tape (Corner Tape)

A special fabric, elastic band that is necessarily placed in the corners.

3. The Implementation Strategy: Where and How Do We Insulate?

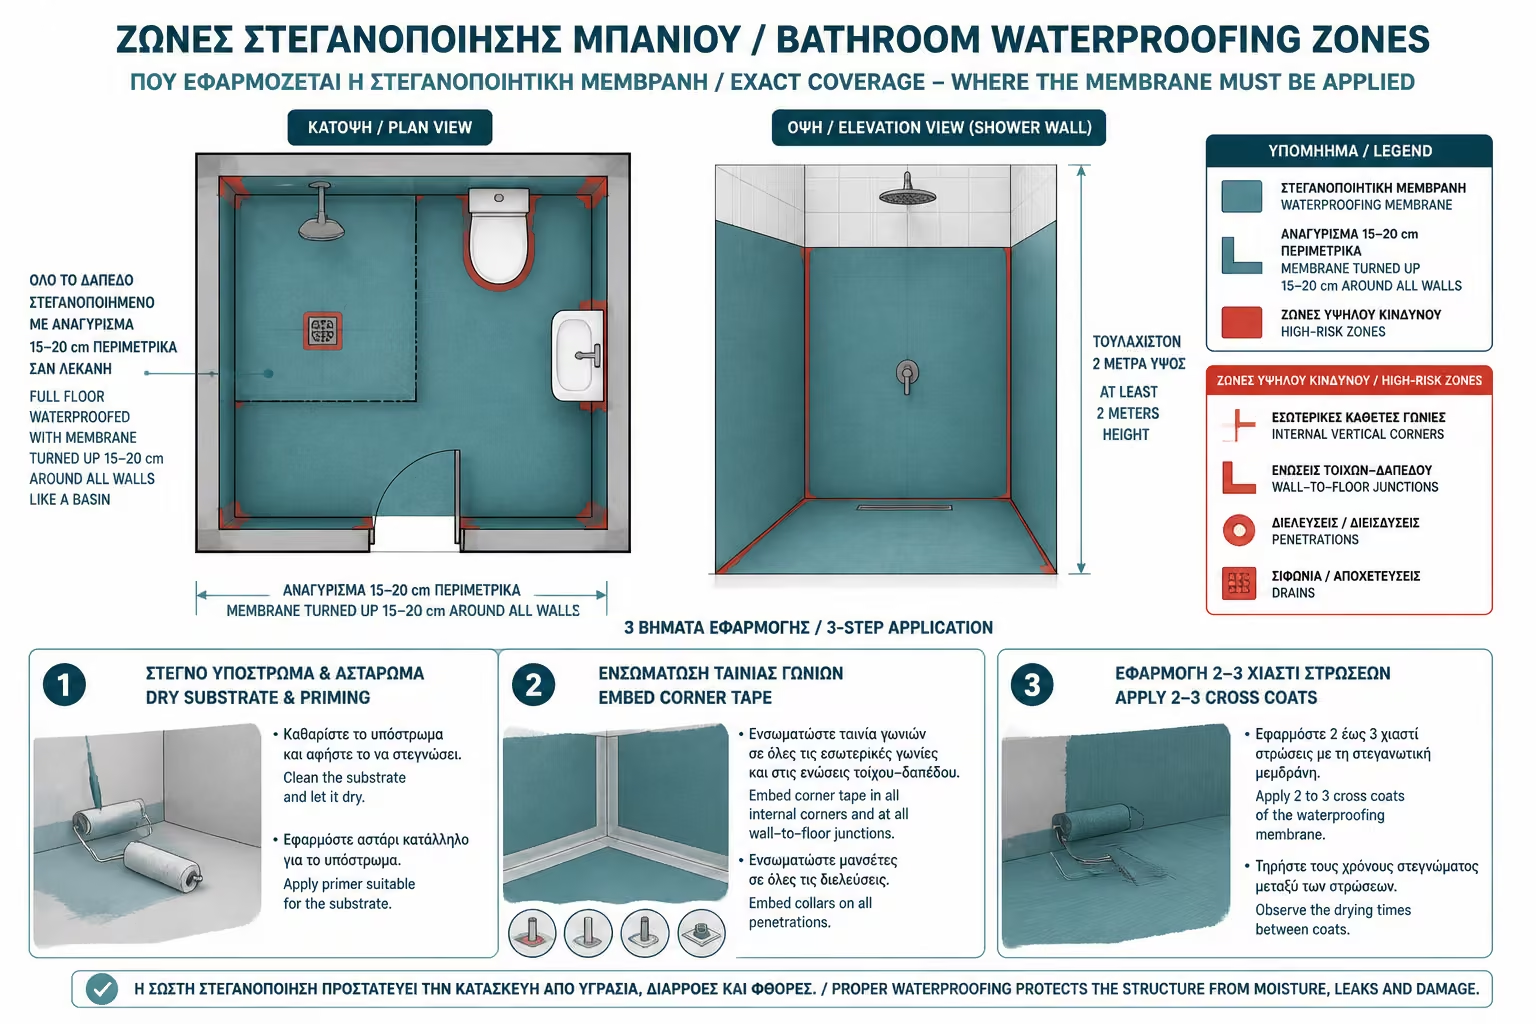
Waterproofing does not come in by accident. We focus on the high risk zones:

Illustration for 3. The Implementation Strategy: Where and How Do We Insulate?

Step 1: The Preparation

Cement mortar and plaster must be well dried. The surface is thoroughly dusted and covered with a special adhesion primer (primer) to stabilize the substrate.

Step 2: The Angles (The Achilles' Heel)

The wall-to-floor and wall-to-wall joints are where the house "works" (micro-movements). The plaster always cracks there.

The solution

A layer of waterproofing is spread in the corner, the elastic waterproofing tape is trapped inside it and a second layer is passed on top. So even if the back wall cracks, the tape will stretch without breaking the insulation.

Step 3: The "Building" of the Membrane

The material to be applied is applied with a roller or brush in at least 2 or 3 cross layers (the second coat is passed perpendicular to the first, after the previous coat has dried).

On the floor

The entire floor surface is insulated and the material is "raised" around the walls to a height of at least 15-20 centimeters (like a basin).

In the Shower / Bath

On the walls of the shower, the waterproofing must rise to a height of at least 2 meters from the floor, as this is where the water hits with pressure.

Comparison Table: With and Without Waterproofing

Illustration for Comparison Table: With and Without Waterproofing
Feature Bathroom with Proper Waterproofing 🛡️ Bathroom WITHOUT Waterproofing ❌
Resistance to Time 20+ years without a trace of internal moisture. Show problems at 2-5 years.
Air Quality Healthy environment, without mold and spores. Persistent musty smell and appearance of black spots on the joints.
Relations with Neighbors Absolute tranquility. Risk of litigation for damage to the lower apartment.
Application Cost Minimum (about 5% of the total budget of the bathroom). Zero initially, huge repair costs down the road.

💡 The Engineer's Advice

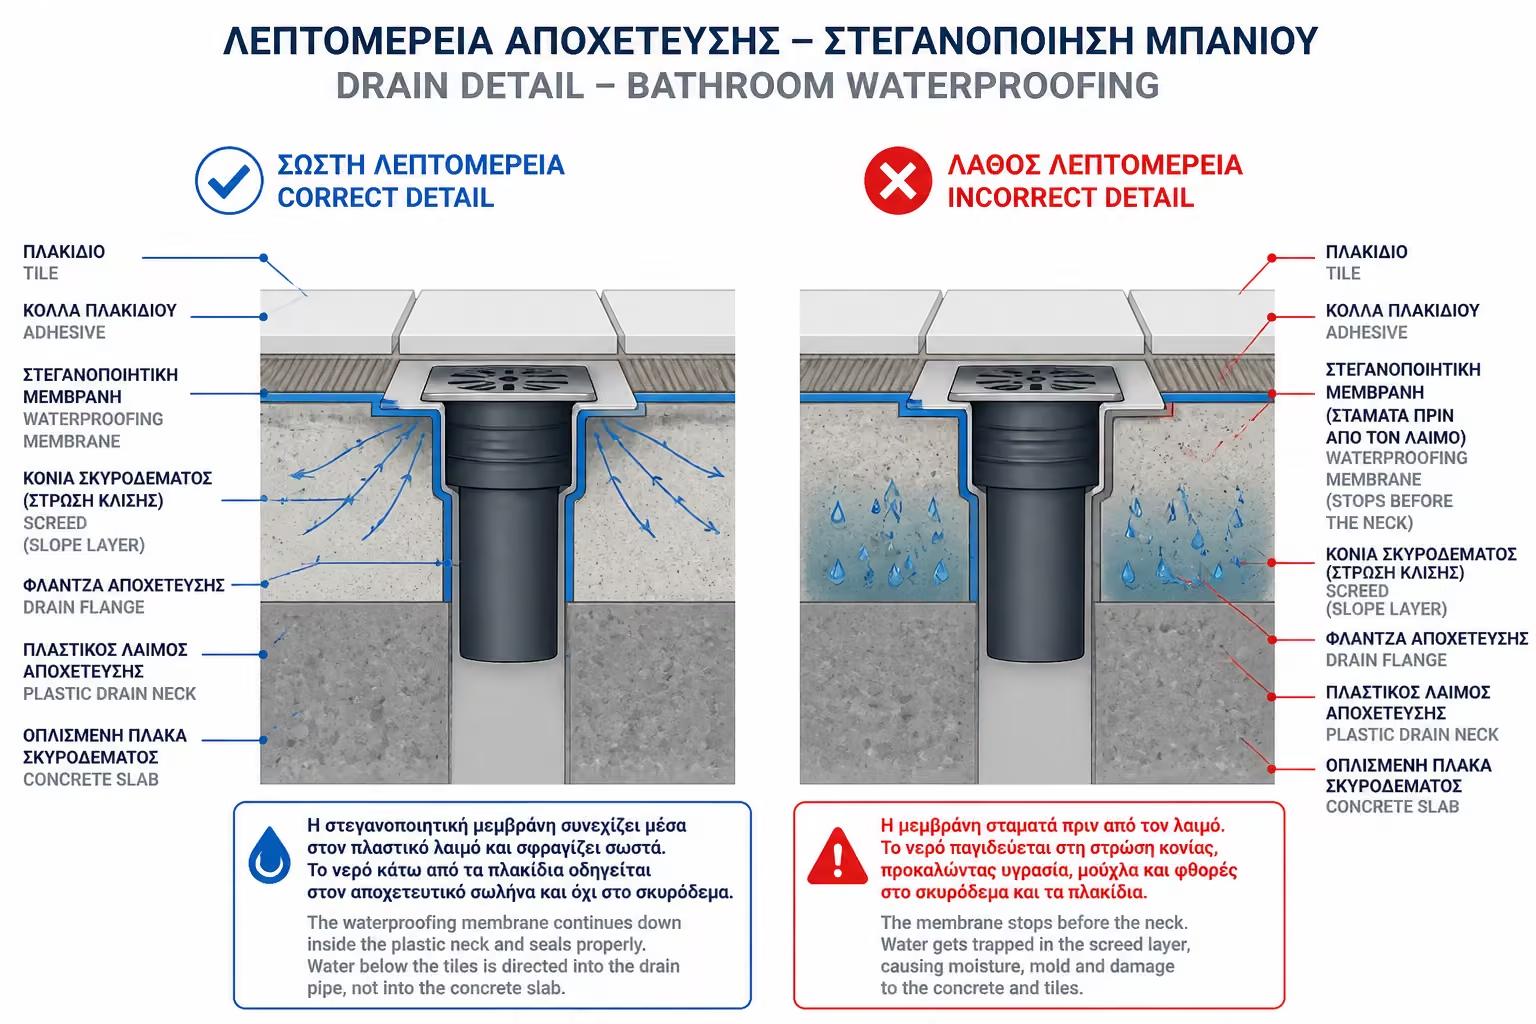
"To make sure the handyman did 2 or 3 coats of waterproofing and didn't skimp on the material, ask him to use a different color on each coat. Many companies put out the same insulation material in gray and white or blue. If the first coat is gray and the second coat is blue, you can tell at a glance if there are gaps or if the wall is covered evenly. Also, pay close attention to the neck of the siphon floor: the insulating material has to penetrate and 'quench' inside the plastic siphon, so that if the water passes under the tile, it will slide off and end up in the drain instead of the concrete slab."

The waterproofing is complete and the bathroom is now completely shielded.

In the next article we move on to the most creative and visible phase of the renovation: Phase 6 - Tiling & Grouting. We will see how to choose the right layout, what are leveling systems (clips) and how to choose the right grout.

Related Articles

Preview