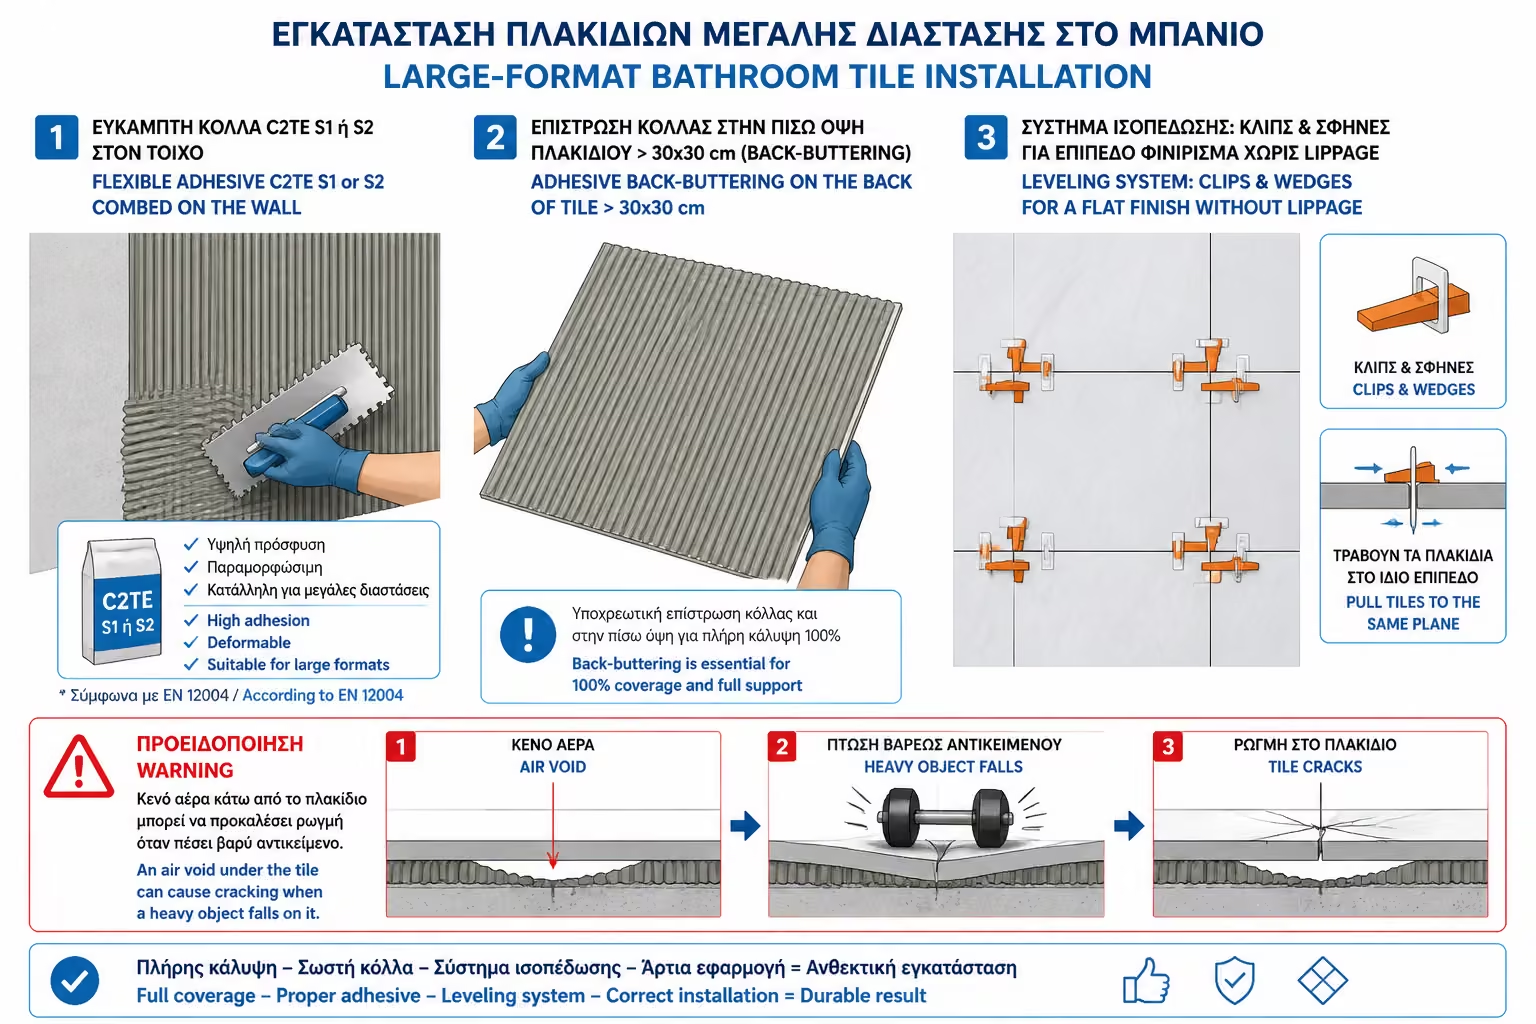
Elastic Adhesives (Category C2TE S1 or S2)
Large tiles are strained by contractions-expansions. They need reinforced adhesives with high elasticity to never peel off.
After weeks of demolition, dust, pipes and invisible insulation, we finally reached the moment of vindication. Phase 6 is the most impressive phase of the renovation, as in just a few days the bathroom is visually transformed from a gray construction site to a ready, clean and beautiful space.
Laying the tiles is a purely artistic but also deeply technical work. A good tile is not judged only by how quickly it sticks, but by how it plans the "set-up" of the space before even opening the first bag of glue.
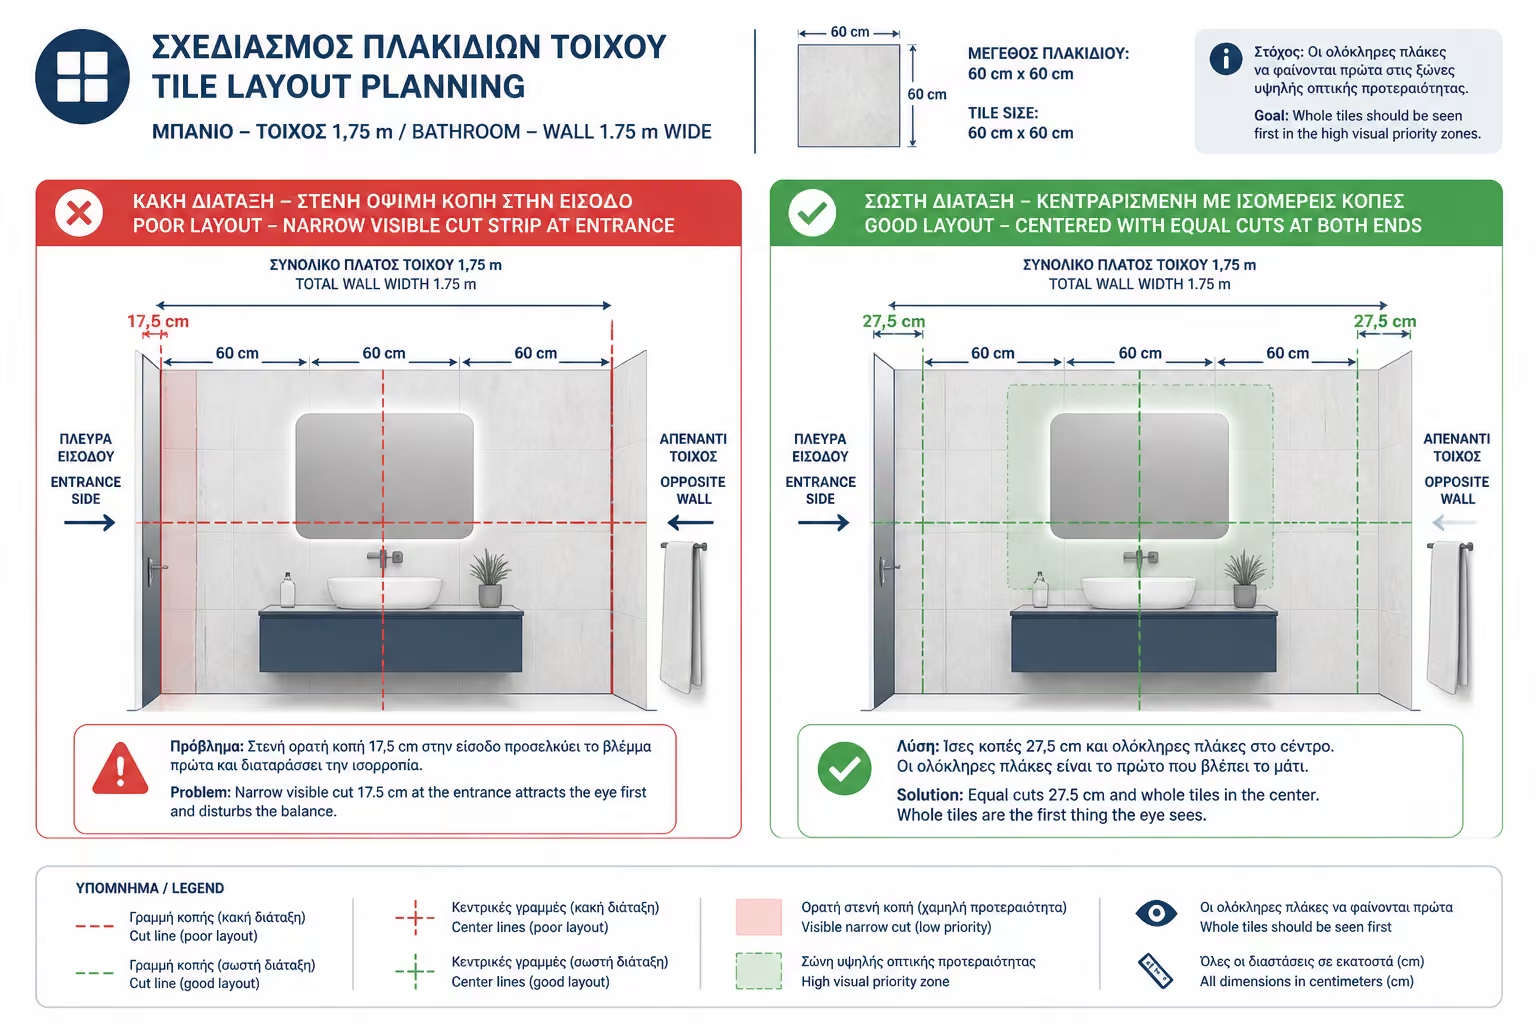
Before glue goes into the wall, the right craftsman does a layout study. He places the laser (or the traditional level and thread) and measures the dimensions of the walls.
The golden rule is one: Whole tiles are put in where the eye first sees them (eg entering through the door, around the mirror), while cut tiles ("slices") are hidden in blind corners, low on the floor or behind the basin.
If your wall is 1.75m long and the tile is 60cm, the tile must decide whether to start with the whole and leave a 55cm piece. on the edge, or whether to center the wall by putting two whole pieces in the middle and two equal pieces at the ends. This detail distinguishes an amateur job from a high-end renovation.
Forget the way tiles were laid 20 years ago. Modern tiles (especially large granite tiles, e.g. 60x60, 60x120 or 80x80) have zero absorbency and require special handling:
Large tiles are strained by contractions-expansions. They need reinforced adhesives with high elasticity to never peel off.
For tiles larger than 30x30 cm, the adhesive should be spread with the combed trowel both on the wall/floor and on the back of the tile itself. This ensures that there are no air gaps underneath. If there is an air gap in the floor and something heavy falls, the tile will break like glass.
They are the plastic parts that are placed between the tiles during installation. They push the tiles so that they are all exactly level. Thus, the annoying "teeth" (raised edges) that you sometimes feel when walking barefoot completely disappear.
Joints are not just there for aesthetics; they are the "hangings" of the tiles. They allow the system to move without the tiles being pressed together and cracking. Installing zero-joint tiles in a bathroom is expressly prohibited.
When the glue dries (usually after 24 hours), the clips are broken with a light tap and the joints are thoroughly cleaned to accept the grout.
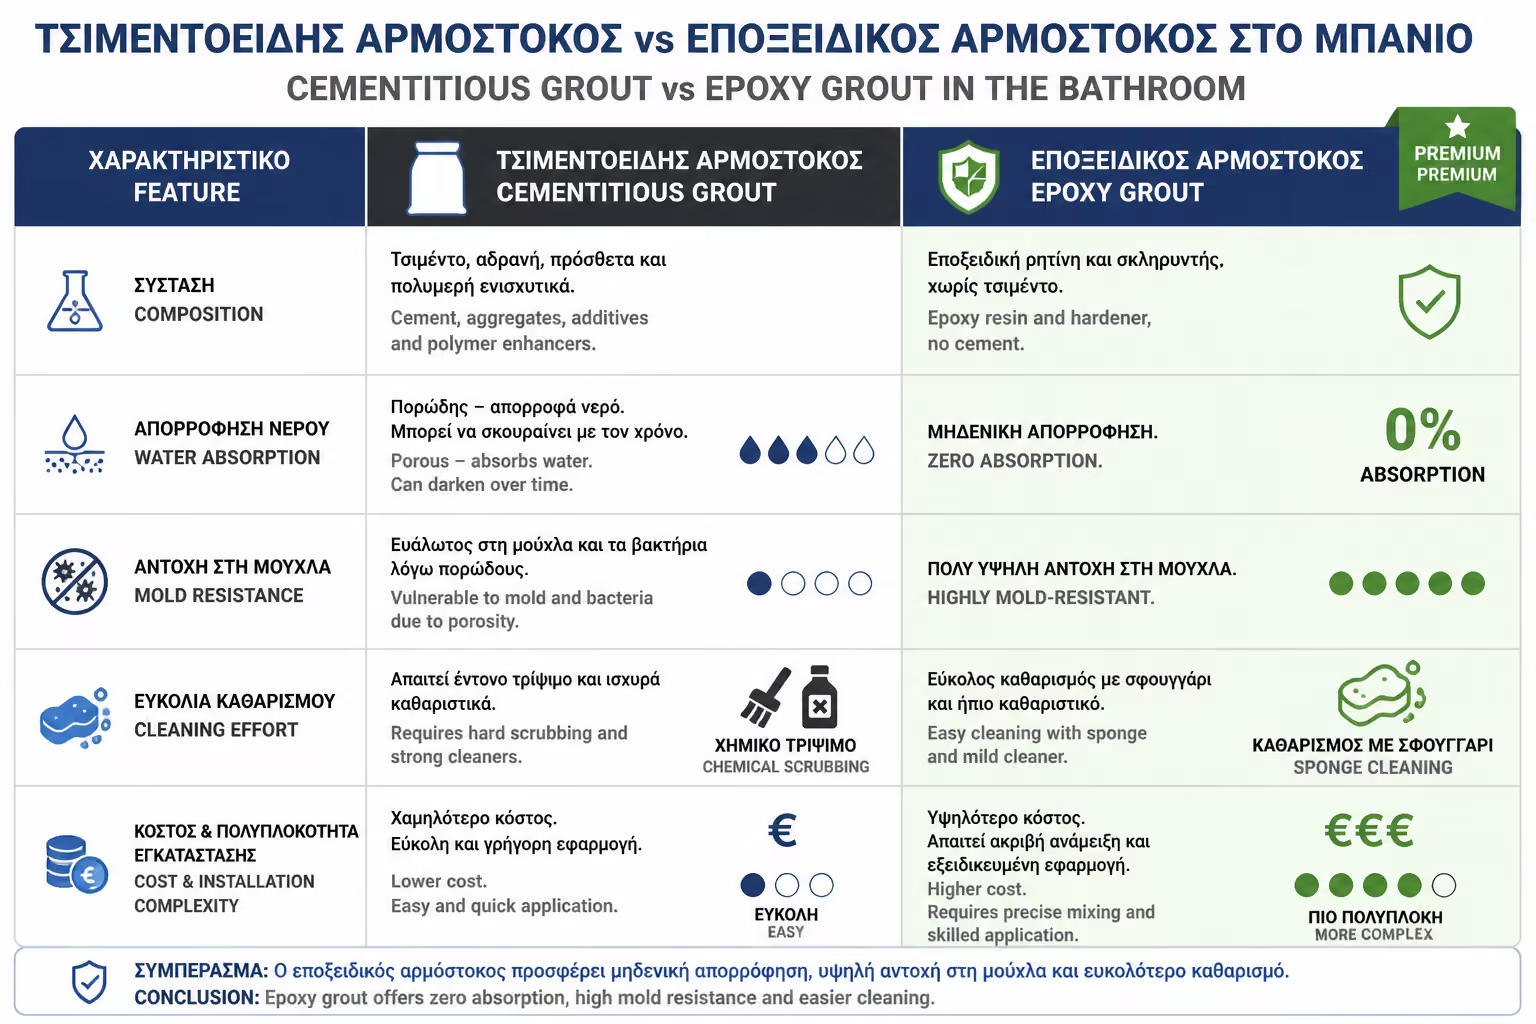
Choosing the right grout will determine how easy your bathroom will be to clean in the future.
| Feature | Cementitious Grout (Classic) | Epoxy Putty (Resinous) 💎 |
|---|---|---|
| Composition | Cement base and polymer additives. | Two-component base (resin and hardener). |
| Absorption | Small to medium (porous material). | Zero. It behaves like glass/plastic. |
| Mold resistance | It can turn black over the years if the bathroom is not ventilated. | Absolute durability. It never grows mold or bacteria. |
| Cleaning | Requires chemical scrubbing if stained. | It cleans very easily with a simple pass with a sponge. |
| Cost & Placement | Economical, simple and quick to implement. | Expensive material, requires a skilled craftsman (dries quickly). |
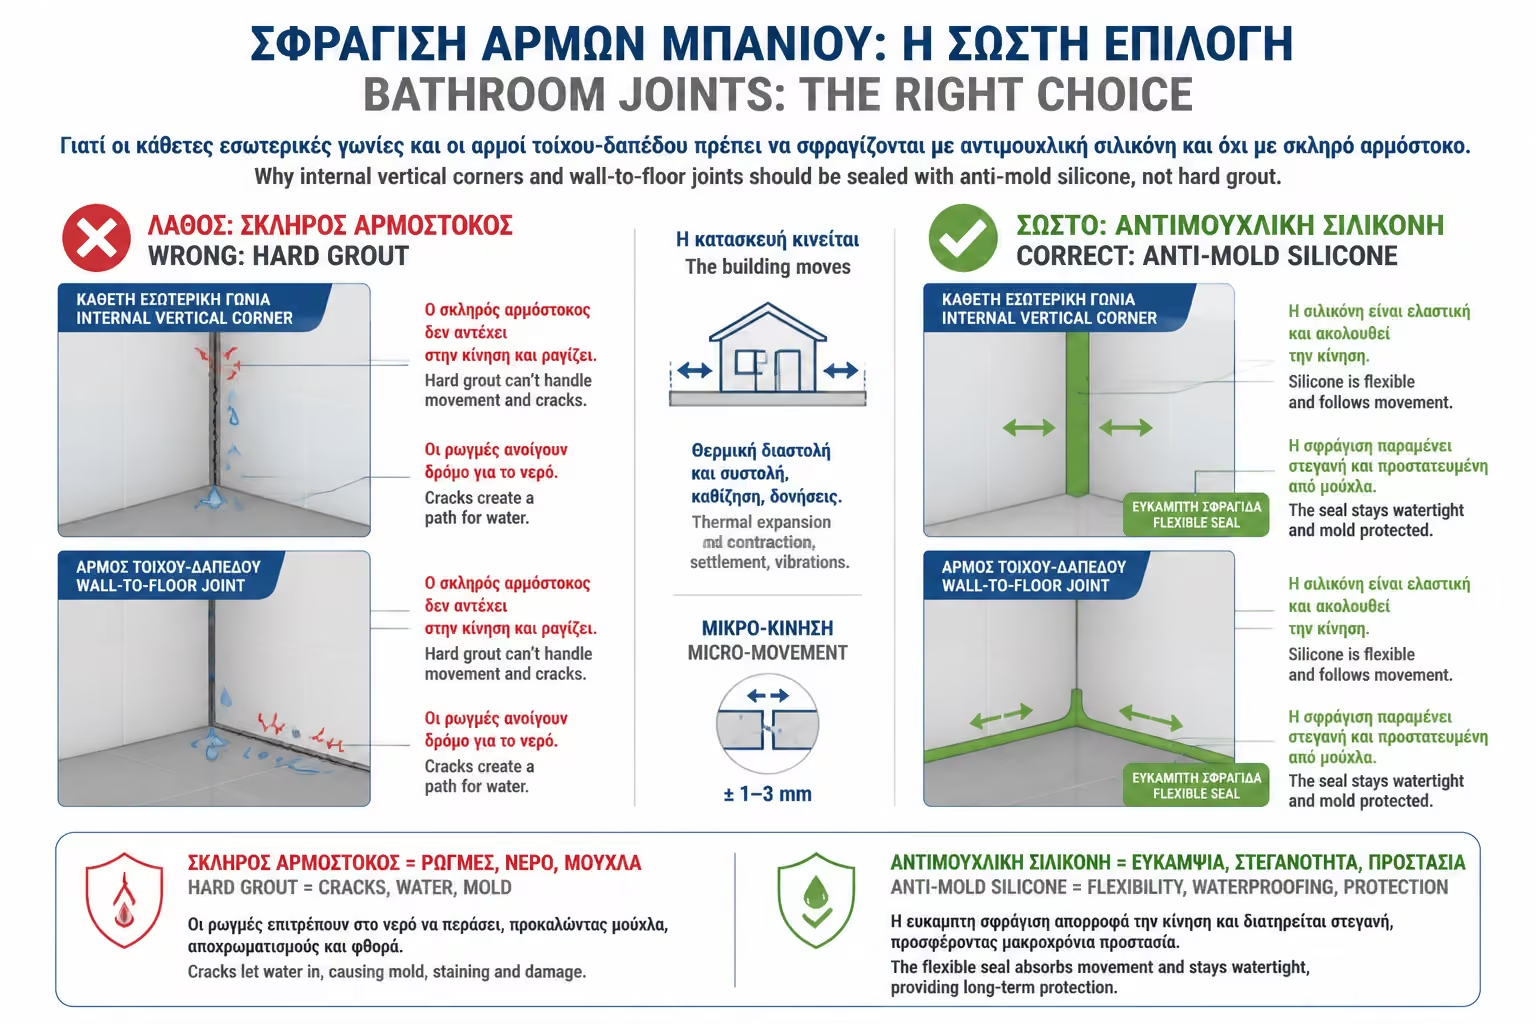
"Note a critical detail that many tilers forget in their haste: In the interior vertical corners of the bathroom (where one wall joins the other) and where the wall meets the floor, DO NOT apply regular grout. Due to the micro-settlements and expansions of the building, the hard grout in these corners will crack and come off in the first time. In these places, the joint should be left empty and finally sealed with a fungicidal silicone in the exact same color as the grout. The silicone is elastic, absorbs movements and will never break, while ensuring that water will not get behind the tiles."
The tiles have been installed, the joints have dried and your bathroom now looks beautiful and spotless.
In the next and final article of the series we move on to completion: Phase 7 - Sanitary Ware, Furniture & Accessories. We will see how the basin, the furniture, the faucets and the highlight of every modern bathroom are properly placed: the glass cabin.
Are you ready to see the final result?
Return to category.
Go to categoryReturn to the central guide.
Go to guide