
Inside a built shower
Wrong Floor Slopes: The Construction Failure That Leaves Water Pooling After Every Shower
Floor falls are one of the quietest but most important technical details in a bathroom renovation. When they are correct, water naturally moves to the drain and the room dries without anyone thinking about it.
When they are wrong, the bathroom may still look brand-new but work badly: standing water, corners that never dry, blackened grout, salt deposits, and a constant damp feeling.
The difficult part is that the failure usually becomes obvious only after the tiles are finished. At that point, the fix is rarely minor. It often means opening the floor and rebuilding the base.
1. What Floor Slopes in a Bathroom Actually Are
Floor slopes are the controlled small falls shaped into the substrate so water can move toward the drain. They do not need to work the same way in every part of the bathroom, but they are essential anywhere water regularly lands.
Inside a walk-in shower
Around a drain or channel
In small bathrooms without clear wet-zone separation
On floors with large tiles that complicate geometry
Where fast drying is part of the goal
A correct slope is subtle but decisive. It must be strong enough to move water, but not so aggressive that the floor feels awkward underfoot.
2. Why Wrong Slopes Become Such a Serious Problem
This is not mainly an aesthetic issue. It is a daily-use, safety, and cleaning issue. A bathroom with wrong slopes can look polished and still become irritating every single day.
Standing water after showers
Moisture that stays for hours
Higher slip risk
Salt marks and staining on the floor
Blackened grout and mould
Water escaping the shower zone
Damage to furniture, trims, and frames
Constant wiping after use
3. The Classic Symptom: Water That Stays on the Floor
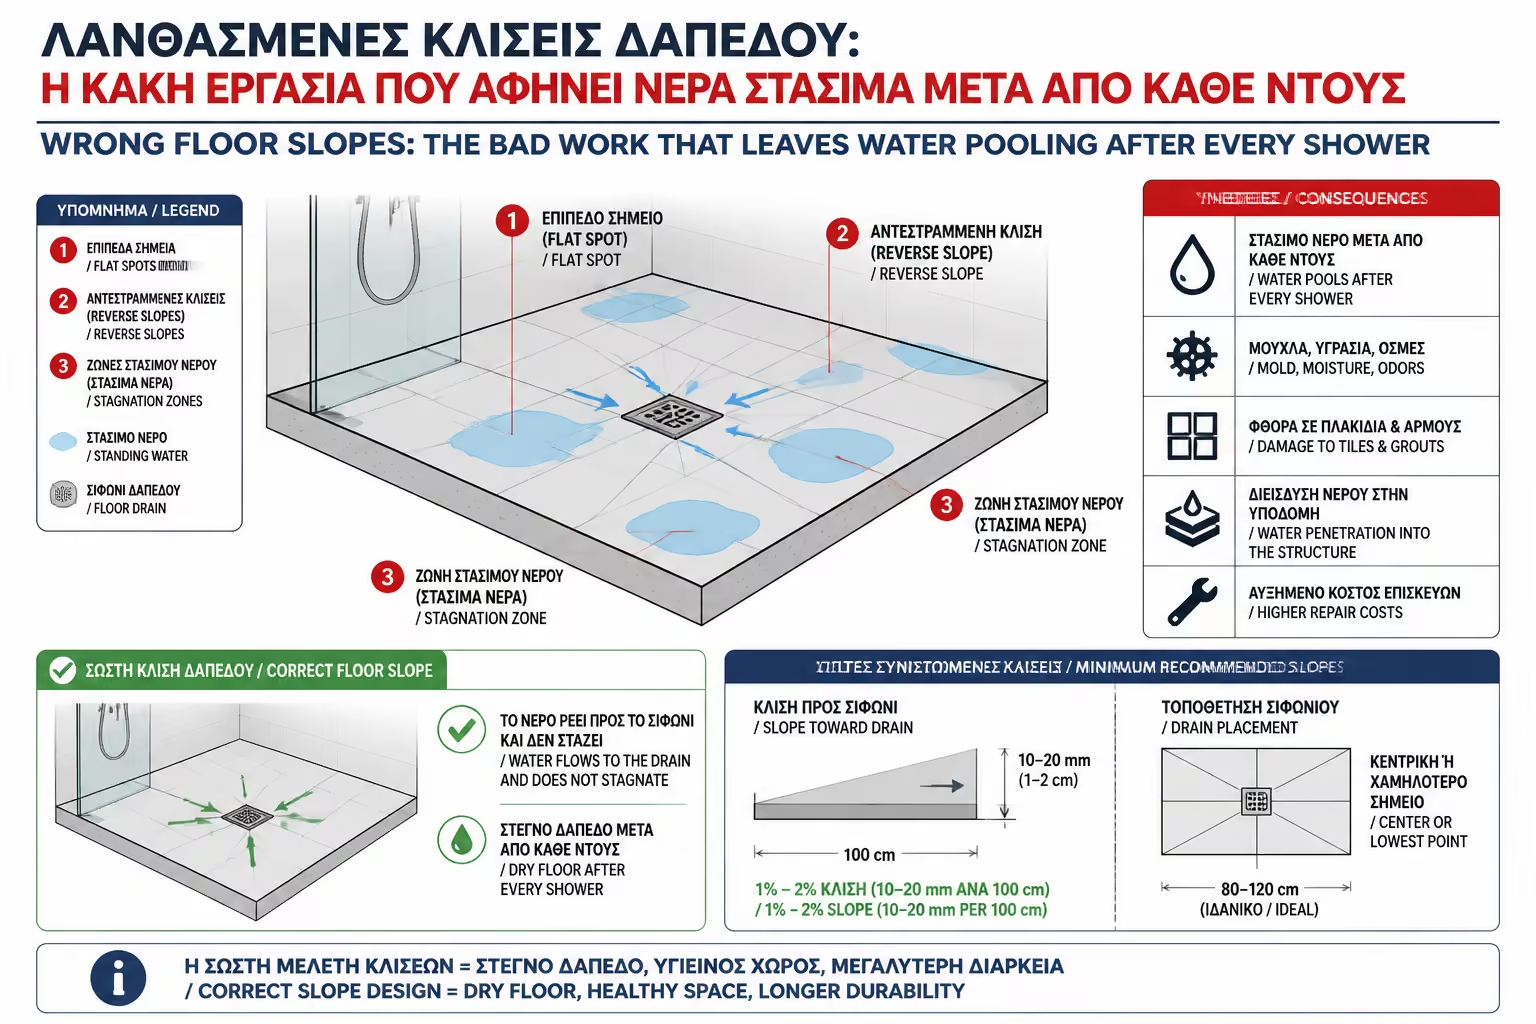
The clearest sign of bad floor geometry is simple: the water does not go where it should. If you repeatedly see water left behind after a shower, the issue is construction-related, not a cleaning habit.
In most cases, that means hollows, reverse slopes, or bad levels around the drain.
In the middle of the floor
In corners that never dry
Outside the shower zone
Around the toilet
In front of the vanity
Next to the drain instead of inside it
4. Where These Mistakes Usually Happen
Bad drain position
If the drain is too close to a wall, too far from the wet zone, or placed at the wrong level, shaping reliable falls becomes much harder.
Poor screed work
The substrate defines the real geometry. If the screed is rough or inconsistent, the tiles cannot magically repair the mistake.
Large tiles without planning
In compact showers with central drainage, large tiles complicate the level changes and often require pre-planned cuts.
Bad channel installation
A linear drain can be excellent, but only if its height, location, and one-way fall are designed correctly.
No water test before closure
If nobody checks the way water moves before the floor is closed, the problem appears only when it has become expensive.
5. Built Showers: The Highest-Risk Area
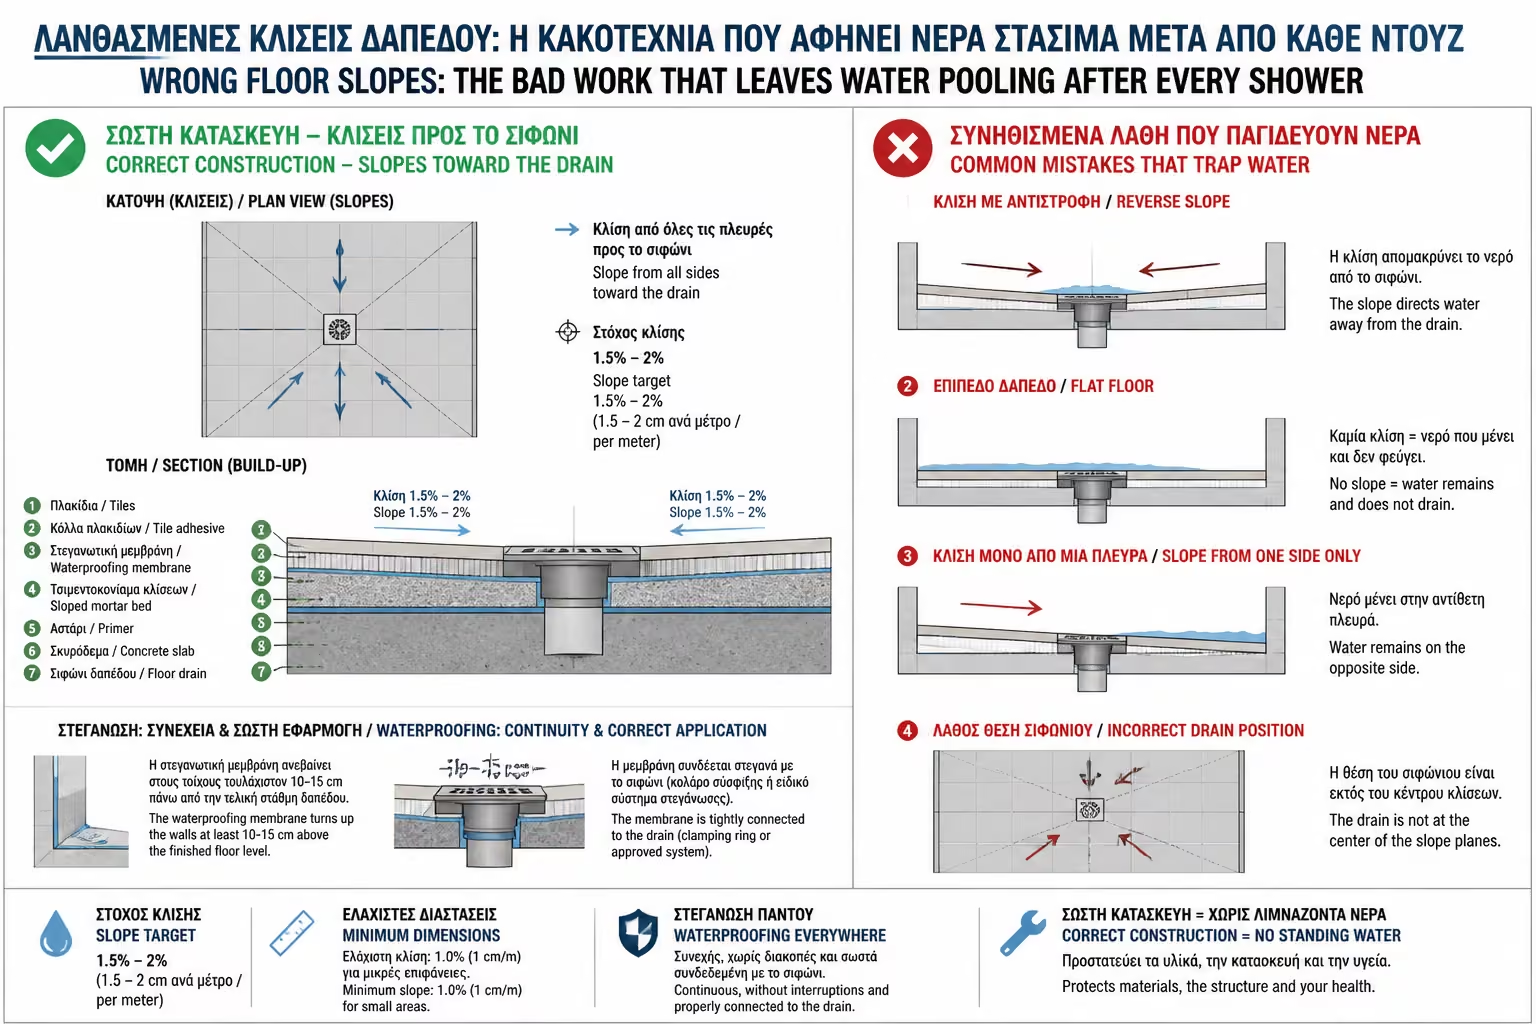
A built shower can look excellent, but technically it is more demanding than a ready-made shower tray. Here, the falls, the drain, the waterproofing, and the tile format all have to work together.
If someone says “we will sort it out later,” the risk of a bad result immediately goes up.
What must already be decided
Drain or channel location
Water-flow direction
Tile type
Required cuts
Shower screen or walk-in logic
How the rest of the bathroom is protected
What goes wrong without that planning
Water pooling inside the shower
Water spilling out
Uncomfortable walking geometry
Difficult cleaning
Stress on grout and sealants
Expensive later corrections
6. Walk-in Showers: Beautiful but Demanding
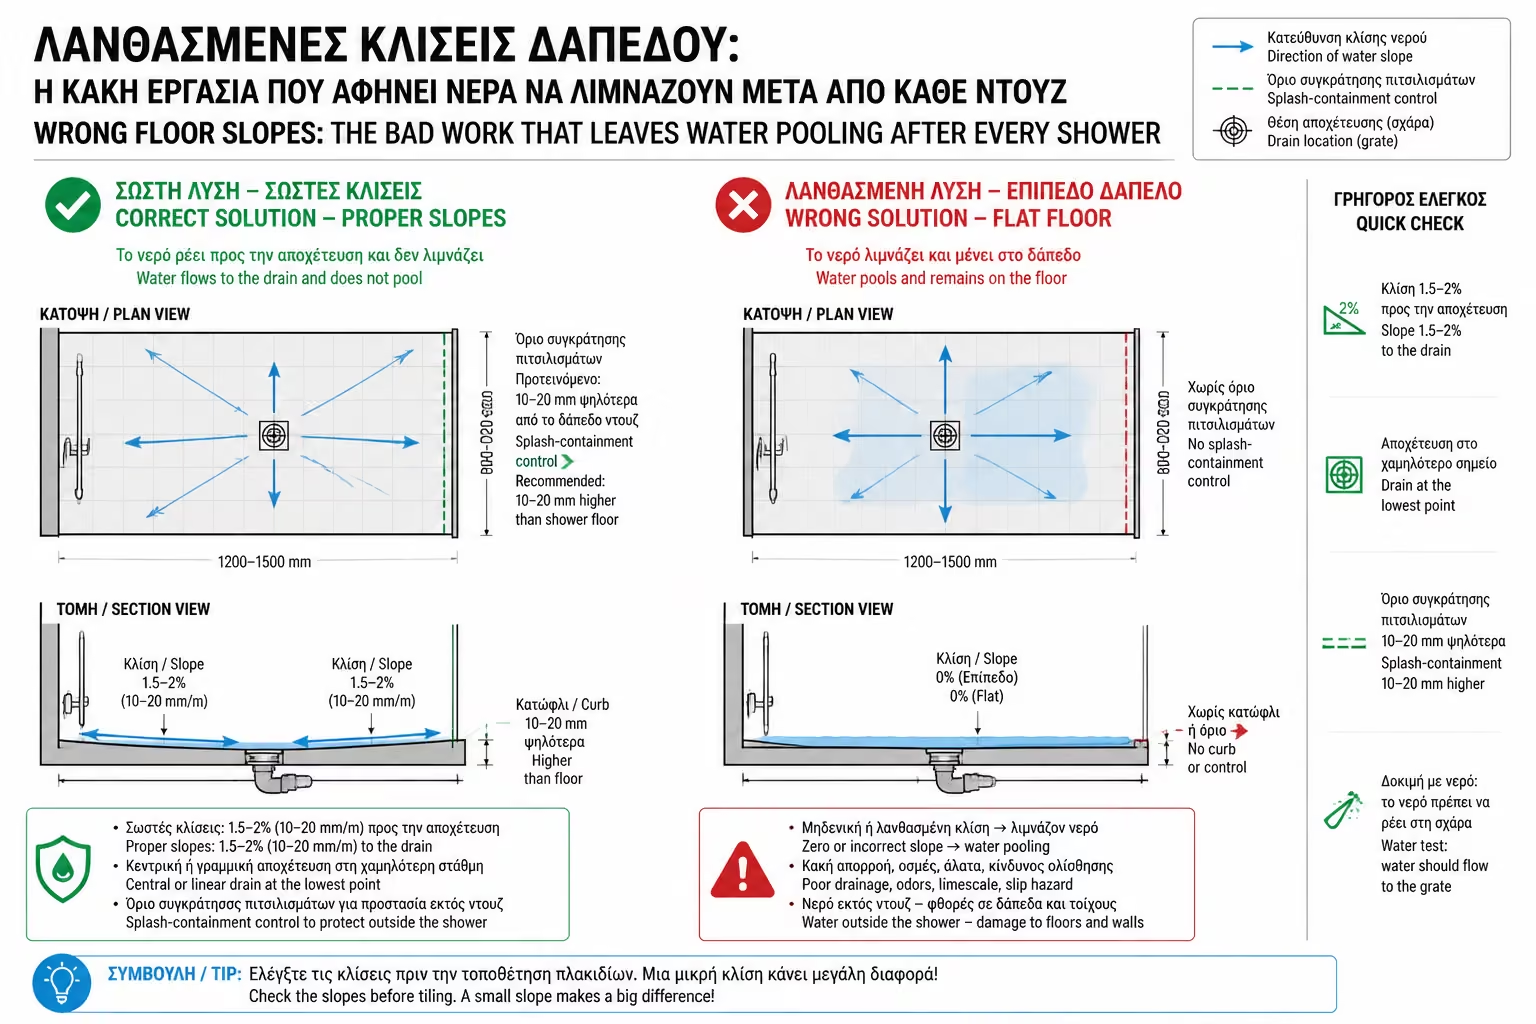
Walk-in showers look clean and modern, but they do not forgive bad floor geometry. Because the wet area is usually more open, even a small directional mistake can leave the whole bathroom wet.
In a walk-in layout, geometry matters more than the elegance of the visual concept.
Typical problems
Water escaping past the glass
Wet floor across the room
Risk to vanity and door frame
Blackened grout and damp odour
What must be studied
Glass length
Shower-head position and spray direction
Drain location
Distance from vanity and door
Slip resistance
Need for a subtle threshold or separator
7. How Much Slope Is Usually Needed
The exact fall depends on the shower type, the drain type, the tile format, and the room geometry. In practice, the shower zone often works in the range of roughly 1% to 2% toward the drain or linear channel.
About 1 cm drop per 1 m for a 1% slope
About 2 cm drop per 1 m for a 2% slope
Direction matters as much as percentage
Too much slope becomes awkward underfoot
8. How Tile Choice Affects the Slopes
Smaller tiles or mosaics
They adapt more easily to multi-directional falls, especially with central drainage in compact shower areas.
Large-format tiles
They create a cleaner look, but they make level transitions harder and require more precise cut planning.
Linear drains
They pair better with large-format tiles because they allow a one-way fall, provided the channel is set correctly.
Practical rule
The final tile should be chosen before the final slope geometry is locked, not after.
9. How to Check the Contractor Before the Tiles Go Down
You do not need to become a specialist to protect yourself. You only need to ask for simple, concrete proof before the base disappears under the finish.
Ask about the path of the water
The answer should be specific: where the water starts and exactly where it is meant to end up.
Ask for a level or laser check
The fall should not depend on “it looks right.” It should be demonstrable.
Ask for a water test
A controlled test in the shower zone reveals early whether the flow actually reaches the drain.
Keep photos
Photos of the base, waterproofing, and drain before tiling are extremely valuable if anything is disputed later.
10. Why You Should Not “Fix Everything with Tile Adhesive”
Tile adhesive is not a slope-forming material. If someone tries to rescue a bad base by adjusting everything during tile fixing, they usually create a second layer of problems.
Uneven adhesive thickness
Weaker adhesion
Voids below the tiles
Unstable or hollow-sounding tiles
Wrong finished levels
The original drainage problem remaining in place
11. Slopes and Waterproofing Must Work Together
Slopes and waterproofing are different tasks, but one does not replace the other. The falls direct water toward the drain. The waterproofing protects the substrate and walls if water passes below the finish layer.
Good waterproofing but bad slopes
Water still remains on the surface and the room works badly every day.
Good slopes but poor waterproofing
Water can still migrate below the tiles and create hidden damp problems.
12. What the Quote Should Clearly State
If the quote only mentions “floor preparation,” that is not enough. The formation of falls should be named explicitly, especially in a built or walk-in shower.
Floor screed
Formation of falls toward the drain or channel
New drain where required
Drainage-flow test
Waterproofing after the base is formed
Tile installation following the final floor geometry
13. When Warning Bells Should Ring
“No falls are needed, the water will go.”
“We will fix it with adhesive.”
“The tile will sort it out.”
“No testing is necessary.”
“This is how we always do it.”
“The old drain location is fine.”
“We can use large tiles and it will still work.”
“If there is slope, waterproofing is unnecessary.”
None of these lines alone proves failure, but all of them mean you need clearer technical answers before the work moves on.
14. What Happens If the Slopes Turn Out Wrong
Once the tiles are installed, your options narrow dramatically. “Small fixes” usually hide the problem for a while instead of solving it.
Tile removal
Removal of the faulty base
New screed
New waterproofing
New tile installation
That means renewed cost, delay, mess, and a second round of disruption for something that should have been checked early.
15. Indicative Correction Cost
The cost depends on whether the defect is minor and localized or whether the whole shower area has to be rebuilt. The main conclusion is simple: prevention is far cheaper than correction.
Milder case
If the problem is small and discovered early, a lighter intervention may be possible, though not always as a permanent solution.
Full correction
In a serious failure, the floor, waterproofing, and finish may need to be rebuilt, which means repeating a critical part of the renovation.
16. Floor-Slope Check Checklist
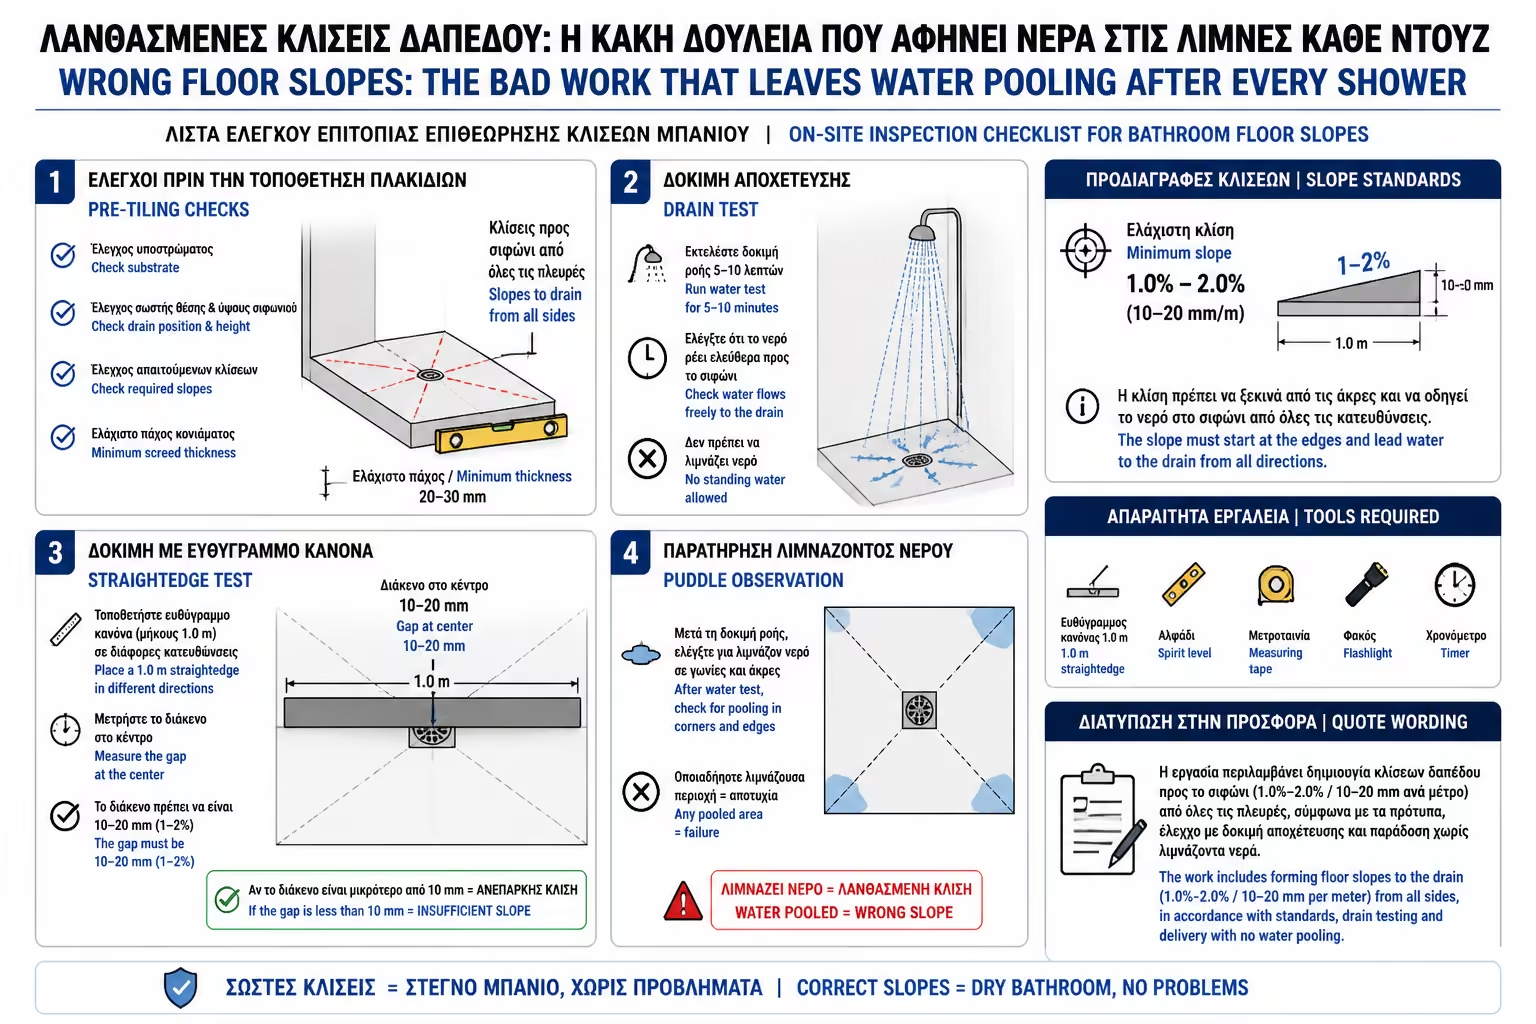
This is the practical checklist worth having before the floor is permanently closed.
The final drain or channel position is fixed
The water-flow direction is clear
The base has been checked with a level or laser
A water test has been done
There are no hollows or reverse slopes
The tile format fits the drainage geometry
The waterproofing follows the formed base correctly
Photos exist before the tiles were installed
17. A Typical Failure Example
In a new walk-in shower, water collects just outside the glass and close to the vanity. The crew says “that is normal.” It is not. The flow pattern shows that the base does not direct enough water toward the channel and part of the floor is acting like a shallow basin.
The lesson is that technical performance must be checked before final handover, not argued about after move-in.
18. How to Discuss It with the Contractor
Do not keep the discussion vague. Ask for specific answers and specific checks.
“Exactly where is the water meant to go?”
“How did you check the fall?”
“Was there a test before the tiles went in?”
“Does my chosen tile help or hinder this geometry?”
“Does the quote explicitly include slope formation?”
💡 The Engineer's Advice
Floor falls are one of the tasks that cannot be judged “approximately.” If the water does not have a clear route to the drain, the problem will return every day for years. In built and walk-in showers, ask to see the drainage logic, the level strategy of the base, and a real water test before the tiles close everything. Anything not checked at that stage is usually corrected later at much higher cost.
Conclusion
Wrong floor slopes are not a minor imperfection. They are one of the most annoying and expensive failures a new bathroom can hide.
Correct drain position
Real slope formation in the substrate
Tile format compatible with the room geometry
Waterproofing that follows the falls
Level checks and water testing
Clear wording inside the quote
If those things are locked in before the tiles go down, the bathroom works quietly and properly. If not, the correction comes later and costs several times more.
Related Articles
Waterproofing Mistakes: The Invisible Threat Behind Bathroom Tiles Pitfalls in Choosing Tiles: From Slippery Floors to Hard-to-Clean Embossed Tiles The 10 Biggest Bathroom Remodeling Mistakes: The Ultimate Guide to Homeowner Regrets After the Project DIY Failures: Which Bathroom Renovation Jobs You Should Not Do Yourself
Bathroom Renovation & Design Guide
Return to category.
Go to categoryCentral Guide
Return to the central guide.
Go to guide