
Bathroom DIY, Maintenance & Styling
Return to category.
Go to categoryThe silicone around the bathtub or shower is one of those small details that we rarely pay attention to when they are correct, but they annoy us every day when they start to blacken, peel or retain water. A clean, straight line of silicone makes the bathroom look neat. An old, moldy or torn silicone immediately gives the feeling of abandonment, even if the tiles and sanitary ware are in good condition.
In practice, however, silicone is not only an aesthetic matter. It is an elastic sealing material that is called to cover joints in places with contractions, expansions, water, cleaners and water vapors. Where the bathtub rests against the wall, where the shower meets the tiles, or where the cabin glass meets the floor and wall, silicone acts as a last line of defense. If it comes off, water finds a way.
Many owners try to solve the problem by putting a new layer over the old one. On the first day the result may seem acceptable. After a few weeks, however, the new silicone begins to peel off, the blackness reappears underneath, and water continues to seep into the same corners. The reason is simple: silicone is not properly patched. The old must first be completely removed, the substrate cleaned and then new material applied.
Replacing silicone in a bathtub or shower is a job that can be done by a careful owner, as long as he understands that success is not in pressing the gun, but in preparation. 70% of the work is scraping, cleaning, drying and properly marking the joint. The rest is the application.
In this guide we'll look at when it needs to be replaced, how to completely remove the old moldy silicone, what tools and chemicals help, how to apply the new, what the role of soapy water is in the final coat, and what mistakes to avoid so that the new line is clean, smooth and durable for everyday use.
Silicone in the bathroom works in a difficult environment. It accepts water, steam, soaps, shampoos, cleaners, temperature changes and small movements between different materials. The tub may have subtle movement when it is filled or when someone steps in it. The shower can work daily with water falling directly on the joint. Tiles, acrylic tray, metal and glass do not all behave in the same way.
Over time, the silicone loses its elasticity or peels away from the edges. If the joint was not thoroughly cleaned in the initial application, the delamination comes more quickly. If the wrong material was used, for example plain silicone instead of hygienic anti-mold silicone, the blackness can appear very early. If the bathroom is not properly ventilated, moisture stays on the surface for hours and creates ideal conditions for mold.
A common example is the corner between the bathtub and the wall. The owner sees that the silicone has turned black on the surface and scrubs it with bleach. She looks better for a while. But if the mold has penetrated the material or if the silicone has come off on the back side, cleaning is not enough. The blackness returns because the problem is now in the material itself and the joint, not just the outer surface.
Silicone is not a permanent construction. It is consumable technical material. In a bathroom with daily use, it is normal at some point to need a replacement. The point is to get it right, before the wear and tear turns into dampness behind the tub, swollen furniture, black joints or a musty smell.
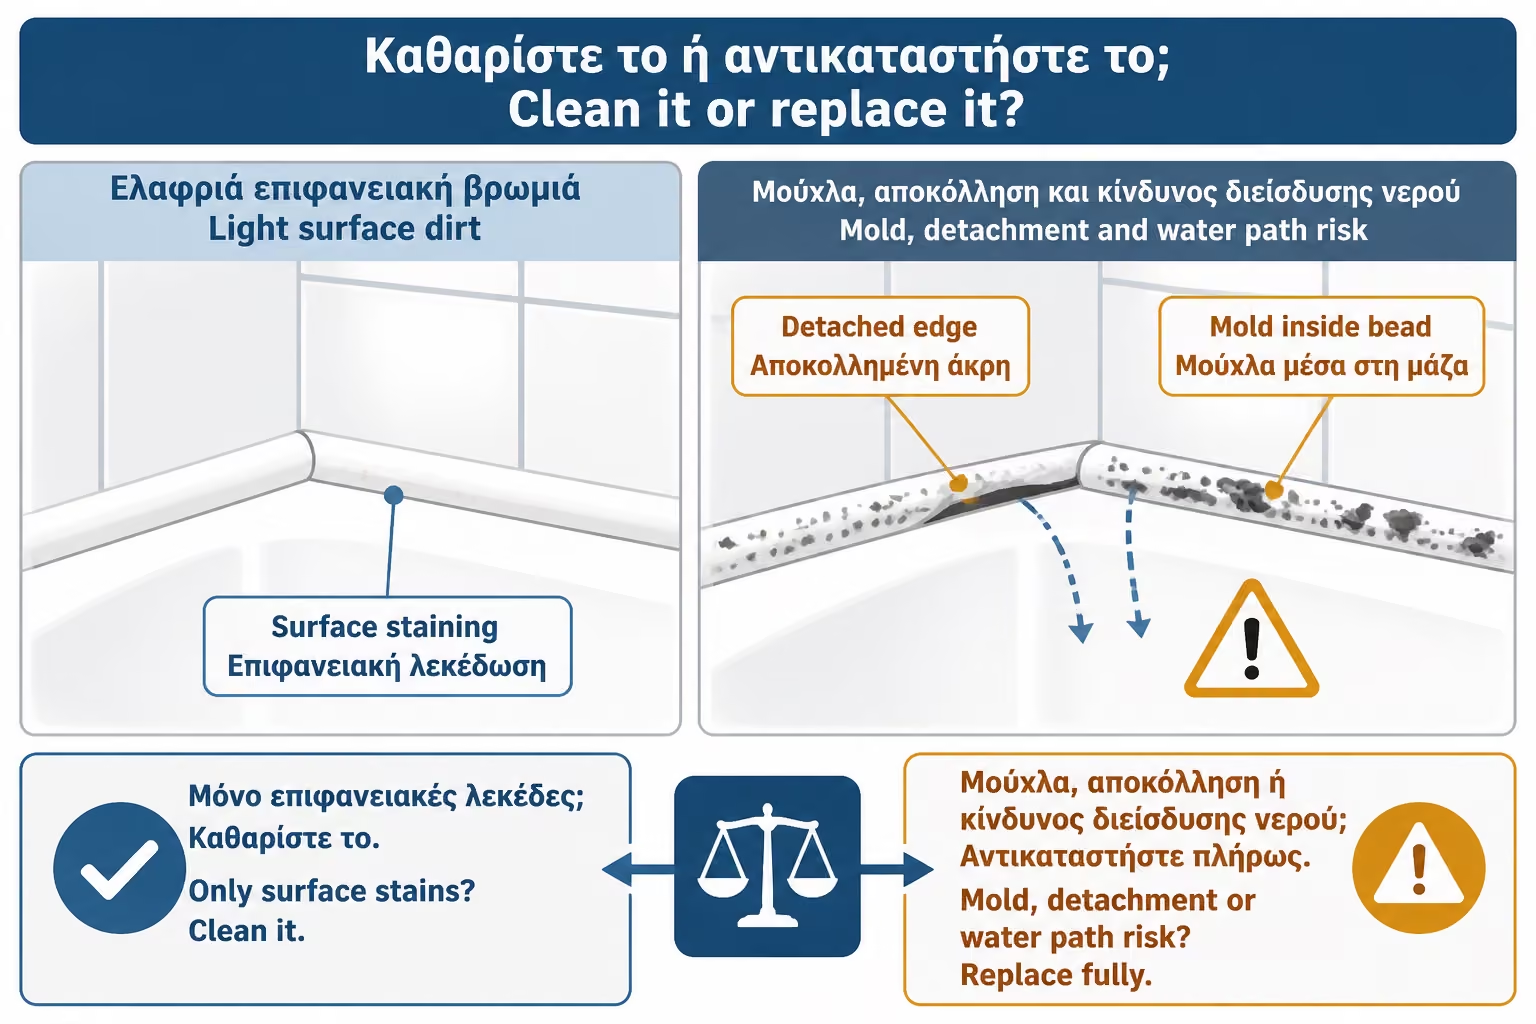
Not every black mark needs to lead immediately to a full replacement. If the silicone is still elastic, well adhered on both sides, and the blackness is only superficial, careful cleaning with a suitable mold cleaner and good ventilation can be tried first. If the mark goes away and does not return quickly, the problem may have been mostly surface moisture.
Replacement is necessary when the silicone has come off the tile or tub, when gaps appear, when it has torn, when it has hardened, when pieces are missing, or when mold has entered its mass. Also, if after the shower moisture appears on the back side, on the floor or in an adjacent area, you should not think that "a little more silicone" will solve the problem. First it must be identified where the water is passing through.
A practical sign is the behavior of the silicone when you lightly press it with your fingernail or a plastic tool. If it comes back and looks whole, it's in better shape. If it crumbles, peels off in strips, or splits open at the edge, it has reached its end. In this case, cleaning is a temporary solution.
There are also cases where the blackness does not come from the silicone but from poor ventilation, permanent water in the area or incorrect slopes. If you replace the silicone without correcting the pooling water, the new material will begin to suffer from the first week. Correct replacement must be accompanied by a control of use and ventilation.
The most common workaround is to run new silicone over the old. It's quick, looks easy and gives the illusion that the joint is "filled". The problem is that the new silicone does not stick properly to old, dirty, greasy or moldy silicone. Moisture, soaps, salts and mold remain between the two layers. The joint looks thicker, but not necessarily tighter.
In practice, the second layer usually peels off at the edges. A small groove is created there where water collects. After a while, the blackness comes back more strongly because there is now old material trapped under new. If the problem was a leak, the new coat may just delay the onset of the symptom, not solve it.
Imagine a bathtub where the old silicone has peeled off on the back, but on the outside it still looks in place. If you put new silicone on top, you cover the visible gap, but water can still seep through behind. The result is a joint that looks "full", when in fact it acts as a cap on a problematic substrate.
Proper replacement always begins with complete removal of the old silicone. As boring as this stage is, it is the basis of all work. The new silicone must press on a clean, dry and stable surface, not on a previous failure.
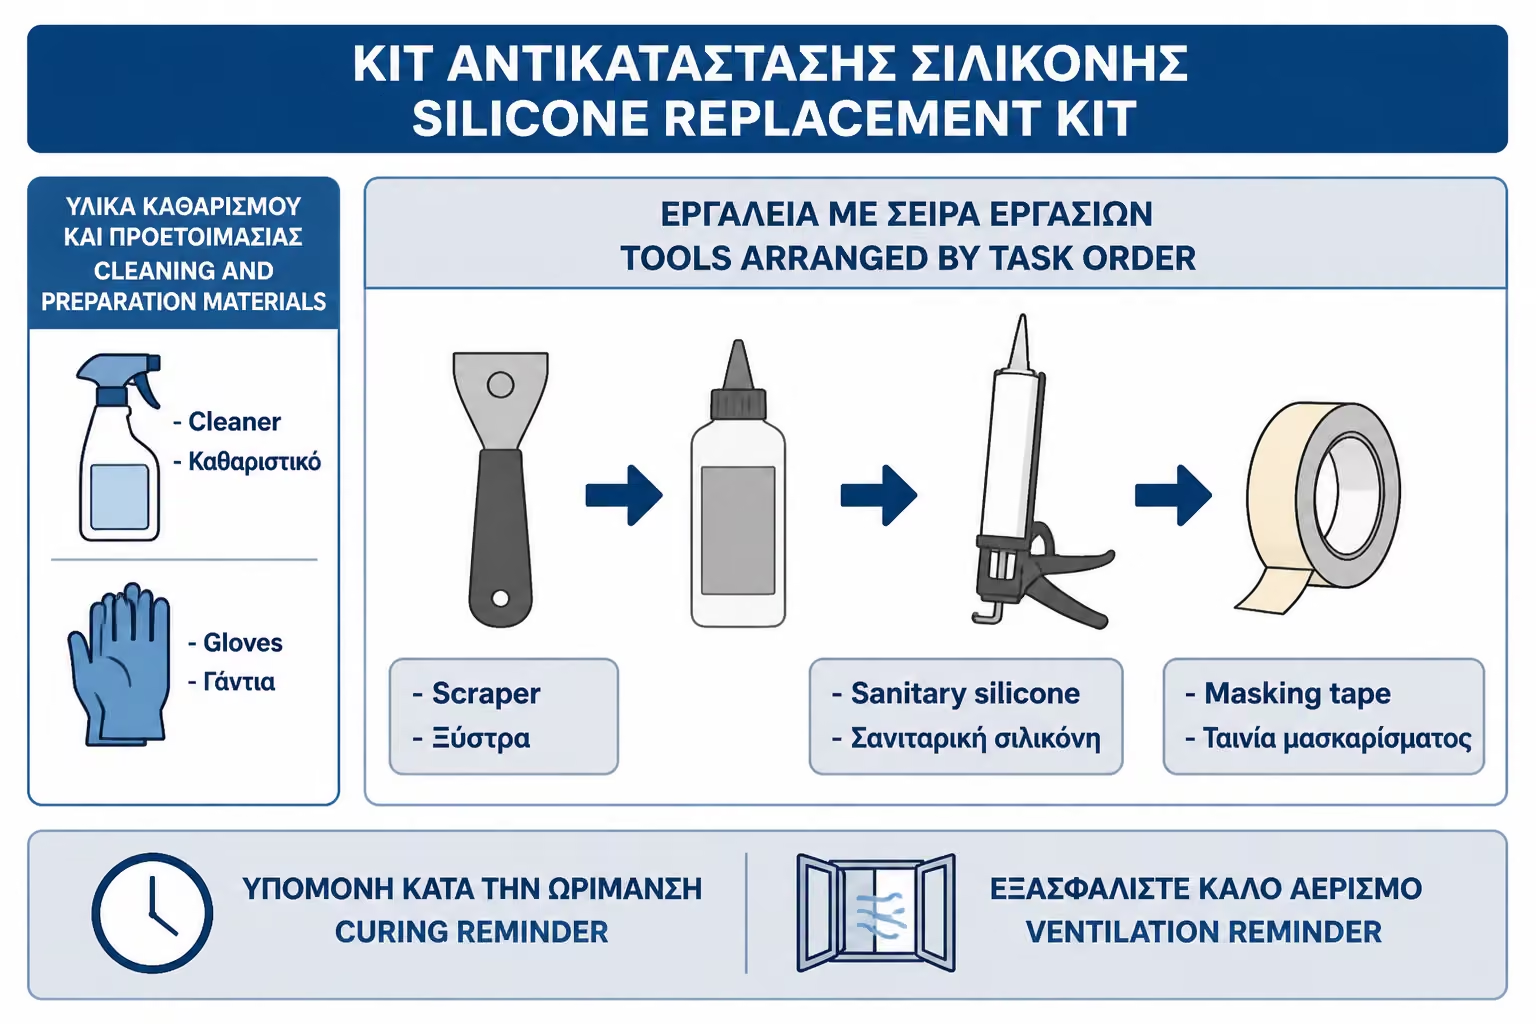
To remove and reapply silicone properly, you don't need expensive equipment, but you do need the right small tools. The kitchen knife, screwdriver and "whatever we can find" are often the reason acrylic tubs are scratched, cabinet profiles are scored or debris is left in the joint.
The basic equipment is as follows:
| Tool / Material | Use |
|---|---|
| Utility knife with a fresh blade | Cutting the old silicone at the edges |
| Plastic scraper or silicone remover | Scratch-free removal on sensitive surfaces |
| Chemical silicone remover | Softening of old silicone residues |
| Lint-free cloths | Cleaning and drying |
| Alcohol or suitable degreasing cleaner | Final surface cleaning |
| Painter's tape | Straight line delineation |
| Silicone gun | Controlled application |
| Silicone finishing tool or plastic spreader | Smooth finish |
| Sprayer with soapy water | Help with final laying |
| Nitrile gloves | Hand protection |
| Mask and good ventilation, where necessary | Use of chemical products |
The most important tool is not the gun, but the scraper and time. If thin films of old silicone remain on the surfaces, the new one will not stick properly. Many failed applications are due to the old silicone appearing to have been removed, but in fact an invisible greasy film was left on the tile or tub.
Acrylic bathtubs and shower trays require more care. The blade can scratch the surface easily. In those cases, plastic tools and gentle movements are safer. Ceramic tile is tougher, but metal profiles, painted fittings, or black-framed enclosures can still be marked.
We do not use any silicone for areas with water and water vapor. You need hygienic silicone, suitable for bathrooms, with anti-mold properties. It is usually listed as sanitary silicone, bathroom silicone or anti-mold silicone. These products are designed for joints in sanitary ware, tiles, cabins, bathtubs and showers.
Classic white silicone is often used around white tubs and sanitary ware. Transparent is used in cabins, profiles, glass or places where we don't want a sharp line. There are also grey, black and colored options, matching modern tiles or special finishes. The more special the color, the more carefully the application must be done, because mistakes are more visible.
Don't choose silicone based on price alone. A very inexpensive silicone may look the same in the tube, but be harder to work with, turn yellow faster, or have less mold resistance. On the other hand, not every case needs the most expensive product on the market. For a typical bathroom, a good anti-mould silicone from a name or trusted range is usually a more sensible choice than an unknown very cheap solution.
Also pay attention to the compatibility with the materials. Some silicones are not ideal for natural stone, marble or sensitive surfaces, as they can stain or affect the material. If you have marble, pressed cement mortar, special cladding or black matte profiles, it is a good idea to check the manufacturer's instructions before applying.
If you do the work yourself, the cost is relatively small. A tube of good bathroom silicone can range from around €5–12, while removal tools, tape, chemical remover and small consumables can add another €10–25, depending on what you already have at home. If you need to buy a silicone gun as well, there is an additional cost, but even a simple tool is sufficient for occasional use.
For professional work, the cost depends on the length of the joints, the condition of the old silicone, access, whether a deep cleaning is required, whether there are multi-profile cabins and whether the work is only a cosmetic replacement or a potential leak. For a simple bathtub or shower, the work can be indicatively around €50–120, while in more demanding cases, with many joints, a cabin, difficult access or additional waterproofing corrections, it can go up.
| Case | Indicative cost picture 2026 |
|---|---|
| DIY with basic silicone and small consumables | around €10–30 |
| DIY with remover, tools and better silicone | around €25–50 |
| Professional replacement in a simple bathtub | around €50–100 |
| Professional work in a shower / cubicle with more joints | around 80–150€+ |
| Work with leak investigation or additional repairs | case by case |
The prices are indicative and depend on the area, access, condition of the joint, whether VAT is included, whether the materials are included in the price and whether the work is done as a standalone visit or together with other bathroom work. A cheap price can be reasonable when it comes to a simple, clean joint. But it can be problematic if it involves simply passing silicone over it without completely removing the old one.
Before you start, the bath must be dry. Not just that there is no water running at the time, but that the joint is actually dry. If the tub or shower has been used a while ago, it's a good idea to wait. Moisture inside the joint is one of the main reasons new silicone fails.
Remove shampoo, sponges, rugs, curtains and anything that blocks access. If there is a cabin, thoroughly clean the lower profiles. There, soaps, salts and black residues collect which prevent proper adhesion. Don't underestimate this point: a nice new silicone on a dirty profile doesn't hold as well as it should.
Wipe the area thoroughly and observe the joint. See if the old silicone has only come off superficially or if there is a deeper gap. Check if the water has gone behind the tub or under the shower. If you see soft joints, swollen baseboards, moisture on the adjacent wall, or a musty smell, replacing silicone may not be enough on its own. Waterproofing, tile joints or drainage may need checking.
Proper preparation is also a matter of time. Don't start work half an hour before you need to use the bathroom. The new silicone needs time to cure before accepting water. If the bathroom is the only one in the house, organize the work so that you don't need to shower immediately afterwards.
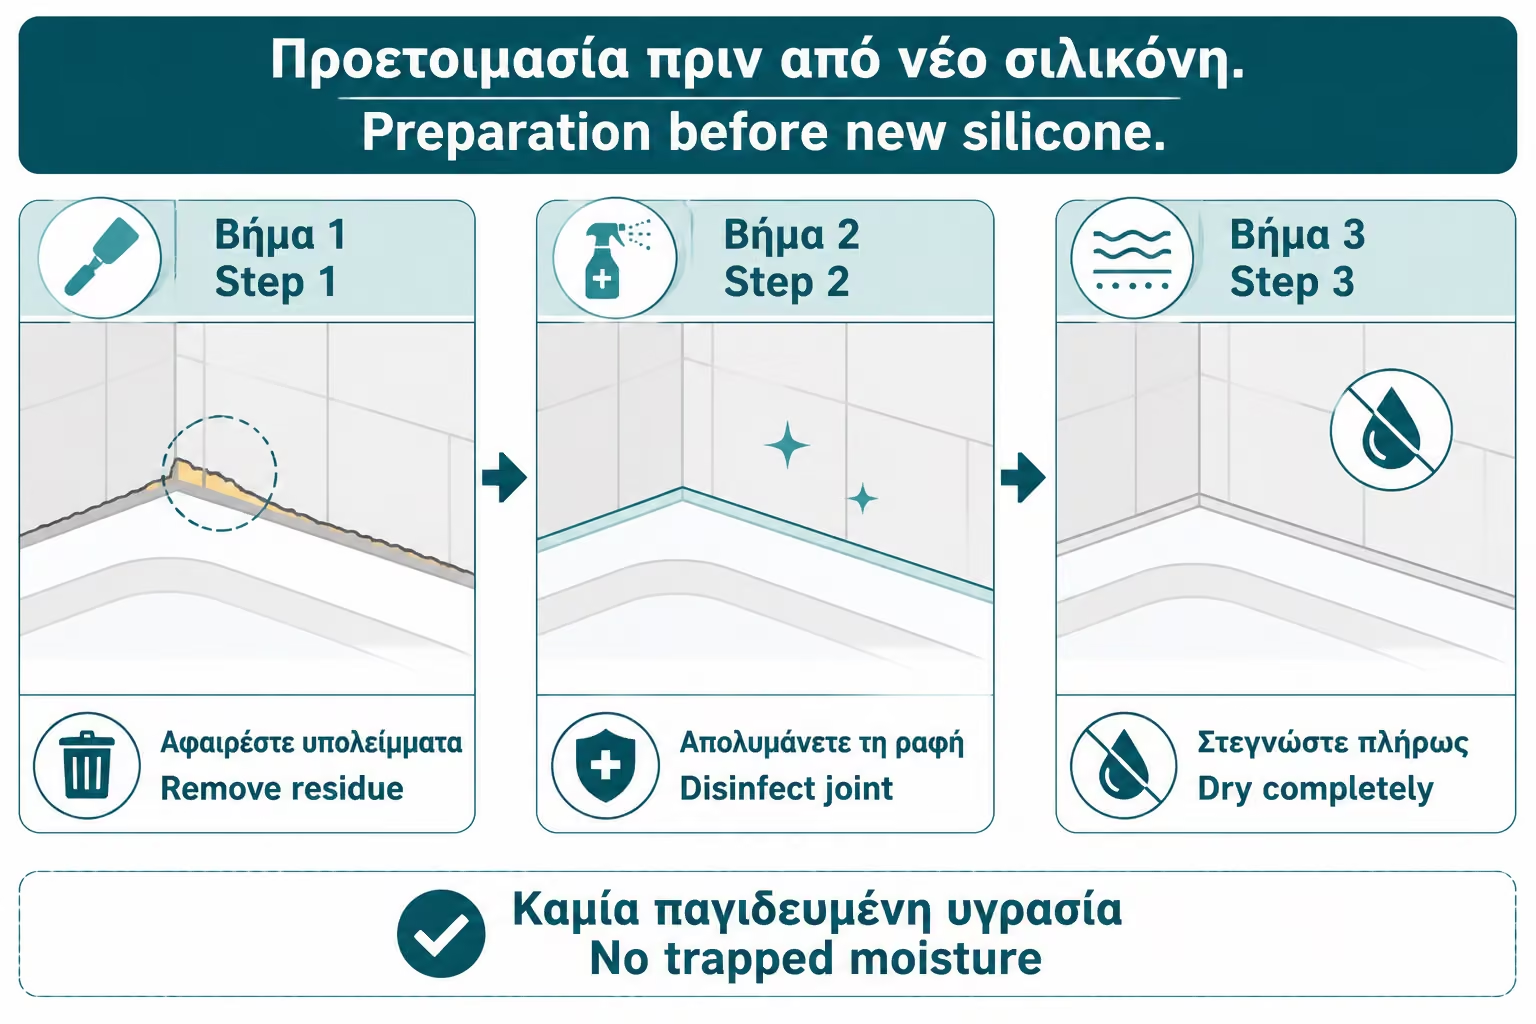
Removal begins with a chisel or special tool. Carefully cut away the old silicone along its contact with the tile and along its contact with the tub or shower. The goal is to peel off like a strip. In a good case, you will grab an edge and pull a large piece. In old or worn out application, it will come out in small pieces.
The blade should work parallel to the surface, not nailed to it. We want to cut the silicone, not etch the material. Ceramic tiles are more durable, but acrylic bathtubs, colored profiles and enamelled surfaces are easily damaged. If you are not sure, prefer a plastic scraper and more patience.
After the large pieces are removed, fine residues are usually left. These are more insidious than the big strip, because they don't look sharp but they prevent traction. Go over the surface with a plastic scraper and clean again. If you feel with your finger that the surface is "shiny" or greasy, there is probably still old material.
An owner can remove 90% of the silicone and think they are done. In fact, it is this last 10% that judges the new application. Silicone needs clean contact with the substrate. If it steps on old film, the new line can peel off the edges within a few weeks.
Chemical silicone removers are not magic products that will effortlessly wipe away all the old silicone. Their correct use is after mechanical removal, to soften the fine residues left on the surfaces. That is, first we cut, scrape and remove as much as we can. Then we use subtraction for the remainder.
Before applying chemical product, read the instructions. Each product has a different action time and different limitations. Some are not suitable for all surfaces. For delicate materials, test on a small inconspicuous spot first. Wear gloves, ventilate the bathroom well and avoid contact with eyes and skin.
After the action time, remove the softened residue with a plastic scraper and clean thoroughly. We don't want any remover left on the joint, because it can affect the adhesion of the new silicone. Final cleaning must leave the surface dry and free of grease.
A practical mistake is to put remover on a large amount of silicone and expect it to go away on its own. This usually leads to wasted time, strong odors and an incomplete result. Remover is an aid to debris, not a substitute for proper mechanical removal.
After the old silicone is removed, the joint must be cleaned. If there was mold, it needs careful decontamination with a suitable mold product according to its instructions. The residue should then be washed away or removed where necessary and the area should be completely dried. We do not apply silicone over active cleaners, moisture or chemical residues.
For the final cleaning, many people use alcohol or a degreasing cleaner suitable for the surfaces. The goal is to remove soaps, grease, salts and dust. Soaps and body cleansers often leave a film that is not visible but prevents proper adhesion.
Drying is critical. If the joint was open and water got behind the old silicone, it may take longer to dry. Do not trap moisture under the new silicone. If the spot smells musty or looks damp, give it time and ventilation. In difficult cases a professional assessment may be needed, especially if there is moisture behind tiles or in construction.
Practically, the best time for such work is when the bathroom can be out of use for several hours. If you do the application in a hurry, on a substrate that "holds" moisture, the new silicone may look perfect on the outside but not have proper adhesion to the edges.
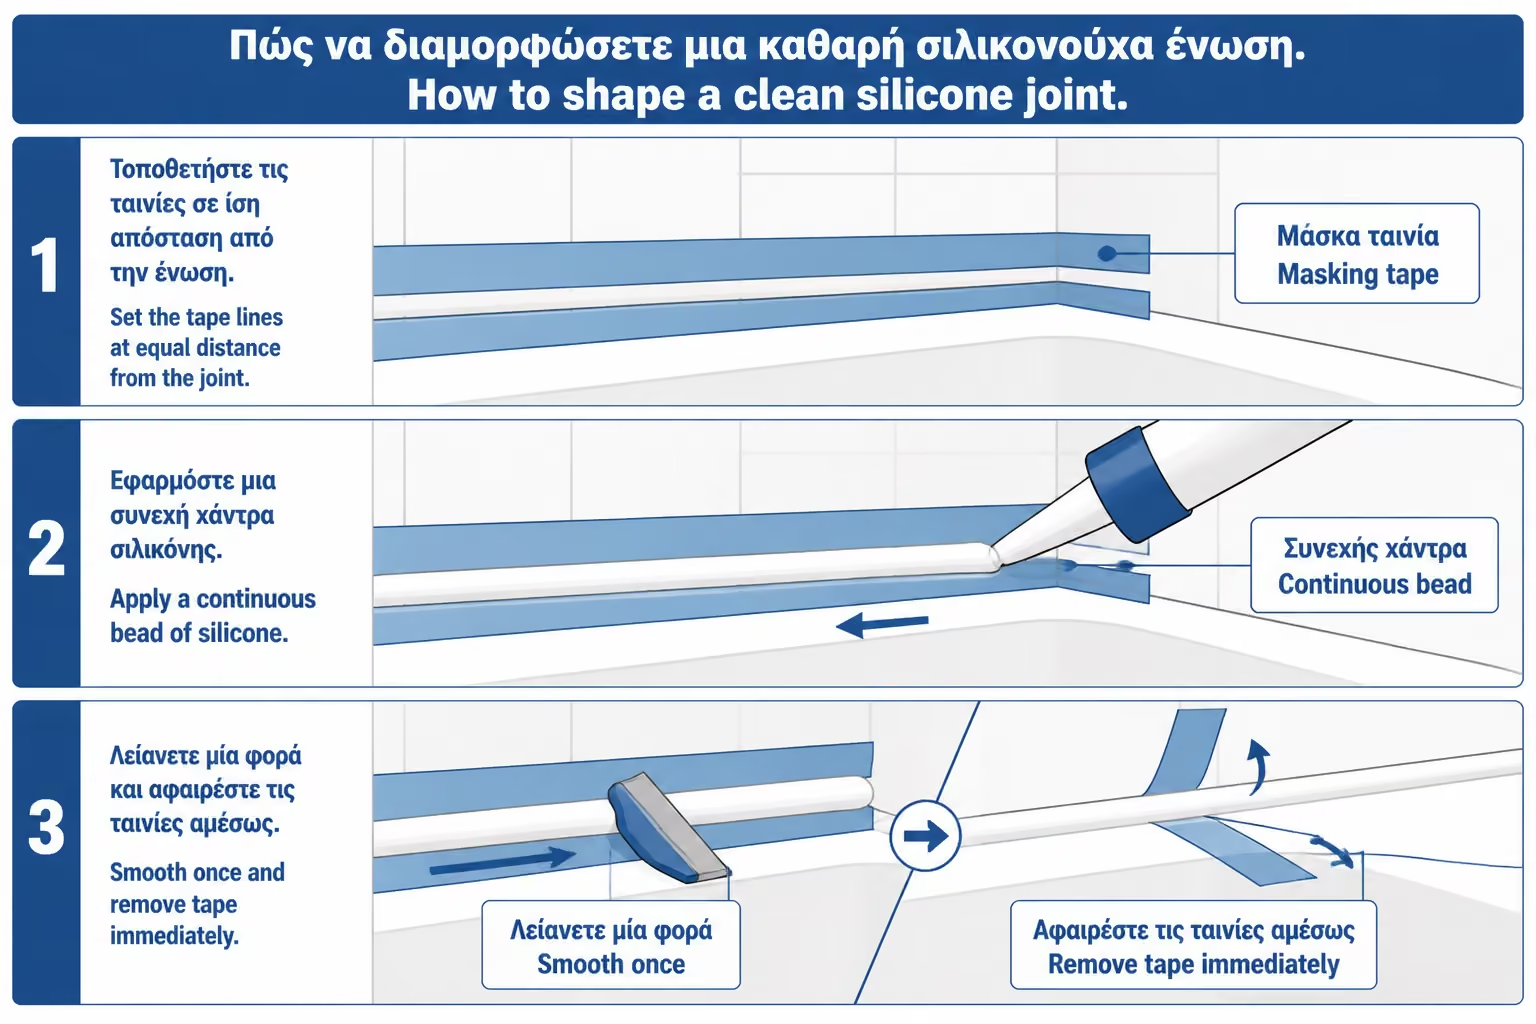
Masking tape is not mandatory for an experienced installer, but for a beginner it is almost essential. It defines the width of the line and protects both sides from smudges. Without tape, silicone often spreads too much, becomes wavy, and leaves marks that are difficult to clean.
Stick one strip of masking tape to the tile and one to the tub or shower, leaving between them the width you want the silicone to cover. The width should not be too small, because it will not cover the joint properly, but not too large, because the line will look heavy and hold more water. For a typical joint, a clean line of a few millimeters is usually sufficient, depending on the gap.
The paper tape should press well on the edges, without gaps. If the tile has a strong texture or if the joint is uneven, press it lightly with your finger. If silicone goes under the tape, the line will not come out clean.
Important: the paper tape is removed while the silicone is still fresh, not after it has dried. If you wait too long, the tape can pull the silicone and ruin the finish. The sequence is: application, layering, tape removal, minor final touch-up if necessary.
The tip of the tube largely determines the amount that will come out. If you cut it too wide, a lot of material will come out and it will be difficult to control. If you cut it too narrow, you will need to apply more pressure and the line may come out uneven.
Cut the nozzle at an angle so you can rest it against the joint and guide the silicone in a steady motion. The opening should be roughly proportional to the width of the joint you want to fill. For a beginner, it is better to start a little narrower and, if necessary, enlarge it. Going too wide from the start is hard to correct.
Before going to the regular joint, test on a piece of cardboard. Push the gun and watch the flow. This way you understand how much force is needed and how fast you have to move your hand. Silicone is not very forgiving of interruptions and stops. The steadier the movement, the better the line will turn out.
If the gun continues to pressurize the tube after stopping, press the pressure release mechanism. Otherwise, the silicone will continue to come out and stain the spot or tool. This is a small detail, but it helps a lot with the net effect.
The application should be done in as continuous a movement as possible. Place the tip at the start of the joint and press the gun firmly, moving your hand at a steady pace. The silicone should fill the joint and press on both sides. We don't want it to just sit on the surface like string. We want it to come into contact with clean surfaces.
If the joint is deep or very large, it is not always correct to fill it all with silicone. Large joints may require joint cord or other technical preparation so that the silicone has the correct thickness and works elastically. If you have a very large gap between the tub and the tile, don't treat it like a simple silicone application. It may look full, but not have proper mechanical behavior.
Avoid going over the same spot with the gun multiple times. The more you correct the application at the extrusion stage, the more irregular it becomes. Better to put a relatively even amount and shape the line in the next step with the liner tool.
If you are doing an angle, for example on two sides of a bathtub, work in sequence. Do not spread a huge length of silicone and then try to layer it. The silicone starts to form a surface film and the longer you delay, the harder the finish becomes. Better to work in controlled departments.
Soapy water is used to keep the fresh silicone from sticking to the tool or finger during final application. A spray bottle with water and a few drops of dishwashing liquid is usually sufficient. Lightly spray the surface of the silicone or squeegee and sweep with a steady motion to create a smooth, clean finish.
The secret is the word "slightly". We don't want to flood the joint with soapy water. If soapy water gets under the silicone or between the silicone and the surface before adhesion is complete, it can affect the hold. Soapy water is an external shaping aid, not a joint preparation material.
Therefore, we first apply the silicone to a clean and dry joint. Then, for layering, we use minimal soapy water on the tool or surface. We spend once or twice, not ten. The more we work the silicone, the more likely we are to mess up the line, create pits, or pull material off the edges.
Many craftsmen use the finger with soapy water. For a beginner, however, a plastic silicone spatula gives a more stable result and a better angle. The finger can work, but often leaves an uneven line. If you use it, wear gloves and don't apply too much pressure. We want to shape the silicone, not remove it.
The paper tape must be removed immediately after laying and before the silicone begins to “pull”. Pull it slowly, in an outward motion, away from the joint so that it does not touch the fresh line. It's a good idea to have a bag or paper nearby to dispose of the tape, as it will have fresh silicone on it.
After removal, a very small pimple may remain on the silicone. If necessary, you can make a final very light pass with a tool lightly dampened with soapy water. Don't overdo it. At this stage, any additional corrections run the risk of spoiling something that is already good.
If the tape is removed too slowly, it can pull the silicone and leave ragged edges. If removed too early, before the line is well laid, more correction may be needed. The right time is right after finishing, while the silicone is still fresh but has taken its shape.
A practical example: in a bathtub with two sides of silicone, do not finish the entire application, drink coffee and return for the films. Work organized. Apply on one side, layer, remove tape. Then continue to the next one if necessary. This is how you control time better.
Drying time depends on the product, application thickness, temperature, humidity and ventilation. Many silicones form a surface film relatively quickly, but this does not mean that they are fully cured. For a bathtub or shower, it is best not to let water fall on the new silicone for as long as the manufacturer specifies. It often takes at least several hours, while for a safer result many prefer to wait about 24 hours before normal use.
Don't judge by touch alone. A silicone may not stain on the outside, but on the inside it may not have finished curing. If it gets wet too soon, especially in a thick joint, its finish and durability can be affected.
Ventilation helps, but it doesn't mean you have to blow dust onto the fresh joint. Open a window or ventilation, keep the area clean and avoid curtains, sponges or objects touching the silicone. If there is a shower curtain, keep it away from the joint until it dries.
In a unique home bathroom, organize work in a practical way. For example, do the replacement after the last shower of the day so that the silicone has all night before it. If there are children or elderly people in the house, let them know that the area should not get wet or touched.
Applying silicone seems easy because the material comes out soft and fixes at first. But the mistakes are visible immediately or appear after a few weeks. The most common is bad removal of the old silicone. The second is the application on a wet or dirty surface. The third is too much.
| Error | What does it cause? | Correct practice |
|---|---|---|
| New silicone over the old | Poor adhesion, quick peeling | Complete removal of old material |
| Application to wet joint | Trapped moisture, mold, delamination | Completely dry before application |
| Line too wide | Bad effect, water retention | Correct width with paper tape |
| Lots of soapy water | Possible reduction in edge grip | Minimal use only in layering |
| Tape removal delay | Torn edges | Remove while the silicone is fresh |
| Using the wrong silicone | Mold, yellowing, low durability | Anti-mold bathroom silicone |
| Hasty use of shower | Poor drying, deterioration of finish | Wait as instructed |
Another mistake is trying to make the line "perfect" with constant corrections. Silicone takes determination. A good fit, a proper pass with a tool, tape removal and that's it. The more you mess with it, the more likely it is to damage the surface.
In some bathrooms, especially older ones, the gap between the tub and the wall is larger than normal. This can be due to incorrect installation, a crooked wall, old subsidence, poor tile application or movement of the tub. In such cases, silicone should not be treated as a material that fills any hole.
If the joint is too wide or deep, the silicone may sink, bulge, or cut with movement. It may require a joint string, a profile, a special angle, a substrate repair or even a technical inspection of the bathtub. Too much silicone does not make the joint more secure. It often makes him weaker.
A practical scenario: if there is a gap of a centimeter or more in some places, and the owner simply fills it with silicone, the outer surface may look closed. But in the background there may be gaps, air or moisture. After use, the silicone is pressed, opens at the edges and water finds its way again.
In large joints, it is worth seeking the opinion of a technician. Sometimes the solution is simple. Other times silicone is just a symptom of a poor finish on a tub or shower installation.
The shower cabin has several points that can hold water: bottom profiles, vertical profiles, corners, glass, guides, joints with tiles. The silicone here is not only a matter of a perimeter joint, but also of correct direction of the water. If the wrong spot is sealed, water can be trapped inside the profile instead of draining.
In many cabins, the manufacturer's instructions call for silicone on certain exterior sides and not all over. Sealing indiscriminately inside and outside can prevent water that normally enters a profile from exiting in the right direction. The result is leakage from another point or permanent moisture inside the profile.
Therefore, in the cabin it needs more attention than in a simple bathtub. Before removing all the silicone, notice exactly where it is and how the construction works. If there is a cabin manual, follow it. If not, don't blindly close every opening you see.
Blackening on the lower profiles is often not only a silicone issue, but also a cleaning issue. Soap residue and limescale create slime that holds moisture. If the enclosure is not cleaned thoroughly before reapplication, the new silicone will be pressed onto a problematic substrate.
Silicone is a joint sealant, not a general bathroom waterproofing solution. If there is a leak from a pipe, from a siphon, from a crack in a shower tray, from a bad slope or from tiles that have lost grout, new silicone may temporarily improve the picture but will not solve the cause.
If after every shower there is moisture at the bottom of the wall, on the ceiling of the lower compartment or behind the furniture, it needs to be investigated. There could be waterproofing failure, a drain leak, a pipe problem, or water seeping through cracked tile joints. In these cases, silicone replacement is only a possible step, not a diagnosis.
Also, if the tub moves noticeably when you step in, the silicone will suffer. The material is elastic, but it cannot fix an unstable base. If the tub is not properly supported, the joint will open again. A technical check of the support is needed there.
The owner should see the silicone as an indicator. If it breaks down every few months in the same spot, something else is going on. Or there is permanent moisture, or wrong fit, or movement, or bad geometry. Repeating the same work without diagnosis just leads to repeated costs and frustration.
| Inquiry | Yes / No |
|---|---|
| Is the old silicone completely removed and not just the visible part? | Yes / No |
| Have soaps, salts, mold and grease been cleaned from the joint? | Yes / No |
| Is the joint really dry before application? | Yes / No |
| Has it been checked that there is no deeper leak or moisture behind the tub/shower? | Yes / No |
| Is an anti-mold silicone used suitable for the bathroom? | Yes / No |
| Has paper tape been put in for a clean and controlled line? | Yes / No |
| Is the silicone nozzle cut to the correct width? | Yes / No |
| Will the soapy water only be used for the final coat and not in the joint? | Yes / No |
| Will the tape be removed while the silicone is still fresh? | Yes / No |
| Is there time to keep the spot dry until the silicone cures? | Yes / No |
If the answer is “No” to removal, cleaning, drying or correct material, do not start the application yet. New silicone does not correct poor preparation. He just hides her for a while.
If you want a clean and durable result, don't rush into the unseen stage: removal and cleaning. Silicone usually fails not because it didn't lay down nicely, but because it stepped on moisture, old residue or soaps. Remove the old one all the way, dry the joint thoroughly, use proper anti-mold silicone and work with paper tape. Soapy water helps with a smooth finish, but should not be a substitute for proper adhesion.
Replacing silicone in your tub or shower is a small job with a big impact. It can refresh the image of the bathroom, reduce the risk of water behind the sanitary ware and stop the blackness that makes the space look dirty even when cleaned frequently. But to be successful, it has to be done in the right order.
The old silicone must be completely removed. The joint must be cleaned, disinfected where there is mold and dried thoroughly. The new silicone must be suitable for bathing, applied in the correct amount and laid in a controlled manner. Masking tape helps with a clean line, and soapy water can give a smooth finish, as long as it's used sparingly and only in the final stage.
If the joint is simple, access is good and there are no signs of a deeper leak, the work can be carefully done by the owner. However, if there is a large gap, repeated moisture, a cabin with complex profiles, an unstable bathtub or water marks in an adjacent space, silicone should not be used as a rough "patch". Then a technical inspection is needed, because the real problem may be behind the joint.
Good silicone is not seen because it is impressive. It shows because it's clean, straight, discreet and stays in place after months of use. That's the goal: not just a beautiful finish on day one, but a proper joint that withstands the everyday reality of the bathroom.
Return to category.
Go to categoryReturn to the central guide.
Go to guide