
Bathroom DIY, Maintenance & Styling
Return to category.
Go to categoryA broken tile can spoil the image of the entire bathroom, kitchen or floor. It could be a small crack from a dropped object, a break in the corner, a tile that "hollowed out" and broke with the weight, or old damage that grew over time. The eye always falls there, even if all the other tiles are in good condition.
Replacing a single tile seems simple: take out the broken one, put in a new one, grout and you're done. In practice, however, this is one of the tasks that requires more patience than strength. The hard part is not breaking the already broken tile. The trick is to remove it without injuring the adjacent ones, without peeling off a larger surface, without breaking seals, and without leaving a new tile that protrudes, sinks, or looks different.
The most critical point is the joint. Before touching the tile, the grout around it must be carefully removed. The joint acts as a "bridge" with the adjacent tiles. If you start pounding on the cracked tile without cleaning the joint, the shock is transferred to the surrounding tiles and may break or peel off. There a small repair turns into a bigger damage.
The correct technique is to first isolate the tile, break it in a controlled manner from the center outwards and remove the pieces without prying on the adjacent edges. Then you clean the old glue, check the substrate, stick the new tile at the right height and grout carefully. It's not a job that necessarily needs a large crew, but it does need a clear mind and proper sequence.
In this guide we will look at when replacing a broken tile can be DIY, what tools are needed, how to remove the grout, how to break the tile from the center, how to stick the new one and how to check the end result. We'll also see when a broken tile is just surface damage and when it might indicate a deeper problem with the substrate, moisture, or old installation.
Replacing a single tile makes sense when the damage is localized and the surrounding tiles are stable. If a heavy object has been dropped and broken a tile on the floor, if a tile on the wall has been cracked by impact, or if there is cosmetic wear in a single spot, local repair usually makes sense.
The same applies when you have the same tile available from the original placement. A spare tile from the same lot is the ideal scenario, because it matches better in shade, dimension and texture. If there is not an identical one, a similar one can be found, but you should be aware that even small differences are visible when a new tile is inserted between old ones.
But it is not worth thinking only about the surface. If the tile broke because it was hollow underneath, because the substrate is moving, because there is moisture, or because a larger area has come off, replacing a single piece can be a temporary solution. The new tile may stick, but if the cause remains, it may crack or peel again.
A simple practical test is to tap the surrounding tiles with the handle of a screwdriver or a small wooden tool. If they sound solid, the damage is likely localized. If they sound "hollow" over a large area, the problem is not limited to the broken tile. There a more careful evaluation is needed before the repair can begin.
Replacing a tile can be done by a careful homeowner in simple spots, but it's not always a safe DIY job. If the tile is inside a shower, on a waterproofed bathroom floor, around a linear siphon, near pipes or on a heated floor, the work becomes more risky. You don't see what's behind or under the tile.
In waterproofed areas such as showers and bathrooms, removing old adhesive by tapping can injure the waterproofing layer. If you open the waterproofing, the new tile may appear properly installed, but water finds its way into the substrate. This is not visible on the first day. It shows up months later, as dampness, mold or swollen joints.
Also, attention is needed on large size tiles, thin large format tiles, old tiles that have become brittle or surfaces where there are no spare parts. If an adjacent tile is broken and there is no identical one, the small repair can create an aesthetic problem for the entire surface.
A professional is needed when there are signs of moisture, when the tile is in a shower or on the roof, when the adjacent ones sound hollow, when the old glue is too hard and the substrate is sensitive, when underfloor heating is installed or when the new tile needs to be precisely cut around pipes, corners or pipes.
A hammer and chisel is not enough for a clean replacement. They need tools that allow control. Damage to adjacent tiles is usually done by haste, the wrong lever, or a tool touching the edge of the adjacent tile. That is why the choice of tools is of great importance.
| Tool / Material | Use |
|---|---|
| Joint scraper or multi-tool with a joint blade | Removing grout around the tile |
| Cutter | Cleaning small joint residues |
| Paper tape | Edge protection on adjacent tiles |
| Safety glasses | Protection from fragments |
| Work gloves | Hand protection from sharp pieces |
| Hammer small | Controlled breaking of the tile |
| Graft or small needle | Removing pieces and old glue |
| Spatula or trowel | Glue application |
| Small toothed spatula | Even layer of glue |
| Tile adhesive suitable for the substrate | Fixing a new tile |
| Crosses or apostates | Maintaining an even joint |
| Level or straight blade | Flatness check |
| Putty | Final joint filling |
| Sponge | Cleaning grout |
| Soft cloth | Final tarnish cleaning |
In some cases an oscillating multi-tool with a suitable joint blade can help. It's faster than a manual scraper, but it takes a steady hand. If it escapes, it can scratch tile or injure the edges. For a beginner, the manual method is slower but often safer.
Safety glasses are required. The tile breaks into sharp shards. A small piece thrown into the face can cause injury. The job may be small, but it shouldn't be done without basic protection.
Before breaking the old one, make sure you have a new tile available. It sounds obvious, but in practice many people start the removal and then discover that the old model is no longer available, that the shade is not available, or that the dimensions do not match exactly.
Tiles have production lots. Two tiles of the same model may have a slight difference in tone or dimension if they are from a different batch. On a large surface, this difference can be seen. If the broken tile is in an obvious place, such as in the center of a floor or on a bathroom wall at eye level, the color difference will be more disturbing.
If you don't have a matching tile, you can look in warehouses, tile stores, or get a piece as a sample. If it is not found, a creative solution may be needed: replacing more tiles in a zone, an inset decorative piece, or changing a small area to make the difference seem intentional. Replacing a single different tile often looks like a patchwork.
Also check the thickness. If the new tile is thinner or thicker than the old, the adhesive will need to be adjusted to make it flush. This can be done, but it needs attention. A tile that protrudes even slightly into the floor can create a step, break more easily at the edges or be a nuisance to clean.
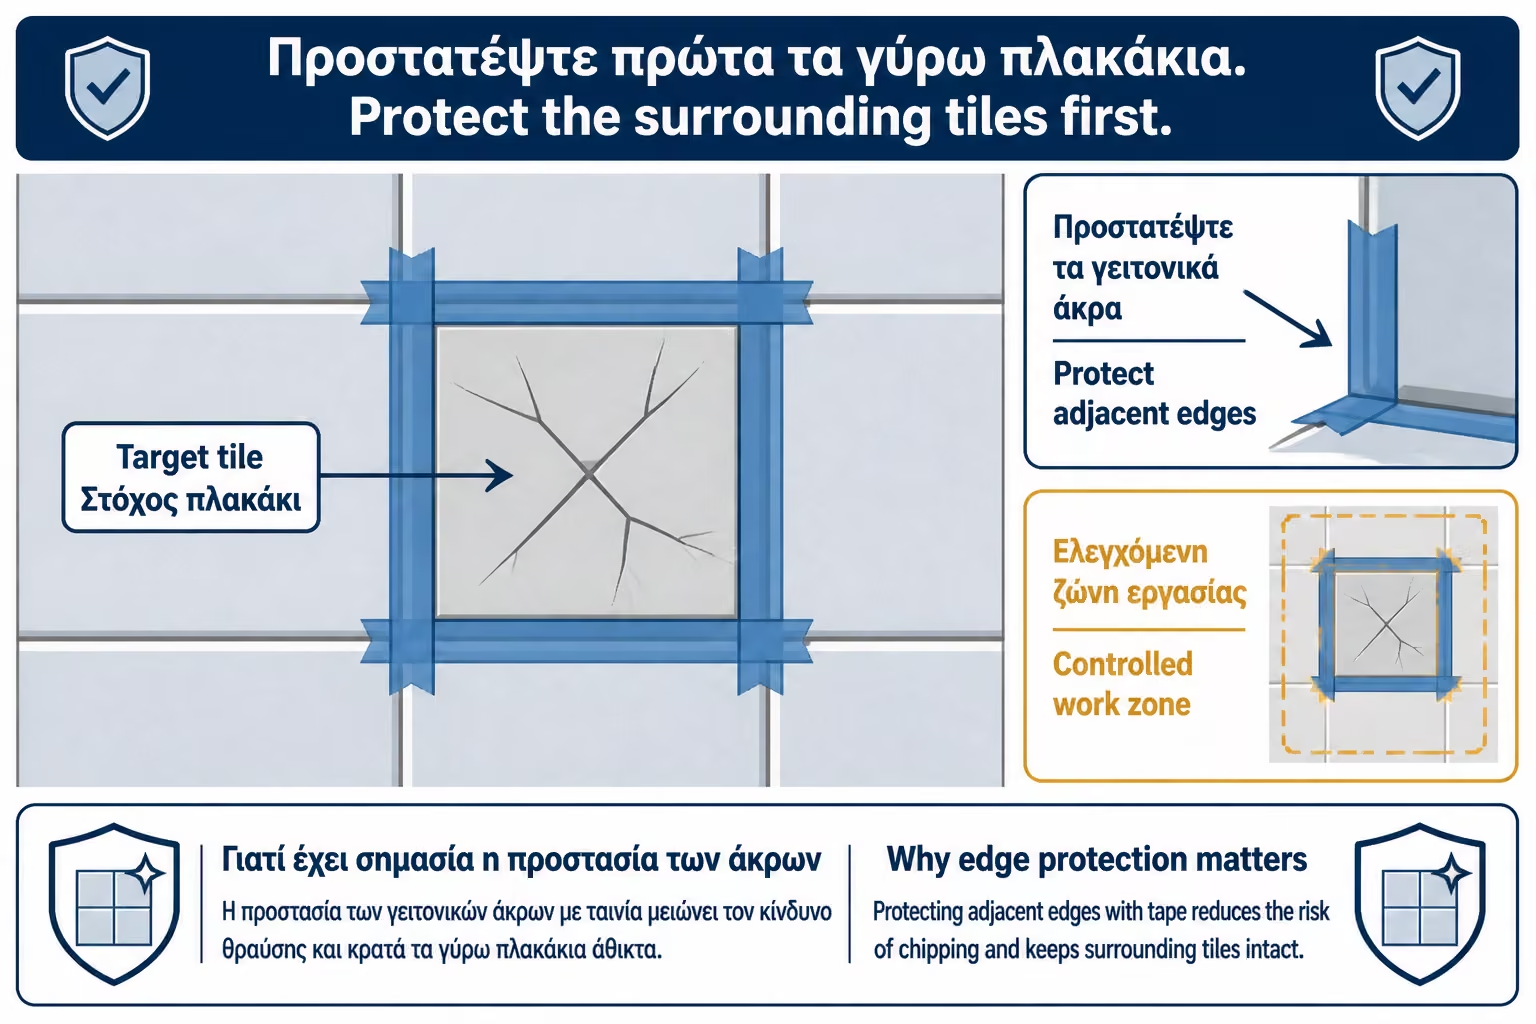
Before removing grout or breaking the tile, protect the surroundings. Tape the edges of adjacent tiles. It won't stop a heavy hit, but it will reduce minor scratches and visually help you stay within the boundary of the tile you're removing.
Remove objects from the area. If you're working in a bathroom, remove rugs, towels, small furniture, and items that can get dusty. If you are working on a kitchen counter or wall, cover the surfaces. Tile fragments are sharp and can scratch delicate materials.
If the tile is near sanitary ware such as a bathtub, basin or sink, cover it with a thick cloth or cardboard. A piece of tile that falls on porcelain can leave a mark or cause a small break. Protection before work is much easier than repairing second damage.
Also, take care of clear lighting. Grout removal and edge checking require visibility. If you are working in a dark corner, use a portable light or flashlight. Many mistakes are made because the craftsman or owner does not see exactly where the joint ends and the adjacent tile begins.
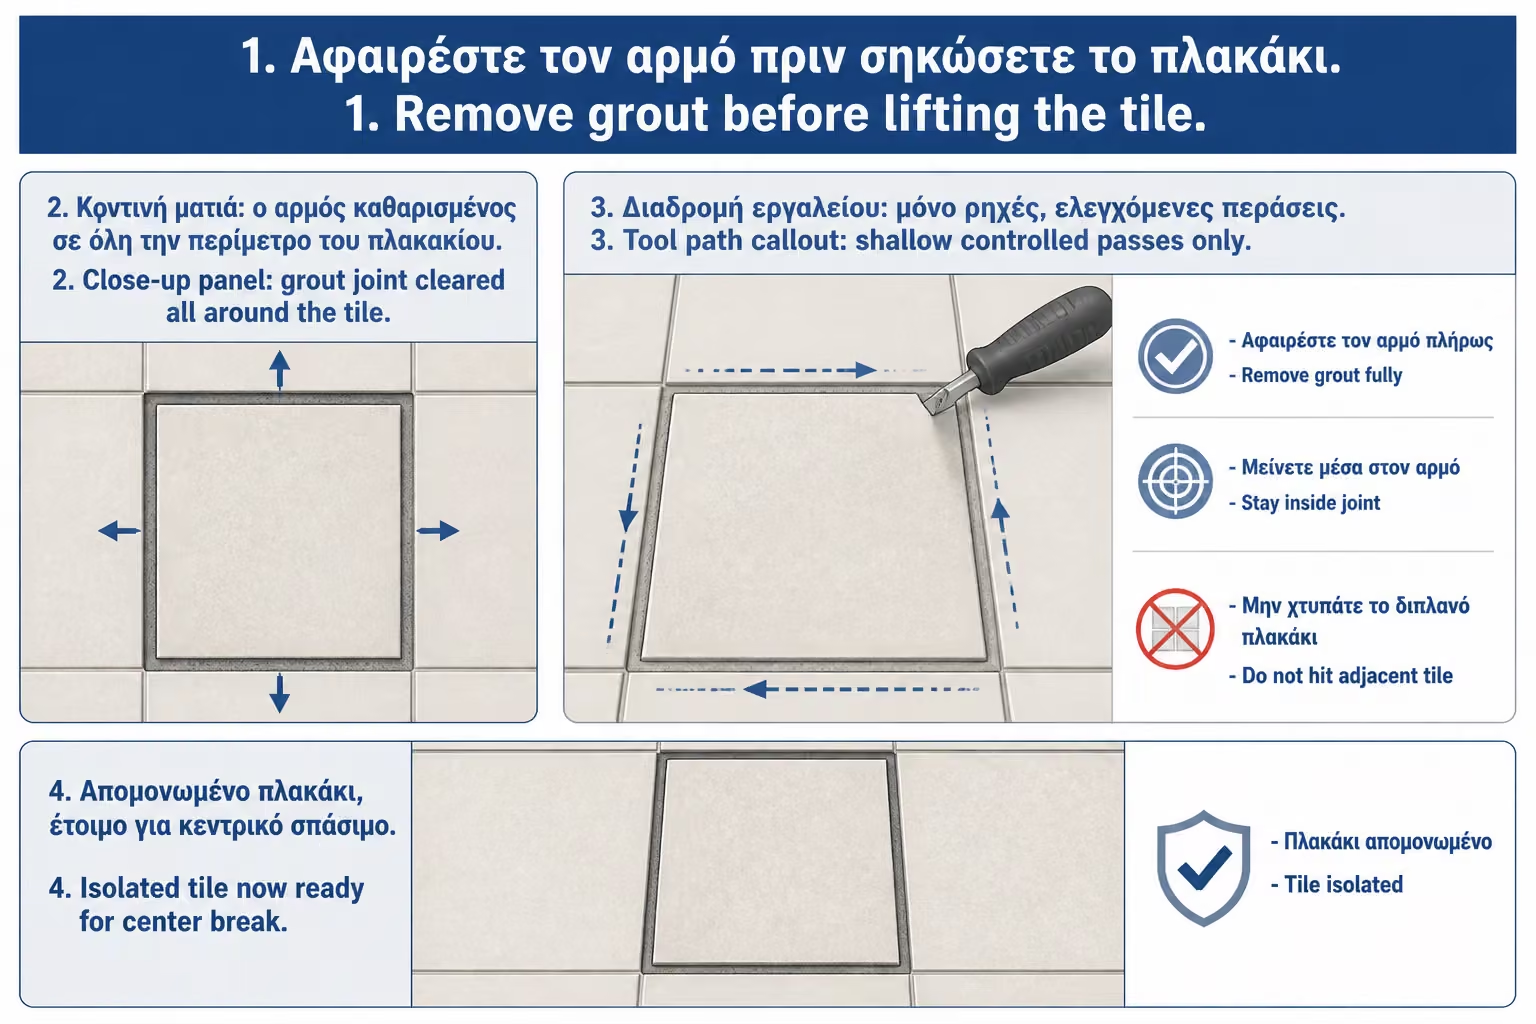
Removing the grout around the broken tile is the step that protects the adjacent tiles. The goal is to "isolate" the tile. We want to cut its connection with the surrounding ones, so that when we break it, no pressure is transferred to their edges.
Start with a joint scraper or suitable tool and work across the joint. Don't try to remove all the depth in one go. Better many gentle passes than one violent one. If the grout is hard, it will take patience. If using a multi-tool, hold it steady and away from exposed edges.
The joint must be cleaned as much as possible throughout the thickness around the tile. You don't always have to go all the way to the substrate, but enough material must be removed so that the broken tile does not "hold" the tiles next to it. In thin joints of 1–2 mm the work is more difficult, because there is little margin for error.
A common mistake is to clean only the surface of the grout, so that it looks like it has been removed, but deep down a hard connection remains. When you then hit the tile, the power goes to the adjacent ones. So before proceeding, carefully run the tool around and make sure the joint is sufficiently opened.
The broken tile should not be removed by prying from the edge. If you put a trowel in the joint with the adjacent tile and lift up, all the pressure is transferred to the edge of the neighbor. This is the most common reason for a second tile to break.
The correct logic is to first create an opening in the center of the tile. There you do not lean on an adjacent edge. With small controlled strokes, you break the tile on the inside and remove pieces on the outside. This way you reduce the pressure on the sides.
If the tile is already cracked, don't necessarily follow the crack all the way to the edge. Cracking can lead to adjacent tile and entice you to work close to the joint. Start again from the center or from a point away from the edges.
For more controlled breaking, you can make small holes in the center with a suitable tile drill, without impact function, and then tap lightly. But this needs attention, especially on walls or floors where you don't know what's behind. In simple cases, a small chisel and controlled strokes are sufficient.
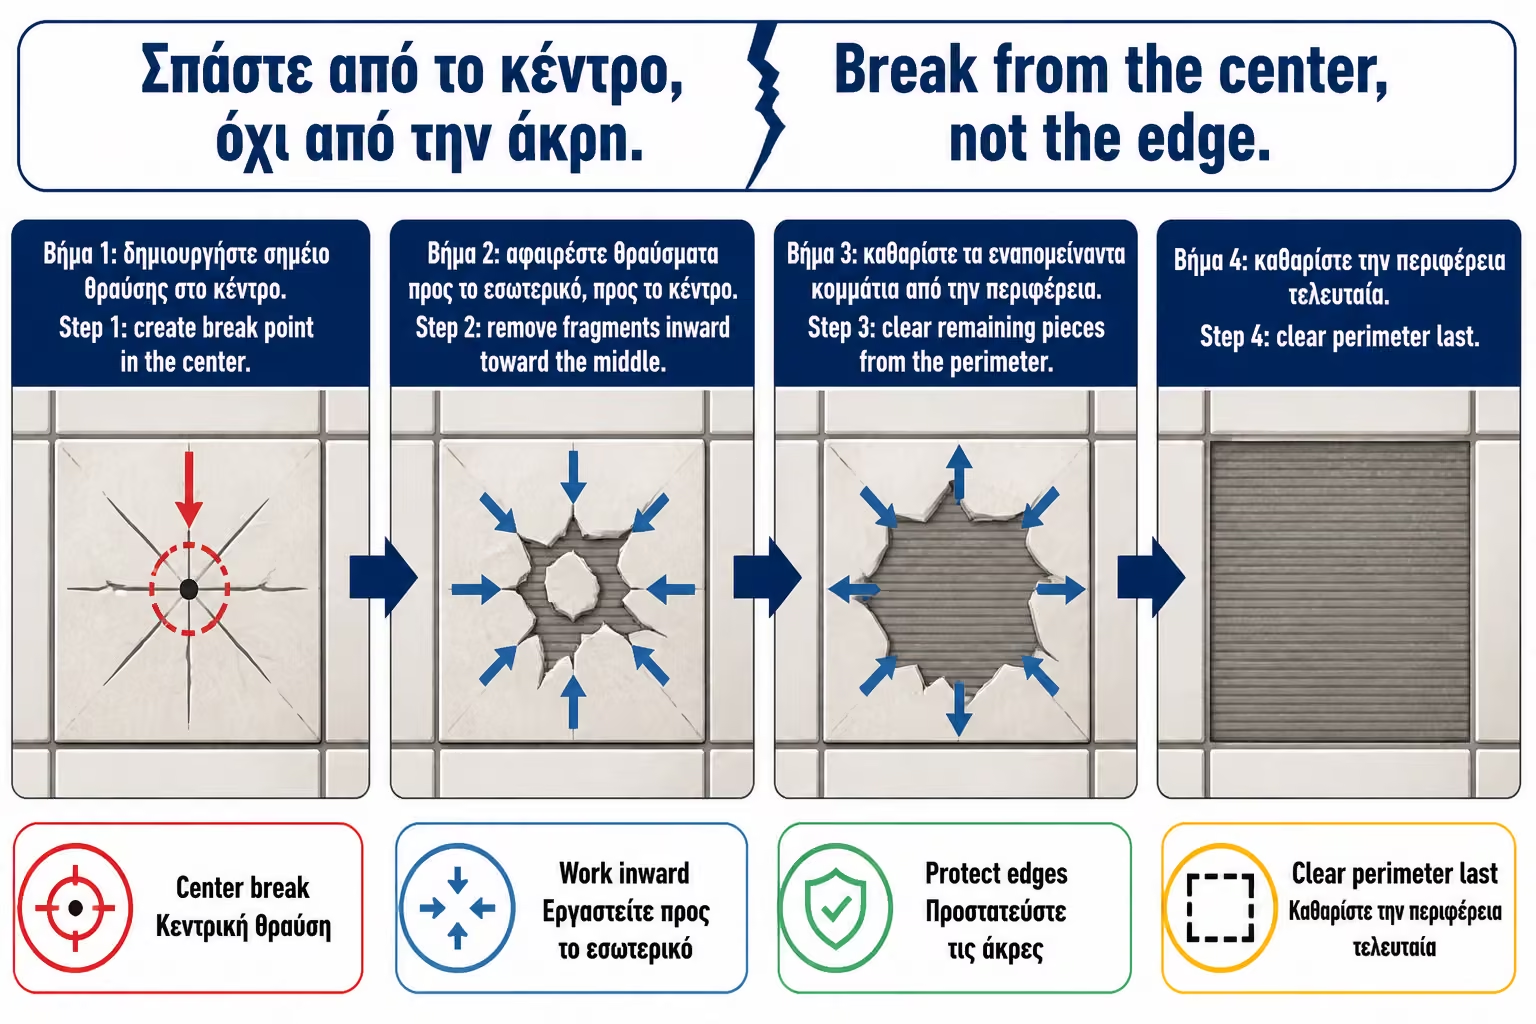
After the center is broken, remove the pieces one by one. Work from the center to the perimeter. The screed should go as far as possible under the piece you are removing, not push sideways against the edge of the adjacent tile. The strokes should be small and controlled.
As you approach the edges, reduce the force. The last pieces are the most dangerous for the adjacent tiles. If a piece resists, do not pry it up onto the joint. Break it into a smaller piece and remove it more gently.
If the tile was installed with good glue, it may be difficult to remove. This is normal. But if you see a large piece of substrate lifting up with the tile, stop and assess. On a plasterboard wall or in a sealed bathroom, the damage to the substrate can be more serious than the tile itself.
Tile pieces are sharp. Do not pick them up with bare hands. Put them in a bag or box, not directly in a thin plastic bag that can be torn. Sweep carefully, as small fragments can remain on the floor and injure feet or scratch surfaces.
After removing the tile, old adhesive will remain on the substrate. This must be removed enough for the new tile to sit flush. If you leave too much old adhesive, the new tile will stick out. If you remove too much and damage the substrate, it may need to be repaired before gluing.
Use a chisel or scraper with gentle strokes. Hold the tool as parallel to the substrate as possible. The goal is not to dig deep, but to clear the surface of lumps. Especially near adjacent tiles, work very carefully so as not to injure their edges.
Check the substrate. It should be firm, with no loose spots, dust, moisture or loose pieces. If the surface is rubbed, damp or soft, you should not stick a new tile right away. The glue needs a solid base.
Before gluing, wipe off the dust thoroughly. Dust is the enemy of traction. A new tile stuck to a dusty substrate may seem firm at first, but come off later. If necessary, wipe the surface with a slightly damp sponge and allow to dry as needed.
Before applying the adhesive, assess why the tile broke. If it was a simple hit, move on. But if the tile was swollen, sounded hollow, or had blackened joints around it, there may be a moisture or delamination problem.
In bathrooms, moisture behind tile is no small matter. If the broken tile is near a shower, tub, or faucet, check if the substrate is smelly, dark, moldy, or crumbling. Simply replacing a tile does not solve a leak or waterproofing failure.
On floors, hollow tile can mean poor adhesion or substrate movement. If the surrounding ones also sound hollow, the new tile will be a small patch to a larger problem. It may hold temporarily, but it is not a permanent solution.
A practical criterion: if the damage is isolated and the substrate is clean, dry and stable, DIY replacement makes sense. If you see signs of moisture, brittleness or extensive peeling, the right move is a technical inspection.
The adhesive must match the substrate, the size of the tile and the space. For simple replacement of a small or medium-sized tile indoors, cementitious tile adhesive of an appropriate grade is usually used. In bathrooms, floors, large tiles or difficult substrates, a more careful selection is needed.
Do not randomly use "general purpose" adhesive without checking whether it is suitable for ceramic, porcelain, natural stone, wall, floor or wet area. Porcelain tiles, for example, have low absorbency and require better adhesion than plain old ceramic tile.
If the new tile is small and the repair involves a dry wall, the work is simpler. If it concerns a floor or a bathroom, the glue must have sufficient strength and be applied correctly. Do not attempt to bond tile with non-specification silicone, putty, plaster, or cement mortar. It may catch temporarily, but it is not a correct technical solution.
The amount of glue must be such that the new tile is flush with the surrounding tiles. In one replacement you cannot afford to "build" the entire surface. You must achieve the height within the existing frame.
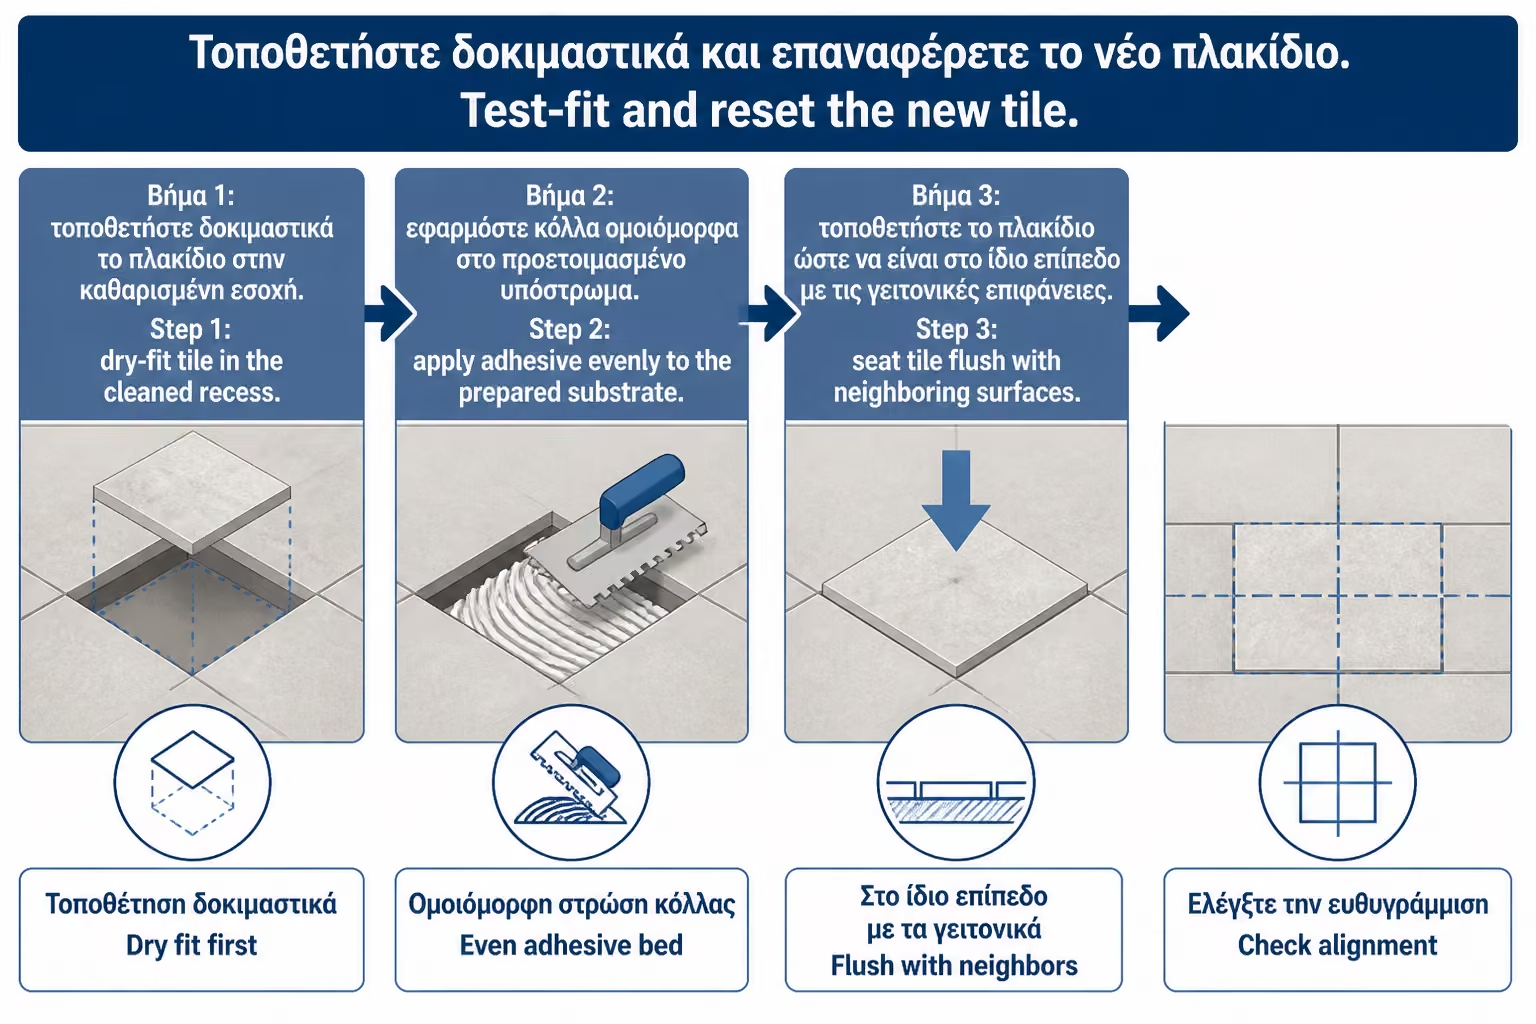
Before applying glue, do a dry test. Put the new tile in place without glue and see if it fits. Check the joints around it. It must have corresponding distances with the adjacent tiles. If the tile is slightly larger, it may not fit. If it is smaller, the joints will look different.
Also check the height. Place a straight blade or spirit level over adjacent tiles and see how much space you have for glue. If the new tile is thicker, it may protrude even with minimal adhesive. If it's thinner, it will take more glue or proper technique to get it level.
This test is necessary because once the glue is in, time starts to count. You don't want to find out then that the tile doesn't fit or that the joints don't come out. If cutting, edge sanding or tile replacement is required, it must be done before gluing.
Also put spacers in the test if needed. Joints must continue the geometry of the existing surface. A tile that goes half a millimeter wrong on a small surface can show more than you expect.
Mix the adhesive according to the manufacturer's instructions. Do not make it too watery so that it "spreads easily". The glue must have the right consistency to hold the tile and not sink. For minor repair, prepare a small quantity. You don't need a whole bucket.
Apply adhesive to the substrate with a small notched trowel. The glue lines help to cover evenly and press the tile down. On small tiles, the application is relatively simple. On larger ones, a thin smear on the back of the tile may also be needed, depending on the case, so that there is better contact.
Place the tile in place with gentle pressure and little movement. Don't squeeze it so much that all the glue comes out from underneath. You want full support, not a vacuum. Put spacers in the joints to keep the distances. Immediately check the flatness with the surrounding tiles.
If the tile sticks out, remove it immediately, remove some glue and re-install. If it sinks, more glue is needed. Do not try to correct the height after an hour. The right time is now, while the glue is fresh.
Once the tile is properly in place, clean off any glue that has come out of the joints. Joints must be left clear to accept grout. If they fill to the top with glue and let it dry, then the grout will not have space and will come out superficial, weak or different.
Use a small tool, spacer or scraper carefully to remove fresh glue from the joints. Do not move the tile. Also clean the surface with a fresh sponge, without wetting the glue too much. We want clean tile, but not to wash away the glue underneath.
Check the alignment again. The tiles can move slightly in the first few minutes, especially on a wall if the glue is soft. Spacers help, but are no substitute for checking by eye and with a straight blade.
Allow the glue to dry as directed before grouting. Do not rush to grout at the same time if the glue has not set. Premature grouting can shift the tile or trap moisture.
Jointing should match existing joints as closely as possible. This is not always easy, because old joints have changed color with time, cleaners and moisture. A new grout of the same code may appear cleaner than the surrounding ones. This is normal, but it can be annoying in an obvious place.
Before grouting, clean the joints of dust and check that they have sufficient depth. Mix a small amount of grout and work diagonally across the joints with a rubber spatula or suitable tool. Press to fill the gap well, not just cover the surface.
After a while, when the grout starts to pull, clean with a slightly damp sponge. Do not use too much water, as this may wash away the joint and make it weak or uneven. Use gentle movements and change the water in the sponge frequently.
When dry, there will be a dullness on the tile. Clean it with a soft dry cloth. Do not let the grout harden for many hours on a textured or matte tile, because it is difficult to clean afterwards.
In a bathroom, tile replacement has additional technical importance. If the tile is on a wall outside the water zone, the process is simpler. If it is in the shower, around the bathtub or on the floor with water, you should consider waterproofing.
Glue and grout are not complete waterproofing. Joints reduce water penetration, but should not be considered the only barrier. If a waterproofing membrane or spreadable sealant under the tile is damaged during removal, it must be repaired before new tile is installed. This is not always easy to repair individually and often requires a technician.
Also, in bathroom corners or joints of different surfaces, grout is not always used. Elastic sealing with suitable silicone is often required because materials move differently. If you replace tile near such a joint, you must also restore the proper seal.
In a shower, after the repair the glue and grout must be given time to cure before water falls. Don't use the shower prematurely because it "seems dry". Materials need time to achieve the strength that the manufacturer predicts.
The most common mistake is not getting enough grout before breaking. The second is edge leverage. The third is the hasty removal of old glue with strong blows. The fourth is installing a new tile without a height test.
| Error | What can it cause? | Correct practice |
|---|---|---|
| Taping without grout removal | Breaking adjacent tiles | Complete isolation of the tile |
| Lever from the edge | Adjacent edge cracking | Break from the center outwards |
| Excessive force on the cutting | Substrate damage | Small, controlled strokes |
| Poor removal of old glue | New tile sticking out | Clean and flat substrate |
| Bonding without dry testing | Wrong joints or height | Test before glue |
| Grouting too early | Tile movement or weak joint | Wait as instructed |
| Wrong grout color | Visible "patch" | Shade test and cleaning of surrounding joints |
| Working in wet zone without waterproofing control | Risk of moisture under tile | Technical control where necessary |
A typical scenario is this: the owner sees a cracked tile on the floor, puts a caulk to the edge and picks it up. The broken tile pops out, but the corner next to it pops. Now two tiles need to be changed. If there is no second part, the damage becomes much greater aesthetically. This development is avoided by a clean joint and breaking from the center.
If you do the work yourself and already have a replacement tile, the cost is small. You will need some glue, some grout, maybe a joint scraper and basic small tools. The real cost in DIY work is mostly time and attention, not materials.
If a craftsman is needed, the cost is not simply calculated by the square footage. Replacing a single tile is a small job but requires a visit, preparation, protection, removal, gluing and often returning or waiting for grouting. That is why the price may seem high in relation to the size of the tile, but it is about time and the responsibility of not damaging the surroundings.
| Case | Indicative cost picture 2026 |
|---|---|
| DIY with existing tile and basic materials | around €10–30 |
| Purchase of small tools and materials | around €20–60 |
| Replacement tile, if found individually | depending on series and store |
| Professional single tile replacement | around €50–120 |
| Difficult spot, bath, humidity or special cuts | around €100–200+ |
| Substrate or waterproofing repair | case by case |
Prices are indicative and depend on area, access, whether there is same tile, size and material, whether VAT and materials are included, whether the work is on a wall or floor, and whether there are hidden difficulties. A low price may be reasonable for an easy spot with available tile. A higher price is justified when there is a risk of breaking adjacent tiles, when the site is a wet zone or when a substrate restoration is required.
Call a professional when the tile is in a wet spot, when you are unsure about the waterproofing, when the surroundings sound hollow, when the substrate looks flimsy, when a replacement is not available and aesthetics are important, or when the tile is large, expensive or difficult to cut.
A professional is also needed when the damage appears to come from movement. If a tile cracks without impact, there may be an issue with the substrate, expansion, poor bonding, or structural movement. Simple replacement doesn't answer why it broke.
In bathrooms, if the broken tile is accompanied by blackened joints, moisture, peeling paint from behind or a musty smell, don't limit yourself to surface repair. Tiling may be the symptom. The cause may be a leak or seal failure.
The right craftsman will not just see the one tile. It will check the surrounding, the substrate, the adhesive, the joint and the point of use. This is what separates a simple replacement from a repair that will last.
| Inquiry | Yes / No |
|---|---|
| Is there an identical or reasonably similar tile to replace? | Yes / No |
| Have the surrounding tiles been checked for hollow sound? | Yes / No |
| Is the tile not in a critical wet zone without waterproofing control? | Yes / No |
| Has the surrounding surface been protected with tape and covers? | Yes / No |
| Do you have safety glasses and gloves? | Yes / No |
| Has enough grout been removed from around the tile? | Yes / No |
| Will the break start from the center and not the edge? | Yes / No |
| Has the old adhesive been cleaned off so the new tile will come flush? | Yes / No |
| Was it dry tested before gluing? | Yes / No |
| Is the adhesive suitable for the substrate and the tile? | Yes / No |
| Were the joints cleaned of glue before it dried? | Yes / No |
| Will drying time be given before grouting and use? | Yes / No |
If the answer is "No" to parts, hollow tiles, waterproofing or protection, don't start yet. Replacing a tile should remain a local fix, not open a new problem.
If you want to replace a broken tile without damage, don't start with a hammer. Start at the joint. Carefully remove the grout around the tile, isolate it from the adjacent tiles, then break it in a controlled manner from the center outwards. The rush to remove is what breaks neighboring tiles. Success is seen at the end when the new tile sits flush, with proper joints, with no second damage around it.
Replacing a broken tile is a small job only when done in the right order. The tile should not be forced off the edge, nor should it be knocked before it is isolated from its surroundings. Removing the grout, controlled breaking from the center, cleaning the old adhesive and testing the new tile are the steps that determine whether the repair will be clean or create new damage.
For simple spots, with identical tile available and a stable substrate, a careful owner can attempt the repair. But it takes patience, protection and the right tools. The point is not to remove the broken tile quickly, but to leave the adjacent ones intact and to stick the new one properly.
If the tile is in a bathroom, shower, wet floor, hollow tile area, or where there are no spare parts, the best decision may be a professional. A good local repair doesn't look like a patch. It is integrated into the surface, keeps the same level and does not create new problems under the beautiful image.
Return to category.
Go to categoryReturn to the central guide.
Go to guide