
Bathroom DIY, Maintenance & Styling
Return to category.
Go to categoryThe joints around the shower are among the parts of the bathroom that are stressed every day. They accept water, soaps, shampoos, steam, cleaners, rubbing and small movements from use. When they are in good condition, we hardly notice them. But when the grout cracks, blackens, crumbles or is missing in small places, the eye immediately falls there. And most importantly: water begins to find its way to the substrate more easily.
Local caulking, i.e. patching joints in specific places, is a small repair that can provide a quick solution when the wear and tear is limited. If a small piece of grout is missing between two tiles, a thin crack has opened, or the grout has been locally eaten away by cleaners and use, you can often scrape the problem spot and refill it. It is not always necessary to strip the entire surface.
But there is an important pitfall here. Grout is not magical waterproofing. It should not be used as a temporary cover over a deeper problem. If the joints are constantly breaking, if the tiles sound hollow, if there is moisture behind the wall, or if the problem is in the corner where there should have been elastic silicone, then simple patching can temporarily hide the symptom without solving the cause.
In the shower, this detail is crucial. Another thing is missing some grout between two solid tiles. Another thing is to have opened a joint in the wall-floor corner or where the shower meets the masonry. Hard grout should often not be put in there, but a suitable elastic seal, because the surfaces move differently. If we fill the wrong joint with the wrong material, it can pop again very quickly.
In this guide we will see when local grouting is enough, when a larger repair is needed, how to remove the old cracked grout, how to clean the gap, what grout to choose, how to properly fill the spot and how to protect the new repair from deterioration from the first week of use.
When we say that the grout has "popped", we can mean different things. A fine crack may have appeared along the joint. A small piece may be gone. It may have crumbled and come out as dust when you touch it. It may also be so blackened that it looks like a void, when in fact there is still material.
The distinction matters. A superficially dirty joint may need cleaning, not grouting. A joint that has lost material needs removal of the loose part and new filling. A joint that opens because the tiles are moving or because there is moisture behind them needs diagnosis before new material is put in.
In the shower, problems often occur in the low spots. That's where more water falls, that's where soaps pool and that's where we clean more intensively. If the slope of the floor is not good and water remains in a certain zone, the grout wears out faster. If strong cleaners or no-rinse bleach are used, it can suffer and become more porous or brittle.
A practical example: an owner sees that a piece of grout is missing next to the linear siphon. He fills it roughly with new material, but after two months the same spot opens up again. It's probably not just the grout that's to blame. The spot may receive continuous water, there may be little movement, the wrong material or poor preparation.
Local grouting makes sense when the wear is limited, the tiles around the spot are stable and there is no evidence of moisture. If a few centimeters of joint are missing between two tiles, if the rest of the joint is in good condition and the problem does not recur, local repair is reasonable.
It is also sufficient when the grout has been superficially eaten away by cleaners or by natural wear and tear, but the substrate is dry and the tiles are not moving. In such cases, proper scraping and re-filling can restore the image and reduce the risk of water seeping through that particular spot.
Patching is also a practical solution when you want to prevent more damage. A small open joint caught early is much easier to fix than a joint that has been left open for months, receiving daily water and allowing moisture into the substrate.
However, local grouting should not be done on loose material. If the old grout around the gap is crumbling, it must be removed until you find stable material. The new material must press on a clean and stable vacuum, not on dust, soaps or a half-broken joint.
There are cases where patching is the wrong approach. If the joints have burst in several places, if the wear is spread over a large area, or if the grout comes out easily with the fingernail in various areas, then the problem is not local. A general resurfacing of joints or a check of the original application may be needed.
If the tiles sound hollow, local grouting does not solve the cause. A hollow tile may move slightly with use. This small movement breaks the joint around it. If you refill the joint without addressing the delamination, it is likely to burst again.
If there is moisture on the adjacent wall, blown paint, a musty smell, blackened silicones or water showing up outside the shower, the problem may be waterproofing or leaking. Grout may be the obvious symptom, not the cause. A careful technical evaluation is needed there.
Corners need special attention. Wall-to-wall, wall-to-floor, shower-to-tile, and cubicle-to-tile joints accept movements. In many such joints, hard grout should not be used, but flexible silicone suitable for bathing. If the hard joint pops again in the corner, the material is probably wrong for the point.
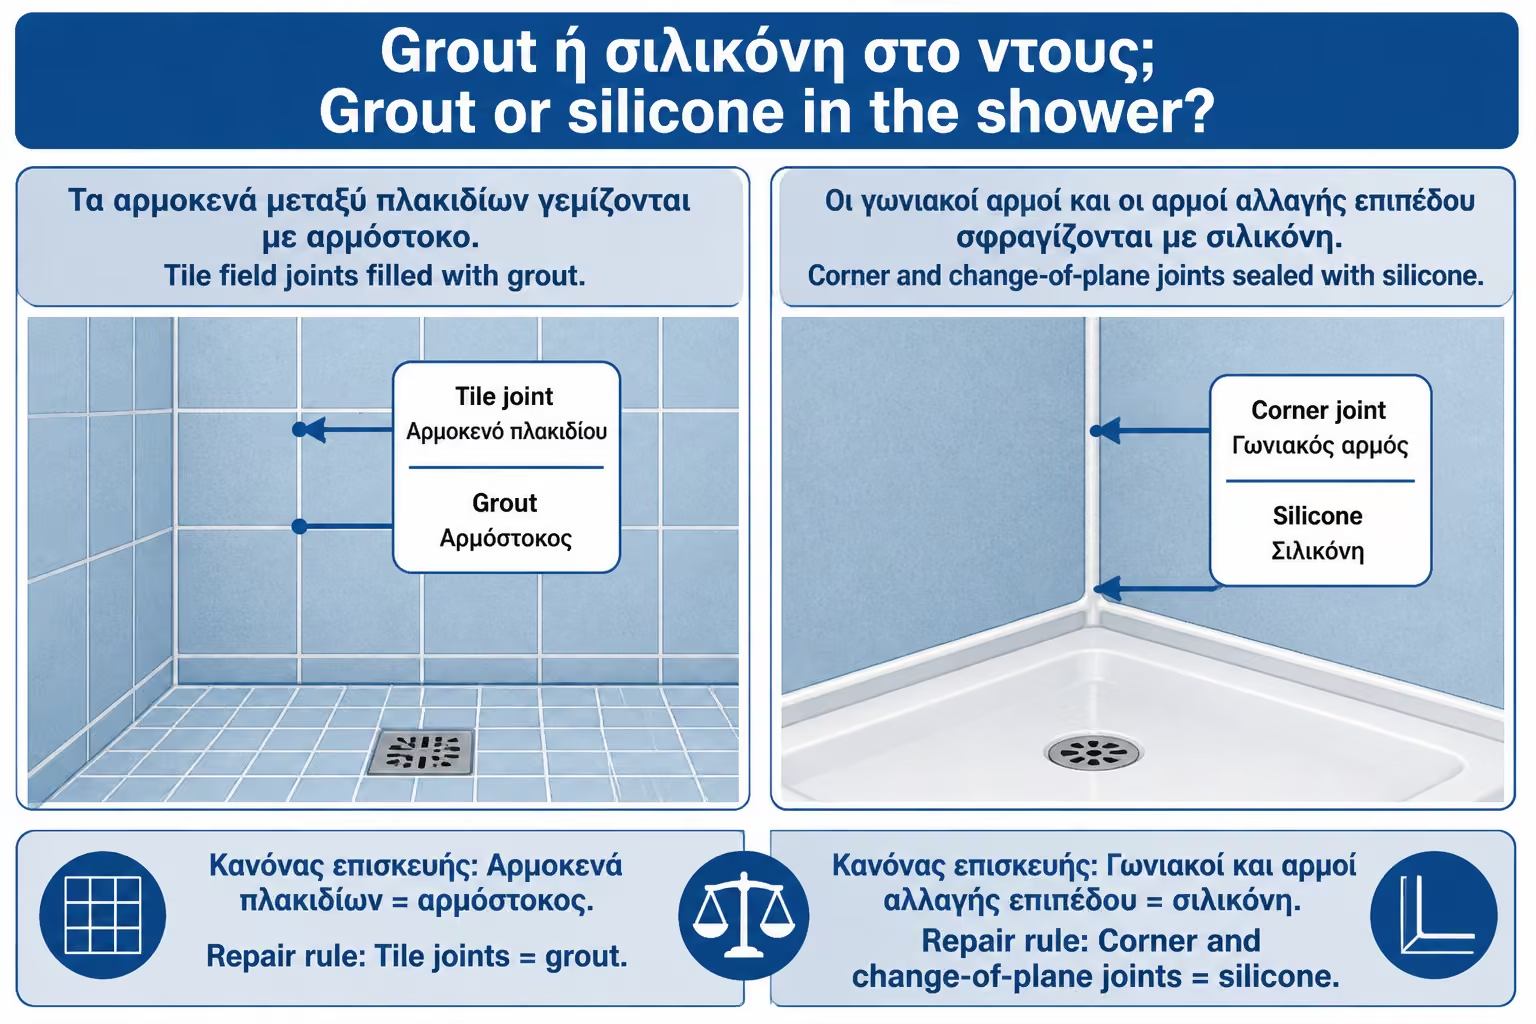
Many failed repairs start with the wrong hardware. Grout is mainly used in the joints between tiles of the same surface. For example, between two tiles on the same wall or floor. It is a hard or semi-hard material that fills the void and gives a uniform surface.
Silicone is used in joints where there is movement or a change of plane. For example, in the corner between two walls, at the junction of wall and floor, around a bathtub or shower tray, in contact with a cabin or profile. That's where elasticity is important, because materials don't always move the same.
If you put hard grout on a corner that moves, it can crack. If you put silicone between regular tile joints instead of grout, it can stain more easily, look different, and not be the right solution for the entire surface. Every material has its place.
A classic mistake is to "patch" with silicone over a cracked grout, because it is easier to apply. If the problem is between tiles, the result often looks sketchy and doesn't blend in with the rest of the grouting. If the problem is in a corner, then silicone may be the right solution, but the old loose material must first be removed and a clean application made.
For local repair in a shower, you need a grout suitable for wet areas. Just any putty will not do. The grout must be compatible with the width of the joint, the type of tile and the use of the space. There are cementitious grouts, improved grouts, epoxy grouts and ready-made pastes for minor repairs.
For most small home repairs, a good cementitious bathroom grout will suffice as long as it fits the width of the joint and is applied correctly. In more demanding showers, in places with intense water or in areas with high cleaning requirements, epoxy grout can be considered, but its application is more demanding and is not always ideal for a beginner.
Color is also important. If the old grout is light gray but has darkened over the years, a new grout of the same original color can look cleaner and stand out. This does not necessarily mean that you put in the wrong color. It means that the surrounding joints have aged. If aesthetics are of great importance, cleaning of a larger area or general refreshing of joints may be needed.
Avoid using plain wall putty, plaster, acrylic putty or silicone as a substitute for grout in a regular tile joint. They may fill the gap temporarily, but they don't have the same resistance to water, cleaners and abrasion.
Local plastering doesn't need many tools, but it does need the right tools. The point is to remove only the problem material, without scratching tiles, damaging waterproofing or opening a larger gap than necessary.
| Tool / Material | Use |
|---|---|
| Joint scraper or special grout removal tool | Local scraping of the old joint |
| Kid with care | Cleaning small edges and residues |
| Old toothbrush or small brush | Dust and debris removal |
| Vacuum cleaner or small brush | Cleaning the void before filling |
| Sponge | Surface cleaning after application |
| Rubber spatula or small grout spatula | Pressure of the grout into the gap |
| Gloves | Hand protection |
| Duct tape, where it helps | Protection around small areas |
| Clean mixing bowl | Preparation of a small amount of grout |
| Soft cloth | Final blur cleaning |
In very thin joints, the tools need special attention. Do not use a large screwdriver or metal tip that can break the edges of the tiles. If the tiles are glossy, black, matte sensitive or embossed, a careless scratch can leave a permanent mark.
If you use a multi-tool, work only if you have a steady hand. It's fast, but it can get away. For local patching of a few centimeters, the manual method is often safer.
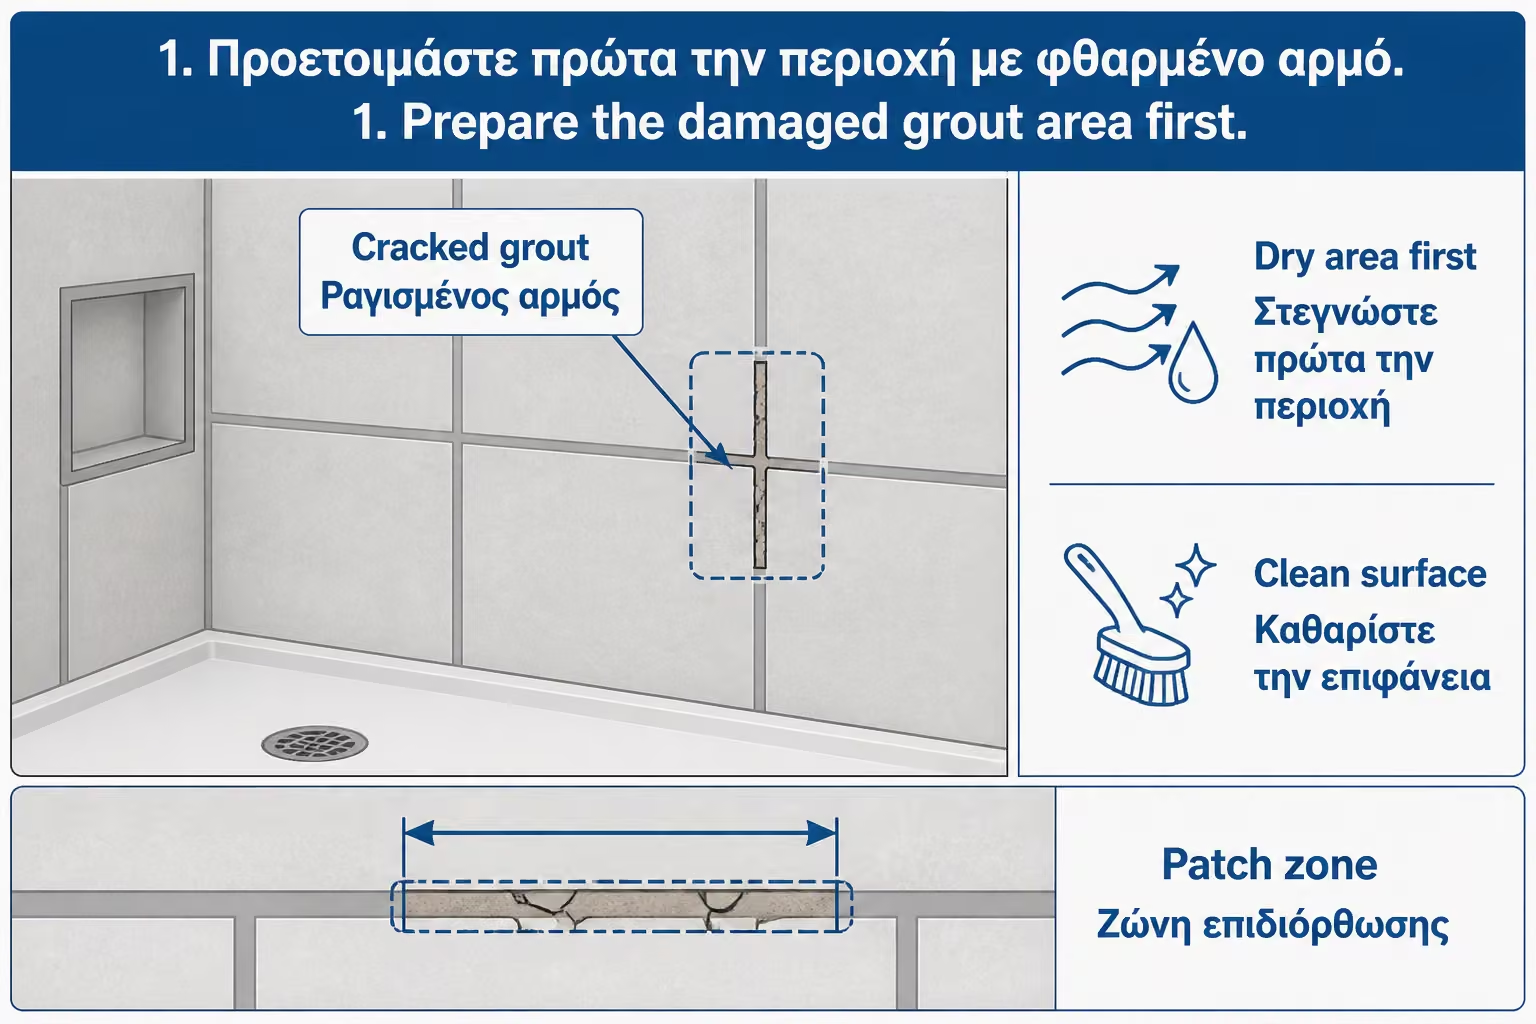
Before you begin, clean the area of soaps, salts and surface dirt. No point working on slime or cleaners. Rinse, dry and let the area dry as much as possible. If the shower was used a while ago, wait. The joint must be dry so that you can clearly see what you are removing and for the new material to adhere properly.
Note the extent of the damage. Do not putty only the gap that is visible if there is loose grout next to it. With the tool, press lightly around the spot. If the joint crumbles, that piece must be removed as well. If it is stable, there is no need to open it unnecessarily.
If the spot is in the corner of the shower stall, stop and assess whether grout or silicone should be put in. If it is a joint of different levels, probably the right solution is elastic sealing and not hard putty. This decision must be made before scraping begins.
It is also a good idea to protect the shower spout. Small pieces of old grout should not end up in the drain. Place a cloth or strainer temporarily on the grill to catch the debris.
Scraping should be done until the loose material is removed and a clear gap is created for the new grout. It is not enough to scratch the surface and put new material on top. The new grout needs some depth to "grab". If it remains only as a thin skin on the surface, it will quickly disappear.
Work across the joint in small motions. Hold the tool in the joint, not on the edges of the tiles. If the joint is tight, patience is necessary. Better to remove bit by bit than to break the edge of a tile.
The depth needed depends on the joint, but practically speaking we want the loose and soiled grout to be gone before we get to solid material. In minor repairs, it is often enough to clean a few millimeters deep, as long as the rest of the joint is strong. But if the material is loose throughout the depth, more must be removed.
Do not unnecessarily open a larger area than the wear. Local plastering means targeted repair. However, if as you scrape you see that the grout continues to come out easily for a long length, then the problem is no longer local. There you stop and reassess if wider grouting is needed.
After scraping, the vacuum will have dust, small pieces and debris. These must go. If the new grout gets dust on it, it will not bond properly to the sides of the joint. It will appear full, but may peel off or burst at first strain.
Use a brush, vacuum or compressed air with care. Don't just blow with your mouth in a dusty and moldy area. Clean until the sides of the tiles look clean. If scale is present, remove it with a mild detergent and then rinse thoroughly.
If there was mold, it needs careful cleaning before the new material. Mold should not be trapped under the grout. Use a suitable cleaner, following the instructions, and allow the area to dry completely. Do not rush to putty over liquid or chemical residues.
Drying is crucial. In the shower, the joint may look dry on the surface but hold moisture inside. If you have opened a deeper gap, give it time. The new material should not be placed on top of trapped moisture, especially if it is suspected that water has been passing through for some time.
A very small amount of material is needed for local patching. But this does not mean that the mixing is done casually. The grout must be properly proportioned with water or the intended liquid, according to the manufacturer's instructions. If you make it too watery to spread easily, it can become weak, shrink or burst. If it's too dry, it won't fill the gap well.
Mix a small amount in a clean container. The texture should be like a thick paste that stands but is workable. Let it "ripen" a little if the product asks for it and mix again. Don't keep adding water after it starts to thicken, because you change its consistency.
For small repairs there are also ready-made grouts in a tube or small package. They are practical, but must be suitable for a shower and wet area. Not all ready-made materials are of the same strength. For a spot that receives daily water, the choice must be made carefully.
If you want to achieve color, test first on a small inconspicuous spot or on cardboard and let dry. Grout often changes color when it dries. Liquid color is not always a reliable indicator.
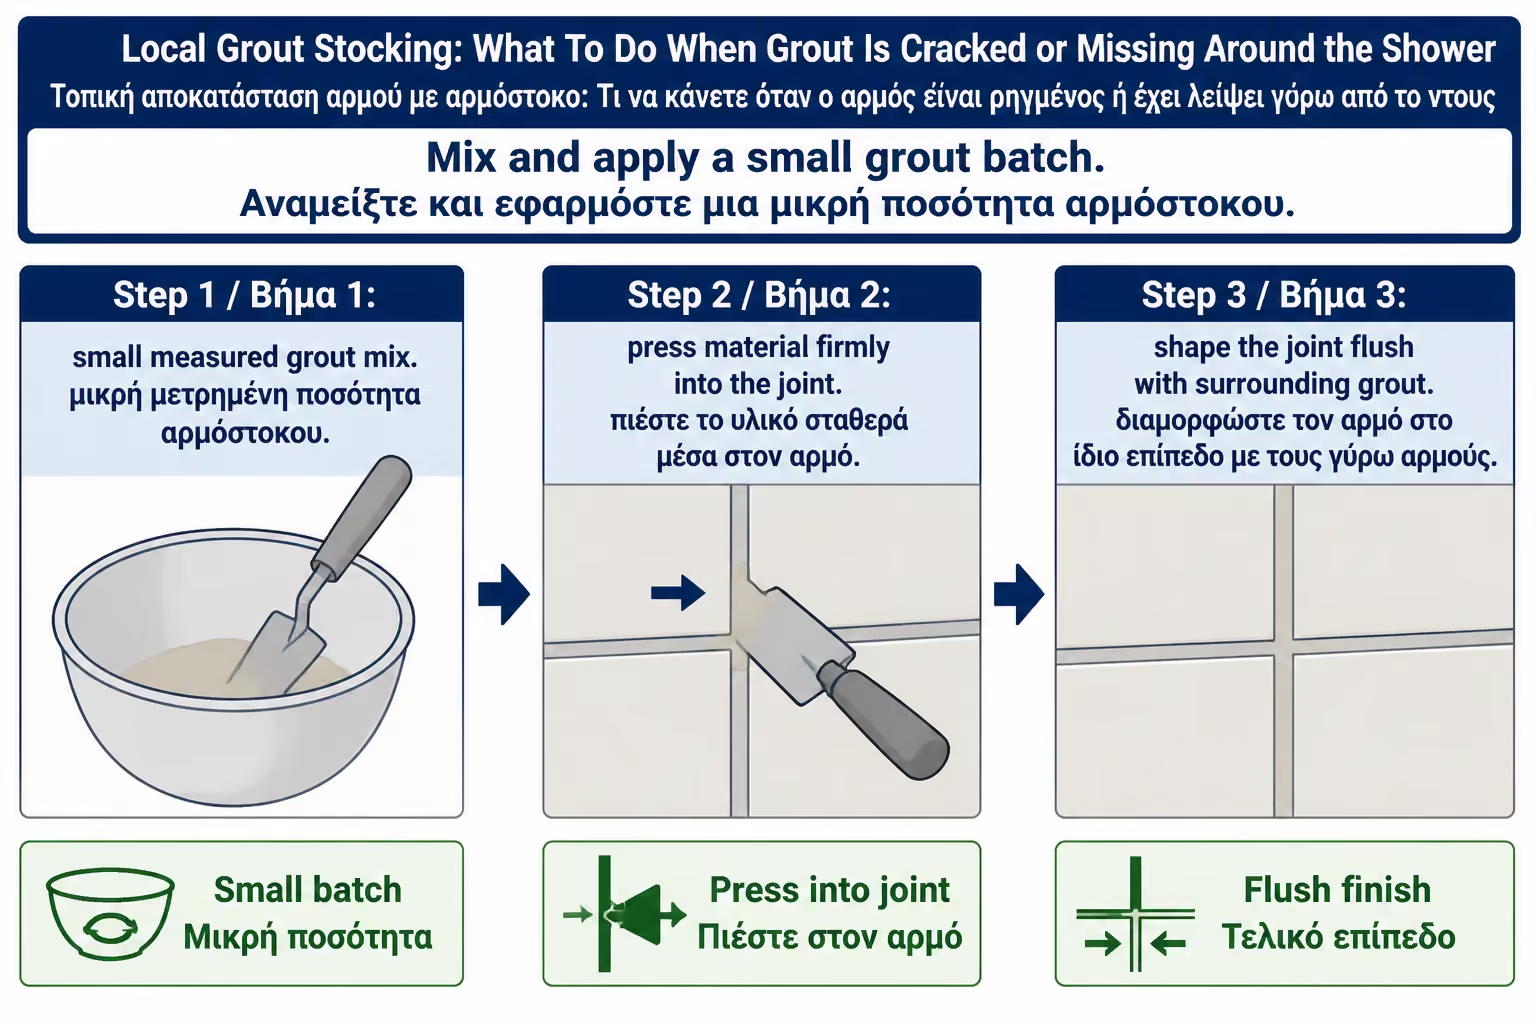
The grout should be pressed into the gap, not just spread over it. Use a small rubber spatula, jointer or even a suitable small tool for very narrow joints. Pass the material diagonally to the joint so that it fits snugly.
Press down enough to fill the entire cleaned depth. If it is left empty underneath and only the surface is closed, the patch will be weak. In a few days it can sink, pop or go away. Correct filling is seen when the joint is solid and the material does not give way.
Do not leave excess material on the tiles. The more textured or matte the tile, the more difficult the grout is to clean if it dries. Work small area and clean in time. Patching locally means you have control over time and quantity.
If the gap is deep and wide, ask yourself why. An excessively deep or wide joint around a shower may indicate an initial installation failure or the wrong place for grout. Don't try to cram too much material into something that might need a different technical solution.
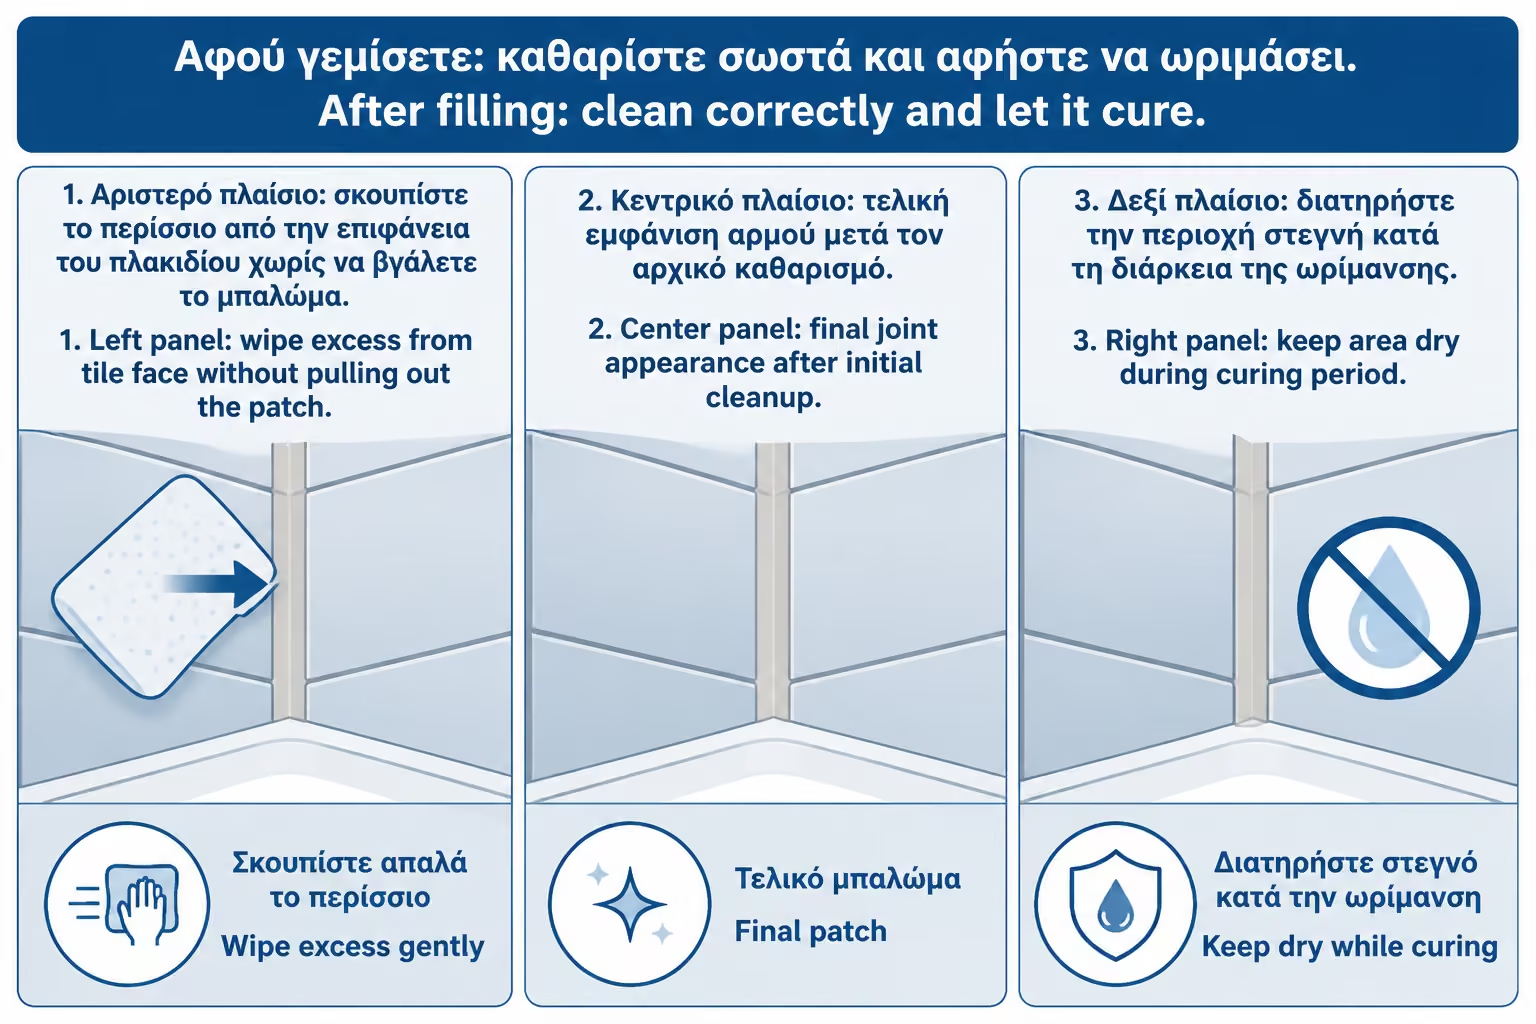
After filling the gap, allow the grout to set slightly according to the product instructions. Then clean the surface with a slightly damp sponge. The sponge should be drained, not dripping. If you add too much water, you may wash away the fresh grout and weaken the surface.
Go through gently, without digging into the joint. The purpose is to remove the excess from the tiles and form a smooth surface. If you press too hard, you will remove material from the gap. If you take too long, the grout will harden on the tile and be difficult to clean.
After the first cleaning, a slight dullness will probably remain. When the grout is more dry, clean with a soft dry cloth. On textured tiles, extra care may be needed to get debris out of the small recesses.
Do not immediately use strong cleaners on the new joint. Fresh grout needs time to gain strength. If you rough it up on the first day, it can affect its final surface.
Waiting time depends on the product. Some grouts allow light use after a few hours, others need more time before accepting heavy water. In the shower, it's best to be conservative. Even if the joint looks dry on the surface, it may not be fully cured inside.
For practical household use, it is good to leave the area without direct contact with water for as long as the manufacturer specifies, and often around 24 hours is a safer option for a simple cementitious material. If the shower is the only bathroom in the house, schedule the job after the last shower of the day so it has time to dry.
Do not cover the new joint with plastic or towels that retain moisture. It needs ventilation and normal drying. If the bathroom is not well ventilated, open a window or vent. Room humidity delays ripening.
If you rush and water in too early, surface wear, white marks, washed out texture or reduced durability can occur. Waiting is part of the repair, not unnecessary delay.
Color is one of the most difficult points in local patching. Even if you find the same grout code, the old grout has been through years of use, cleaners, salts and moisture. It may have darkened or turned yellow. The new one will look cleaner.
If the patch is too small, the difference may not be noticeable. But if the point is on a visible surface, it can stand out. One solution is to thoroughly clean the surrounding joints before judging the result. Many times the "wrong" new joint is just clean next to old dirty joints.
If the old joints are badly damaged, it may be worth re-passing a larger area so that the difference does not look like a patch. In a small shower, sometimes it is more aesthetically correct to renew the entire problem area than a single part.
Do not mix different grouts or pigments without specification to achieve a shade. You may spoil the strength of the material. If color is critical, request samples or choose a product with an available palette close to the existing joint.
If the locally repaired joint pops again soon, don't just do a second patch. The replay indicates that something was not handled. Not enough loose material may have been removed. The spot may have been moist. The wrong grout may have been used. However, there may also be movement or moisture behind the tiles.
Notice how it popped. If it skimmed off the surface, it probably didn't have enough depth or traction. If it broke along the joint, there may be movement. If it darkens quickly, it may be holding water or there is poor ventilation. If it came out with pieces of old material, the joint substrate was not properly cleaned.
In corners, re-capping often means that elastic silicone is needed. In flat joints between tiles, it can mean hollow tiles or poor initial grouting. In a shower floor, it can be related to slopes, standing water or thermal/mechanical stresses.
The second repair should only be done after you understand why the first one failed. Otherwise, you're just repeating the same mistake with new material.
After topical plastering, proper maintenance helps a lot. Allow the joint to mature, avoid vigorous rubbing for the first few days and do not use strong cleaners immediately. When normal use begins, make sure the area is as dry as possible after showering.
Good ventilation is important. If the shower remains wet for hours, all the joints suffer more. A properly functioning fan or an open window after a shower helps not only with mold, but also with the life of the materials.
Clean with mild products and rinse well. Continuous use of very strong cleaners, especially without rinsing, can wear down grouts and silicones. If scale is present, prefer more frequent gentle cleaning instead of infrequent aggressive scrubbing.
Periodically check the joints at the bottom of the shower. If you see minor wear early, the repair is easy. If you leave it, the water can go deeper and the problem will grow.
The most common mistake is to run new grout over the old one without scraping. This is almost always temporary. The new material is not thick enough, doesn't grip well and wears off quickly. The second mistake is applying to a wet or dirty joint. The third is using the wrong material in a corner that needs silicone.
| Error | What does it cause? | Correct practice |
|---|---|---|
| New grout over the old | Peeling and fast peeling | Scratching to stable substrate |
| Application to wet joint | Poor adhesion, mold, failure | Completely dry before application |
| Wrong material in the corner | Cracks from movement | Silicone where there is a level change |
| Very watery grout | Shrinkage and weakness | Correct mixing ratio |
| Clean with plenty of water | Flush the new joint | Lightly fresh sponge |
| Hasty use of shower | Wear before the material matures | Wait as instructed |
| Repeat crack patch | It hides a bigger problem | Check for movement, moisture or hollow tiles |
A typical example is the joint in the low corner of the shower. The owner fills it every few months with grout, but it bursts again. The problem is not that the grout "didn't stick well". It is that in the corner there is movement and water, so it needs proper removal and elastic sealing with suitable silicone.
Local plastering is one of the most economical small bathroom repairs when done DIY. The cost is mostly for a small package of grout, removal tools and maybe a scale or mold cleaner. If you already have basic tools, the cost is low.
| Case | Indicative cost picture 2026 |
|---|---|
| DIY small local patch with simple grout | around €5–15 |
| DIY with scraping tools, brushes and materials | around €15–40 |
| Ready-made micro-repair grout | around €5–15 |
| Best grout for wet areas | around €8–25, depending on packaging |
| Professional minor repair of joints, if combined with other work | usually a small charge |
| Autonomous technician visit for local repair | around €40–90 |
| General joint resurfacing or shower zone repair | case by case |
Prices are indicative and depend on area, size of repair, access, whether VAT is included, type of material, whether there is mold or damp and whether the work is truly local or requires a larger restoration. A low price is reasonable for clean small point. A higher price is justified when removal over a larger area, careful cleaning, color matching or checking for possible moisture is required.
A professional is needed when the wear is extensive, when the joints are opened repeatedly, when there is moisture, when the tiles sound hollow, when the problem is inside a shower with possible sealing failure, or when you are not sure whether to put in grout or silicone.
A professional is also needed when the tiles are delicate, high value, natural stone or special material that can be stained by the wrong grout. In natural stones and marbles, the choice of material needs more care, because some products can leave stains or affect the surface.
If odor, mold or damp persists despite cleaning and patching, do not continue with surface solutions. The shower is a high-risk spot for hidden moisture. A small crack can be just wear and tear, but it can also be an indication that water is getting under the tiles.
The technician will check not only the joint, but also the stability of the tiles, silicones, slopes, siphon, waterproofing and possible water path. This is what makes the difference between a patch and a proper repair.
| Inquiry | Yes / No |
|---|---|
| Is the wear really localized and not over a large area? | Yes / No |
| Are the tiles around the spot solid and not sound hollow? | Yes / No |
| Is there no moisture, mold or swelling on an adjacent wall? | Yes / No |
| Is the point a joint between tiles and not a corner that needs silicone? | Yes / No |
| Has the loose old grout been removed and not just the surface? | Yes / No |
| Was the vacuum cleaned of dust, salts and soaps? | Yes / No |
| Is the spot dry before application? | Yes / No |
| Is the new grout suitable for wet space and joint width? | Yes / No |
| Was the material pressed into the void and not just spread over the surface? | Yes / No |
| Was the cleaning done with a slightly damp sponge and not with too much water? | Yes / No |
| Will the shower sit unused until the material matures? | Yes / No |
| If the joint pops again, will the cause be checked before a new patch? | Yes / No |
If the answer is “No” to the questions about humidity, tile stability or correct material, do not rush. Local plastering is only successful when the problem is really local and the substrate is suitable.
If grout is missing in a small spot around the shower, don't just cover it over. First scrape the loose material until you find a stable joint, clean the gap thoroughly, allow to dry, then fill with a suitable wet area grout. If the problem is in a corner, if it pops again often, or if the tiles sound hollow, stop patching and check the cause. In the shower, the right repair is not the one that looks clean the first day, but the one that doesn't let water through after months of use.
Local joint caulking is a useful and economical repair when the wear is small, clearly localized and there is no indication of a deeper problem. With proper scraping, cleaning, drying and application of suitable grout, a small gap around the shower can be repaired without any general work.
The crucial thing is not to do it casually. The new grout should not get on loose old material, moisture, mold or soaps. It must be pressed into a clean vacuum and given time to mature before receiving water. Also, you need to distinguish whether the spot needs grout or silicone. This distinction is decisive in the shower.
If the joint reopens, if there are hollow tiles, if wear spreads or if moisture appears, patching is not a solution. It's just a temporary cover. There you need to check the waterproofing, the tiles, the silicones and the general condition of the shower. The right decision is to fix the small problem while it's still small, but recognize when it points to something bigger.
Return to category.
Go to categoryReturn to the central guide.
Go to guide